This tutorial walks you through setting up a backend API journey that processes requests from your backend system, executes business logic, and returns RESTful results.
Specifically, this example demonstrates how to set up a journey that executes backend logic for validating transactions. The journey validates the expiration of an external access token and ID token from an external system. If the tokens are valid, it checks whether Multi-Factor Authentication (MFA) has been performed. If MFA is complete, the transaction is approved; otherwise, the journey responds with a requirement to challenge the user.
By following this tutorial, you’ll gain practical experience and insights into optimizing interactions between your backend services and Mosaic Journeys.
While this tutorial focuses on a straightforward example, Backend API journeys offer far greater flexibility and complexity. You can implement advanced logic, multi-branch workflows, and tailored responses to meet diverse requirements. To explore the full scope of possibilities, refer to this guide.
To send HTTP requests to the Mosaic Journeys, you need to have an application configured in Mosaic. If you don't have one, configure your application in the Admin Portal and create a client as shown below. For example:
Application name: Your demo app
Protocol: OIDC
Client name: Demo client
Redirect URIs:
https:/yourdemoapp.com/verifyAuthentication method: Client secret
Upon saving, Client ID and Client Secret are generated automatically. You'll need the Client ID for running the HTTP request to Mosaic.
To call the Backend API journey, you'll need a client access token. This token is generated by Mosaic and must be included in the Authorization header of your API request to authorize it.
To obtain the token, make a request to the Get Client Access Token endpoint using a call similar to the following:
  curl -i -X POST \
    https://api.transmitsecurity.io/oidc/token \
    -H 'Content-Type: application/x-www-form-urlencoded' \
    -d grant_type=client_credentials \
    -d client_id=[CLIENT_ID] \
    -d client_secret=[CLIENT_SECRET]
The response will include a client access_token, which must be included in the Authorization header of your journey request.
In this example journey, the payload of the call to the backend API journey includes two tokens generated by an external system and passed in the API request body: external_access_token and external_id_token.
- from the
external_access_token, the journey verifies theexpclaim to ensure the token's validity. - from the
external_id_token, the journey checks theamrclaim to confirm that the user has authenticated with MFA.
Mosaic supports journeys designed specifically for backend API operations. To create a Backend API journey, go to the B2C or B2B Identity section (based on your setup) and select the Backend API (single call) journey type when creating a new journey.
The Enforce Mosaic Token toggle is enabled by default. It ensures the API call to the journey validates the Mosaic client access token included in the Authorization header. For more, see Backend API Journeys Overview.
When you open the newly created journey, the HTTP Complete Journey step is included by default.
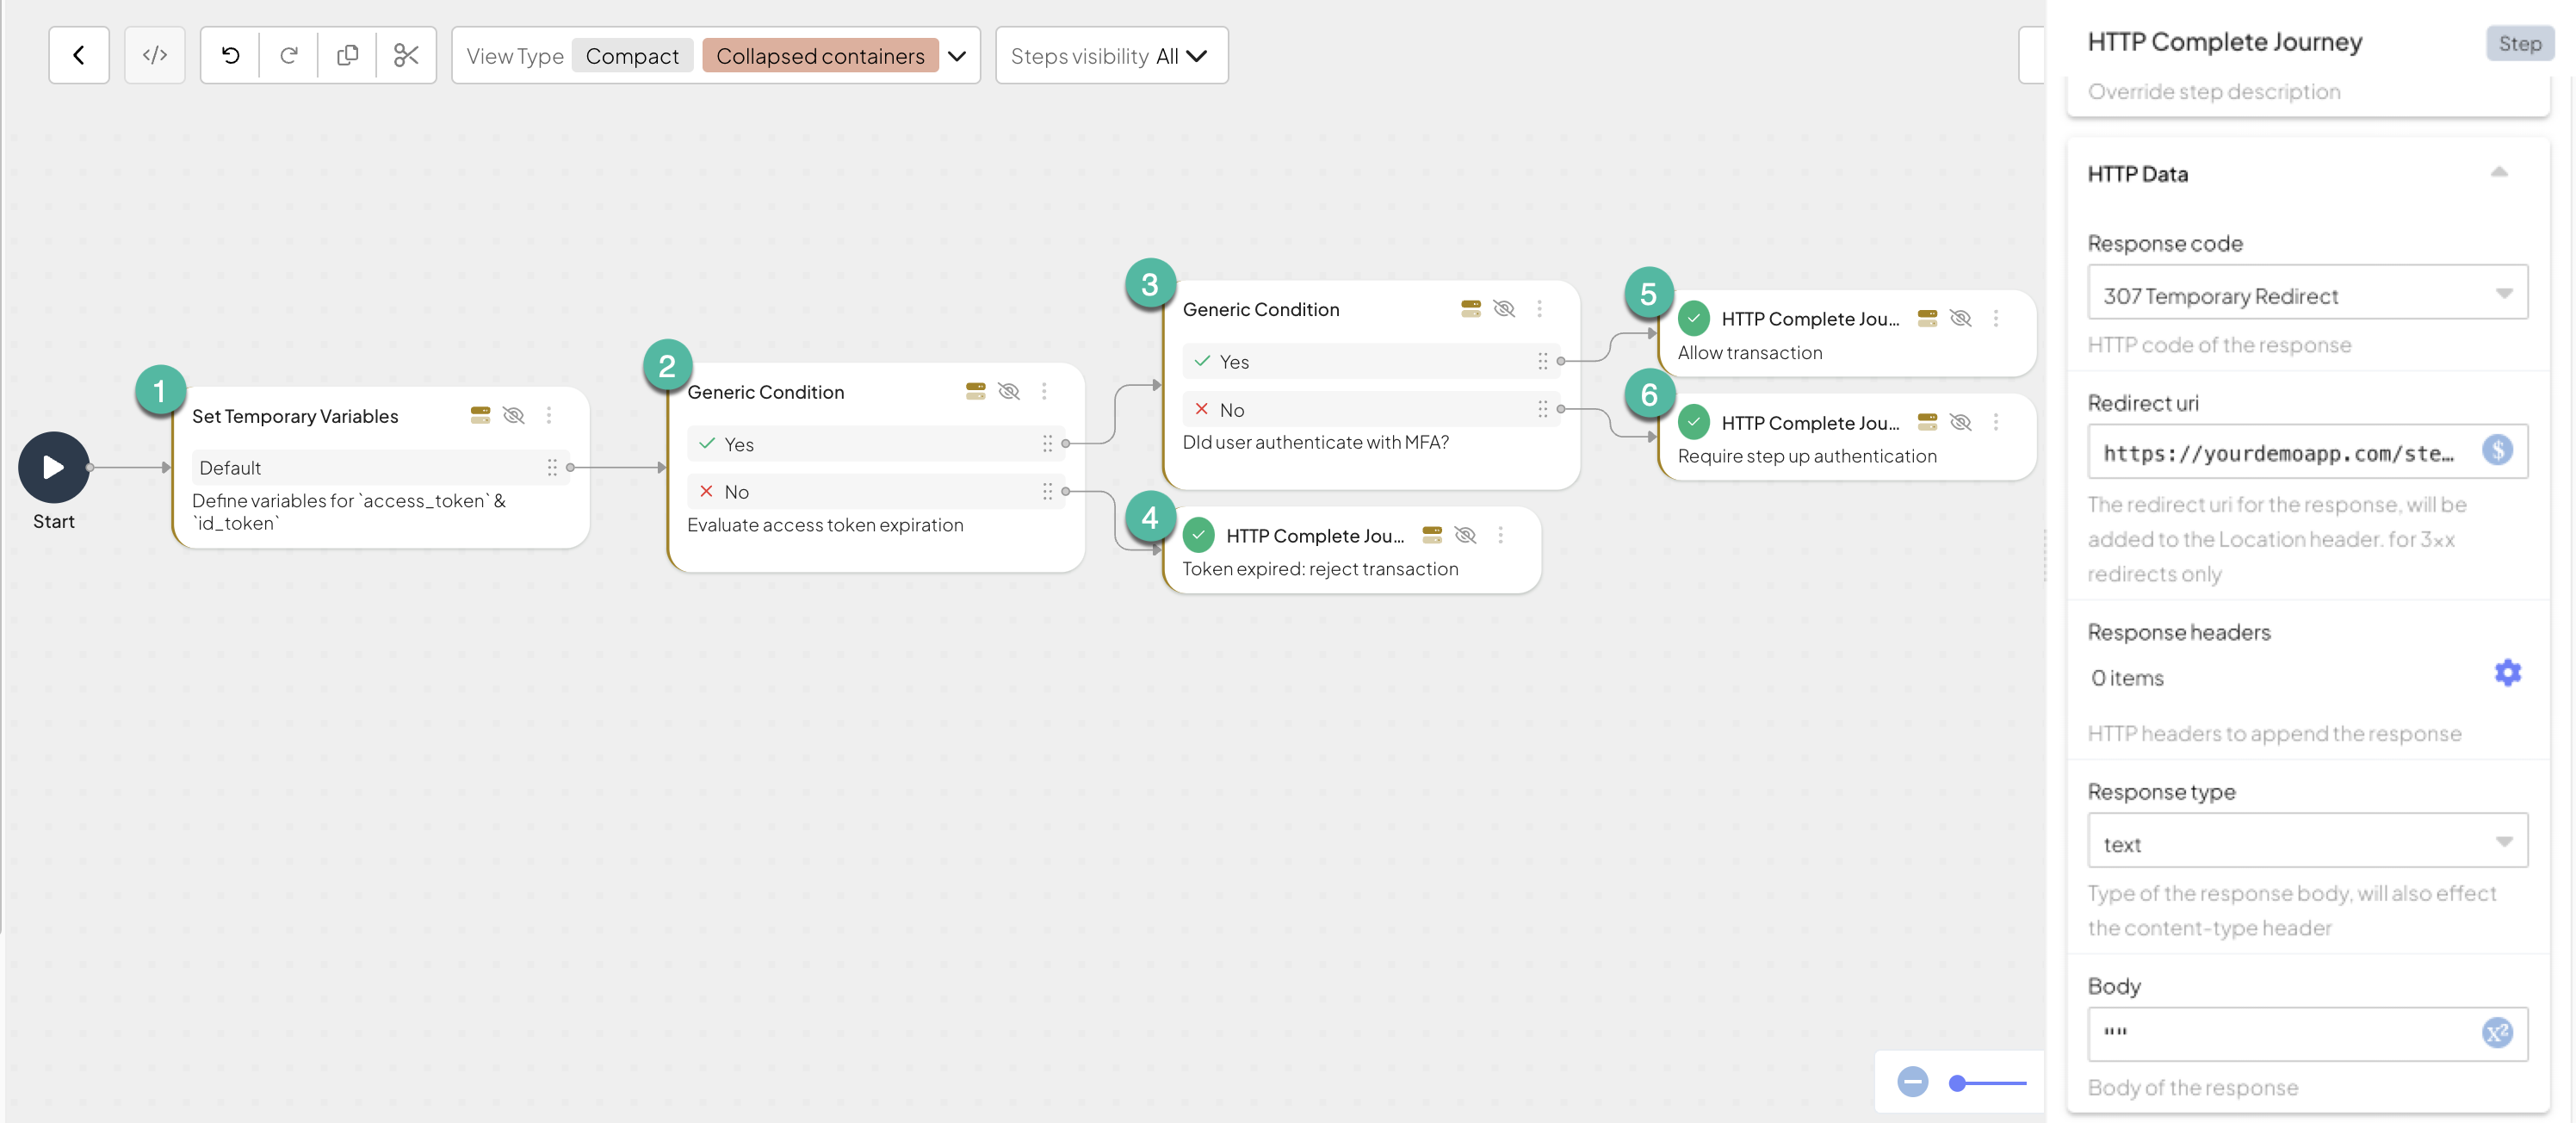
Here's what our example backend API journey configuration looks like. The journey includes logic steps (steps 1, 2, 3), along with HTTP Complete steps (steps 4, 5, 6), which execute the backend processes. These steps send custom HTTP responses to the calling application, marking the journey's completion.
For more details, see HTTP Complete Journey.

Here's the list of steps involved in this backend API journey and their configurations:
Set Temporary Variable (define variables for external access and ID tokens) step:
Add a Set Temporary Variable step to define the variables extracted from the API call payload:
external_access_token: Extracts the access token provided by the external system. This token contains theexp(expiration) claim, which will later be used to verify the token's validity:@crypto.extractTokenClaims(@policy.request().body.external_access_token)external_id_token: Extracts the ID token provided by the external system. This token contains theamr(authentication method reference) claim, which will later be used to check if the user authenticated with MFA:@crypto.extractTokenClaims(@policy.request().body.external_id_token)
Condition (evaluate access token expiration) step:
Add a Condition step to define the expression to evaluate the access token expiration:
- Set Source with
@std.strToInt(access_token.exp) > @time.now()/1000 && @std.strToInt(id_token.exp)> (@time.now()/1000) - Set Data Type on Boolean
- To the Success branch, add an Condition step step (see step 3)
- To the Failure branch, add a HTTP Complete Journey step (see step 4 in the table located further down the page).
- Set Source with
Condition (check MFA) step:
Add a Condition step to define the expression to check if MFA requirements were satisfied before requesting the transaction.
- Set DataType on Boolean
- To the Success branch, add an HTTP Complete journey step step (see step 5 in the table located further down the page).
- To the Failure branch, add an HTTP Complete Journey step (see step 6 in the table located further down the page)
Our example illustrates how a single journey can result in different outcomes, each corresponding to a distinct RESTful response type sent from Mosaic’s server to your server. Below are the configurations demonstrating the different responses returned by our example journey.
| HTTP Complete Journey step | Description | Response code | Redirect URI | Response type |
|---|---|---|---|---|
| 4 | Rejects the transaction due to token expiration | 401 Unauthorized | ||
| 5 | Allows transaction | 200 OK | ||
| 6 | Triggers a client journey for step-up authentication | 307 Temporary redirect | e.g. https://yourdemoapp.com/stepup | text |
After configuring the journey, you can test it using an API management tool or curl. This section demonstrates how to test your configuration.
curl -X POST "https://api.transmitsecurity.io/ido/api/v2/invoke-api-journey/[JOURNEY_ID]?clientId=[CLIENT_ID]" \
--header "Content-Type: application/json" \
--header "Authorization: Bearer <[CLIENT_TOKEN]>" \
--data '{
  "external_access_token": "eyJhbGciOiJSUzI1NiIsInR5cCI6ImF0K2p3...",
  "external_id_token": "eyJhbGciOiJSUzI1NiIsInR5cCI6IkpXVC.."
}'
Replace the placeholders:
[CLIENT_TOKEN]: The client access token generated by Mosaic in the Get access token step.[JOURNEY_ID]: The backend API journey ID.[CLIENT_ID]: The client ID of your application, available in Mosaic's Admin portal (Admin portal > Applications > your application).external_access_tokenandexternal_id_token: These values are included in the API call payload and mapped to variables in the Set Temporary Variable step.
If configured correctly, Mosaic will respond with the Response types configured in each HTTP Complete Journey step.