Provides the client with authentication options to choose from, and receives user input for the chosen option (such as username and password)
A journey is a sequence of steps that are executed when it's invoked by a client application (known as the "client"). Some steps require involvement from the client, such as to collect user input. Other steps, like validating a token, are executed in the backend by the Mosaic journey engine alone.
When invoked, the journey begins executing the steps while the client waits for further instructions. When a journey reaches a client-facing step, the journey asks the client for the required input and then waits for the client to respond. The client presents their own UI if user interaction is required, and returns input to the journey. The journey then proceeds in a similar manner until it’s completed.
This client-facing step is used to obtain input from the client for user authentication. This includes which authentication method to use (if multiple methods are supported), and user input based on the chosen method. For example, a login form may collect a user's email to send an OTP, or collect a username and password before proceeding to password authentication. A single login form may also allow the user to choose whether to receive an OTP by email or SMS, and collect the user's email or phone number depending on which option they choose.
The step is configured with a set of authentication methods that will be presented to the client as options to choose from. When a method is toggled in the step, a branch is automatically created containing the related login method node. In this node, any login-related information (e.g., username, password, phone, etc.) is automatically populated. In B2B journeys, the org context dynamically determines authentication methods available for current organization.
The Views & Actions field opens the form builder for this step, where you configure form fields and actions. In SSO journeys, the form builder also shows a style dropdown that lets you preview the step with a saved style. See Configuration and Manage styling for the Mosaic-hosted SSO experience.
When the Login form step and its related login method nodes are inserted in the middle of an existing flow, the "tail" of the journey will be automatically linked to the first login method step. However, these nodes will not be automatically updated with information from the added nodes.
The configured form for each enabled authentication method defines the input expected back from the client. The journey author can then add the appropriate authentication steps to the journey under the created branches.
Once the step is triggered, the journey asks the client for input and provides a step ID that uniquely identifies this particular step. The client knows which methods are enabled and what input is expected based on the step configuration and the forms defined in Views & Actions. The client is responsible for retrieving the input, including any supporting UI (e.g., HTML form).
Once the input is returned to the journey, it's stored in the configured output variable so it can be accessed by subsequent journey steps. If successful, the journey proceeds to the relevant branch. If the client cancels, the journey proceeds to a cancel branch if configured and is aborted otherwise.
As implied, this step requires coordination between the journey author and app developer, including:
- How the client should process the request when the journey returns a particular form ID
- Whether the client needs any context data like user-specific values to prefill a form. If so, this is configured in the step as application data as a free-form JSON and the expected payload is shared offline.
- What input the journey expects from the client for each branch. The related forms are configured in Views & Actions in this step.
- If the client cancels the step, whether it should fail the journey or proceed to another branch
- Whether the step supports additional branches that can be selected by the client (in addition to method branches)
This step is the recommended way to collect user input for authentication scenarios.
For other scenarios (such as registration forms), use the Collect information step.
| Field | Description |
|---|---|
| Form title | The form title to present in UI. |
| Form description | The call-to-action text or description to present in UI. |
| Application data | Data to send to the client, formatted as a free-form JSON. It may include expressions. For example, it can contain user-specific values to prefill a form, such as a masked phone number. |
| Error data | When this step is executed within a While Loop step, this represents errors to return to the client. For example, if an authentication error occurs, this can provide errors to display to the user. May be configured as a variable or JSON object, and contain expressions. |
| Step ID | Identifier of the step, used by the client to process the request for input. It can only contain letters, numbers, and underscores (no spaces), and it cannot begin with a number. Some examples of valid IDs are loginForm1 or login_form_1 |
| Views & Actions (only visible in SSO journeys) | Opens the form builder, where you can configure the forms for enabled authenticators, add actions, and preview the rendered UI for this step. |
| Custom branches | Additional journey branches supported for this step. For each branch, you define a branch ID and display name to label it in the editor, and a schema for the input expected back from the client. Note: The schema is used by the code generator and for autocompleting journey expressions, and isn't expected to be used by the client dynamically. The client can select a branch by returning the branch ID when calling submitClientResponse(). See Example 3: Forgot my password for implementation details. |
| Password | If toggled, password authentication is a login option. Its form is configured in Views & Actions using the form builder. Access it via the gear icon. Fields may include expressions. |
| Passkeys | If toggled, WebAuthn biometric authentication is a login option. Its form is configured in Views & Actions using the form builder. Access it via the gear icon. Fields may include expressions. |
| TOTP | If toggled, TOTP authentication is a login option. Its form is configured in Views & Actions using the form builder. Access it via the gear icon. Fields may include expressions. |
| Email OTP | If toggled, email OTP authentication is a login option. Its form is configured in Views & Actions using the form builder. Access it via the gear icon. Fields may include expressions. |
| SMS OTP | If toggled, SMS OTP authentication is a login option. Its form is configured in Views & Actions using the form builder. Access it via the gear icon. Fields may include expressions. |
| Native biometrics | If toggled, mobile biometric authentication is a login option. Its form is configured in Views & Actions using the form builder. Access it via the gear icon. Fields may include expressions. |
| Web to mobile | If toggled, web to mobile authentication is a login option. Its form is configured in Views & Actions using the form builder. Access it via the gear icon. Fields may include expressions. |
| Mobile PIN | If toggled, logging in with an app-specific PIN code chosen by the user is available as an authentication method. Its form is configured in Views & Actions using the form builder. Access it via the gear icon. Fields may include expressions. |
| Face authentication | If toggled, authentication with facial biometrics is a login option. Its form is configured in Views & Actions using the form builder. Access it via the gear icon. Fields may include expressions. |
| Auth Methods by Org | Only in B2B journeys. Controls whether authentication methods are shown dynamically based on the user's organization or manually defined. By default, the step uses the org context previously set in the journey (e.g., using Select organization step). If set to "manual", you can provide an expression that yields the organization ID. |
| Branch output variable | Name of the variable used to store the data returned by the client, which can be used in subsequent journey steps. |
| Cancel behavior | Determines the behavior of client cancellation, which either aborts the journey (default) or proceeds to a cancel branch of the control flow. |
This step can be configured to record step input and output data, or a custom payload, which is then surfaced in journey events in Journey Analytics for diagnostic purposes. For details, see Additional data reporting.
Below are some examples of implementing this step:
Consider a simple login form that collects username and password for password authentication. In our example, the form ID is loginForm, the input will be stored in a variable named loginData, and only Password is enabled.
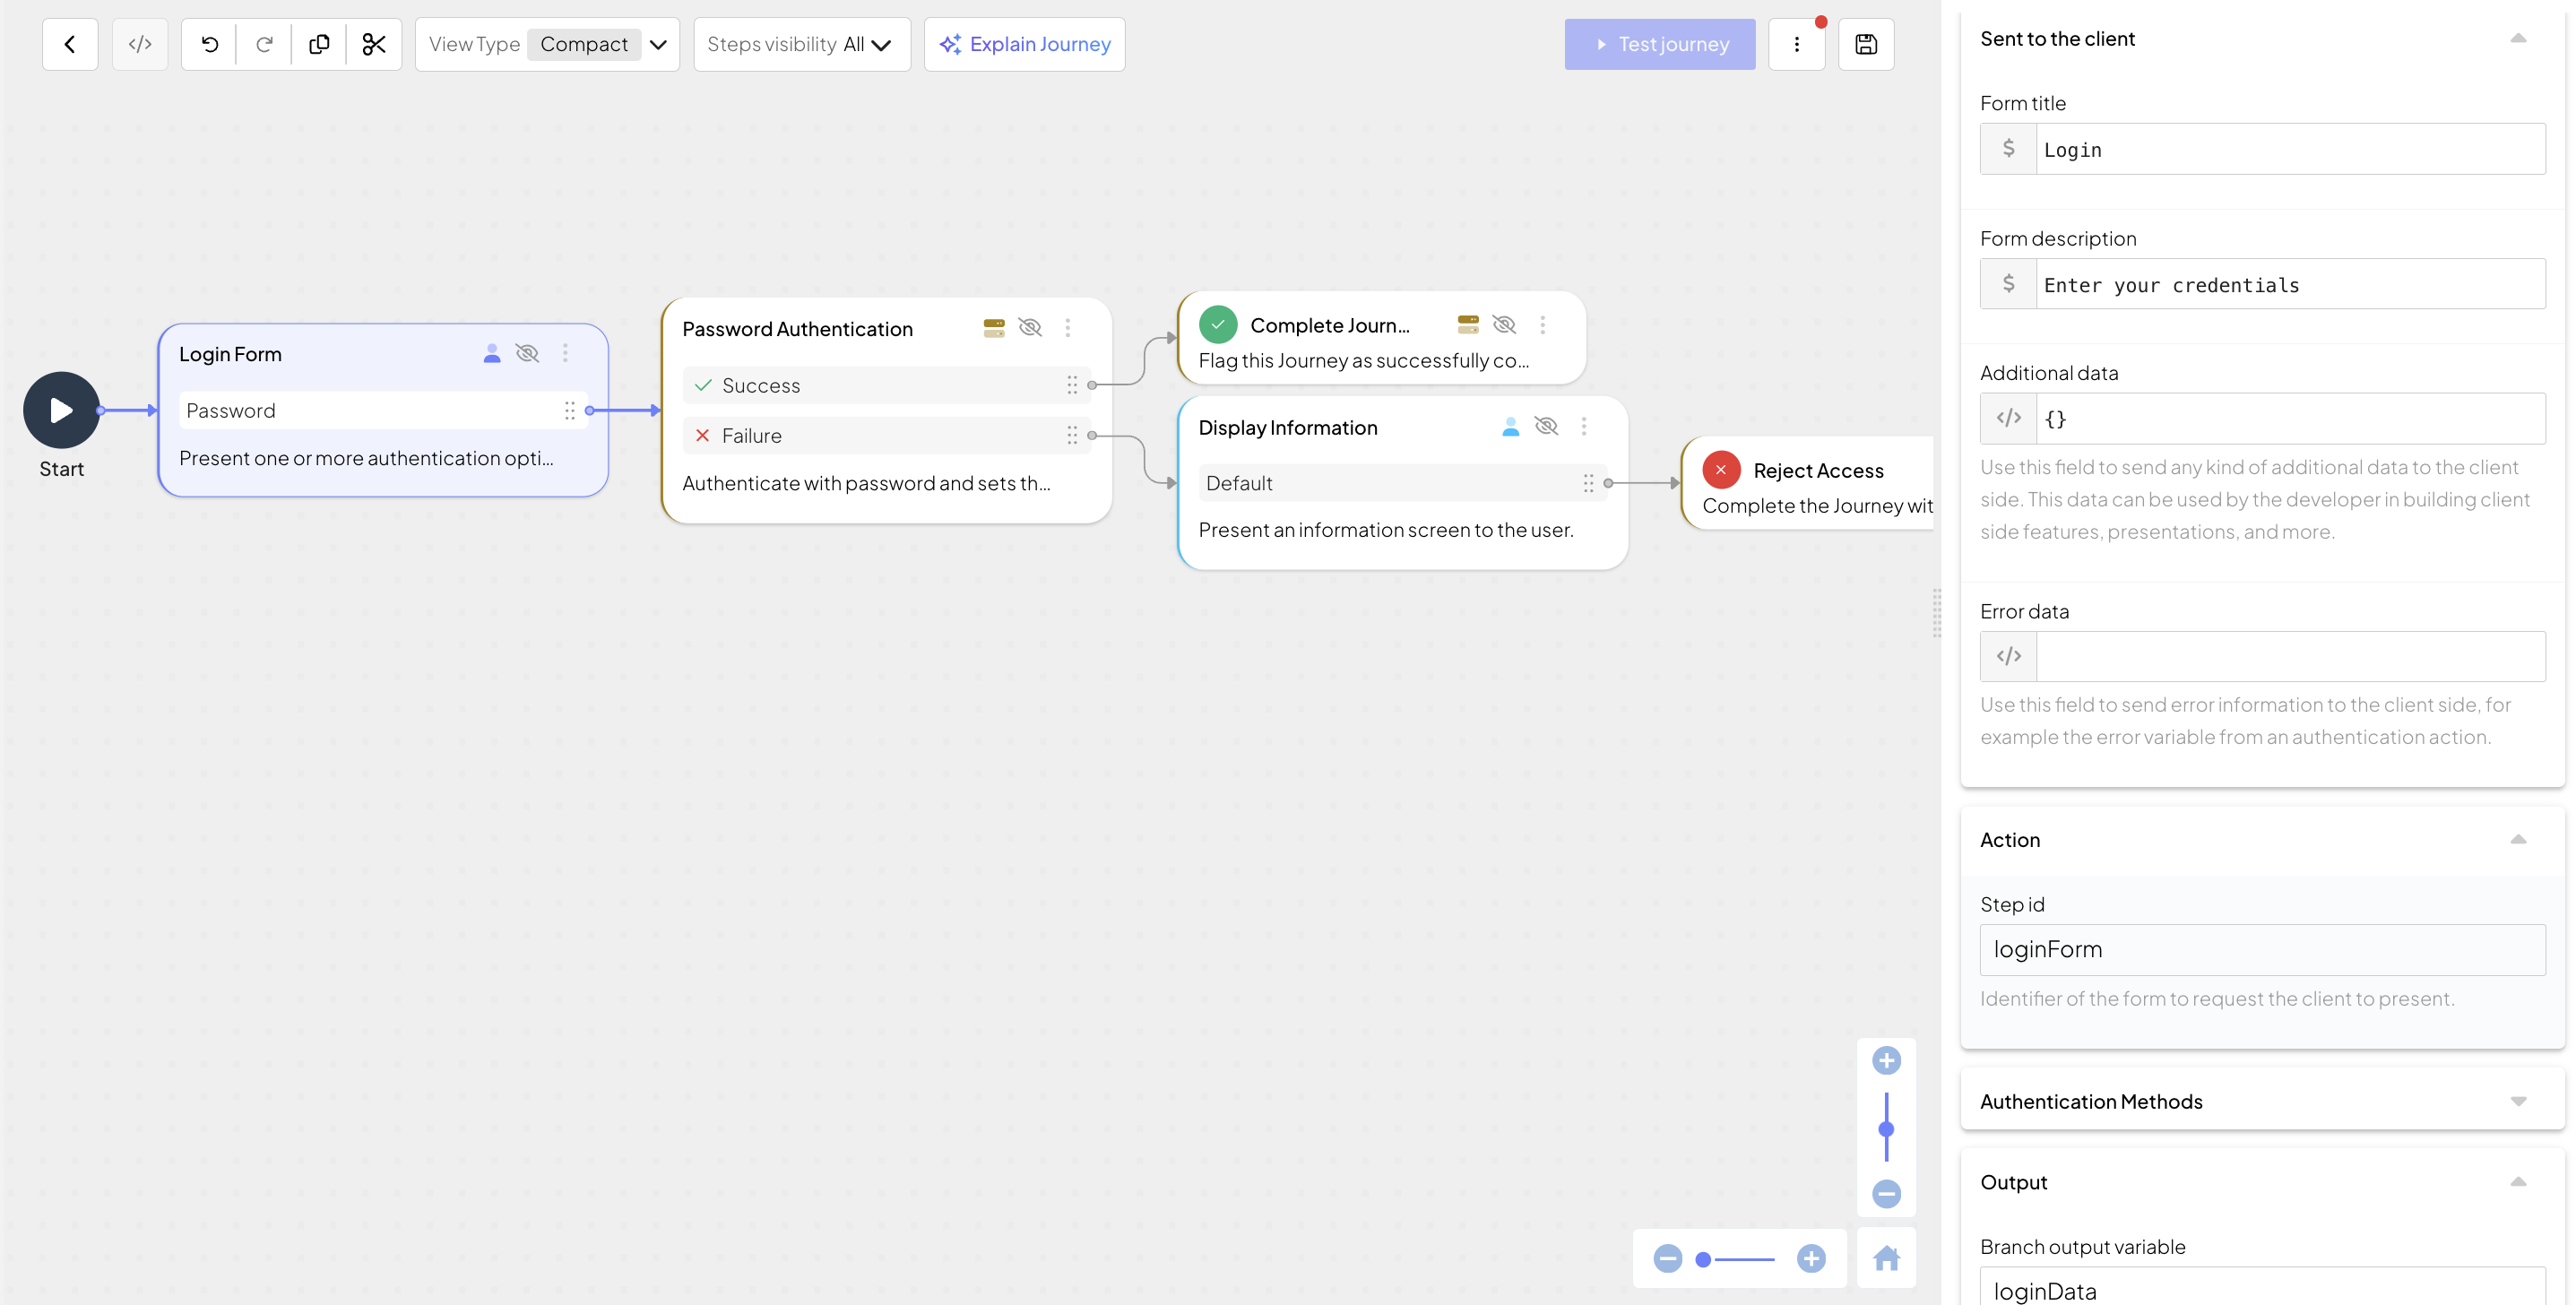
When executed, this step returns to the client the idoServiceResponse object. The client then processes the request based on the form ID passed in journeyStepId. For example:
function handleLoginForm(idoResponse) {
  // Generate the form's HTML
  const formHtml = `<form id="loginForm">
    <h3>Login</h3>
    <h6>Enter your credentials</h6>
    <input type="text" id="username" name="username" placeholder="username" />
    <input type="text" id="password" name="password" placeholder="password" />
    <button>Submit</button>
  </form>`;

  // Render the form
  document.body.innerHTML = formHtml;

  document.querySelector('#loginForm').addEventListener('submit', function(event) {
    event.preventDefault();

    // Collect the form data
    const form = event.target;
    const formData = new FormData(form);
    // The data will look like this:
    // {
    //   "username": "Johnny1990",
    //   "password": "some-password"
    // }
    const data = Object.fromEntries(formData.entries());

    // Submit the data to the SDK
    // If SDK was loaded via script tag, invoke functions inside 'window.tsPlatform'
    ido.submitClientResponse("password", data);
  });
}Building on the previous example, consider a login form that supports both password and SMS OTP authentication. In this case, both password and SMS OTP methods are enabled in the step. The password branch expects username and password, while the SMS OTP branch only expects phone number in our example (since we're assuming phone number is also the username, and we updated the schema accordingly).
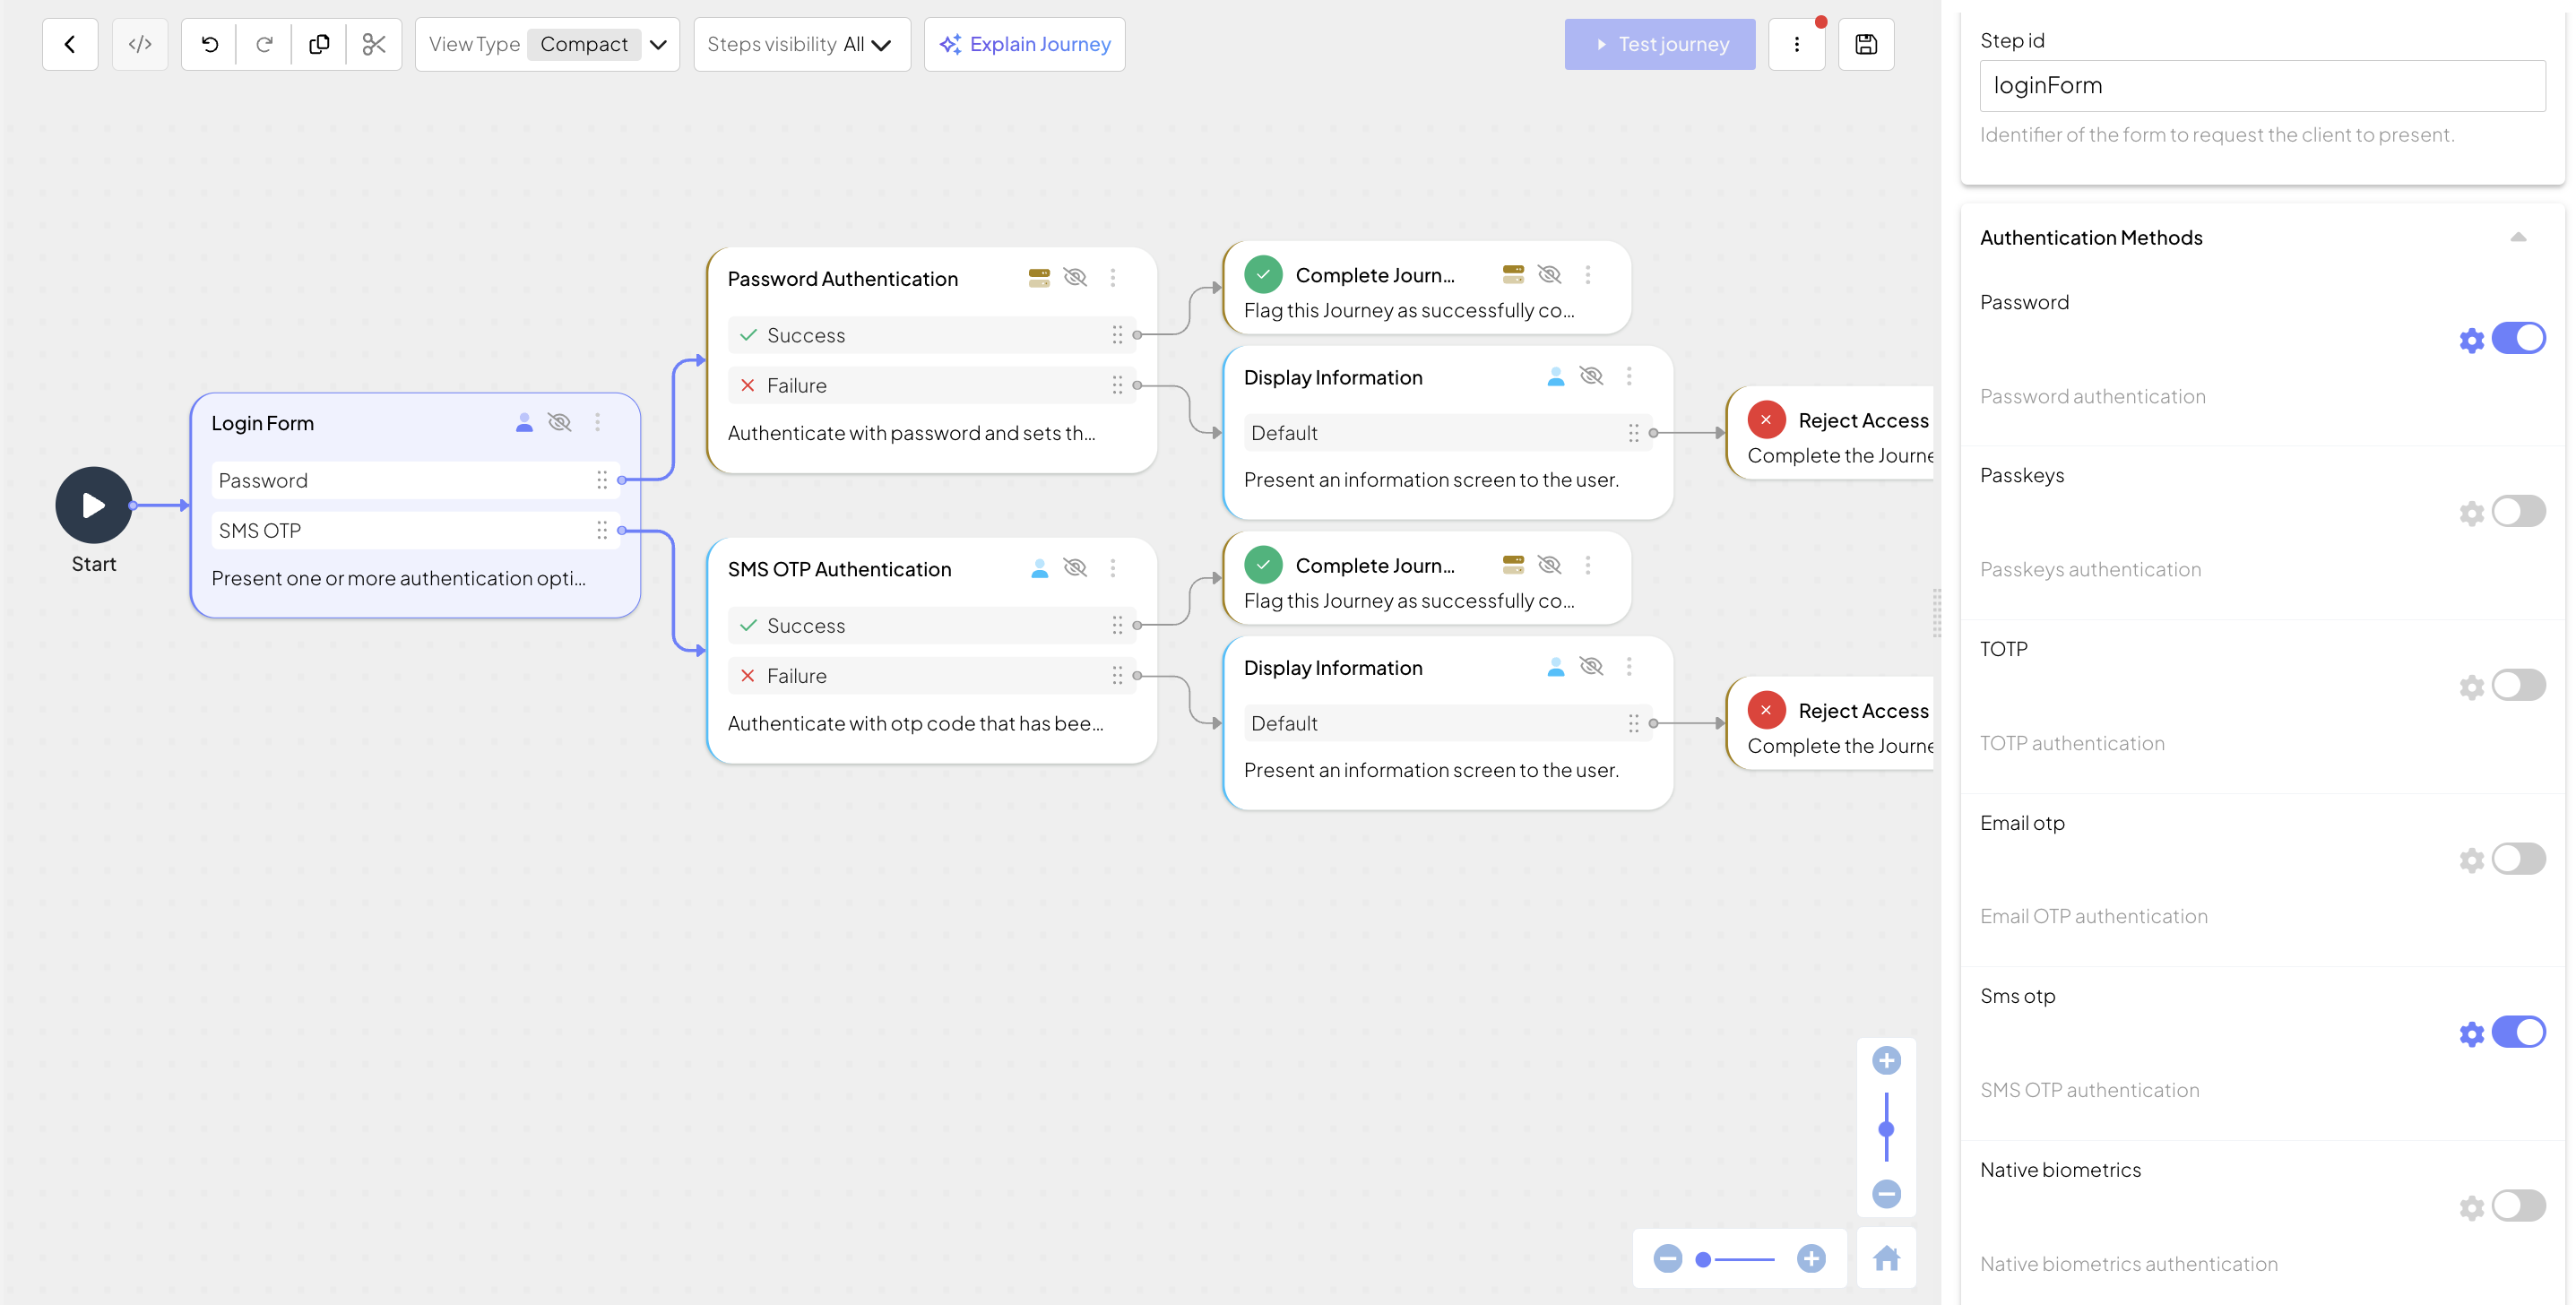
When executed, this step returns to the client the idoServiceResponse object, which now includes the custom branches in the clientResponseOptions. The client selects a branch using the branch ID (either password or sms_otp), and returns the relevant input. For example:
// Submits input for password authentication
// If SDK was loaded via script tag, invoke functions inside 'window.tsPlatform'
ido.submitClientResponse(
     "password",
     {
         "username": "<username>",
         "password": "<password>",
     });

// Submits input for SMS OTP authentication
// If SDK was loaded via script tag, invoke functions inside 'window.tsPlatform'
ido.submitClientResponse(
     "sms_otp",
     {
         "phone": "<phone_number>"
});Building on the first example, suppose the login form for password authentication also includes an option the user can choose in case they forgot their password. In this example, a custom branch (forgotten_password) is added to the step, which automatically creates a new branch that will be used to execute the recovery flow. For this branch, the schema includes just the username field.
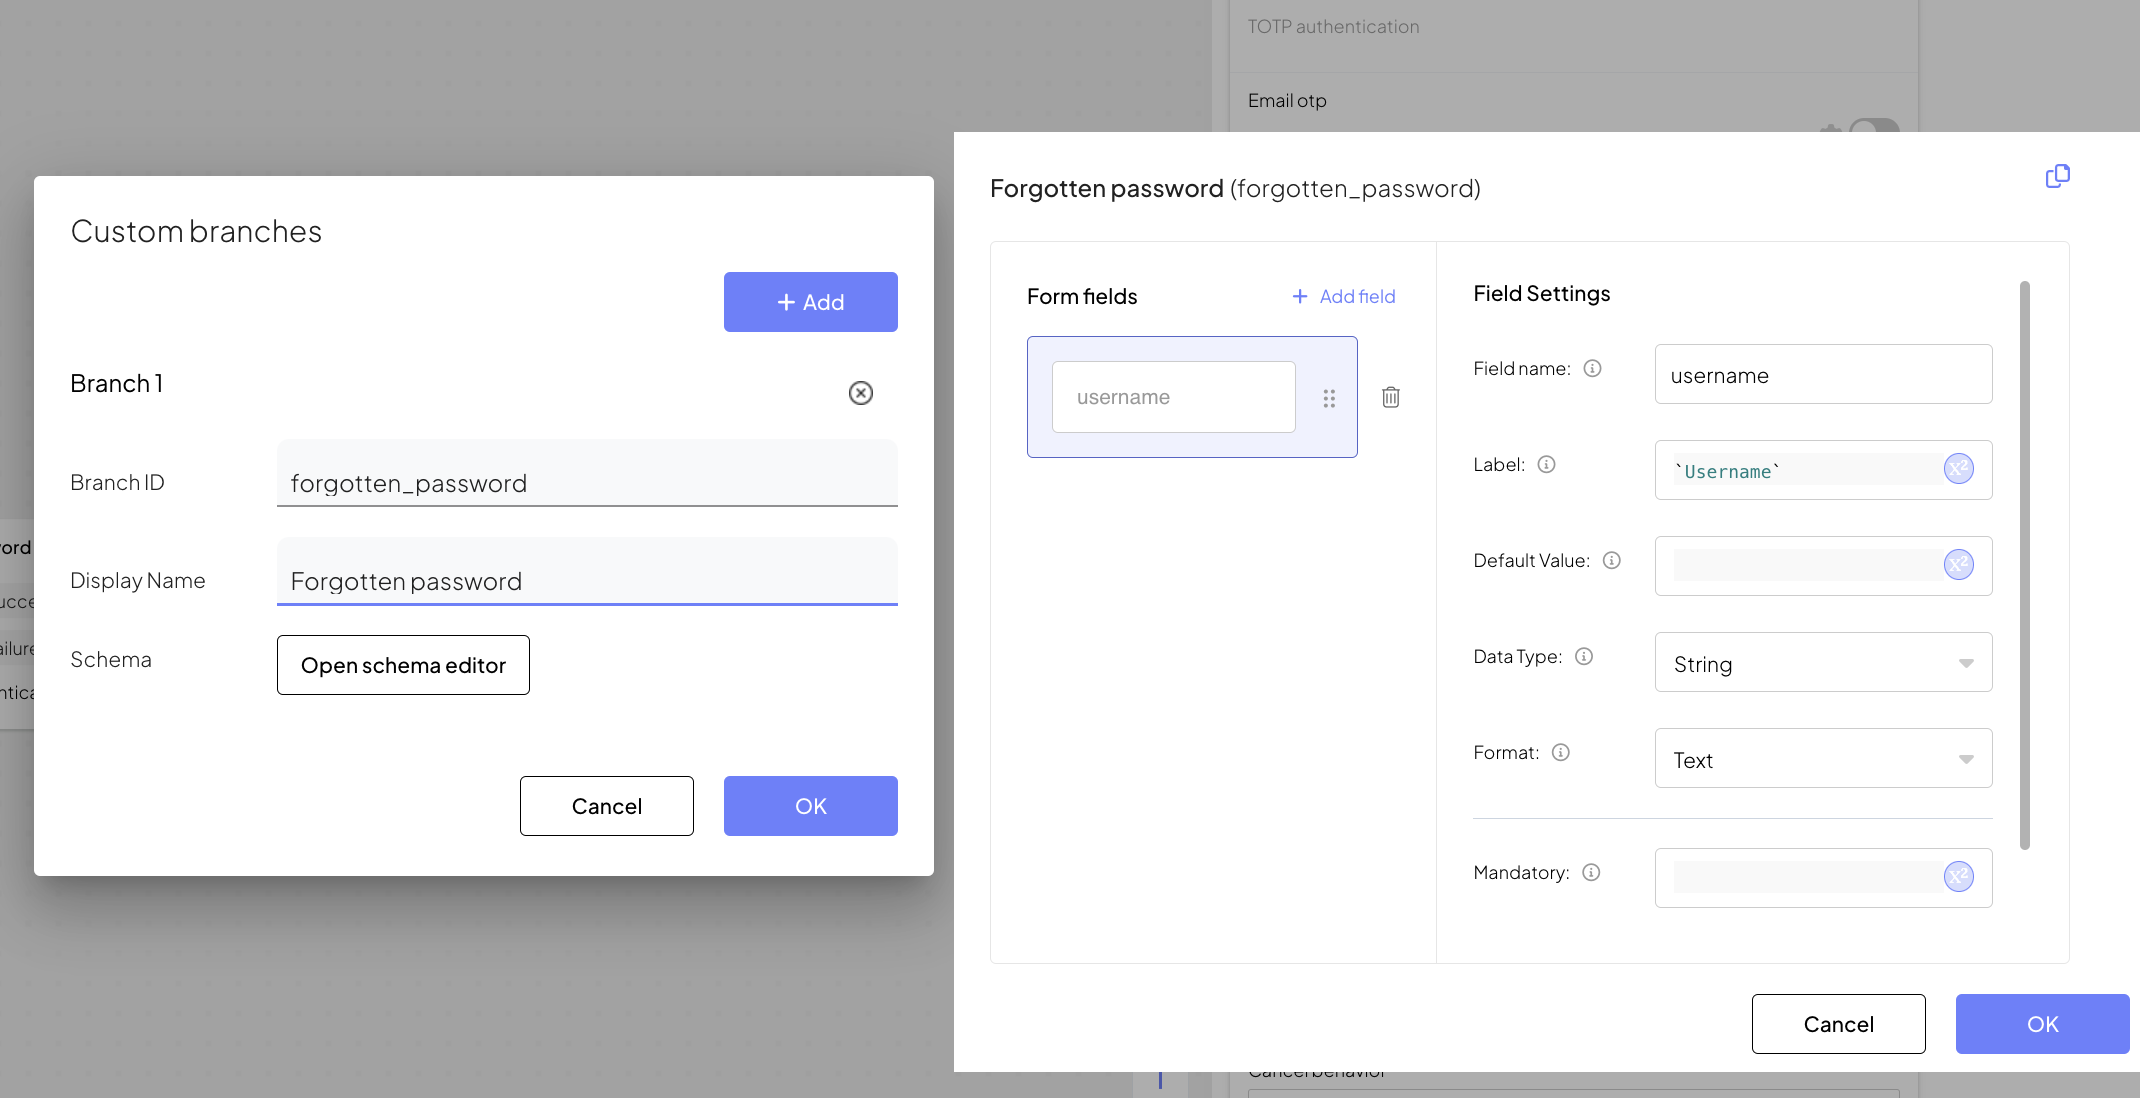
When executed, this step returns to the client the idoServiceResponse object, which now includes the forgot password option in the clientResponseOptions. For example, if the user clicks a "Forgot my password" link on the login form, the client can proceed to collect just the username and submit it to direct the journey to the relevant branch.
// Submits username to reset forgotten password
// If SDK was loaded via script tag, invoke functions inside 'window.tsPlatform'
ido.submitClientResponse(
     "forgotten_password",
     {
         "username": "<username>",
     });