This guide describes how to integrate Fraud Prevention into your Cordova application. It helps you set up the Mosaic Cordova plugin, enabling you to enhance your mobile applications' security with Fraud Prevention services.
Client-side integrations are recommended for POCs and testing. For production environments, consider implementing Backend integration. Learn more about integration options: Client-side integration vs Backend integration.
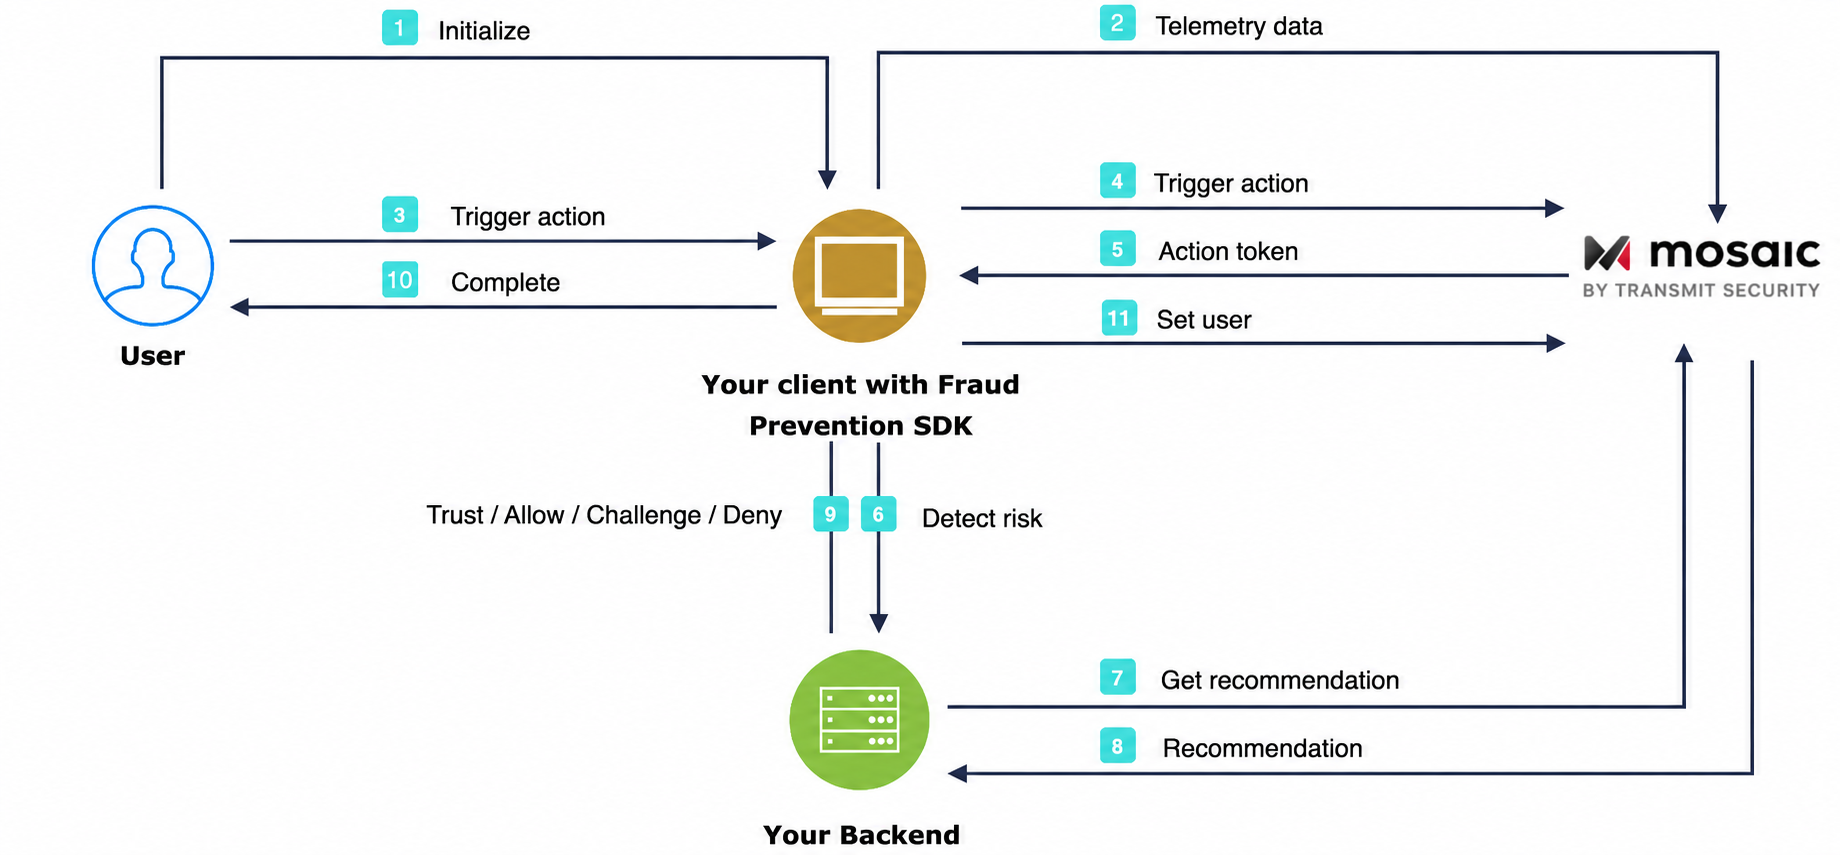
The flow starts with the user navigating to the app (1). The plugin gets initialized and starts sending telemetry to Mosaic (2). When a user performs an action, for example, clicks a login button (3), the plugin triggers an action event (4) and obtains an action token (5) which then forwards to the backend (6). Having received an action token, the application backend uses it to fetch recommendation from Mosaic (7 & 8) and instructs the client to act accordingly (9) in order to complete the login procedure (10). Upon successful login, the client sets the user (11).
- Cordova CLI 12.0 or higher (tested with cordova-ios 8.x and cordova-android 14.x)
- iOS 13.0 or higher, Xcode 16 or higher
- Android API level 24 (Android 7.0) or higher
- Node.js LTS
Before integrating, make sure you have:
- Fraud Prevention enabled as the risk engine for your tenant. Identity Threat Protection and Fraud Prevention are mutually exclusive—contact your Customer Success Manager to enable the appropriate engine.
- An application with a service client in the Admin Portal. The service client provides the client ID and secret used to authorize backend requests to Mosaic. If you don't have one yet, see Create an application.
Add the Mosaic Cordova plugin to your project from the published plugin repository:
cd /path/to/your/cordova/app

# Pinned to a release (recommended for production)
cordova plugin add https://github.com/TransmitSecurity/cordova_ts_account_protection_plugin.git#v0.1.0

# Add the platforms (first time only)
cordova platform add ios android

# Prepare the native projects
cordova prepare ios android
On iOS, the plugin resolves the native Fraud Prevention SDK through Swift Package Manager, so you don't need to build native SDK sources in your app project. On Android, the plugin pulls the SDK from the Transmit Security Maven repository.
The plugin adds the INTERNET, ACCESS_NETWORK_STATE, and ACCESS_FINE_LOCATION permissions to the manifest and resolves the Fraud Prevention SDK from the Transmit Security Maven repository. Ensure your app-level Gradle can resolve the repository (usually inherited from the Cordova Android project).
Add your credentials to res/values/strings.xml:
<resources>
    <!-- Mosaic Credentials -->
    <string name="transmit_security_client_id">[YOUR_CLIENT_ID]</string>
    <string name="transmit_security_base_url">https://api.transmitsecurity.io/risk-collect/</string>
</resources>
Use the appropriate base URL for your environment:
| Environment | Base URL |
|---|---|
| US | https://api.transmitsecurity.io/risk-collect/ |
| EU | https://api.eu.transmitsecurity.io/risk-collect/ |
| Canada | https://api.ca.transmitsecurity.io/risk-collect/ |
| Australia | https://api.au.transmitsecurity.io/risk-collect/ |
| Japan | https://api.gasne1-ts01.transmitsecurity.io/risk-collect/ |
| Custom domain | https://<your_custom_domain>/risk-collect/ |
The plugin exposes the cordova.drs object once the deviceready event has fired. Initialize the plugin when your app starts, using the platform-specific configuration files created in Step 2:
document.addEventListener('deviceready', function () {
  cordova.drs.initializeSDK()
    .then(function () {
      console.log('Fraud Prevention SDK initialized');
    })
    .catch(function (err) {
      console.error('Init failed', err);
    });
});Start a plugin session and obtain a device session token after plugin initialization and prior to triggering events, and persist it on your backend. This step is optional for client-side integration but strongly recommended as it allows you to transition to the backend integration—a device session token is needed to trigger events from the backend and binds the user's interactions to their device.
const sessionToken = await cordova.drs.getSessionToken();The plugin loads web telemetry on startup. It maps DOM widgets, tracks taps and touches, and reports navigation changes in the WebView, so no extra wiring is required for basic HTML apps.
If your app uses a custom SPA router and you want to report explicit page names, call logPageLoad() whenever the active route changes:
cordova.drs.logPageLoad('Dashboard');The example below demonstrates triggering a login event from a login button, setting and clearing a user.
For an alternative approach that directly utilizes our backend API instead, refer to our Backend API implementation guide.
triggerAction()receives an action type and returns a response that includes theactionTokenthat you should pass to the backend. To obtain risk recommendations for sensitive actions, your application should report these actions. To do this, add the code below to relevant user interactions (such as the Login buttonclickevent handler). The plugin allows reporting on events with specific action types. Replace[ACTION_TYPE]with the appropriate action type from our list of actions.To improve Fraud Prevention, optionally pass the correlation ID, and claimed user ID and its type (for users that haven't authenticated yet).
To report precise device location, add
locationConfigto the call (the user has to consent to sharing location in advance, see Track geolocation).customAttributesis an optional object that adds context to an action but must match the schema defined in the Portal. Invalid attributes are ignored (see Custom attributes).
triggerAction()resolves with{ success, actionToken }. It does not throw when the SDK rejects the action, so checksuccessbefore usingactionToken.
cordova.drs.triggerAction(
  'login',
  {
    correlationId: 'login-' + Date.now(),
    claimedUserId: '91e25bea0c...', // hashed email
    claimedUserIdType: 'email'
  },
  { mode: 'default' }, // locationConfig (optional)
  { userLevel: 'premium' } // customAttributes (optional)
).then(function (result) {
  if (result.success) {
    console.log('Action Token:', result.actionToken);
  } else {
    console.log('Action failed or flagged');
  }
});setAuthenticatedUser()sets the user context for all subsequent events for the session (or until the user is explicitly cleared). It should be called only after you've fully authenticated the user (including, for example, any 2FA that was required). On Android, call this after the WebView activity is visible. For the complete list of action types, see our recommendations page.await cordova.drs.setAuthenticatedUser('user-123', { loginMethod: 'password', email: 'user@example.com' });clearUser()clears the user context for all subsequent events in the mobile session. The user gets automatically cleared once the session expires or in case of a login action.await cordova.drs.clearUser();getSessionToken()returns a session token needed for triggering events from the backend.const sessionToken = await cordova.drs.getSessionToken();
You can fetch recommendations for the reported action using the Recommendation API. This is the same API that's also used for mobile integrations.
Mosaic APIs are authorized using an OAuth access token so you'll need to fetch a token using your service client credentials. To do this, send the following request:
const resp = await fetch(
  `https://api.transmitsecurity.io/oidc/token`,
  {
    method: 'POST',
    headers: {
      'Content-Type': 'application/x-www-form-urlencoded'
    },
    body: new URLSearchParams({
      grant_type: 'client_credentials',
      client_id: '[CLIENT_ID]',
      client_secret: '[CLIENT_SECRET]'
    })
  }
);
const { access_token } = await resp.json();
From your backend, invoke the Recommendation API by sending a request like the one below. The [ACCESS_TOKEN] is the authorization token you obtained using your client credentials and [ACTION_TOKEN] is the actionToken received in Step 5.
const query = new URLSearchParams({
  action_token: '[ACTION_TOKEN]',
}).toString();

const resp = await fetch(
  `https://api.transmitsecurity.io/risk/v1/recommendation?${query}`,
  {
    method: 'GET',
    headers: {
      Authorization: 'Bearer [ACCESS_TOKEN]',
    },
  }
);