This guide describes how to integrate Fraud Prevention into your React Native application. It helps you set up the Mosaic React Native module, enabling you to enhance your mobile applications' security with Fraud Prevention services.
Client-side integrations are recommended for POCs and testing. For production environments, consider implementing Backend integration. Learn more about integration options: Client-side integration vs Backend integration.
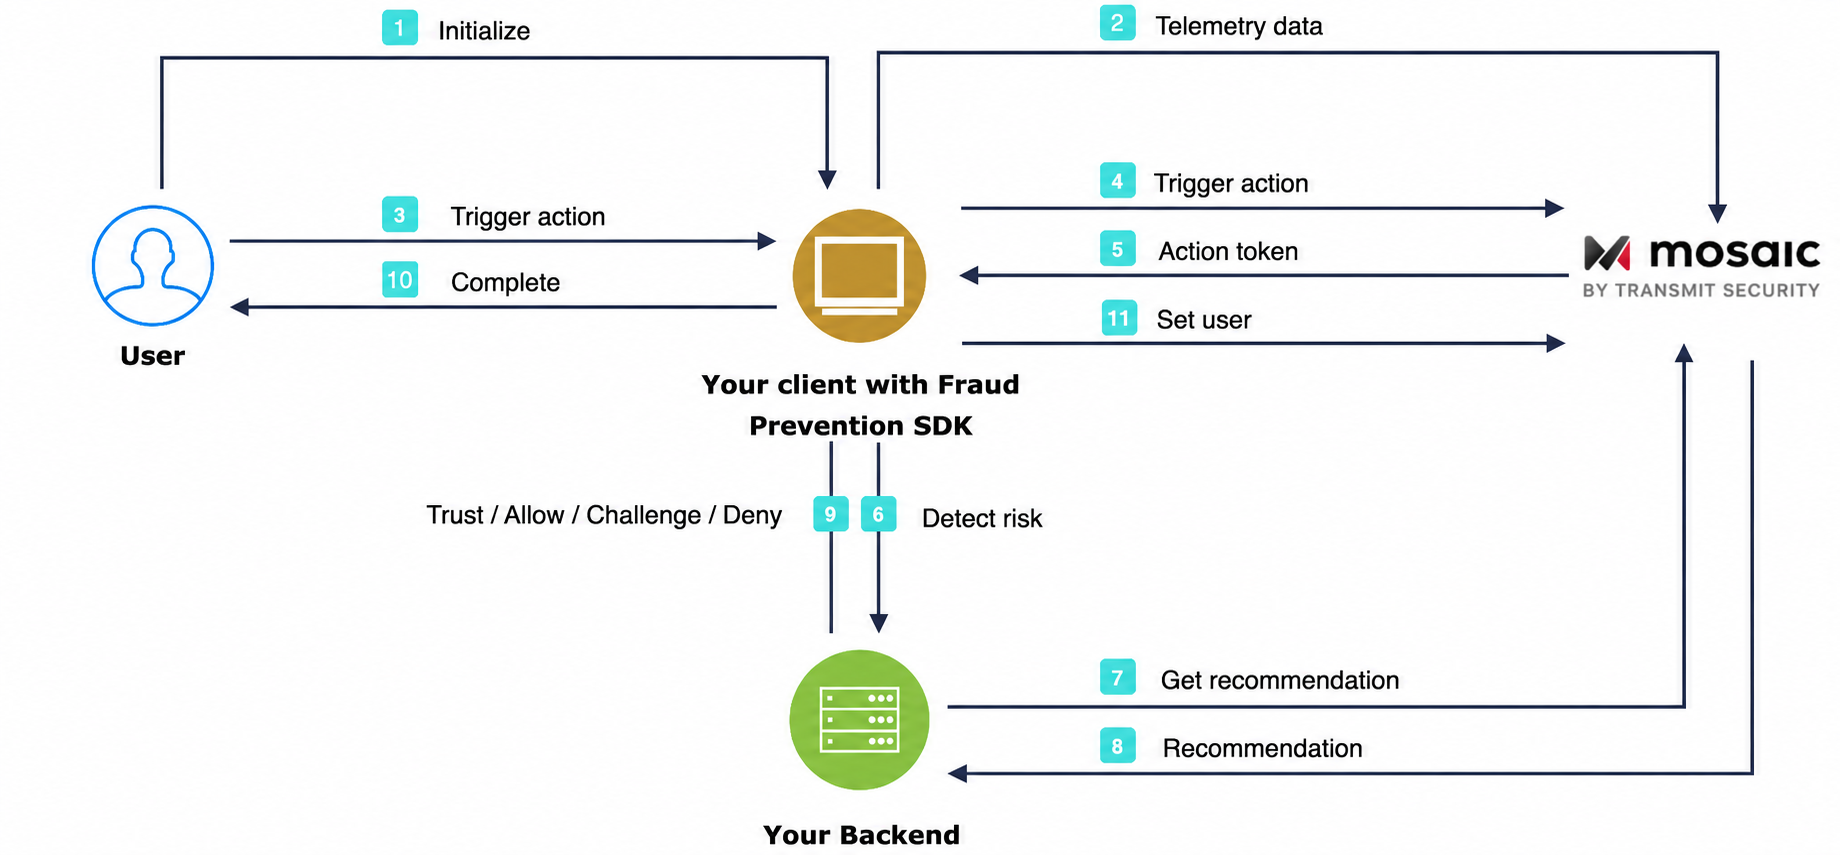
The flow starts with the user navigating to the app (1). The module gets initialized and starts sending telemetry to Mosaic (2). When a user performs an action, for example, clicks a login button (3), the module triggers an action event (4) and obtains an action token (5) which then forwards to the backend (6). Having received an action token, the application backend uses it to fetch recommendation from Mosaic (7 & 8) and instructs the client to act accordingly (9) in order to complete the login procedure (10). Upon successful login, the client sets the user (11).
Ensure that Fraud Prevention is enabled as the risk engine for your tenant. Identity Threat Protection and Fraud Prevention are mutually exclusive—contact your Customer Success Manager to enable the appropriate engine.
Client credentials are used to identify your app and generate access tokens for authorizing Mosaic requests. To obtain them, you'll need to create an application in the Admin Portal (if you don't have one yet).
- From Applications, click Add application.
- Add the friendly application name to display in the Admin Portal.
- Add an OIDC client, specify the client secret as an authentication method, and your website URL as a redirect URI (e.g.,
https://your-domain.com).
These fields are required for all Mosaic apps, but won't be used for Fraud Prevention.
- Click Add to create your application. This will automatically generate your client credentials.
Install the Mosaic React Native module:
npm install react-native-ts-accountprotectionIn your app/build.gradle file, add the following under repositories:
repositories {
  google()
  maven {
    url 'https://transmit.jfrog.io/artifactory/transmit-security-gradle-release-local/'
  }
}
Then, add the following under dependencies:
dependencies {
  implementation "com.ts.sdk:accountprotection:3.+"
}If your React Native Android app enables code shrinking or obfuscation (minifyEnabled true in build.gradle), add the following keep rule to your app's proguard-rules.pro file:
-keep class com.facebook.react.** { *; }Update your strings.xml file by adding the following:
<resources>
    <!-- Mosaic Credentials -->
    <string name="transmit_security_client_id">[YOUR_CLIENT_ID]</string>
    <string name="transmit_security_base_url">https://api.transmitsecurity.io/risk-collect/</string>
</resources>
Use the appropriate base URL for your environment:
| Environment | Base URL |
|---|---|
| US | https://api.transmitsecurity.io/risk-collect/ |
| EU | https://api.eu.transmitsecurity.io/risk-collect/ |
| Canada | https://api.ca.transmitsecurity.io/risk-collect/ |
| Australia | https://api.au.transmitsecurity.io/risk-collect/ |
| Custom domain | https://<your_custom_domain>/risk-collect/ |
Open your MainApplication.kt file in your React Native Android project, and add:
import com.transmit.accountprotection.TSAccountProtection

class MainApplication : Application() {
  override fun onCreate() {
    super.onCreate()
    TSAccountProtection.initializeSDK(this.applicationContext)
    // ...
  }
}Start a module session and obtain a device session token after module initialization and prior to triggering events, and persist it on your backend. This step is optional for client-side integration but strongly recommended as it allows you to transition to the backend integration—a device session token is needed to trigger events from the backend and binds the user's interactions to their device.
import { getSessionToken } from 'react-native-ts-accountprotection';

const sessionToken = await getSessionToken();To collect behavioral data in addition to the other telemetry the module sends, do the following:
- Track screen navigation by calling
logPageLoad()whenever the active route changes. If you use React Navigation, attach handlers toNavigationContaineras in this example:
import React from 'react';
import { NavigationContainer, useNavigationContainerRef } from '@react-navigation/native';
import { logPageLoad } from 'react-native-ts-accountprotection';

export default function App() {
  const navigationRef = useNavigationContainerRef();
  const previousRouteNameRef = React.useRef<string | undefined>();

  return (
    <NavigationContainer
      ref={navigationRef}
      onReady={() => {
        const routeName = navigationRef.getCurrentRoute()?.name;
        if (routeName) {
          previousRouteNameRef.current = routeName;
          logPageLoad(routeName);
        }
      }}
      onStateChange={() => {
        const routeName = navigationRef.getCurrentRoute()?.name;
        if (routeName && routeName !== previousRouteNameRef.current) {
          previousRouteNameRef.current = routeName;
          logPageLoad(routeName);
        }
      }}
    >
      <YourNavigator />
    </NavigationContainer>
  );
}
Replace <YourNavigator /> with your app's navigator component.
- Label important UI elements. We strongly recommend assigning a value to the
testIDproperty on views that hold significance within the user flow in your app, such as buttons, inputs, and other key controls. Elements without atestIDattribute are not included in behavioral data collection.
<TouchableOpacity testID="login_button" onPress={handleLogin}>
  <Text>Login</Text>
</TouchableOpacity>

<TextInput
  testID="username_input"
  placeholder="Username"
  value={username}
  onChangeText={setUsername}
/>

<TouchableOpacity testID="submit_payment_button" onPress={handlePayment}>
  <Text>Submit Payment</Text>
</TouchableOpacity>The example below demonstrates triggering a login event from a login button, setting and clearing a user.
For an alternative approach that directly utilizes our backend API instead, refer to our Backend API implementation guide.
triggerAction()receives an action type and returns a response that includes theactionTokenthat you should pass to the backend. To obtain risk recommendations for sensitive actions, your application should report these actions. To do this, add the code below to relevant user interactions (such as the Login buttonclickevent handler). The module allows reporting on events with specific action types. Replace[ACTION_TYPE]with the appropriate action type from our list of actions.To improve Fraud Prevention, optionally pass the correlation ID, and claimed user ID and its type (for users that haven't authenticated yet).
To report precise device location, add
locationConfigto the call (the user has to consent to sharing location in advance, see Track geolocation).customAttributesis an optional object that adds context to an action but must match the schema defined in the Portal. Invalid attributes are ignored (see Custom attributes).
import { triggerAction, setAuthenticatedUser, clearUser, TSAction, TSClaimedUserIdType } from 'react-native-ts-accountprotection';

private handleTriggerActionLoginExample = async () => {
  const triggerActionResponse = await triggerAction(
    TSAction.login,
    {
      correlationId: "CORRELATION_ID",
      claimedUserId: "91e25bea0c...", // hashed email
      claimedUserIdType: TSClaimedUserIdType.email,
      referenceUserId: "REFERENCE_USER_ID",
      transactionData: undefined
    },
    { // locationConfig (optional)
      mode: "default" // Options: "disabled", "default", "forceCurrent", "forceLastKnown", "lastKnown"
    },
    { // customAttributes (optional)
      userLevel: "premium"
    }
  )
  const actionToken = triggerActionResponse.actionToken;
  console.log("Action Token: ", actionToken);
}setAuthenticatedUser()sets the user context for all subsequent events for the session (or until the user is explicitly cleared). It should be called only after you've fully authenticated the user (including, for example, any 2FA that was required). For the complete list of action types, see our recommendations page.await setAuthenticatedUser(username);clearUser()clears the user context for all subsequent events in the mobile session. The user gets automatically cleared once the session expires or in case of a login action.await clearUser();getSessionToken()returns a session token needed for triggering events from the backend.import { getSessionToken } from 'react-native-ts-accountprotection'; const sessionToken = await getSessionToken();
You can fetch recommendations for the reported action using the Recommendation API. This is the same API that's also used for mobile integrations.
Mosaic APIs are authorized using an OAuth access token so you'll need to fetch a token using your client credentials (from Step 1). To do this, send the following request:
  const resp = await fetch(
    `https://api.transmitsecurity.io/oidc/token`,
    {
      method: 'POST',
      headers: {
        'Content-Type': 'application/x-www-form-urlencoded'
      },
      body: new URLSearchParams({
        grant_type: 'client_credentials',
        client_id: '[CLIENT_ID]',
        client_secret: '[CLIENT_SECRET]'
      })
    }
  );
  const { access_token } = await resp.json();
From your backend, invoke the Recommendation API by sending a request like the one below. The [ACCESS_TOKEN] is the authorization token you obtained using your client credentials and [ACTION_TOKEN] is the actionToken received in Step 6.
const query = new URLSearchParams({
  action_token: '[ACTION_TOKEN]',
}).toString();

const resp = await fetch(
  `https://api.transmitsecurity.io/risk/v1/recommendation?${query}`,
  {
    method: 'GET',
    headers: {
      Authorization: 'Bearer [ACCESS_TOKEN]',
    },
  }
);