In this tutorial, learn to integrate Azure Active Directory B2C (Azure AD B2C) authentication with Mosaic's Fraud Prevention. Mosaic allows you to detect risk in customer interactions on digital channels, and to enable informed identity and trust decisions across the consumer experience.
A Mosaic Fraud Prevention integration includes the following components:
- Azure AD B2C tenant: Authenticates the user and hosts a script that collects device telemetry as users execute a target policy. It blocks or challenges sign-in/up attempts based on the risk recommendation returned by Mosaic.
- Custom UI templates: Customizes HTML content of the pages rendered by Azure AD B2C. These pages include the JavaScript snippets required for Mosaic risk detection.
- Mosaic data collection service: Dynamically embedded script that logs device telemetry, which is used to continuously assess risk during user interactions.
- Mosaic Fraud Prevention API endpoint: Provides the risk recommendation based on collected data. Azure AD B2C communicates with this endpoint using a REST API connector.
- Azure Functions: Your hosted API endpoint that's used to obtain a recommendation from the Mosaic Fraud Prevention API endpoint via the API connector.
The following architecture diagram illustrates the implementation described in the guide:
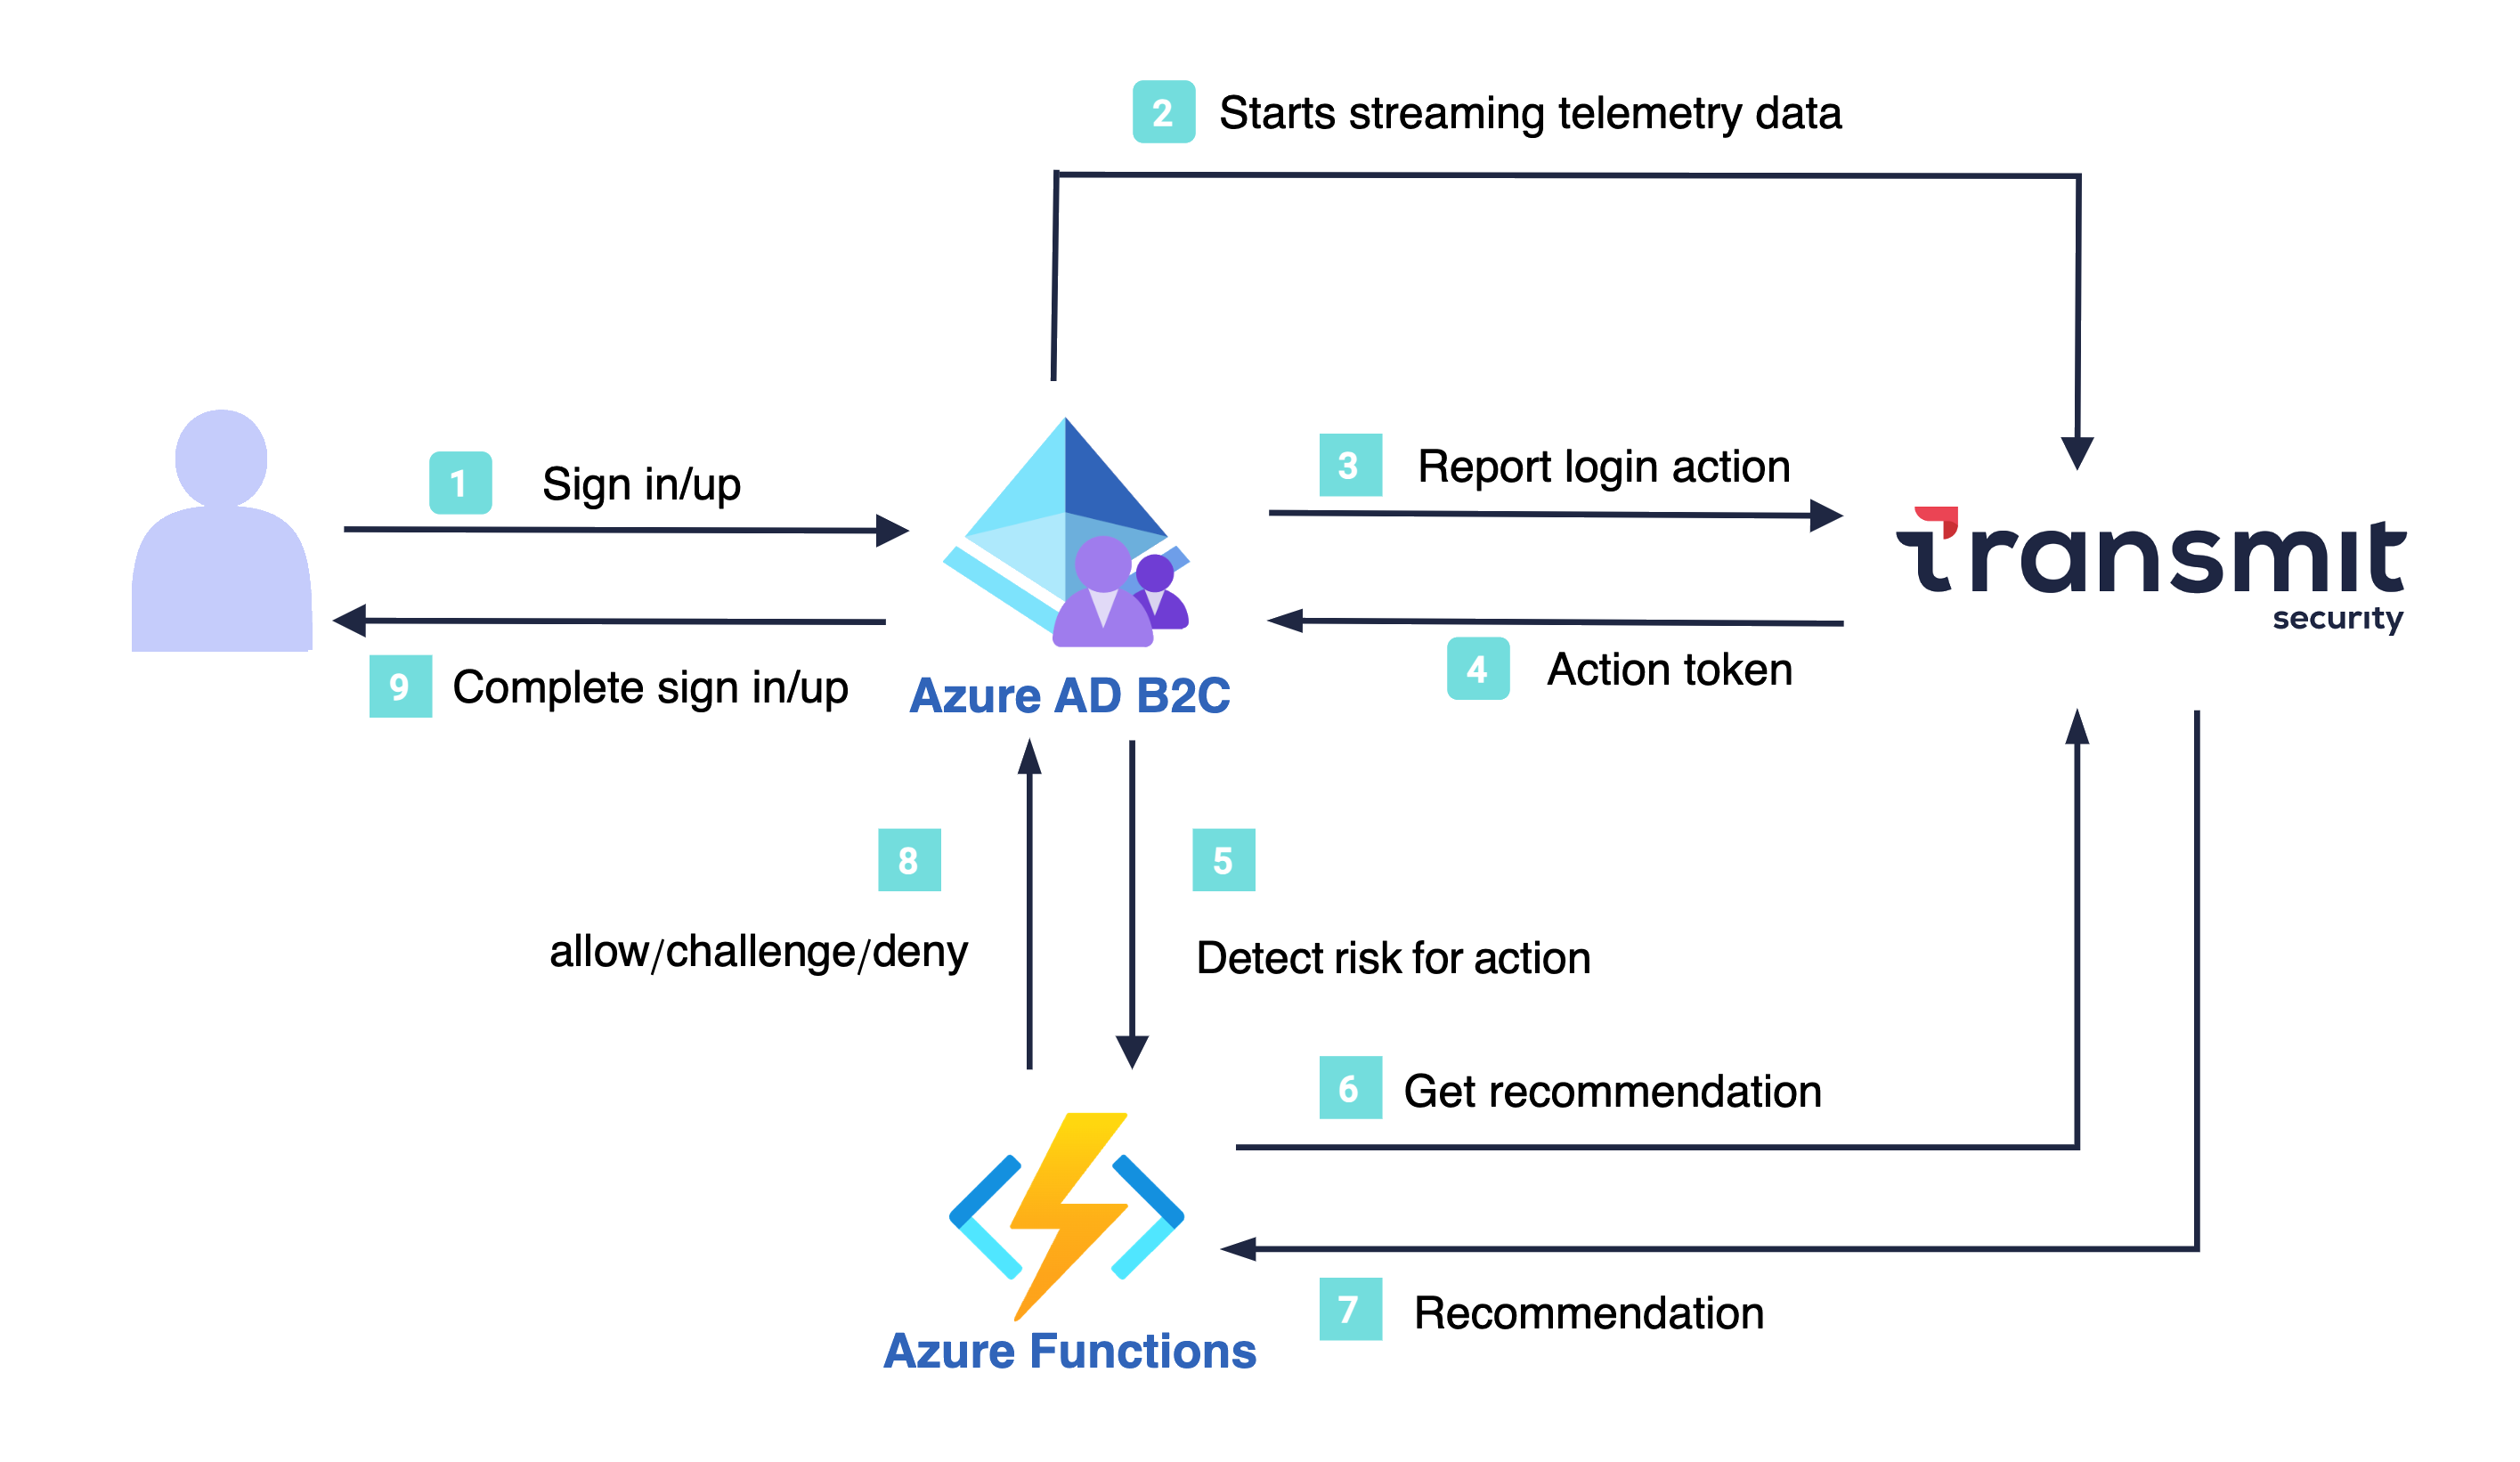
- The user opens the Azure AD B2C sign-in page.
- The page initializes the Mosaic SDK, which starts streaming device telemetry to Mosaic.
- Azure AD B2C reports a login action event to Mosaic in order to obtain an action token.
- Mosaic returns an action token, and Azure AD B2C proceeds with the user sign in/up.
- After authenticating the user, Azure AD B2C requests a risk recommendation from Mosaic via Azure Functions.
- The Azure Function sends Mosaic the recommendation request with the action token.
- Mosaic returns a recommendation (challenge/allow/deny) based on the collected device telemetry.
- The Azure Function passes the recommendation result to Azure AD B2C to handle accordingly.
- Azure AD B2C performs additional steps if needed (e.g., MFA) and completes the sign-in/up flow.
To get started, you need:
- A Microsoft Entra subscription. If you don't have one, get a free account
- An Azure AD B2C tenant linked to the Entra subscription
- A registered web application in your Azure AD B2C tenant
- Azure AD B2C custom policies
- A Mosaic tenant. Go to transmitsecurity.com
Sign in to the Mosaic Admin Portal and create an application:
From Applications, select Add application.
Configure the application with the following attributes:
Property Description Application name Application name Client Add a new OIDC client. Redirect URIs Enter your website URL. This is a required field but not used for this flow Select Add.
Record Client ID and Client Secret values to use later.
Start by integrating Mosaic Fraud Prevention into the B2C frontend application. This involves creating a custom sign-in page that integrates the Mosaic SDK, and will replace the default Azure AD B2C UI. Once activated, Mosaic Fraud Prevention starts collecting telemetry data for the user interacting with your app. Mosaic Fraud Prevention returns an action token that Azure AD B2C will need to get a risk recommendation.
- Prepare a custom HTML file for your sign-in page based on the sample templates and a separate file with JavaScript code.
Azure AD B2C does not allow executing inline scripts. You must place the JavaScript code in a separate file and reference it from your HTML. Use a MutationObserver to detect when B2C injects elements into the DOM, as recommended by Microsoft.
Add the following to your custom HTML file to load the SDK and your custom script.
    <!-- Loads Fraud Prevention SDK -->
    <script src="https://platform-websdk.transmitsecurity.io/platform-websdk/2.x/ts-platform-websdk.js" defer></script>

    <!-- Loads custom Mosaic initialization script (host this file alongside your HTML) -->
    <script src="https://[YOUR_STORAGE_ACCOUNT].blob.core.windows.net/[CONTAINER]/mosaic-drs.js" defer></script>
Create a separate JavaScript file (mosaic-drs.js) with the following code. The action token should be stored in a hidden HTML element (ts-drs-response in our example).
// Triggers an action event and obtains an action token
async function fill_token() {
    const actionResponse = await window.tsPlatform.drs.triggerActionEvent("login");
    const actionToken = actionResponse.actionToken;
    document.getElementById("ts-drs-response").value = actionToken;
    console.log(actionToken);
}

// Uses MutationObserver to detect when B2C injects elements into the DOM
const observer = new MutationObserver(function (mutations, obs) {
    const tokenElement = document.getElementById("ts-drs-response");
    if (tokenElement && window.tsPlatform) {
        obs.disconnect(); // Stop observing once element is found

        // Client ID found in the app settings in Mosaic Admin Portal
        window.tsPlatform.initialize({
            clientId: "[clientId]",
            drs: {
                serverPath: "https://api.transmitsecurity.io/risk-collect/", // Required: Set serverPath based on your region or custom domain
            },
        });
        console.log("Mosaic platform initialized");
        fill_token();
    }
});

// Start observing the document body for changes
observer.observe(document.body, {
    childList: true,
    subtree: true
});
Enable JavaScript and page layout versions in Azure AD B2C.
Host the HTML page on a Cross-Origin Resource Sharing (CORS) enabled web endpoint by creating a storage account and adding CORS support for Azure Storage.
Azure AD B2C can obtain a risk recommendation from Mosaic using a REST API connector. Passing this request through an intermediate web API (such as using Azure Functions) provides more flexibility in your implementation logic. This step creates an Azure function that uses the action token from the frontend application to get a recommendation from the Mosaic Fraud Prevention endpoint.
- Create the entry point of your Azure Function, an HTTP-triggered function that processes incoming HTTP requests.
public static async Task<HttpResponseMessage> Run(HttpRequest req, ILogger log)
{
    // Function code goes here
}- Extract the action token from the request. Your custom policy will define whether it's passed in the query or body.
// Checks for the action token in the query string
string actionToken = req.Query["actiontoken"];

// Checks for the action token in the request body
string requestBody = await new StreamReader(req.Body).ReadToEndAsync();
dynamic data = JsonConvert.DeserializeObject(requestBody);
actionToken = actionToken ?? data?.actiontoken;- Validate the action token by checking that the provided value isn't empty or null:
// Returns an error response if the action token is missing
if (string.IsNullOrEmpty(actionToken))
   {
       var respContent = new { version = "1.0.0", status = (int)HttpStatusCode.BadRequest, userMessage = "Invalid or missing action token" };
       var json = JsonConvert.SerializeObject(respContent);
       log.LogInformation(json);
       return new HttpResponseMessage(HttpStatusCode.BadRequest)
       {
           Content = new StringContent(json, Encoding.UTF8, "application/json")
       };
   }
- Call the Mosaic Fraud Prevention API. The Mosaic Client ID and Client Secret obtained in Step 1 should be used to generate bearer tokens for API authorization. Make sure to add the necessary environment variables (like ClientId and ClientSecret) in your
local.settings.jsonfile.
HttpClient client = new HttpClient();
client.DefaultRequestHeaders.Add("Authorization", $"Bearer {transmitSecurityApiKey}");

// Add code here that sends this GET request:
// https://api.transmitsecurity.io/risk/v1/recommendation?action_token=[YOUR_ACTION_TOKEN]

HttpResponseMessage response = await client.GetAsync(urlWithActionToken);- Process the API response. The code below forwards the API response if successful; otherwise, handles any errors.
 if (response.IsSuccessStatusCode)
   {
       log.LogInformation(responseContent);
       return new HttpResponseMessage(HttpStatusCode.OK)
       {
           Content = new StringContent(responseContent, Encoding.UTF8, "application/json")
       };
   }
   else
   {
       var errorContent = new { version = "1.0.0", status = (int)response.StatusCode, userMessage = "Error calling Mosaic API" };
       var json = JsonConvert.SerializeObject(errorContent);
       log.LogError(json);
       return new HttpResponseMessage(response.StatusCode)
       {
           Content = new StringContent(json, Encoding.UTF8, "application/json")
       };
}You can incorporate Mosaic Fraud Prevention into your Azure B2C application by extending your custom policies.
Download the custom policy starter pack to get started (see Create custom policies in Azure AD B2C)
Create a new file that inherits from TrustFrameworkExtensions, which will extend the base policy with tenant-specific customizations for Mosaic Fraud Prevention.
  <BasePolicy>
    <TenantId>YOUR AZURE TENANT</TenantId>
    <PolicyId>B2C_1A_TrustFrameworkExtensions</PolicyId>
  </BasePolicy>
- In the
BuildingBlockssection, defineactiontoken,ts-drs-response, andts-drs-recommendationas claims:
  <BuildingBlocks>
    <ClaimsSchema>
      <ClaimType Id="ts-drs-response">
        <DisplayName>ts-drs-response</DisplayName>
        <DataType>string</DataType>
        <UserHelpText>Parameter provided to the Fraud Prevention for the response</UserHelpText>
        <UserInputType>TextBox</UserInputType>
      </ClaimType>
      <ClaimType Id="actiontoken">
        <DisplayName>actiontoken</DisplayName>
        <DataType>string</DataType>
        <UserHelpText />
        <UserInputType>TextBox</UserInputType>
      </ClaimType>
      <ClaimType Id="ts-drs-recommendation">
        <DisplayName>recommendation</DisplayName>
        <DataType>string</DataType>
        <UserHelpText />
        <UserInputType>TextBox</UserInputType>
      </ClaimType>
    </ClaimsSchema>
<BuildingBlocks>- In the
BuildingBlockssection, add a reference to your custom UI:
  <BuildingBlocks>
    <ClaimsSchema>
      <!-- your claim schemas-->
    </ClaimsSchema>

    <ContentDefinitions>
      <ContentDefinition Id="api.selfasserted">
      <!-- URL of your hosted custom HTML file-->
        <LoadUri>YOUR_SIGNIN_PAGE_URL</LoadUri>
      </ContentDefinition>
    </ContentDefinitions>
</BuildingBlocks>- In the
ClaimsProviderssection, configure a claims provider that includes the following technical profiles: one (SelfAsserted-LocalAccountSignin-Email) that outputs the action token, and another (login-DRSCheckin our example) for the Azure function that receives the action token as input and outputs the risk recommendation.
  <ClaimsProviders>
    <ClaimsProvider>
      <DisplayName>Sign in using Fraud Prevention</DisplayName>
      <TechnicalProfiles>
        <TechnicalProfile Id="SelfAsserted-LocalAccountSignin-Email">
          <DisplayName>Local Account Signin</DisplayName>
          <Protocol Name="Proprietary" Handler="Web.TPEngine.Providers.SelfAssertedAttributeProvider, Web.TPEngine, Version=1.0.0.0, Culture=neutral, PublicKeyToken=null" />
          <Metadata>
            <Item Key="SignUpTarget">SignUpWithLogonEmailExchange</Item>
            <Item Key="setting.operatingMode">Email</Item>
            <Item Key="setting.showSignupLink">true</Item>
            <Item Key="setting.showCancelButton">false</Item>
            <Item Key="ContentDefinitionReferenceId">api.selfasserted</Item>
            <Item Key="language.button_continue">Sign In</Item>
          </Metadata>
          <IncludeInSso>false</IncludeInSso>
          <InputClaims>
            <InputClaim ClaimTypeReferenceId="signInName" />
          </InputClaims>
          <OutputClaims>
            <OutputClaim ClaimTypeReferenceId="signInName" Required="true" />
            <OutputClaim ClaimTypeReferenceId="password" Required="true" />
            <OutputClaim ClaimTypeReferenceId="objectId" />
            <OutputClaim ClaimTypeReferenceId="authenticationSource" />
            <!-- Outputs the action token value provided by the frontend-->
            <OutputClaim ClaimTypeReferenceId="ts-drs-response" />
          </OutputClaims>
          <ValidationTechnicalProfiles>
            <ValidationTechnicalProfile ReferenceId="login-DRSCheck" />
            <ValidationTechnicalProfile ReferenceId="login-NonInteractive" />
          </ValidationTechnicalProfiles>
        </TechnicalProfile>
        <TechnicalProfile Id="login-DRSCheck">
          <DisplayName>Fraud Prevention checks to validate the interaction and device </DisplayName>
          <Protocol Name="Proprietary" Handler="Web.TPEngine.Providers.RestfulProvider, Web.TPEngine, Version=1.0.0.0, Culture=neutral, PublicKeyToken=null" />
          <Metadata>
            <!-- Azure Function App -->
            <Item Key="ServiceUrl">YOUR_FUNCTION_URL</Item>
            <Item Key="AuthenticationType">None</Item>
            <Item Key="SendClaimsIn">Body</Item>
            <!-- JSON, Form, Header, and Query String formats supported -->
            <Item Key="ClaimsFormat">Body</Item>
            <!-- Defines format to expect claims returning to B2C -->
            <!-- REMOVE the following line in production environments -->
            <Item Key="AllowInsecureAuthInProduction">true</Item>
          </Metadata>
          <InputClaims>
            <!-- Receives the action token value as input -->
            <InputClaim ClaimTypeReferenceId="ts-drs-response" PartnerClaimType="actiontoken" DefaultValue="0" />
          </InputClaims>
          <OutputClaims>
            <!-- Outputs the risk recommendation value returned by Mosaic (via the Azure function) -->
            <OutputClaim ClaimTypeReferenceId="ts-drs-recommendation" PartnerClaimType="recommendation.type" />
          </OutputClaims>
        </TechnicalProfile>
      </TechnicalProfiles>
    </ClaimsProvider>
</ClaimsProviders>- In the
UserJourneyssection, create a new user journey (SignInDRSin our example) that identifies the user and performs the appropriate identity protection steps based on the Mosaic risk recommendation. For example, the journey can proceed normally if Mosaic returns 'allow' or 'trust', terminate and inform the user of the issue if 'deny', or trigger a step-up authentication process if 'challenge'.
  <UserJourneys>
    <UserJourney Id="SignInDRS">
      <OrchestrationSteps>
        <!-- Step that identifies the user by email and stores the action token -->
        <OrchestrationStep Order="1" Type="CombinedSignInAndSignUp" ContentDefinitionReferenceId="api.selfasserted">
          <ClaimsProviderSelections>
            <ClaimsProviderSelection ValidationClaimsExchangeId="LocalAccountSigninEmailExchange" />
          </ClaimsProviderSelections>
          <ClaimsExchanges>
            <ClaimsExchange Id="LocalAccountSigninEmailExchange" TechnicalProfileReferenceId="SelfAsserted-LocalAccountSignin-Email" />
          </ClaimsExchanges>
        </OrchestrationStep>

        <!-- Step to perform Fraud Prevention check -->
        <OrchestrationStep Order="2" Type="ClaimsExchange">
          <ClaimsExchanges>
            <ClaimsExchange Id="DRSCheckExchange" TechnicalProfileReferenceId="login-DRSCheck" />
          </ClaimsExchanges>
        </OrchestrationStep>

        <!-- Conditional step for ALLOW or TRUST -->
        <OrchestrationStep Order="3" Type="ClaimsExchange">
          <Preconditions>
            <Precondition Type="ClaimEquals" ExecuteActionsIf="false">
              <Value>ts-drs-recommendation</Value>
              <Value>ALLOW</Value>
              <Value>TRUST</Value>
              <Action>SkipThisOrchestrationStep</Action>
            </Precondition>
          </Preconditions>
          <!-- Define the ClaimsExchange or other actions for ALLOW or TRUST -->
        </OrchestrationStep>

        <!-- Conditional step for CHALLENGE -->
        <OrchestrationStep Order="4" Type="ClaimsExchange">
          <Preconditions>
            <Precondition Type="ClaimEquals" ExecuteActionsIf="false">
              <Value>ts-drs-recommendation</Value>
              <Value>CHALLENGE</Value>
              <Action>SkipThisOrchestrationStep</Action>
            </Precondition>
          </Preconditions>
          <!-- Define the ClaimsExchange or other actions for CHALLENGE -->
        </OrchestrationStep>

        <!-- Conditional step for DENY -->
        <OrchestrationStep Order="5" Type="ClaimsExchange">
          <Preconditions>
            <Precondition Type="ClaimEquals" ExecuteActionsIf="false">
              <Value>ts-drs-recommendation</Value>
              <Value>DENY</Value>
              <Action>SkipThisOrchestrationStep</Action>
            </Precondition>
          </Preconditions>
          <!-- Define the ClaimsExchange or other actions for DENY -->
        </OrchestrationStep>
    </UserJourney>
  </UserJourneys>
Save the policy file as
DRSTrustFrameworkExtensions.xml.Create a new file that inherits from the file you just saved. It will extend the SignIn policy that works as an entry point for the Signin and Signup user journeys with Mosaic Fraud Prevention.
  <BasePolicy>
    <TenantId>YOUR AZURE TENANT</TenantId>
    <PolicyId>B2C_1A_DRSTrustFrameworkExtensions</PolicyId>
</BasePolicy>- In the
RelyingPartysection, configure your Fraud Prevention-enhanced user journey (SignInDRSin our example).
  <RelyingParty>
    <DefaultUserJourney ReferenceId="SignInDRS" />
    <UserJourneyBehaviors>
      <ScriptExecution>Allow</ScriptExecution>
    </UserJourneyBehaviors>
    <TechnicalProfile Id="PolicyProfile">
      <DisplayName>PolicyProfile</DisplayName>
      <Protocol Name="OpenIdConnect" />
      <OutputClaims>
        <OutputClaim ClaimTypeReferenceId="displayName" />
        <OutputClaim ClaimTypeReferenceId="givenName" />
        <OutputClaim ClaimTypeReferenceId="surname" />
        <OutputClaim ClaimTypeReferenceId="email" />
        <OutputClaim ClaimTypeReferenceId="objectId" PartnerClaimType="sub" />
      </OutputClaims>
      <SubjectNamingInfo ClaimType="sub" />
    </TechnicalProfile>
  </RelyingParty>
- Save the policy file as
DRSSignIn.xml.
Using the directory with your Azure AD B2C tenant, upload the custom policy:
- Sign in to the Azure portal.
- In the portal toolbar, select Directories + subscriptions.
- On the Portal settings | Directories + subscriptions page, in the Directory name list, find the Azure AD B2C directory and then select Switch.
- Under Policies, select Identity Experience Framework.
- Select Upload Custom Policy, and then upload the updated custom policy files.
Using the directory with your Azure AD B2C tenant, test your custom policy:
- In the Azure AD B2C tenant, and under Policies, select Identity Experience Framework.
- Under Custom policies, select the Sign in policy.
- For Application, select the web application you registered.
- Select Run now.
- Complete the user flow.