# WebAuthn quick start: Web SDK (Older SDK)
Get started with WebAuthn APIs using our [WebAuthn SDK](/older-versions/guides/webauthn/overview). This describes how to quickly integrate WebAuthn registration and authentication into your application.
Note
This guide describes integrating using the older WebAuthn SDK. The new [Platform SDK](/sdk-ref/platform/introduction) offers all the same functionality and more. While the older SDK is still supported for existing integrations, new features will only be supported by the Platform SDK. [Return to the Platform SDK guide](/guides/webauthn/quick_start_sdk)
## Sample flows
Here are samples of some flows that implement WebAuthn biometric login using our [WebAuthn Web SDK](/sdk-ref/authnsdk/overview). These are simplified representations to help you get to know Mosaic APIs in context. There are many different ways to implement this and this is just an example.
* [New credential registration](#new-credential-registration)
* [Single device authentication](#single-device-authentication)
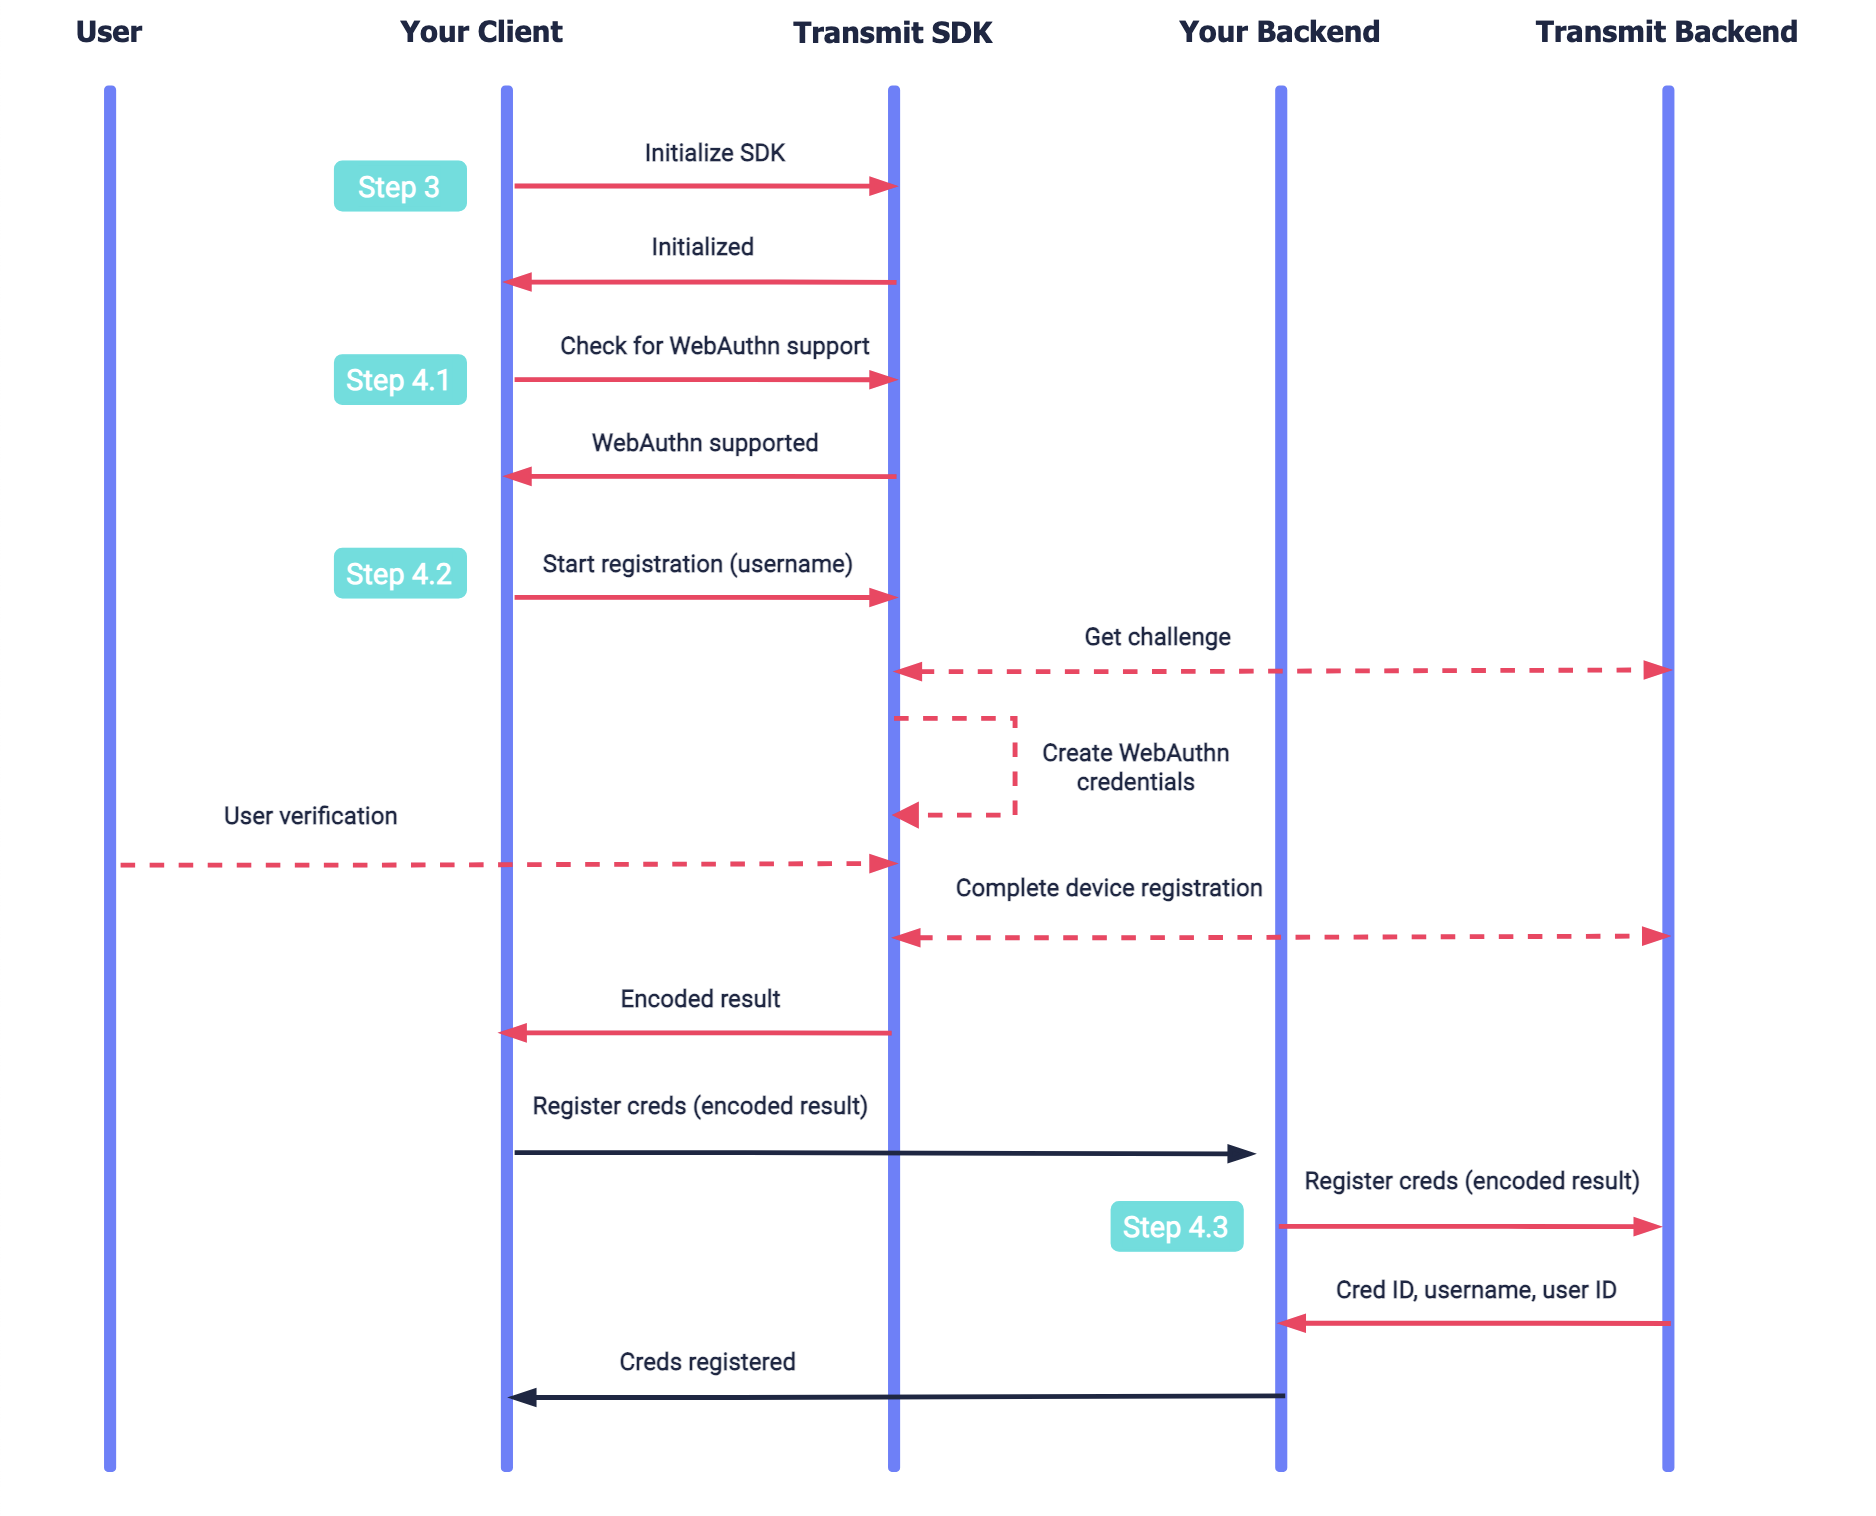
### New credential registration
This flow represents a user registering new WebAuthn credentials. Mosaic APIs are shown in pink along with the relevant integration steps.
After initializing the SDK, the client validates that the device supports WebAuthn. An authorized session is then created to establish a secure context for registration. For a better UX, the SDK prepares for registration by fetching the challenge from the Mosaic Server and storing it locally. Once the user is ready to register their credential, the SDK tells the browser to create credentials, which may require the user to verify (e.g., via TouchID). Once completed, an authorization code is returned to the client to exchange for user tokens via their backend. Once tokens are validated, the user's credential is registered and they're logged in.
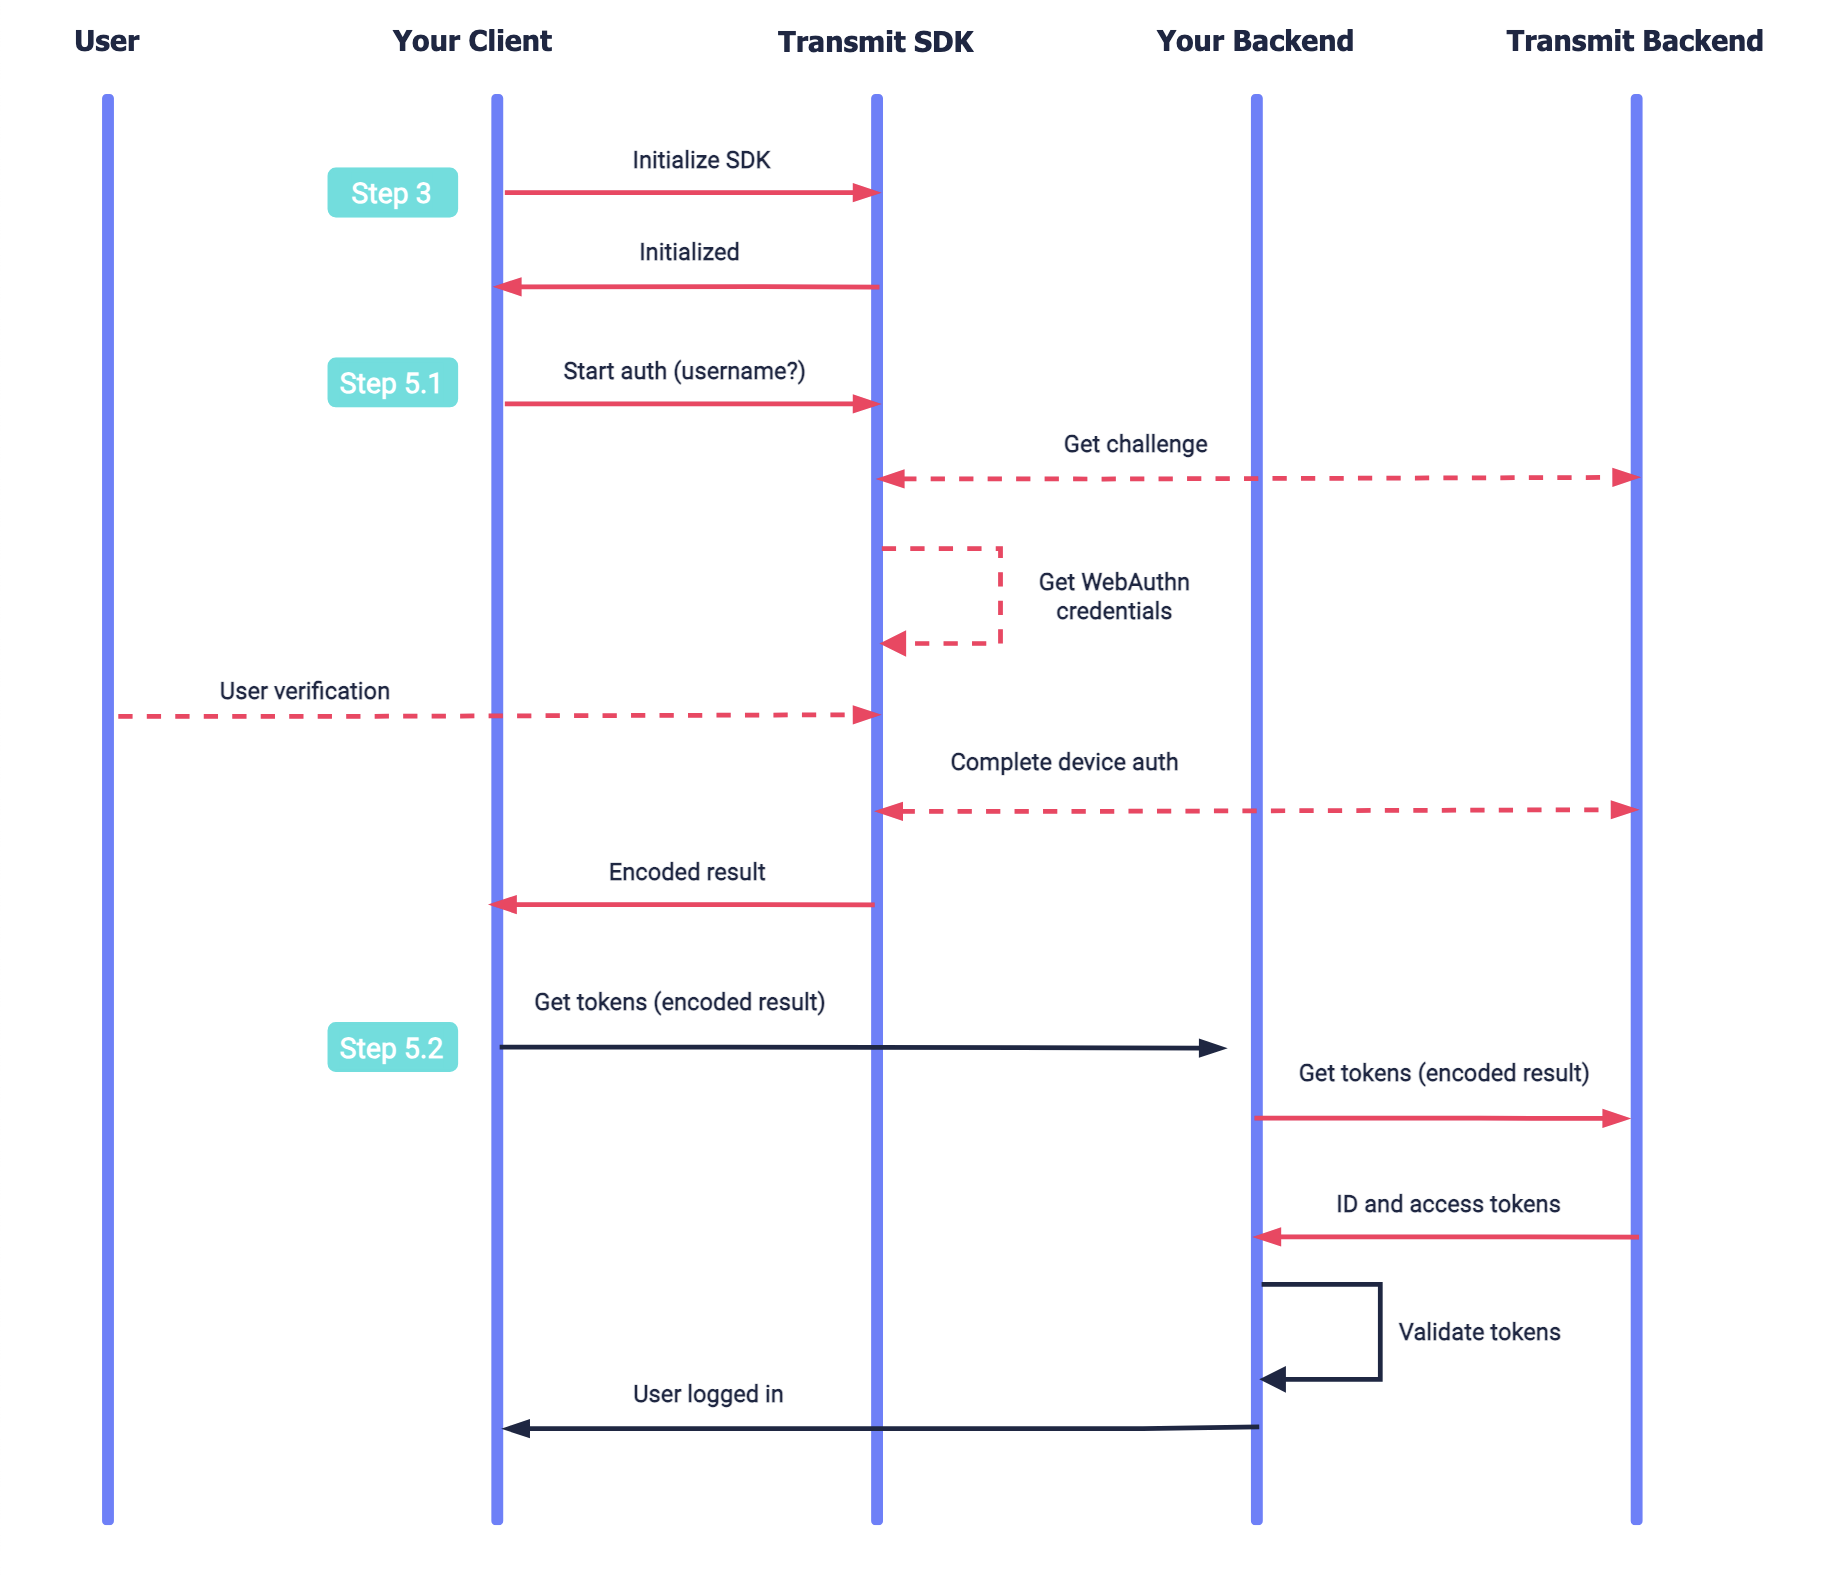
### Single device authentication
This flow represents an existing user authenticating using registered credentials which exist on the device, and assumes that you've collected the username before initiating authentication. Mosaic APIs are shown in pink along with the relevant integration steps.
The SDK is initialized. For a better UX, the SDK prepares for authentication by fetching the challenge from the Mosaic backend and storing it locally. Once the user is ready to authenticate, the SDK tells the browser to get credentials, which may require the user to verify (e.g., via TouchID). Once completed, an authorization code is returned to the client to exchange for user tokens. Your client backend exchanges the auth code for ID and access tokens. Once tokens are validated, the user is logged in.
## Step 1: Configure your app
To integrate with Mosaic, you'll need an application. From the [Applications](https://portal.transmitsecurity.io/applications) page, [create a new application](/guides/user/create_new_application) or use an existing one. The application settings provide client credentials that you'll need for API calls. These credentials are automatically generated when your application is created.
Note
- Redirect URI is required, although it's not used in the WebAuthn flow. If you're not using any other login method (which do require redirection), enter your website URL here instead. Use HTTPS (e.g., `https://login.example.com`), unless using a local environment (e.g., http://localhost).
- Enable [public sign-up](/guides/user/manage_apps#advanced-settings) if you manage users using an external system (e.g., external identity provider) or if you want to quickly test WebAuthn registration and authentication without first logging in using a different authentication method.
## Step 2: Configure auth method
From the [Authentication methods](https://portal.transmitsecurity.io/authentication/methods/webAuthN) page, configure the WebAuthn login method for your application:
- For **WebAuthn RP ID**, add your application's domain (e.g., `example.com`). This is the domain to which WebAuthn credentials are registered and used to authenticate.
- For **WebAuthn RP Origin**, add the web origin that will be used to request registration and authentication. The origin must match the domain of the RP ID, but may be a subdomain of the RP ID (e.g., `https://login.example.com`). The origin must also include the HTTPS scheme and port (if relevant).
TIP
For testing and development, configure the login method for your local environment by setting the RP ID to `localhost` and the RP origin to `http://localhost:(PORT)` (e.g., `http://localhost:1234`).
## Step 3: Initialize the SDK
You can install the [WebAuthn SDK](/older-versions/guides/webauthn/overview) by adding a script tag with the latest SDK to the relevant pages of your application:
```html
```
Configure the SDK by calling the [`init()`](/older-versions/guides/webauthn/webauthnsdk#init) SDK method, passing the client ID obtained in Step 1. For example:
```js
await window.WebAuthnSdk.init('CLIENT_ID', {serverPath: "https://api.transmitsecurity.io/cis"});
```
## Step 4: Register credentials
To implement a WebAuthn registration flow, you'll need to:
1. [Check that the device supports WebAuthn](#1-check-for-webauthn-support)
2. [Create a secure context for registration](#2-start-an-authorized-session)
3. [Prepare registration](#3-prepare-registration)
4. [Perform the credential registration](#4-complete-registration)
### 1. Check for WebAuthn support
Before initiating WebAuthn registration, use the [`isPlatformAuthenticatorSupported()`](/older-versions/guides/webauthn/webauthnsdk#isplatformauthenticatorsupported) SDK call to check if the device supports WebAuthn.
```js
const isBiometricsSupported = await window.WebAuthnSdk.isPlatformAuthenticatorSupported();
```
### 2. Start an authorized session
From your **backend**, create an authorized authentication session for the user in order to provide the secure context required for WebAuthn registration. To do this, send the [`/auth-session/start-with-authorization`](/openapi/user/auth-sessions.openapi/other/startauthorizedauthsession) request below from your client backend. The API returns the session ID of the created session, which you'll need for subsequent API calls.
In the request below, you should replace the following:
- `USERNAME` is a verified username, which should be a representation of the user in your system (such as their email, phone number, or another verifiable username known to the user like account ID).
- `TOKEN` is either a [client access token](/openapi/client_access_tokens) or a [user access token](/openapi/user_access_tokens) depending on your [login scenario](/guides/webauthn/basic_login_scenarios). To quickly test a basic WebAuthn integration (without implementing any additional login methods or the full logic required for your use case), make sure [public sign-up](/guides/user/manage_apps#advanced-settings) is enabled for your application and use a [client access token](/openapi/client_access_tokens).
```js
const basePath = 'v1';
const resp = await fetch(
`https://api.transmitsecurity.io/cis/v1/auth-session/start-with-authorization`,
{
method: 'POST',
headers: {
'Content-Type': 'application/json',
Authorization: 'Bearer TOKEN' // Type of token depends on the use case, as explained above
},
body: JSON.stringify({
username: 'USERNAME'
})
}
);
const data = await resp.json();
console.log(data);
```
### 3. Prepare registration
Optional
Check if there are users who have already registered biometrics or authenticated with this device. Call the [`getDeviceUsers()`](/older-versions/guides/webauthn/webauthnsdk#getdeviceusers) SDK method. It returns a promise that resolves to an array containing usernames or an empty array in case there are no device users or the browser local storage was cleared (e.g., the incognito mode is on).
As soon as the username is known, call the [`prepareWebauthnRegistration()`](/older-versions/guides/webauthn/webauthnsdk#preparewebauthnregistration) SDK call as shown below. Pass the username, an optional display name for the user account, as well as the session ID returned upon session creation.
```js
await window.WebAuthnSdk.prepareWebauthnRegistration('USERNAME', 'DISPLAY_NAME', 'SESSION_ID');
```
### 4. Complete registration
When the user is ready to proceed to device registration (and only after calling `prepareWebauthnRegistration()`), call the [`executeWebAuthnRegistration()`](/older-versions/guides/webauthn/webauthnsdk#executewebauthnregistration) SDK method. This will prompt the user for biometrics. If successful, it returns a promise that resolves to the authorization code, which you'll exchange for a token via your backend in [step 6](#step-6-get-user-tokens).
```js
const authCode = await window.WebAuthnSdk.executeWebauthnRegistration();
```
## Step 5: Authenticate user
To implement a WebAuthn authentication flow, you'll need to:
1. [Prepare authentication](#1-prepare-authentication)
2. [Complete authentication](#2-complete-authentication)
### 1. Prepare authentication
When logging in users with registered devices, call the [`prepareWebauthnAuthentication()`](/older-versions/guides/webauthn/webauthnsdk#preparewebauthnauthentication) SDK call as soon as the username is known. For example:
```js
await window.WebAuthnSdk.prepareWebauthnAuthentication('USERNAME');
```
### 2. Complete authentication
When the user is ready to proceed to authentication (and only after calling `prepareWebauthnAuthentication()`), call the [`executeWebAuthnAuthentication()`](/older-versions/guides/webauthn/webauthnsdk#executewebauthnauthentication) SDK method. This will prompt the user for biometrics. If successful, this call returns a promise that resolves to the authorization code, which you'll exchange for a token via your backend in [step 6](#step-6-get-user-tokens).
```js
const authCode = await window.WebAuthnSdk.executeWebauthnAuthentication();
```
## Step 6: Get user tokens
In response to each successful authentication or registration, an authorization code is returned to your client application (frontend). After sending this code to your backend, exchange it for an ID and access token by sending a [`/oidc/token`](/openapi/user/oidc.openapi/other/oidctoken) request like the one below from your **backend** . Pass your client credentials, along with the authorization code returned by the SDK upon successfully completing authentication or registration.
The user tokens will identify the user via `user_id`, and include any other alias you've verified and set for the user (such as `email` or `phone number`). These tokens should be validated as described [here](/guides/user/validate_tokens). For more, see the [Token Reference](/openapi/id_token_reference).
```js
var axios = require('axios');
var qs = require('qs');
var data = qs.stringify({
'grant_type': 'authorization_code',
'code': 'CODE',
'client_id': 'CLIENT_ID',
'client_secret': 'CLIENT_SECRET',
'redirect_uri': 'REDIRECT_URI'
});
var config = {
method: 'post',
url: 'https://api.transmitsecurity.io/oidc/token',
headers: {
'Content-Type': 'application/x-www-form-urlencoded'
},
data : data
};
axios(config)
.then(function (response) {
console.log(JSON.stringify(response.data));
})
.catch(function (error) {
console.log(error);
});
```
br
## Full code examples
Here's an example of a registration flow:
```html
Username
User display name
```
Here's an example of an authentication flow:
```html
Username
```
## Next steps
Once you've tested your basic WebAuthn integration, you can complete your implementation:
- See [Implement login scenarios](/guides/webauthn/basic_login_scenarios) for additional logic, like how to verify user identities before registering credentials.
- See [Add cross-device login](/older-versions/guides/webauthn/cross_device_flows) for implementing user flows that include multiple devices.
style
hr {
border: 2px solid #C6F5F5 !important;
}
section article ol li {
margin-top: 6px !important;
}