This integration is in early availability. The SDK files are provided in an onboarding package sent directly by Transmit Security. A public package or hosted distribution may be offered in the future.
Cloudflare Workers is a serverless computing platform that runs JavaScript code at the edge of Cloudflare’s global network. It allows you to build serverless APIs, dynamic websites, and real-time applications with high scalability.
By integrating with Cloudflare Workers, Mosaic can capture API requests and responses at the edge and forward them for threat detection and analysis. The Worker mirrors traffic asynchronously to Mosaic, so your backend remains unchanged and the end-user experience is not affected.
For example, a financial services app that exposes APIs for payments and account management can place a Cloudflare Worker in front of those APIs. Every request and response is then automatically sent to Mosaic for inspection, providing visibility into suspicious or fraudulent activity.
Before you begin:
- Your website domain is already onboarded to Cloudflare.
- Cloudflare Worker sub-requests are enabled (so the Worker can make outbound calls to Mosaic).
- Cloudflare DNS records are set to Proxy. If set to DNS Only, traffic bypasses Cloudflare (and Workers) and is not captured.
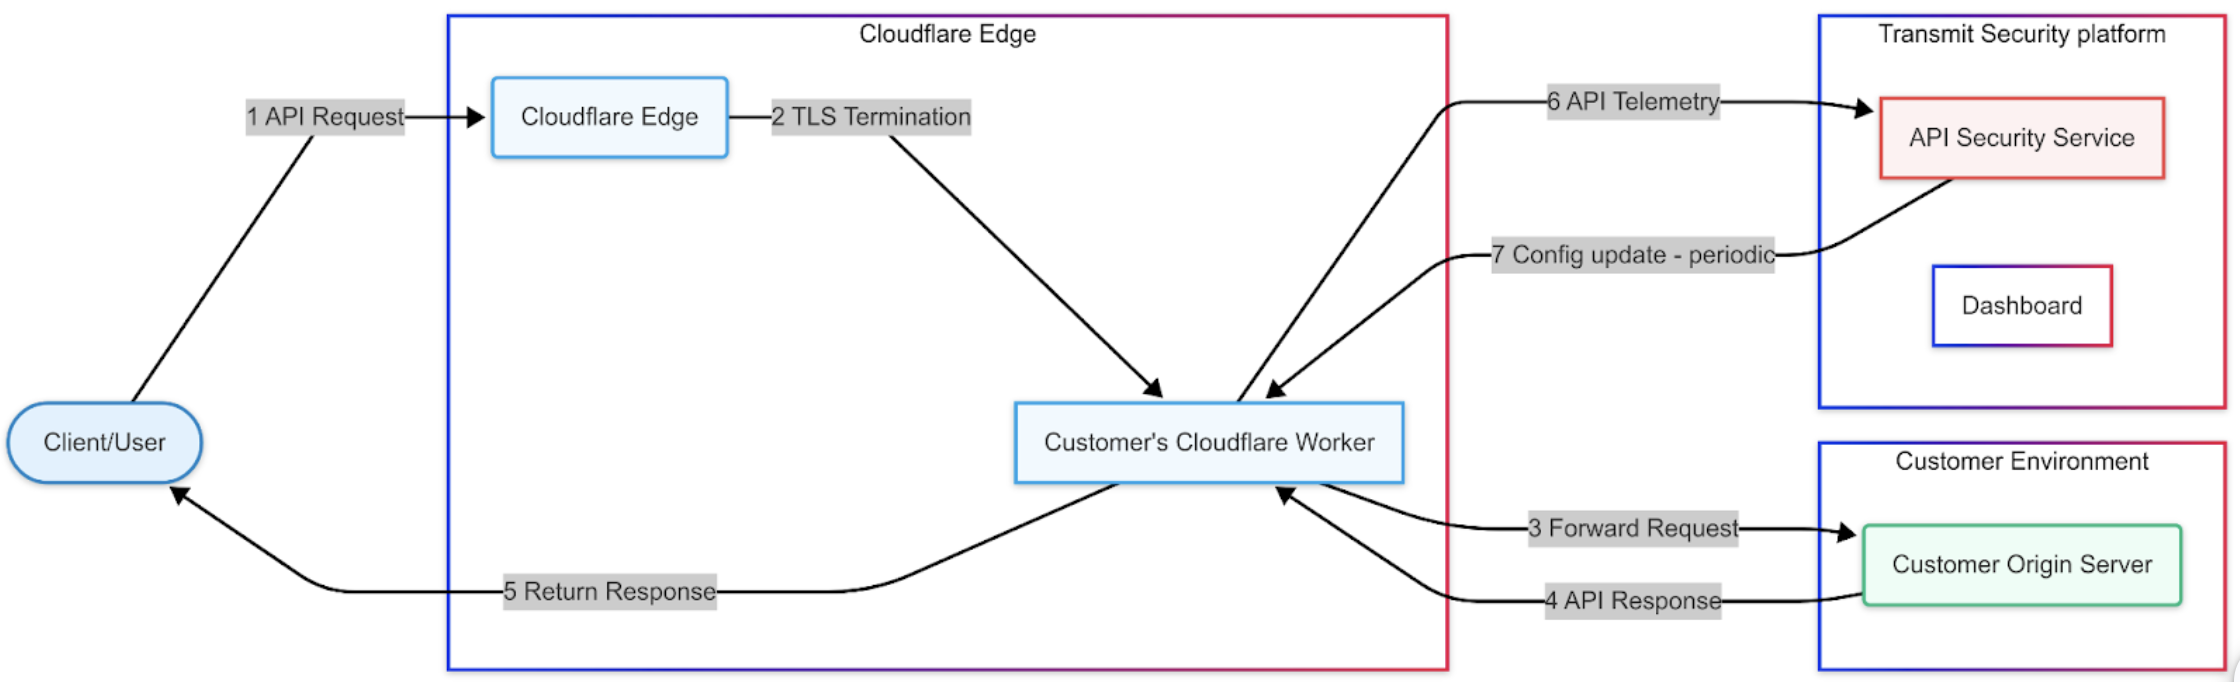
When a client sends an API request, it first lands on the Cloudflare Edge (1). At this layer, Cloudflare performs TLS termination before passing the request into the customer’s Cloudflare Worker (2). The Worker forwards the request upstream to the customer’s origin server and waits for the backend response (3).
Once the origin responds, the Worker captures the API response (4), prepares read-once clones of the request and response, and immediately returns the live response to the client so latency is not affected (5).
In parallel, the Worker processes the cloned request and response asynchronously with the Mosaic API Security SDK, sending telemetry to the Mosaic API Security Service for inspection and threat detection (6).
Finally, the API Security Service pushes periodic configuration updates back to the Worker, with monitoring and visibility available in the Dashboard (7).
Client credentials are used to identify your app and generate access tokens for authorizing Mosaic requests. To obtain them, you'll need to create an application in the Admin Portal (if you don’t have one yet).
From Applications, click Add application.
Add the friendly application name to display in the Admin Portal.
Add a client display name, and your website URL as a redirect URI (e.g.,
https://your-domain.com). These fields are required for all Mosaic apps, but won’t be used for Fraud Prevention.Click Add to create your application. This will automatically generate your client credentials.
This Worker service performs the following actions:
- intercepts every incoming HTTP request acting as a gateway before it reaches your origin server (for more, see Cloudflare Workers Overview),
- forwards the request to your origin server with
fetch(), - asynchronously sends request/response data to the API Security SDK for analysis. The SDK processes the cloned request and response using
ctx.waitUntil(...), - logs errors gracefully without blocking user traffic.
Here are the steps to configure the Worker:
In the Cloudflare dashboard, go to Compute > Workers & Pages.
On Start with Hello World! > click Get started, then enter a descriptive name for the Worker (e.g.,
api-security) and click Deploy.Go to the Workers & Pages overview. If the new Worker isn’t visible yet, wait a few seconds and refresh. Click the Worker name you just created.
In the Worker page, click on the Worker name to view its details and metrics. In the Worker view, click the
 Open editor icon in the top-right corner to open the online editor.
In the editor, click the
 Explorer icon in the toolbar on the left. You should see the default files:
package-lock.jsonworker.js
In the Explorer, add a new file named
sdk.js.Open
sdk.jsand replace its content with thesdk.jsfile you received from Transmit Security.NoteAlways use the exact
sdk.jsprovided by Transmit Security. Do not modify its content.The
worker.jsfile coordinates the connection to the SDK and the information stream:- It imports the SDK from
./sdk.jsand uses environment variables such asAPI_SECURITY_CLIENT_ID,API_SECURITY_BACKEND, and (optionally)API_SECURITY_LOG_LEVEL. - It forwards requests upstream with
fetch()and leveragesctx.waitUntil(...)to process telemetry asynchronously without delaying the user response.
ImportantIf you received a
worker.jsfile in the onboarding package from Transmit Security, paste that exact content into theworker.jsfile in Cloudflare and proceed directly to sub-step 9. If you did not receive aworker.jsfile, continue with the sub-steps below.To configure your own worker:
8.1 - Import the SDK:
import { ApiSecuritySDK } from './sdk.js';8.2 - Initialize the SDK using environment variables. These are configured in Step 3. Do not hard-code credentials or URLs.
const sdk = new ApiSecuritySDK({
clientId: env.API_SECURITY_CLIENT_ID,
backendUrl: env.API_SECURITY_BACKEND,
logLevel: env.API_SECURITY_LOG_LEVEL || 'info'
});
8.3 - Clone the incoming Request and Response before passing them to the SDK. This allows you to forward the response to the client and pass a copy to the SDK, preventing runtime errors and ensureing the worker behaves reliably in production.
const requestForSdk = request.clone();
const responseForSdk = response.clone();
8.4 - Process the API event asynchronously by wrapping the call in
ctx.waitUntil(...)so that telemetry processing does not delay the user’s response. Attach.then()and.catch()handlers directly toprocessApiEvent() to provide clear success and failure handling in one place, and prevent unhandled promise rejections that could break the worker.ctx.waitUntil( sdk.processApiEvent(requestForSdk, responseForSdk) .then(() => { console.log('WORKER: SDK processing completed successfully'); }) .catch(error => { console.warn('WORKER: SDK processing failed:', error.message); console.warn('WORKER: SDK error details:', error); }) );NoteIf the
worker.jsfile provided by Transmit Security includes additional fields (e.g.,backendUrl,logLevel), keep them exactly as provided. These values are read at runtime from the environment variables you configure later.// Cloudflare Worker with API Security SDK import { ApiSecuritySDK } from './sdk.js'; export default { async fetch(request, env, ctx) { const startTime = Date.now(); try { // Initialize SDK const sdk = new ApiSecuritySDK({ clientId: env.API_SECURITY_CLIENT_ID || 'zsKFyTytYtZL3R8hcvQQ7', backendUrl: env.API_SECURITY_BACKEND || 'https://apisec.riskid-dev.io', logLevel: 'info' // Force debug }); const requestForSdk = request.clone(); // Forward the request (transparent proxy) const response = await fetch(request); // Clone response for SDK const responseForSdk = response.clone(); // Process request and response in background with CLONED objects ctx.waitUntil( sdk.processApiEvent(requestForSdk, responseForSdk) .then(() => { console.log('WORKER: SDK processing completed successfully'); }) .catch(error => { console.warn('WORKER: SDK processing failed:', error.message); console.warn('WORKER: SDK error details:', error); }) ); // Log processing time const processingTime = Date.now() - startTime; console.log(`Request processed in ${processingTime}ms`); return response; } catch (error) { console.error('Worker error:', error); // Return error response return new Response(JSON.stringify({ error: 'Internal server error', timestamp: new Date().toISOString() }), { status: 500, headers: { 'Content-Type': 'application/json' } }); } } };- It imports the SDK from
Click Deploy to activate the Worker shell. You still need to configure environment variables (following step) before the Worker functions correctly.
Configure the environment variables required by the API Security SDK. In your Worker’s page, go to the Settings tab. Under Variables and Secrets, click Add variable and add the following variables:
API_SECURITY_CLIENT_ID
- Type: Secret
- Value: your Mosaic client ID
API_SECURITY_CLIENT_SECRET
- Type: Secret
- Value: your Mosaic client secret
API_SECURITY_BACKEND
- Type: Text
- Value:
https://api.transmitsecurity.io/apisec-collect
API_SECURITY_LOG_LEVEL
- Type: Text
- Value:
debug(optional, defaults toinfoif not set)
The Worker code expects these variables. Make sure their names match exactly.
A KV namespace in Cloudflare is a globally distributed key-value store used by Workers.
In this integration, the KV namespace is used to cache the configuration file received from Mosaic's backend. Without this cache, the Worker would request the configuration from Mosaic's backend on almost every event, adding latency and load.
- In the Cloudflare Dashboard, go to Workers & Pages > Storage & Databases.
- Create a new KV Namespace named
api-security-config. - Go back to your Worker’s Settings > Bindings.
- Click Add binding and select KV Namespace.
- Set the Variable name to
CONFIG_KV. - Select the
api-security-confignamespace you just created. - Click Add binding to save.
- In the Cloudflare Dashboard, select Websites.
- Choose the site where you want to enable the Worker.
- From the site’s overview, go to Worker Routes and click Add Route.
- Specify the route pattern, service, and environment, then click Save.
Common route patterns:
- Capture all sub-domains and paths:
*example.com/* - Capture traffic for a specific domain:
www.example.com/* - Capture traffic for a subset of paths:
example.com/some-path/*
After configuring the Worker code, environment variables, KV bindings, and routes,
go back to your Worker’s page in the Cloudflare Dashboard and click Save and Deploy.
This ensures all changes are active and the Worker is now fully functional with the API Security SDK integration.