Cross-device face authentication extends the standard face authentication flow to support scenarios where users begin the login process on a desktop or laptop but perform the biometric capture on a personal mobile device. This is especially useful for users who cannot access an internal enterprise mobile application—such as contractors, interview candidates, or external partners—and must authenticate using a personal phone instead.
This guide builds on the Face authentication guide. Make sure you are familiar with the base flow and requirements, have installed required SDKs, and have checked prerequisites before proceeding. This guide introduces modifications to the existing journeys to enable the cross-device capability.
Below are examples of registration and authentication flows.
Face registration relies on the Identity Verification and works the same way as in the base guide. If the user starts the flow in the web app, the hosted Identity Verification performs the handoff to mobile automatically.
Initiating a face authentication on a desktop:
When a user requests to log in from a desktop or laptop with face authentication as a second factor, the authentication journey detects that the client is running on a non-mobile device. Instead of requesting a selfie directly, the journey creates a cross-session message and displays a QR code on the desktop screen. The journey running on a desktop waits for the mobile journey to communicate back the result. Once received, the web journey processes the message from the mobile journey and continues.
Completing face authentication on mobile:
The user scans the QR code with their personal mobile device, which initiates a new instance of the journey. It detects the client and cross-session message, and performs the selfie capture. Once the selfie is acquired and validated on the mobile device, the result is communicated via the cross-session message.
Complete all prerequisite steps described in the Face authentication guide, including creating an application, installing SDKs, and implementing a login method for existing users.
The cross-device flow requires modifying the authentication journey from the base guide to detect the client platform and route the flow accordingly.
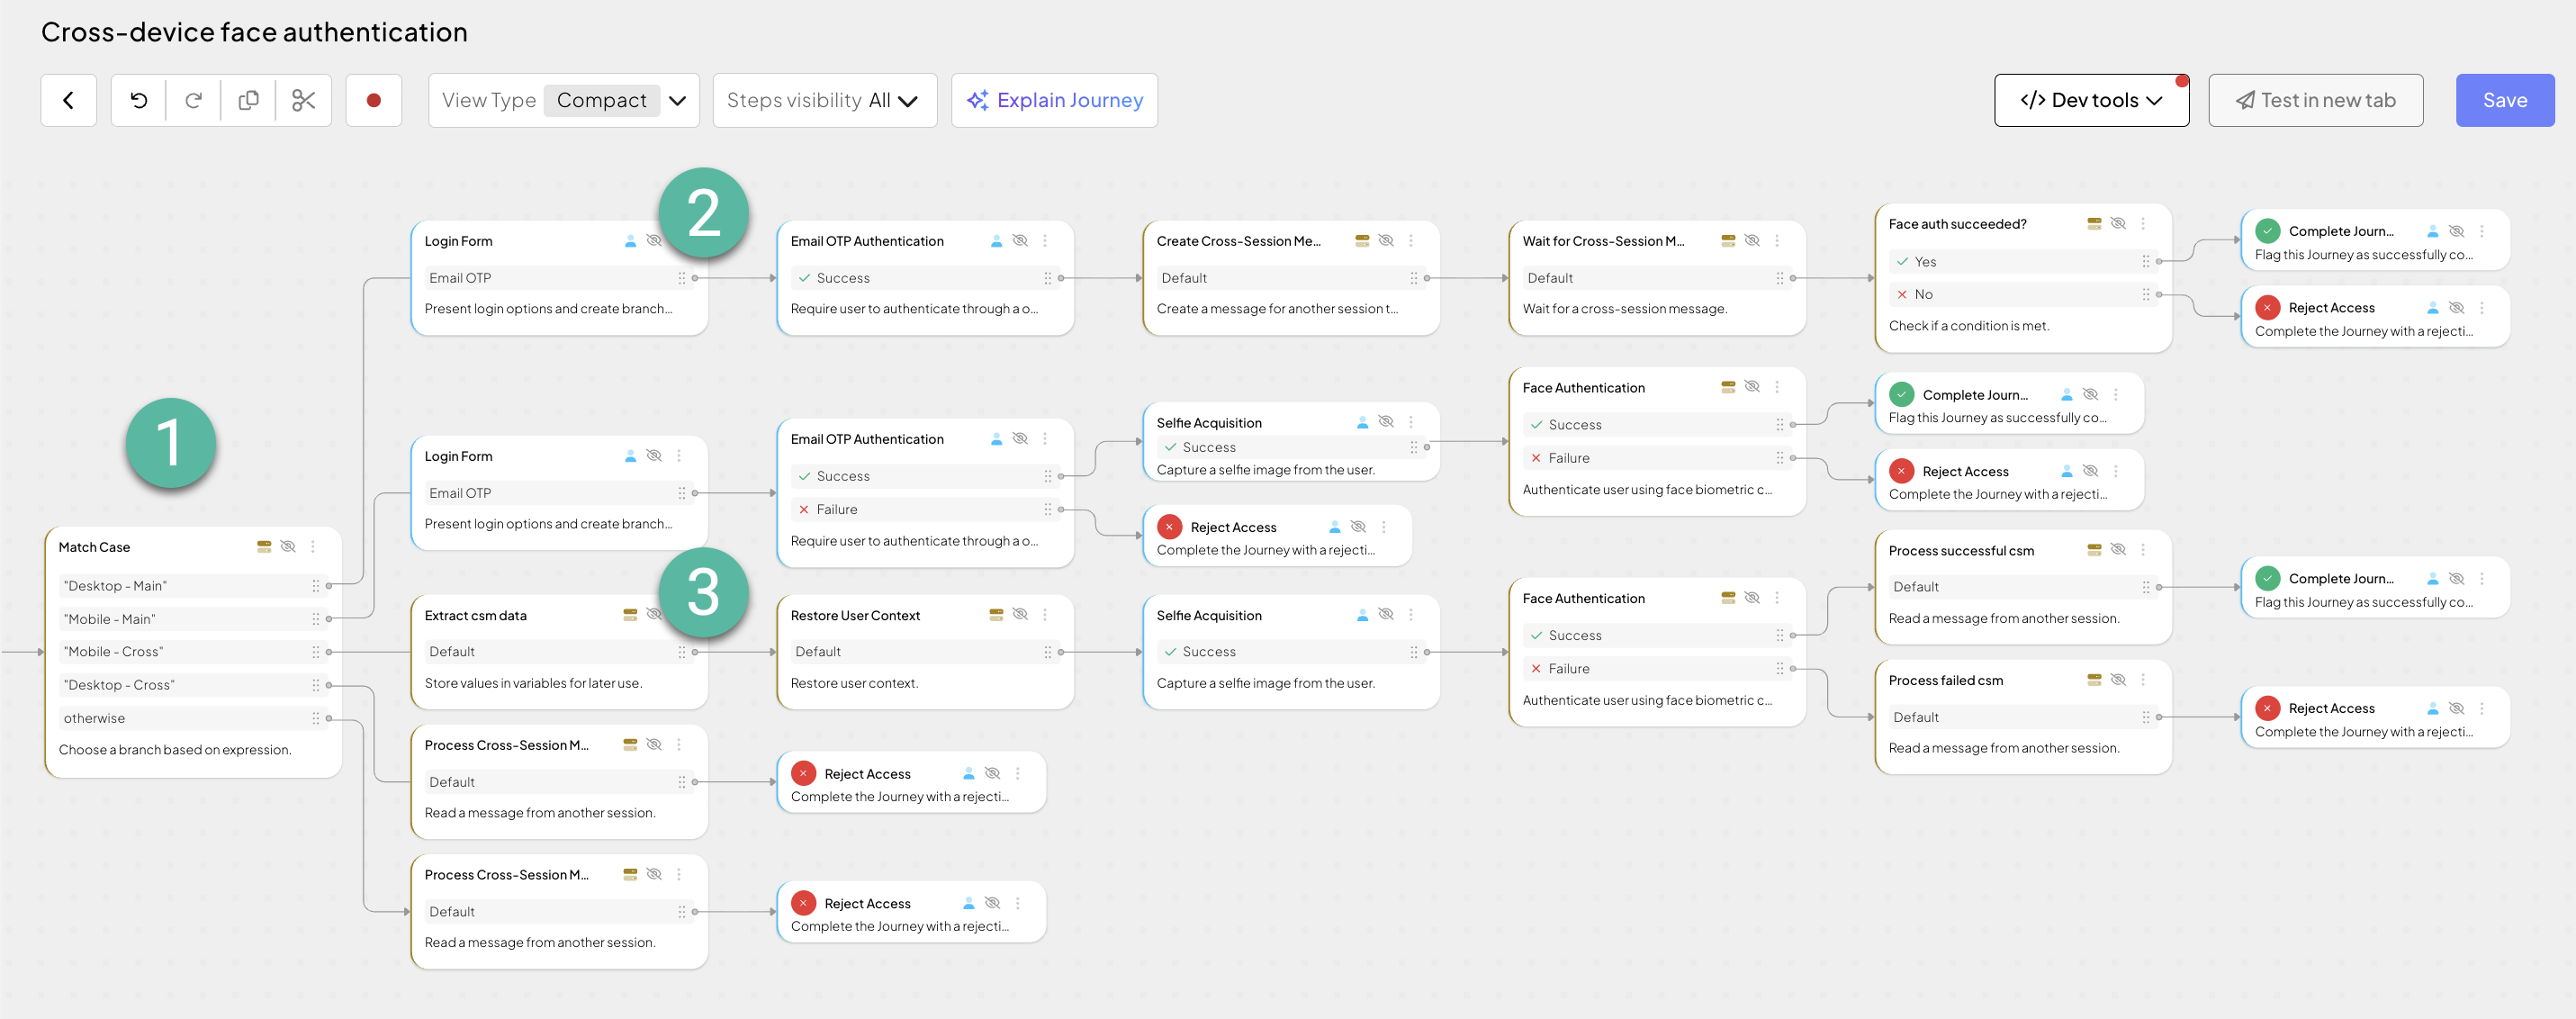
This is an example journey that represents a basic use case that uses face authentication as a second factor after email OTP. Adjust your journey as needed. The numbered callouts in the example journey above highlight the areas that differ from the basic use case and require configuration for cross-device face authentication.
Add the Match case step as an initial step in the journey. The source expression should detect whether the journey is running on a mobile or desktop device and whether a cross-session message is present before branching accordingly. For example, you can use the code below to evaluate the user agent and check for a cross-session message.
let userAgent = @policy.request().headers["user-agent"] return
let commonMobileKeys = ["Mobi","Android","iPhone","iPad","iPod","Windows Phone","Opera Mini","IEMobile"] return
let isMobile = @std.containsIf(commonMobileKeys, (item) => @strings.refind(userAgent,item)) return
let isCross = @policy.getInteractionParameters().interactionParams.claims.csm != null return
let result = isMobile ? (isCross ? "Mobile - Cross" : "Mobile - Main") : (isCross ? "Desktop - Cross" : "Desktop - Main")
return result
This routes the journey into one of the following branches:
| Branch | Description |
|---|---|
| Desktop - Main | The journey runs on a desktop without a cross-session context. This is the primary entry point: collects the user identifier and initiates the cross-device handoff. |
| Mobile - Main | The journey runs on a mobile device without a cross-session context. This is the primary entry point for the standard mobile face authentication (same as the base guide). |
| Mobile - Cross | The journey runs on a mobile device with a cross-session context. This is the branch triggered when the user scans the QR code—it performs the selfie capture and communicates the result back. |
| Desktop - Cross | Not a valid scenario. Routes to Reject access. |
| Otherwise | Fallback for unrecognized contexts. Routes to Reject access. |
This branch represents the primary entry point for the cross-device use case. The user starts the face authentication on the desktop, and the journey initiates the cross-device handoff to a mobile device. For example, it can include the following actions:

Login form and Email OTP authentication steps: Displays the login form and performs email OTP authentication as a first factor.
Create cross-session message step: Creates a cross-session message containing the user context so it can be shared with the mobile session. Configure the step as follows:
- Cross-session message request fields: add
user_contextfield with@policy.userContext()value - Output variable: set to
csm
- Cross-session message request fields: add
Wait for cross-session message step: Waits for the mobile device to process the cross-session message, displaying a QR code that the user scans with their phone. Configure the step as follows:
- Message id: set to
csm - Message id format: set to "Display as QR code"
- Message id display mode: set to "Display Custom Expression"
- Message id to display: set to expression below. Client ID can be found in your app settings in the Admin Portal. Redirect URL can be any page the client redirects to upon completion, such as SSO hosted domain URL or your custom domain. Base URL depends on your region or custom domain (api.transmitsecurity.io, api.sbx.transmitsecurity.io, etc.),
let clientId = "<YOUR_CLIENT_ID>" return let redirectUrl = `https://<YOUR_REDIRECT_URL>/cross-device-complete/?clientId=${clientId}` return let claims = @strings.tojson({csm: csm, id_token:{}}) return `https://<YOUR_BASE_URL>/cis/oidc/auth?client_id=${clientId}&redirect_uri=${@strings.urlEncode(redirectUrl)}&response_type=code&prompt=login&scope=openid&claims=${@strings.urlEncode(claims)}`- Message id: set to
Condition step: Once the mobile session completes, checks whether the face authentication succeeded.
Complete journey or Reject access steps: Depending on the result, successfully completes the journey or rejects access.
This branch runs on the mobile device after the user scans the QR code displayed on the desktop. It performs the selfie capture and face authentication, then communicates the result back to the desktop session. For example, it can include the following actions:

- Set temporary variables step: Extracts cross-session message values and sets temporary variables for use later in the flow. Configure this step as follows:
- Variable
csm: set to@policy.getInteractionParameters().interactionParams.claims.csm - Variable
original_user_context: set to@policy.readCrossSessionMessage(@policy.getInteractionParameters().interactionParams.claims.csm).user_params.user_context
- Variable
- Restore user context step: Restores the user context from the cross-session message so the journey can act on behalf of the authenticated user. Configure this step as follows:
- Saved user context: set to
original_user_context - If you expect multiple users to use the same device for authentication (meaning somebody could have already authenticated on this mobile device), consider clearing user context first by setting Saved user context to
null
- Saved user context: set to
- Selfie acquisition step: Obtains a selfie image from the user on the mobile device.
- Face authentication step: Verifies the selfie (obtained from the journey context) against the stored reference vector. Configure this step as follows:
- Identifiers: set to "Email"
- Identifier value: set to
@policy.userContext().user_identifiers.email
- Depending on the result:
- Success: Process cross-session message and Complete journey steps: Processes the cross-session message to signal success back to the desktop session, then completes the journey. Configure the Process cross-session message step as follows:
- Cross-session message reply fields: add
access_tokenfield with@policy.userContext().access_tokenvalue - Output variable: set to
cross_session_message - Message id: set to
csm
- Cross-session message reply fields: add
- Failure: Process cross-session message and Reject access steps: Processes the cross-session message to signal failure back to the desktop session, then rejects access. Configure the Process cross-session message step as follows:
- Cross-session message reply fields: add
errorfield witherrorvalue - Output variable: set to
cross_session_message - Message id: set to
csm
- Cross-session message reply fields: add
- Success: Process cross-session message and Complete journey steps: Processes the cross-session message to signal success back to the desktop session, then completes the journey. Configure the Process cross-session message step as follows: