To support integrations between your apps and external services, Mosaic enables you to create third-party clients and authorize them to access data via your APIs on behalf of the user. Such authorizations always require obtaining consent from the end-users to ensure they have control over personal data.
User consent is a fundamental aspect of privacy and data protection laws in many jurisdictions. It ensures that individuals have control over their personal information, especially when sensitive data is involved. By obtaining user consent, organizations demonstrate transparency and build trust with their users, reducing the risk of legal repercussions and reputational damage. Mosaic stores granted user consents and invalidates them after 30 days.
Example: To get better control of finances, a bank customer installs a third-party financial app that helps them track spending habits and manage income streams. Before linking to the banking app, the financial app asks a user to consent to share some details (e.g., balance, transactions) available in their banking app. The user grants consent and enables the financial app to retrieve the balance from the banking app on behalf of the user.
Below is an example of the authorization flow that grants access to an external service (third-party client) by obtaining the user's consent within your app. Mosaic APIs are shown in pink along with the relevant integration steps, described below.
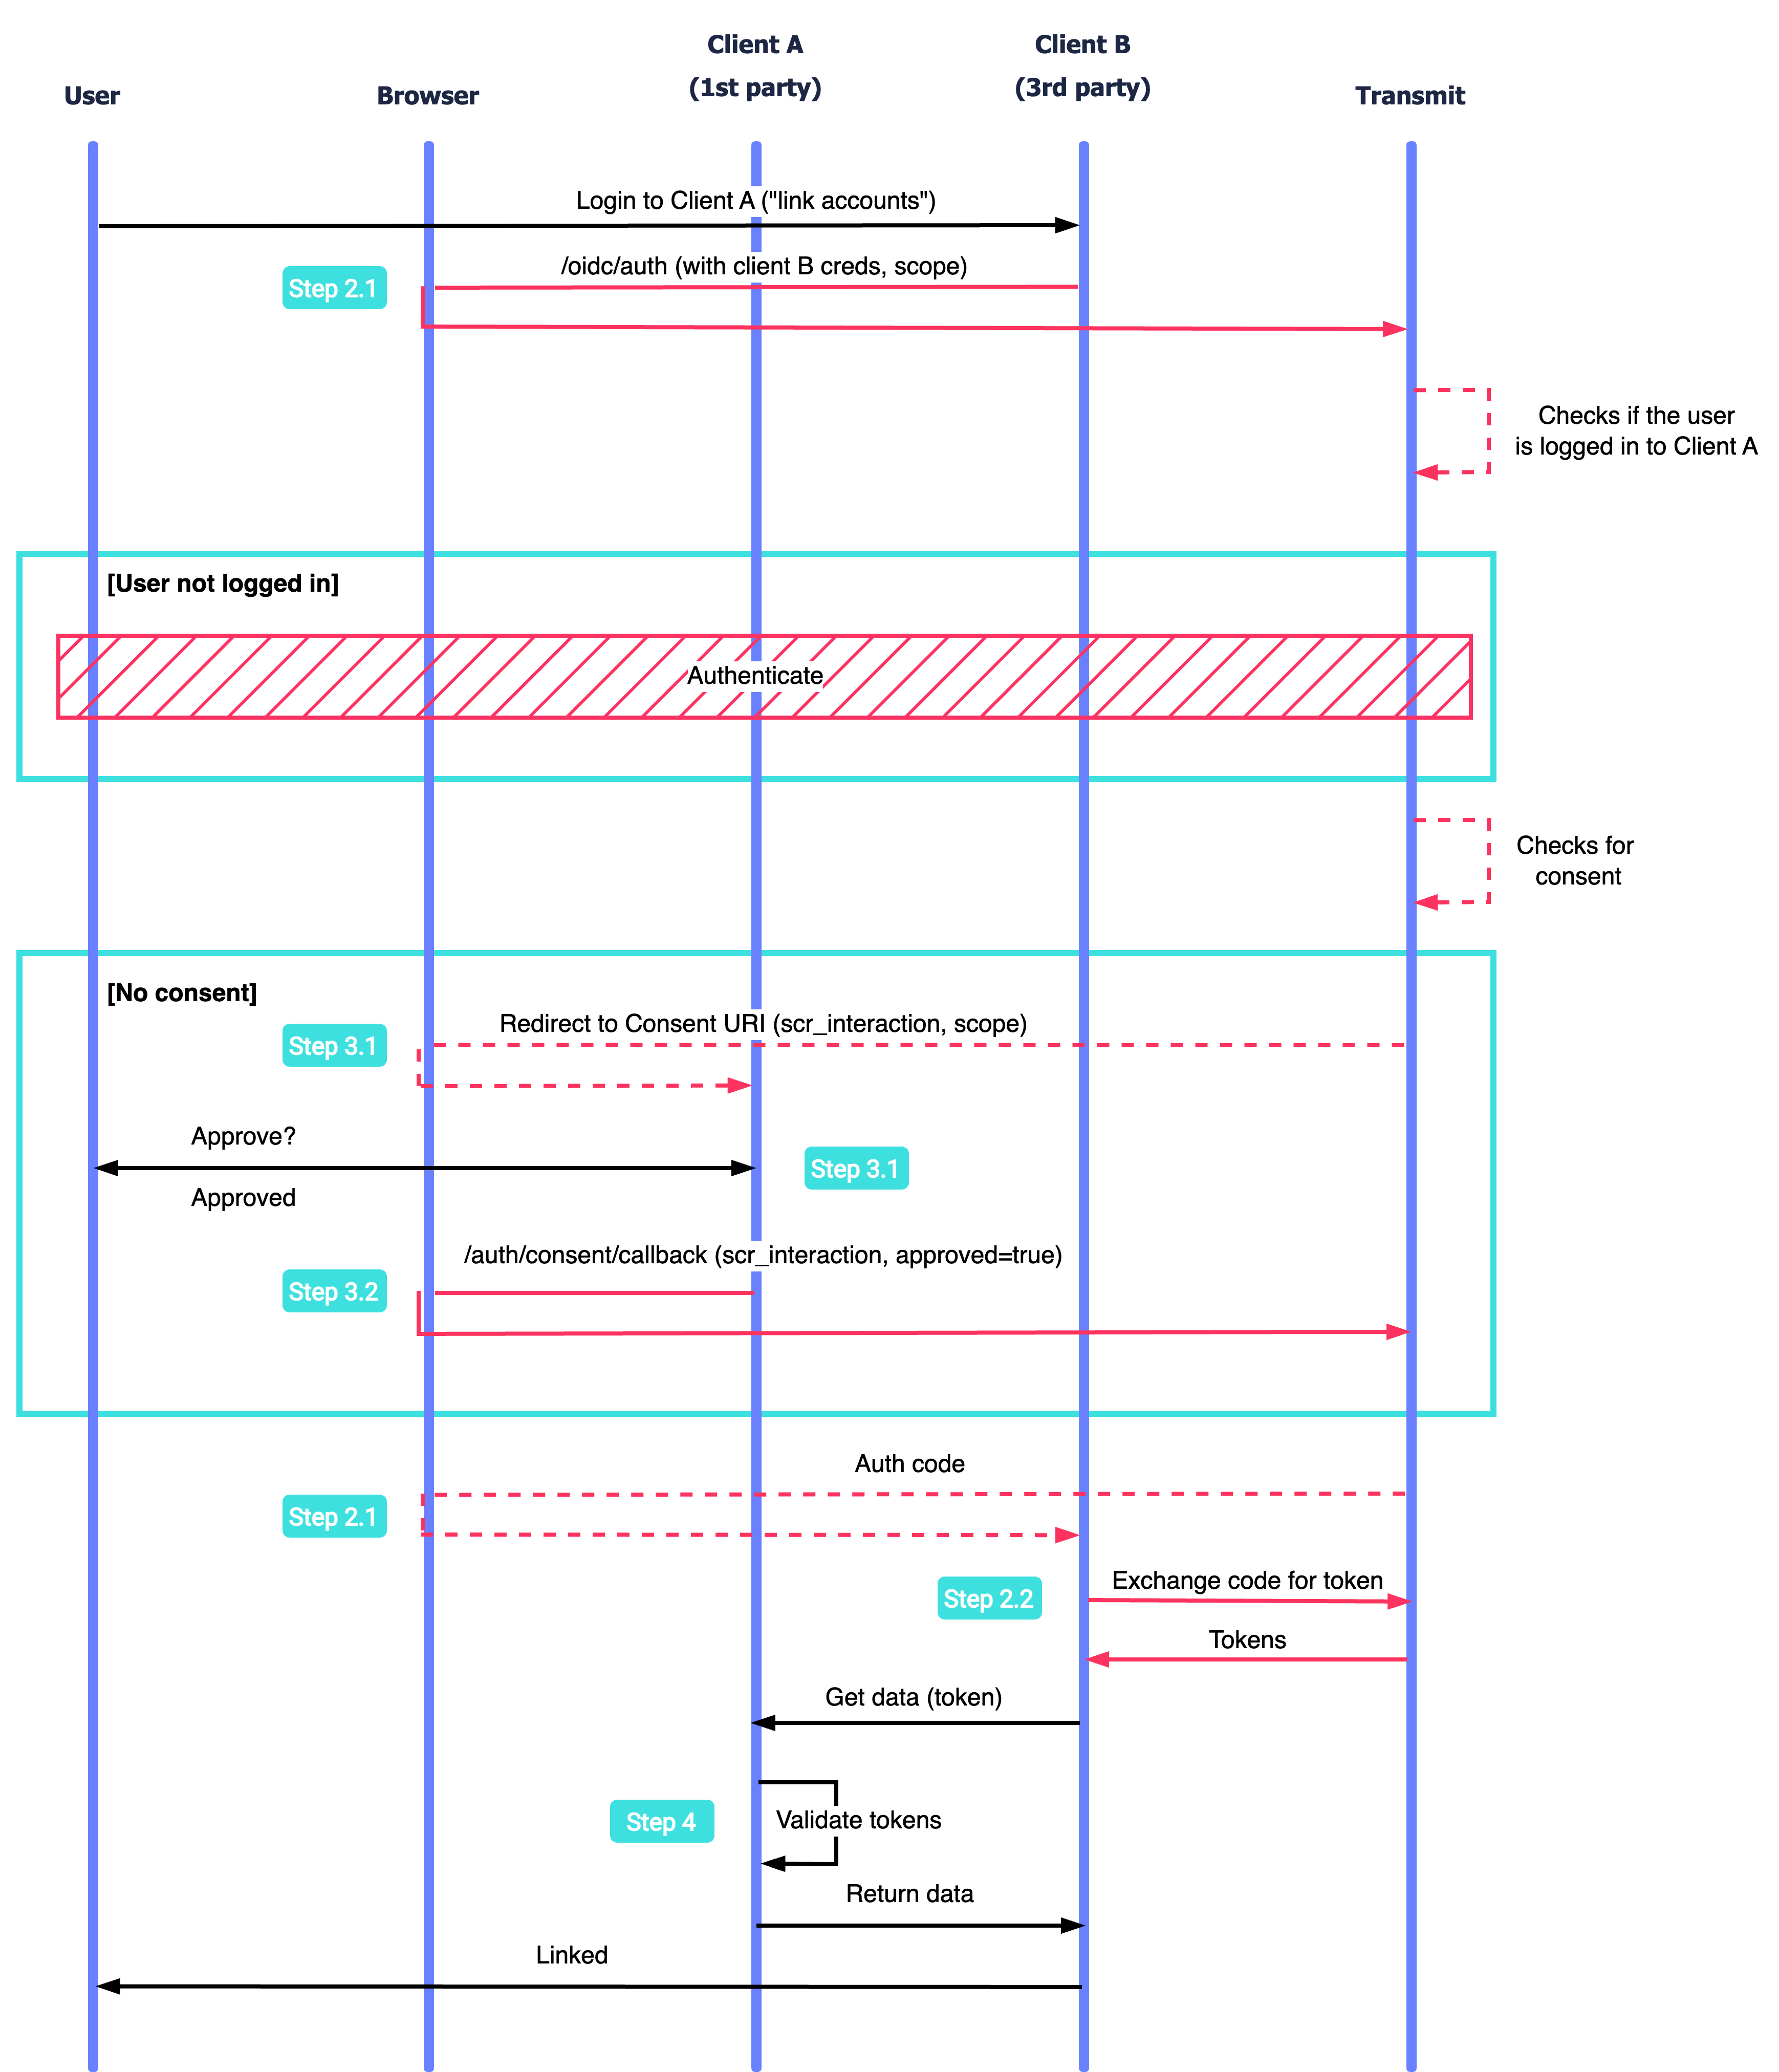
- An external service (third-party client B) sends an authentication request to Mosaic.
- Mosaic verifies whether the user is logged in to the app and proceeds to authentication if necessary.
- Mosaic looks up for consent. If not found or expired, Tranmit redirects a user to the client A consent page to obtain one. Once the user consents, client A sends a callback to Mosaic.
- Mosaic redirects to client B with an auth code which should be exchanged for tokens.
- Client B uses the token to access client A APIs.
- After validating the tokens, client A returns data to client B.
Before you can start implementing this flow, make sure all prerequisites are in place.
Application is created in Mosaic. App settings contain Client ID and Client Secret, which you'll need later. If you don't already have an application, you'll need to create one first (see Create application).
Users are already registered to the app. You cannot create new users using this flow.
An authentication method is configured for your application, for example, Google login or Apple login. For implementation details, refer to step 1 of this guide. Alternatively, configure Hosted login in Experience Management.
Social login (Apple, Facebook, Google, Line) and Hosted login.
From the Admin Portal under Applications, click on your application to edit application settings. Add a new third-party client. Mosaic will generate Client ID and Client Secret automatically. For this client, provide the following:
- Redirect URI: the endpoint within the third-party service that handles authentication requests (see Step 2.2). For example,
https://third-party.com/verify - Consent URI: the endpoint within your app that obtains consents from users (see Step 3.1). For example,
https://first-party.com/consent. - Scopes/permissions: resources the third-party service may request from your app (see Step 3.1). Add
offline_accessas a permission to this list, if the app needs a refresh token to continue operating while the user is away.
Make sure to communicate client credentials and scopes to the third-party service you integrate with.
The flow is initiated when an external service (third-party client) requests access to your app resources by sending an auth request to Mosaic. Having received the request, Mosaic checks if the user has already logged in to the app (i.e., an active session exists). In case there is no active session, Mosaic will prompt the user to authenticate.
Although the external service isn't controlled by you, it should be able to communicate with Mosaic. Make sure this service implements an OIDC authorization code flow. This requires the following steps:
To initiate authentication, the third-party service should redirect the browser to a URL like the one below. In addition to openid, the scope must include the permissions requested by the third-party service. These permissions were configured in the app settings (see Step 1) and will be presented on the consent page (see Step 3.1). If the app needs a refresh token in addition to the access token, the offine_access has to be included in the scope as well as in the list of permissions configured in the third-party app settings.
This URL initiates a flow using the Mosaic hosted login experience. However, social login can be requested instead by passing the acr_values parameter with the relevant value (see OIDC API reference). The app should instruct the third-party service regarding which experience/method can be requested for their app.
If successful, the auth call returns an authorization code to the Redirect URI (e.g., https://domain.com/verify?code=123abc); otherwise, an error.
Below is a sample request (line breaks and spaces were added for readability):
  https://api.transmitsecurity.io/cis/oidc/auth?
    client_id=[CLIENT_ID]& // Third-party client ID found in the app settings
    scope=openid%20[SCOPE] // Scope of access for third-party service configured in Step 1
    response_type=code&
    redirect_uri=[REDIRECT_URI]&  // The URI to return auth code
prompt=consent // Requires a user to consentOnce the end-user grants consent (Step 3.2), Mosaic returns an auth code to the third-party's redirect URI. It should pass the code to the backend. The third-party should have an endpoint that sends a POST request like the one below to the Mosaic /oidc/token endpoint. Mosaic exchanges the auth code for an ID and access token which can be used to authorize requests to the first-party client resources.
curl -i -X POST \
  https://api.transmitsecurity.io/oidc/token \
  -H 'Content-Type: application/x-www-form-urlencoded' \
  -d client_id=[CLIENT_ID] \ # Third-party client ID found in app settings
  -d client_secret=[CLIENT_SECRET] \ # Third-party client secret found in app settings
  -d code=[CODE] \ # The auth code returned on Step 2.1
  -d grant_type=authorization_code \
-d redirect_uri=[REDIRECT_URI] # The endpoint URI that accepted the auth code, configured in app settingsIf the end-user declines the consent request (Step 3.2), the authentication request (Step 2.1) returns an error instead of the auth code. The access_denied is returned as an error query parameter and error_description query parameter will be set to User denied consent to requested scope. For example, https://third-party.com/verify?error=access_denied&error_description=User%20denied%20consent%20to%20requested%20scope.
The third-party service should have a page that processes this result and notifies a user about the inability to proceed with linking accounts.
After the third-party client initiates the flow as described in Step 2.1, Mosaic checks if the user has already logged into the app and prompts authentication if necessary. As a next step, Mosaic validates if the request came from a third-party client and checks for existing user consents. If the user has already logged in to the app but hasn't consented to allow third-party access or this consent has expired, Mosaic will redirect a user to the consent page managed by the first-party client.
Create a frontend endpoint (Consent URI) that the browser will redirect to in order to obtain user consent. When invoked, the endpoint should accept src_interaction (string) and requested_scope (string array) query parameters and present a user with the consent screen. Create a page that clearly presents requested permissions from the requested_scope parameter and has an option to approve or decline a consent request.
To complete the consent process, the Consent endpoint should send a callback to Mosaic by running the GET request to /auth/consent/callback. It should include the src_interaction parameter, which is used to identify the consent request, as well as define if the user consented to grant access (approved=true). In case the user grants consent, the callback will trigger a redirect to the third-party's redirect URI with an auth code (Step 2.2).
const query = new URLSearchParams({
  src_interaction: '[INTERACTION_ID]',  // Unique ID sent to your Consent URI
  approved: 'true' // True if user approves, false if user declines
}).toString();

const resp = await fetch(
  `https://api.transmitsecurity.io/cis/auth/consent/callback?${query}`,
  {method: 'GET'}
);

const data = await resp.text();
console.log(data);The third-party client can use user access tokens returned by Mosaic at Step 2.2 to authorize requests to protected first-party client resources. These tokens must be validated as described here. Make sure that the client ID (client_id) corresponds to the third-party client ID of your application and scope aligns with third-party service scope.
Manage user consents in the Mosaic Admin Portal. By default, the consent expires after 30 days and needs to be requested again. You can review consents and revoke them earlier if necessary using Consent APIs.