Face authentication is a next-generation biometric authenticator that combines speed, security, and user convenience. By leveraging Mosaic Identity Verification powered by AI-driven facial recognition, it helps organizations deliver frictionless access while ensuring the highest levels of fraud prevention and compliance. This solution is designed to work seamlessly across industries like finance, healthcare, and enterprise security, supporting both account recovery and day-to-day authentication scenarios.
- Account recovery: verify user identity with a live selfie to reset access securely.
- Login & access control: replace passwords with seamless face authentication for apps and systems.
- Fraud prevention: protect sensitive actions such as account changes.
Mosaic supports face registration and authentication and using the full Identity Verification flow both on web and mobile devices. Face registration and authentication via selfie only is currently only available for mobile apps. To support cross-device flow that starts on a desktop and then performs the selfie capture on a mobile device, first read this guide and then see Implement cross-device face authentication.
Mosaic Identity Verification helps ensure that a user’s digital identity matches their real-world identity. A key part of this process is face authentication—comparing a live selfie against a trusted reference image vector.
Behind the scenes, Identity Verification evaluates the selfie capture through multiple checks: image quality, liveness detection, and biometric matching against the reference vector. It allows your app to confidently confirm that the person is who they claim to be and that they are physically present and not attempting to spoof the system with a photo, video, or mask. This ensures only legitimate users are granted access and authenticated in the app.
Learn more:
Below are examples of registration and authentication flows.
To be able to authenticate with their face in the future, the logged-in user starts the face registration process. The client invokes the face registration journey and upon reaching the Identity Verification step, Mosaic creates an Identity Verification session. The Orchestration (IDO) SDK passes the step payload to the client, which in turn either invokes Identity Verification SDK (mobile apps) or redirects to the Hosted Experience (web apps). After completing identity verification, the Orchestration SDK resumes the journey. As a next step, Mosaic registers the selfie for the user identity specified earlier in the journey.
When a user requests to log in to the app using their face as second factor, the client invokes the authentication journey, where it first logs in the user. Upon reaching the Selfie Acquisition step, Mosaic creates an Identity Verification session. The Orchestration (IDO) SDK passes the step payload to the client, which in turn invokes the Identity Verification (IDV) SDK. Having collected a selfie, the Identity Verification SDK signals to the Orchestration SDK that it can resume the journey. As a next step, Mosaic validates this selfie (selfie_data) against a previously collected reference and authenticates the user if the validation is successful.
iOS:
- iOS 13+
- Xcode 11+
Android:
- Android 5+ (API level 21+)
If this is your first time integrating with Mosaic, create an application in the Admin Portal as described here, then implement a login for the app using another authentication method, e.g. email OTP authentication, since face authentication can only be enabled for existing users.
The face authentication settings (Admin Portal > B2C Identity or B2B Identity > Authentication methods) allow you to configure the lockout policy in case of repeated failed attempts:
- Failed attempts: set the number of attempts allowed before triggering a lockout.
- Lockout duration: define how long the user must wait before they can try again.
For more about this authenticator, see Customize login methods.
Once you've configured the lockout policy, you may also implement logic to unlock the authenticator in case it locks. Use the Unlock authenticators API to reset a locked authenticator.
For web apps, you can customize the identity verification experience, for example, by changing the default language or image retention period (Admin Portal > Identity Verification > Customization). For details, see this guide.
In the Admin Portal, go to B2C Identity or B2B Identity based on your setup, and open the Journeys section. Create two separate journeys—one for face registration and one for face authentication. You'll need to implement some client-side code for these journeys later (see Step 4).
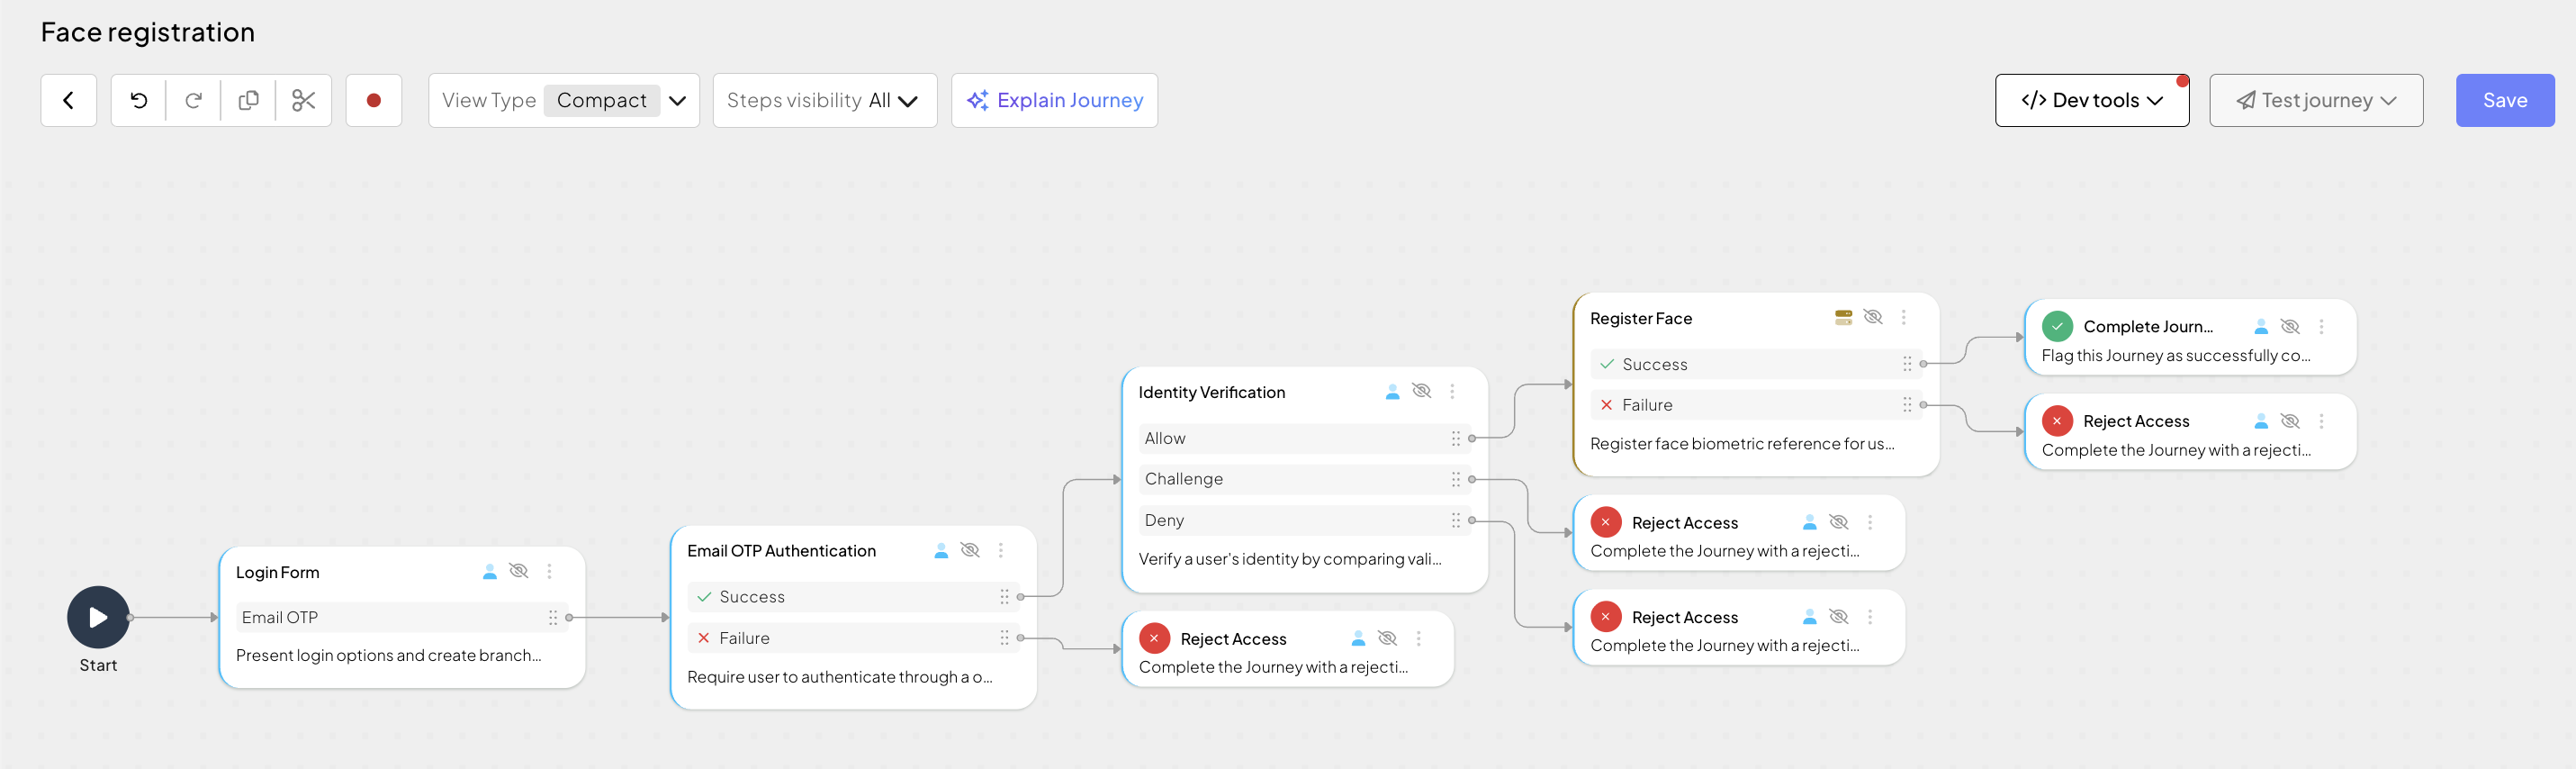
This client SDK journey obtains a selfie from the logged-in user (e.g., after email OTP authentication) and registers it as a reference vector in Mosaic. It can include the following actions:
- Login form step: Displays the login form with enabled email OTP authentication.
- Email OTP authentication step: Logs in the user using email OTP authentication or any other supported authentication method.
- Identity Verification step: Performs identity verification, including obtaining the user's selfie and validating it against their legal document, such as an ID or driver's license. For web apps, specify the callback URL to redirect to once the user completes the process via hosted experience. For mobile apps, the callback URL isn't used but you have to provide some value. After processing, this step issues a recommendation. For Allow recommendations, proceed to face registration next.
To register a face, the journey must obtain a selfie. This can be done using either the Identity Verification or the Selfie Acquisition step. The main difference between these two methods is the balance between security and user friction:
- Identity Verification step requires an additional step of verifying the user’s identity against a government-issued document before capturing the selfie. This provides a higher level of assurance and is recommended when it is critical to validate the existence of the user and ensure the selfie matches their actual biometric footprint.
- Selfie Acquisition step captures the selfie while performing only a liveness check, without requiring prior document verification or matching the selfie with an additional source. This step should be performed when the user is already logged in and a lower level of security is acceptable. This offers less friction but a lower security level. This step supports mobile devices only.
- Register face step: Registers the image vector as the reference for future face authentication flows. In our example, this step automatically obtains the user ID from the journey context since the user has authenticated earlier in the flow.
- Complete journey or Reject access steps: Depending on results, successfully completes the journey or rejects access.
This client SDK journey prompts the user to authenticate with their face on their mobile device as a second factor. It can include the following actions:
- Login form step: Displays the login form with enabled email OTP authentication.
- Email OTP authentication step: Logs in the user using email OTP authentication or any other supported authentication method.
- Selfie acquisition step: Obtains a selfie image from the user.
- Face authentication step: Verifies the selfie against the stored reference vector (user ID and selfie data are obtained from the journey context). In case of successful verification, logs in the user.
- Complete journey or Reject access steps: Depending on results, successfully completes the journey or rejects access.

To run this flow, your integration needs both the Orchestration SDK and Identity Verification SDK.
Make sure to initialize all SDKs within the context of the same client ID and the same region.
For Android, see instructions here:
- Adding to project/loading: Orchestration SDK, Identity Verification SDK
- Initializing: Orchestration SDK, Identity Verification SDK
For iOS, see instructions here:
- Adding to project/loading: Orchestration SDK, Identity Verification SDK
- Initializing: Orchestration SDK, Identity Verification SDK
For web, see instructions here (only for face registration with hosted experience):
- Adding to project/loading: Orchestration SDK
- Initializing: Orchestration SDK
Implement the client-side code needed to execute journeys on the user's device. Since face authentication is scoped per app, you have to implement face registration in each app that offers face authentication as a login method.
In a nutshell, you have to implement:
- Starting the journey. See implementation instructions below.
- Verifying identity of the user. See implementation instructions below.
- Acquiring selfie. See implementation instructions below.
- Login forms with enabled email OTP authentication. See implementation instructions below.
- Further client logic depending on the journey completion results.
Note that Register face and Face authentication are executed by Mosaic and don't require any client-side code.
For example, implement a switch (or other routing mechanism) that invokes a handler responsible for a specific journey step (returned in idoServiceResponse.journeyStepId parameter). Each handler processes data, displays whatever UI is needed, and calls submitClientResponse() when the interaction is concluded.
The journey loops back to the switch unless Mosaic signals journey completion by setting the journeyStepId property to Rejection.type or Success.type. The idoServiceResponse.token property contains a JWT token as a proof of journey completion.
For more guidance on mobile development with the Orchestration SDK, refer to these quickstarts: Web, Android, or iOS as well as individual step guides.
Implement a handler that starts the journey. Use the following call to start the journey by replacing YOUR_JOURNEY_ID with the journey IDs you've created in Step 2:
  do {
      try TSIdo.startJourney(journeyId: "YOUR_JOURNEY_ID")
  } catch {
      debugPrint("[DEBUG] Failed to start journey: \(error)")
}Implement a handler that performs identity verification (using the Identity Verification SDK) if the IDO service response object has the journeyStepId set to identityVerification. For more details, see Identity Verification step guide. In web apps, users are redirected to the hosted verification experience, while in mobile apps the verification procedure is handled by Mosaic UI right in the app.
// On page load
const params = Object.fromEntries(new URLSearchParams(window.location.search).entries());
const sdkState = loadFromLocalStorage(); // Implementation of this function is up to the developer
if (params.state && params.sessionId && sdkState) {
  // Indicates the journey resumes after redirection
  // If SDK was loaded via script tag, invoke functions inside 'window.tsPlatform'
  const idoResponse = ido.restoreFromSerializedState(sdkState);
  if (idoResponse.journeyStepId === IdoJourneyActionType.IdentityVerification) {
    handleIdentityVerification(idoResponse);
  } else { /* Handle this */ }
} else { // Indicates a regular journey flow
  // TODO: Init IDO DK, start journey, and loop+switch on IdoJourneyActionType
  //
}

// Handle the Identity Verification step
async function IdentityVerification(idoResponse) {
  const params = Object.fromEntries(new URLSearchParams(window.location.search).entries());

  if (params.state && params.sessionId) {
    // Mosaic verification experience returns params
    // Submit the data to the SDK
    const data = {
      payload: {
        state: params.state,
        sessionId: params.sessionId,
      },
    };
    // If SDK was loaded via script tag, invoke functions inside 'window.tsPlatform'
    await ido.submitClientResponse(ClientResponseOptionType.ClientInput, data);
  } else {
    // If the sessionID and state are not in the URL, redirect the user to the Mosaic verification experience
    // If SDK was loaded via script tag, invoke functions inside 'window.tsPlatform'
    const sdkState = ido.serializeState();
    await saveToLocalStorage(sdkState); // implementation of this function is up to the developer

    window.location.href = idoResponse.data?.payload.endpoint;
  }
}Implement a handler that collects user's selfie (using the Identity Verification SDK) if the IDO service response object has the journeyStepId set to selfieAcquisition. For more details, see Selfie acquisition step guide.
For example:
  private fun processServiceResponse(idoResponse: TSIdoServiceResponse) {
      when (idoResponse.journeyStepId) {
          TSIdoJourneyActionType.SelfieAcquisition.type -> handleSelfieAcquisition(idoResponse)
      }
  }

  private fun handleSelfieAcquisition(idoResponse: TSIdoServiceResponse) {
          var idvStartToken = idoResponse.responseData?.optString("start_token")
          idvStartToken?.let { token ->
              activity?.applicationContext?.let {
                  TSIdentityVerification.initializeSDK(it)
                  TSIdentityVerification.registerForStatus(object: ITSIdentityVerificationStatus{
                      ...
                      override fun verificationCompleted() {
                          TSIdo.submitClientResponse(TSIdoClientResponseOptionType.ClientInput.type, null, callback)
                      }

                      override fun verificationFail(p0: TSIdentityVerificationError) {
                          if (idoResponse.clientResponseOptions?.get(TSIdoClientResponseOptionType.Fail.type) != null) {
                              TSIdo.submitClientResponse(TSIdoClientResponseOptionType.Fail.type, null, callback)
                          } else {
                              //handle failure
                          }
                      }
                      ...
                  })
                  TSIdentityVerification.start(it, idvStartToken)
              }
          }
}Implement a handler that presents a login form with different login options if the IDO service response object has the journeyStepId set to loginForm. The form should collect input from the user depending on the branch ID returned in the clientResponseOptions. For email OTP authentication, username and email.
For more details, see Login form and Email OTP authentication step guides.
- Implement cross-device face authentication for scenarios where users start on a desktop and perform the selfie capture on a personal mobile device.
- Introduce step-up flows for high-risk transactions.
- Consider adding fallback methods if face authentication fails.
- Consider including the face registration into the user onboarding journey to register a face along with the user creation.