Strengthen security of your native iOS applications by adding strong authentication with mobile biometrics. This describes how to use the Mosaic Authentication SDK to set up biometrics authentication on the user's device. The guide includes both the client-side integration, as well as the backend API integration required to complete the flow.
iOS devices have biometric sensors that enable a device to recognize its owner. The Mosaic Authentication SDK utilizes these sensors and allows you to add biometric authentication such as FaceID authentication to your iOS app. Below are sample flows for registering biometric authenticator and authenticating the user.
Registration
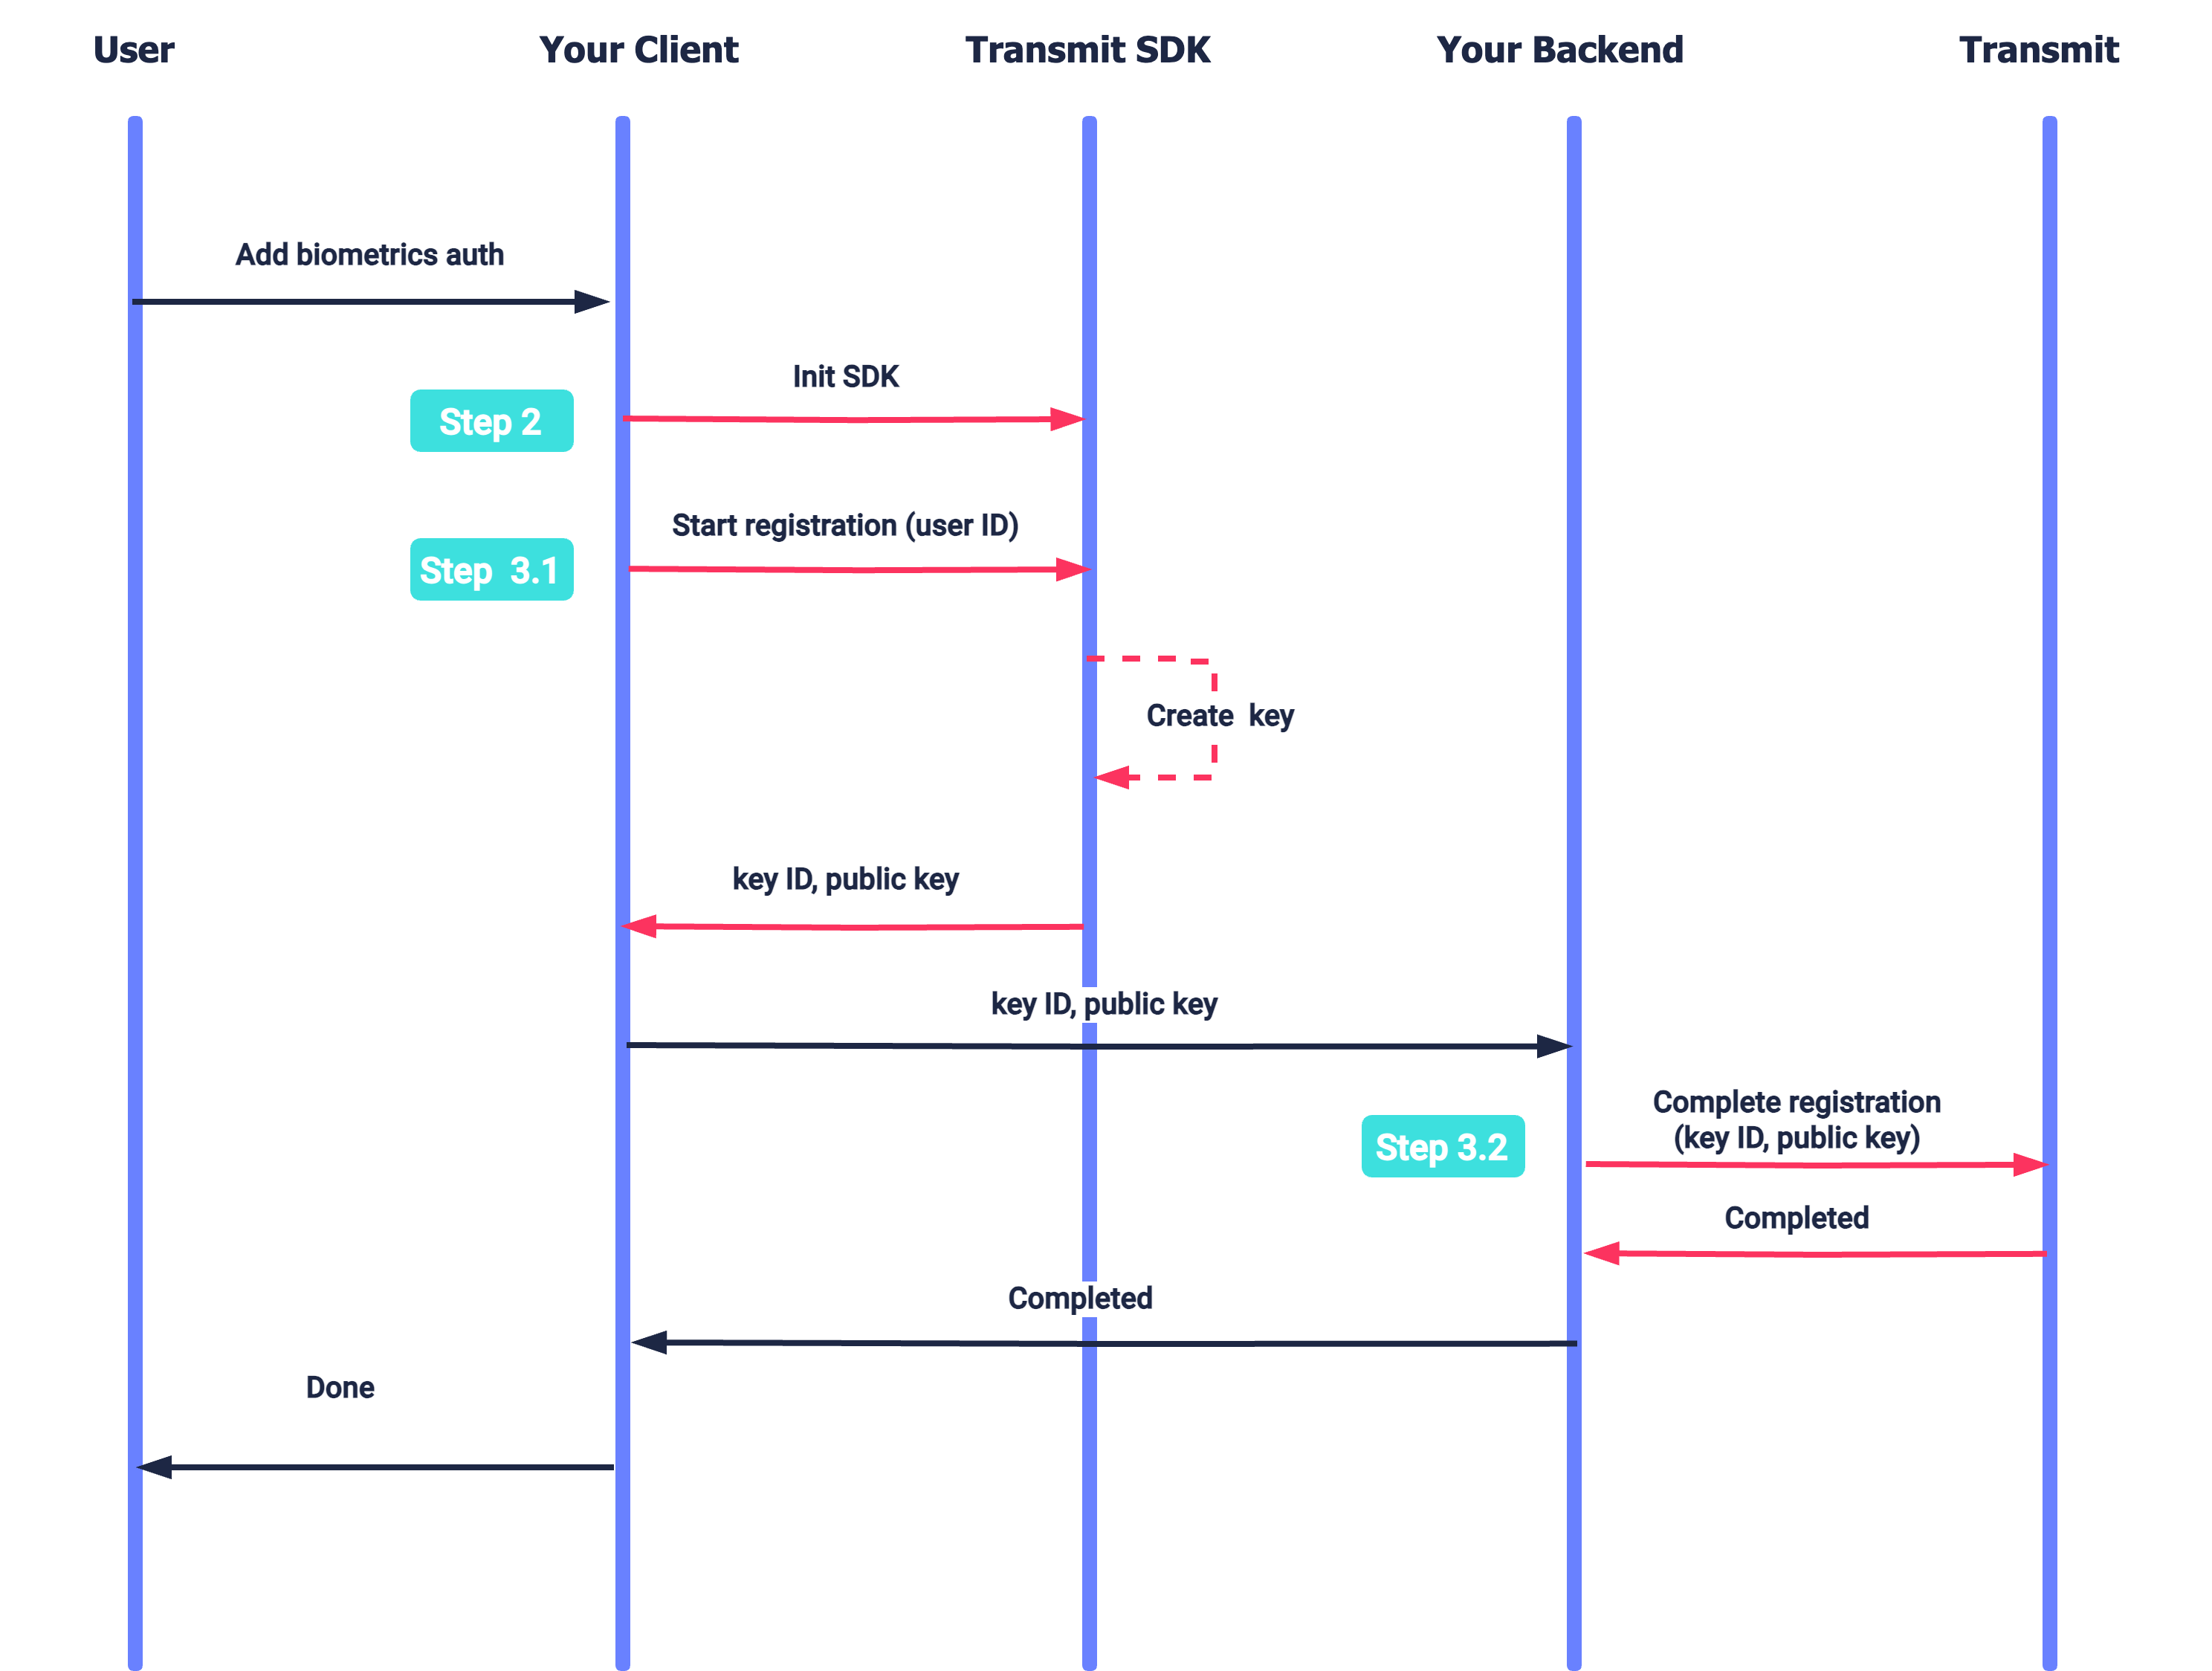
The logged-in user requests to register biometrics on their device. After initializing the SDK (Step 2), the app instructs the SDK to register a biometric authenticator (Step 3.1). Upon successful registration, the SDK returns the public key and public key ID. The app backend completes the registration flow by submitting these parameters to Mosaic (Step 3.2).

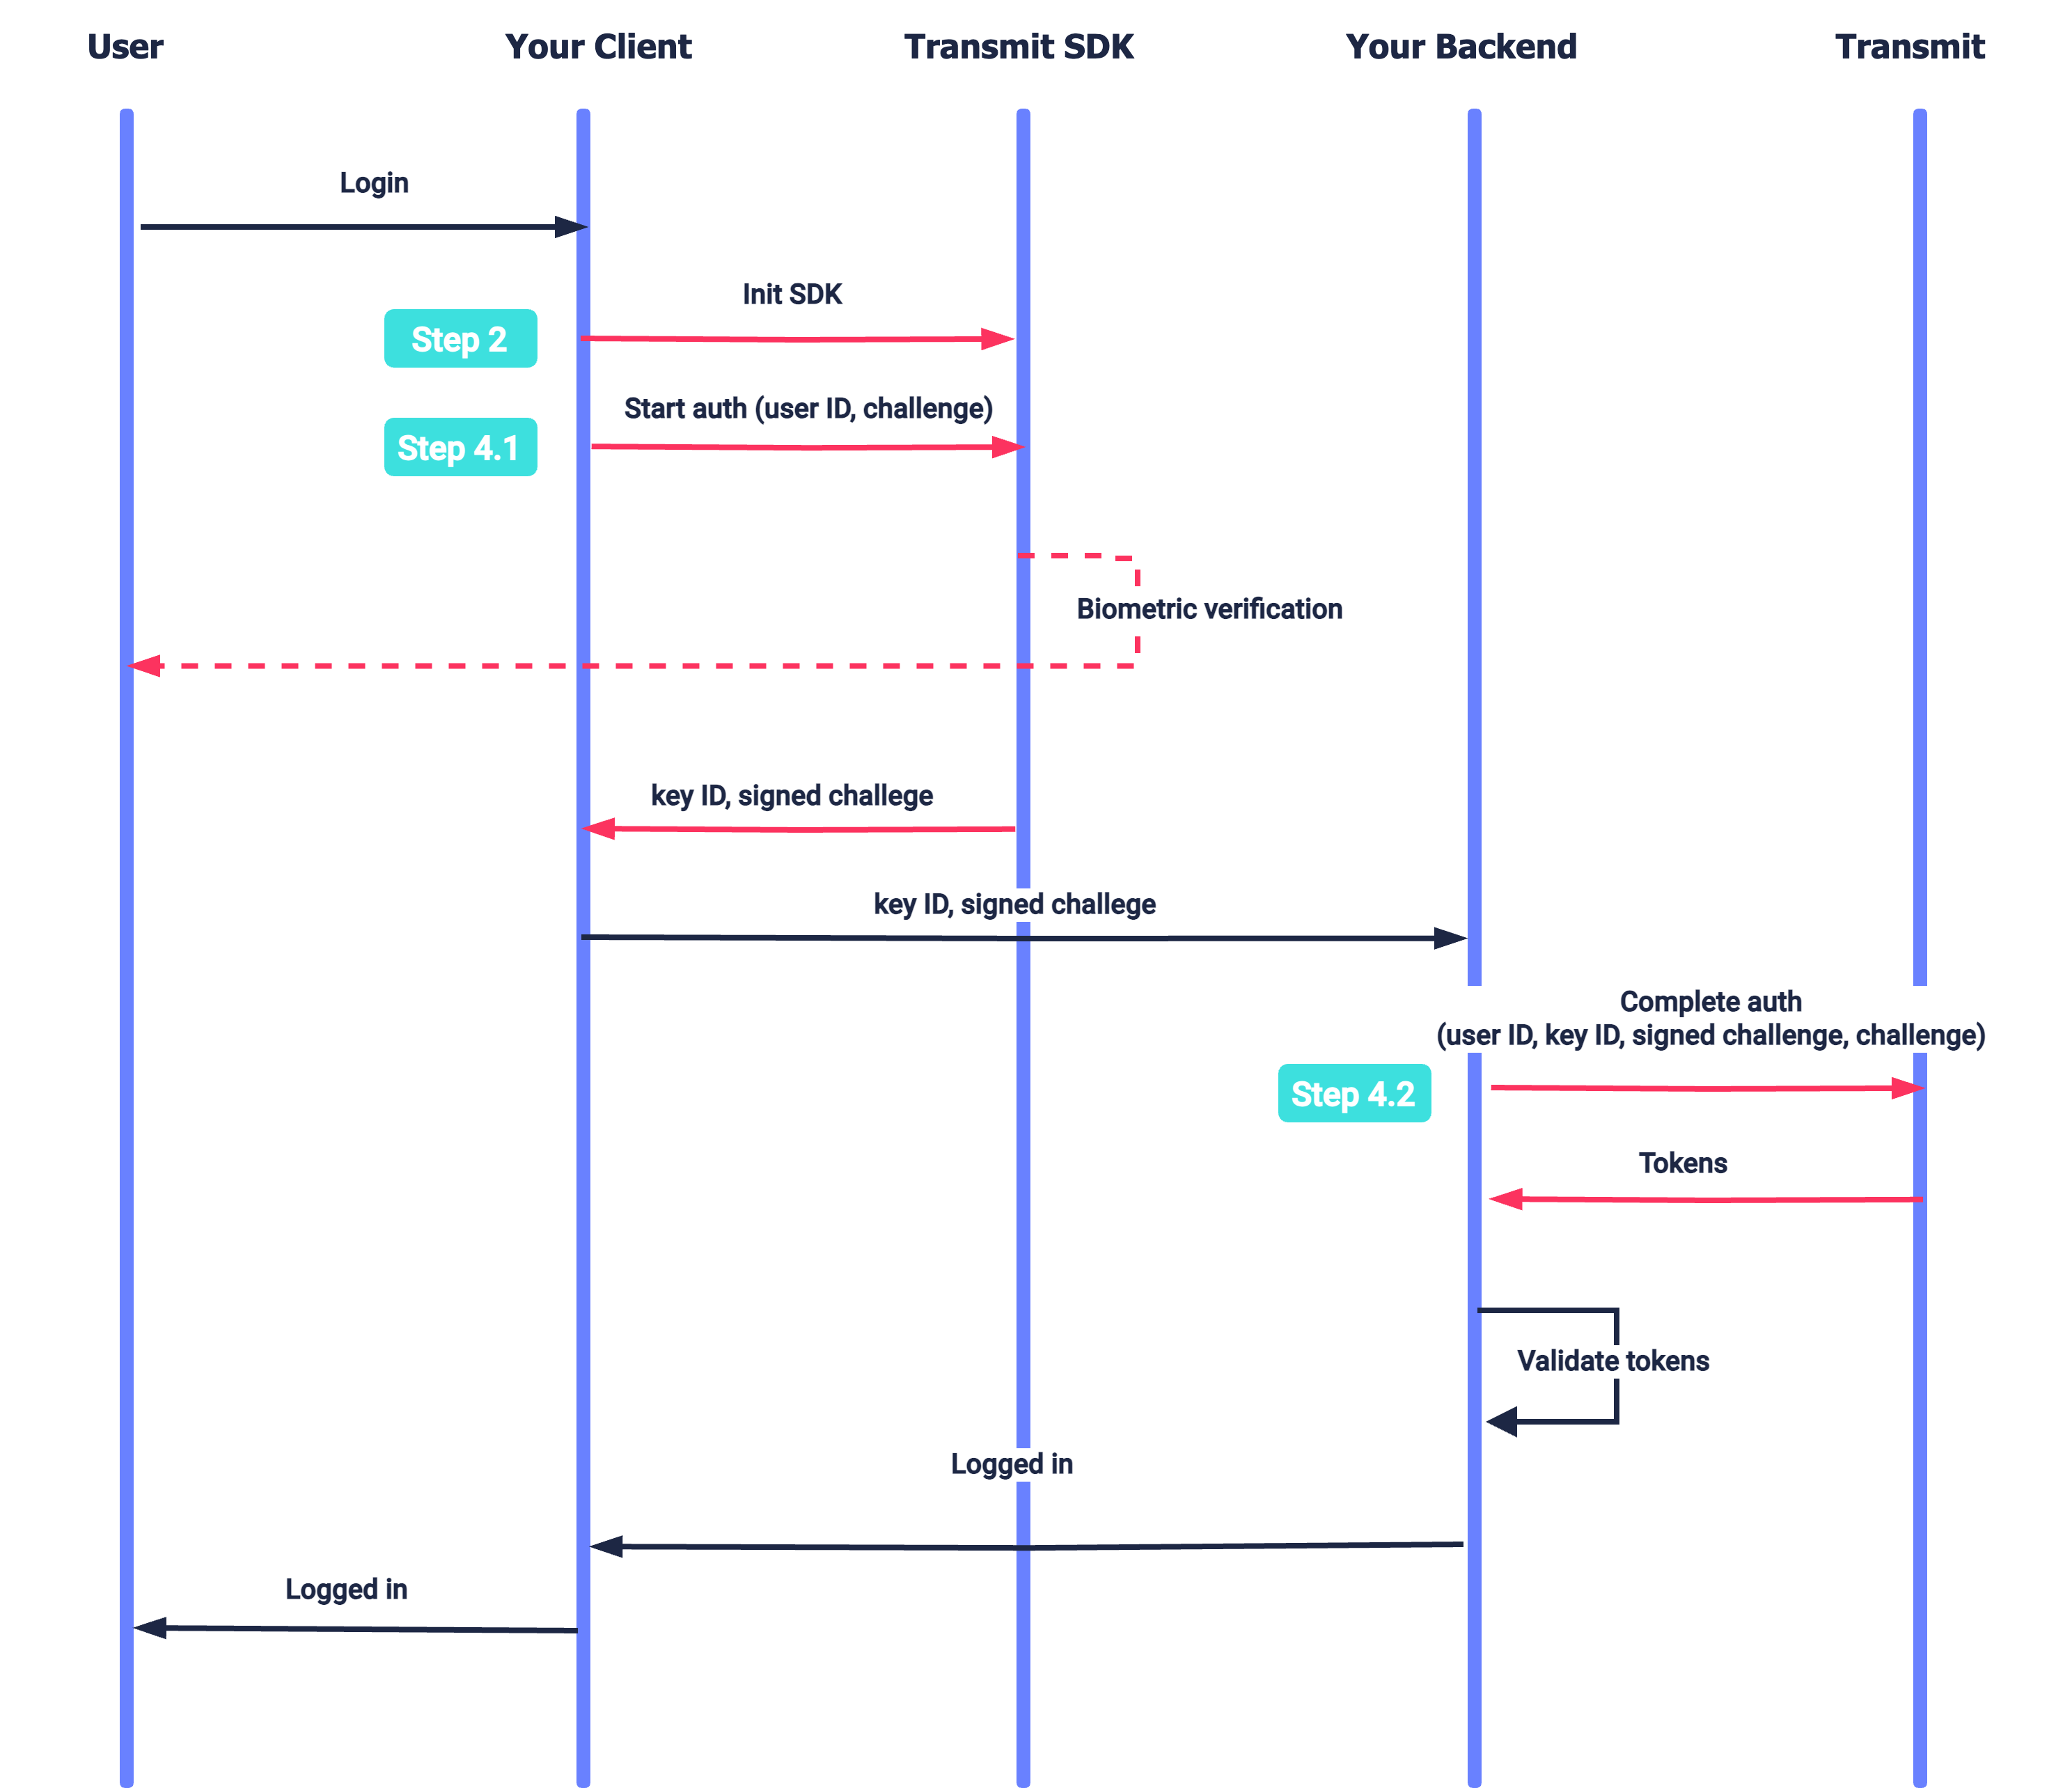
The user requests to log in using mobile biometrics. After initializing the SDK (Step 2), the app instructs the SDK to authenticate using biometrics (Step 4.1). Upon successful authentication, the SDK returns the public key ID and the signed challenge which are then used to complete the authentication process and obtain tokens (Step 4.2).

The requirements for biometric authentication include:
- iOS 13.0+
- Xcode 11.0+
- Device with registered biometrics (e.g., FaceID or TouchID)
If this is your first time integrating with Mosaic, create an application in the Admin Portal as described here, then implement a login for the app using another authentication method since mobile biometrics can only be registered for logged-in users.
CocoaPods is a dependency manager for Cocoa projects. For usage and installation instructions, visit their website. To integrate TSAuthenticationSDK into your Xcode project using CocoaPods, specify it in your Podfile:
pod 'TSAuthentication', '~> 1.0.4'The Swift Package Manager is a tool for automating the distribution of Swift code and is integrated into the swift compiler. It is in early development, but TSAuthenticationSDK does support its use on supported platforms.
Once you have your Swift package set up, adding TSAuthenticationSDK as a dependency is as easy as adding it to the dependencies value of your Package.swift.
dependencies: [
    .package(url: "https://github.com/TransmitSecurity/authentication-ios-sdk", .upToNextMajor(from: "1.0.4"))
]Initialize using PLIST configuration (recommended)
To do this, create a plist file named TransmitSecurity.plist in your Application with the following content. Where CLIENT_ID is the client ID of your application.
<?xml version="1.0" encoding="UTF-8"?>
<!DOCTYPE plist PUBLIC "-//Apple//DTD PLIST 1.0//EN" "http://www.apple.com/DTDs/PropertyList-1.0.dtd">
<plist version="1.0">
<dict>
    <key>credentials</key>
    <dict>
        <!-- Use api.eu.transmitsecurity.io for EU, api.ca.transmitsecurity.io for CA -->
        <key>baseUrl</key>
        <string>https://api.transmitsecurity.io/</string>
        <key>clientId</key>
        <string>CLIENT_ID</string>
    </dict>
</dict>
</plist>
Add the code below to your Application Class
Make sure to add the import TSAuthenticationSDK at the top of the implementation class.
class AppDelegate: UIResponder, UIApplicationDelegate {

    func application(_ application: UIApplication, didFinishLaunchingWithOptions launchOptions: [UIApplication.LaunchOptionsKey: Any]?) -> Bool {
        TSAuthentication.shared.initializeSDK()
        return true
    }
}
Initialize using SDK parameters
Add the code below to your Application Class. Where CLIENT_ID is the client ID of your application.
Make sure to add the import TSAuthenticationSDK at the top of the implementation class.
class AppDelegate: UIResponder, UIApplicationDelegate {

    func application(_ application: UIApplication, didFinishLaunchingWithOptions launchOptions: [UIApplication.LaunchOptionsKey: Any]?) -> Bool {
        let config = TSConfiguration(domain: YOUR_DOMAIN)
        TSAuthentication.shared.initialize(baseUrl: "https://api.transmitsecurity.io/", clientId: "CLIENT_ID", domain: "[YOUR_DOMAIN]") // Use api.eu.transmitsecurity.io for EU, api.ca.transmitsecurity.io for CA, api.au.transmitsecurity.io for AU, or your custom domain, if you're using one
        return true
    }
}Before users can log in with biometrics, the app needs to register the authenticator that leverages the user's biometrics data. The registration flow occurs only after the end-user has logged in to your mobile app using another auth method.
To proceed with registration, ensure that the user is logged in to your app and your app maintains a reference to the user ID. If needed, retrieve the user ID using another user identifier via Users APIs.
To implement a registration flow, you'll need to:
When the end-user requests to enable login with biometrics, call the registerNativeBiometrics() SDK call as shown below and provide a user ID. The SDK returns the key type, public key and key ID which you will need to complete registration in Step 3.2.
// Registers biometrics authenticator
// 'username' (required): user ID in Transmit
TSAuthentication.shared.registerNativeBiometrics(username: "[USER_ID]") { response in
    DispatchQueue.main.async {
        switch response {
        case .success(let result):
            // Extract returned values
            let publicKey = result.publicKey
            let publicKeyId = result.publicKeyId
            let keyType = result.keyType
        case .failure(let error):
            // Handle registration failure
            break
        }
    }
}Once credentials for biometrics authentication have been registered on the device (via the SDK), they will need to be registered in Mosaic to the relevant user. This is done by passing the public key and key ID returned by the SDK (in Step 3.1) to the app backend.
Complete the registration process by calling the registration API from the backend. The token used to authorize the call is the user access token returned upon user login. If successful, the credentials will be registered for the user that corresponds to the authorization token.
const resp = await fetch(
  `https://api.transmitsecurity.io/cis/v1/auth/mobile-biometrics/register`, // Use api.eu.transmitsecurity.io for EU, api.ca.transmitsecurity.io for CA
  {
    method: 'POST',
    headers: {
      'Content-Type': 'application/json',
      Authorization: 'Bearer [TOKEN]' // User access token returned upon the Mosaic login
    },
    body: JSON.stringify({
      publicKeyId: '[PUBLIC_KEY_ID]', // Returned by registerNativeBiometrics() SDK call
      publicKey: '[PUBLIC_KEY]', // Returned by registerNativeBiometrics() SDK call
      encryptionType: '[KEY_TYPE]', // Returned by registerNativeBiometrics() SDK call
      os: "iOS"
    })
  }
);

const data = await resp.json();
console.log(data);A user can leverage mobile biometrics to authenticate in your iOS app once the registration process is complete. To implement an authentication flow, you'll need to:
To log in the user, call the authenticateNativeBiometrics() SDK method and provide the user ID and challenge parameters. This will prompt the user for biometrics. If successful, it returns a public key ID and a signed challenge in the result object. These parameters are required to complete the authentication via your backend.
For example:
// Authenticates a user
// 'username' (required): user ID in Transmit
// 'challenge' (required): a unique string generated for this call

TSAuthentication.shared.authenticateNativeBiometrics(username: "[USER_ID]", challenge: "[CHALLENGE]") { result in
    switch result {
    case .success(let response):
        let publicKeyId = response.publicKeyId
        let signature = response.signature
    case .failure(let error):
        if case .nativeBiometricsError(let nativeBiometricsError) = error {
            // Handle native biometrics error
        }
    }
}Once the user has authenticated on the device, call the authentication endpoint via your backend. The call is authorized with a client access token using the Client ID and Secret of your app.
If successful, the tokens will be returned. These tokens must be validated as described here.
const resp = await fetch(
  `https://api.transmitsecurity.io/cis/v1/auth/mobile-biometrics/authenticate`, // Use api.eu.transmitsecurity.io for EU, api.ca.transmitsecurity.io for CA
  {
    method: 'POST',
    headers: {
      'Content-Type': 'application/json',
      Authorization: 'Bearer [CLIENT_ACCESS_TOKEN]' // Token generated using Client ID and Secret of the app
    },
    body: JSON.stringify({
      key_id: '[KEY_ID]', // Returned by authenticateNativeBiometrics() SDK call
      user_id: '[USER_ID]', // ID of the user that was specified in authenticateNativeBiometrics() SDK call
      signature: '[SIGNATURE]', // Returned by authenticateNativeBiometrics() SDK call
      challenge:'[CHALLENGE]' // Specified in authenticateNativeBiometrics() SDK call
    })
  }
);

const data = await resp.json();
console.log(data);