Mosaic allows authenticating users with time-based one-time passcodes (TOTP) which are unique one-off numeric codes generated by authenticator apps (Google Authenticator, Microsoft Authenticator, Twilio Authy, and others). The passcodes are short-lived and typically change every 30 seconds making the TOTP authentication hard to compromise.
You can leverage TOTP as a stand-alone passwordless authentication solution, but it's mainly used as a second factor in MFA or with user actions that affect sensitive resources, such as their payment data or personal records, and require an additional layer of security.
This implements a backend-to-backend integration for authentication. See Mosaic TOTP APIs. Alternatively, use Journeys.
The TOTP authentication relies on the static secret (seed) and passcode validity. To use the TOTP for the first time, one has to register the TOTP authenticator with Mosaic and connect it to the authenticator app. Mosaic uses the TOTP authenticator to validate codes that are generated by the authenticator app. Depending on the app settings, a user can register one authenticator per application or multiple authenticators. Once set, a user can proceed to log in using time-based passcodes generated by the authenticator app.
The diagrams below present basic single-TOTP registration and authentication scenarios for this integration; Mosaic TOTP APIs are shown in pink along with the relevant integration steps, described below.
The app requests to register a TOTP authenticator for the logged-in user. Mosaic generates and returns the static secret that will be used to generate TOTP codes for authentication (Step 1). The app then provides the secret to the user, for example, by displaying it as a QR code (Step 2). The user scans the QR code using their authenticator app, and indicates to your app once they're done.

As a part of login procedure, the app prompts a user to input a passcode generated by the authenticator app (Step 3). Once the code is received, the app uses it to obtain user tokens from Mosaic (Step 4).
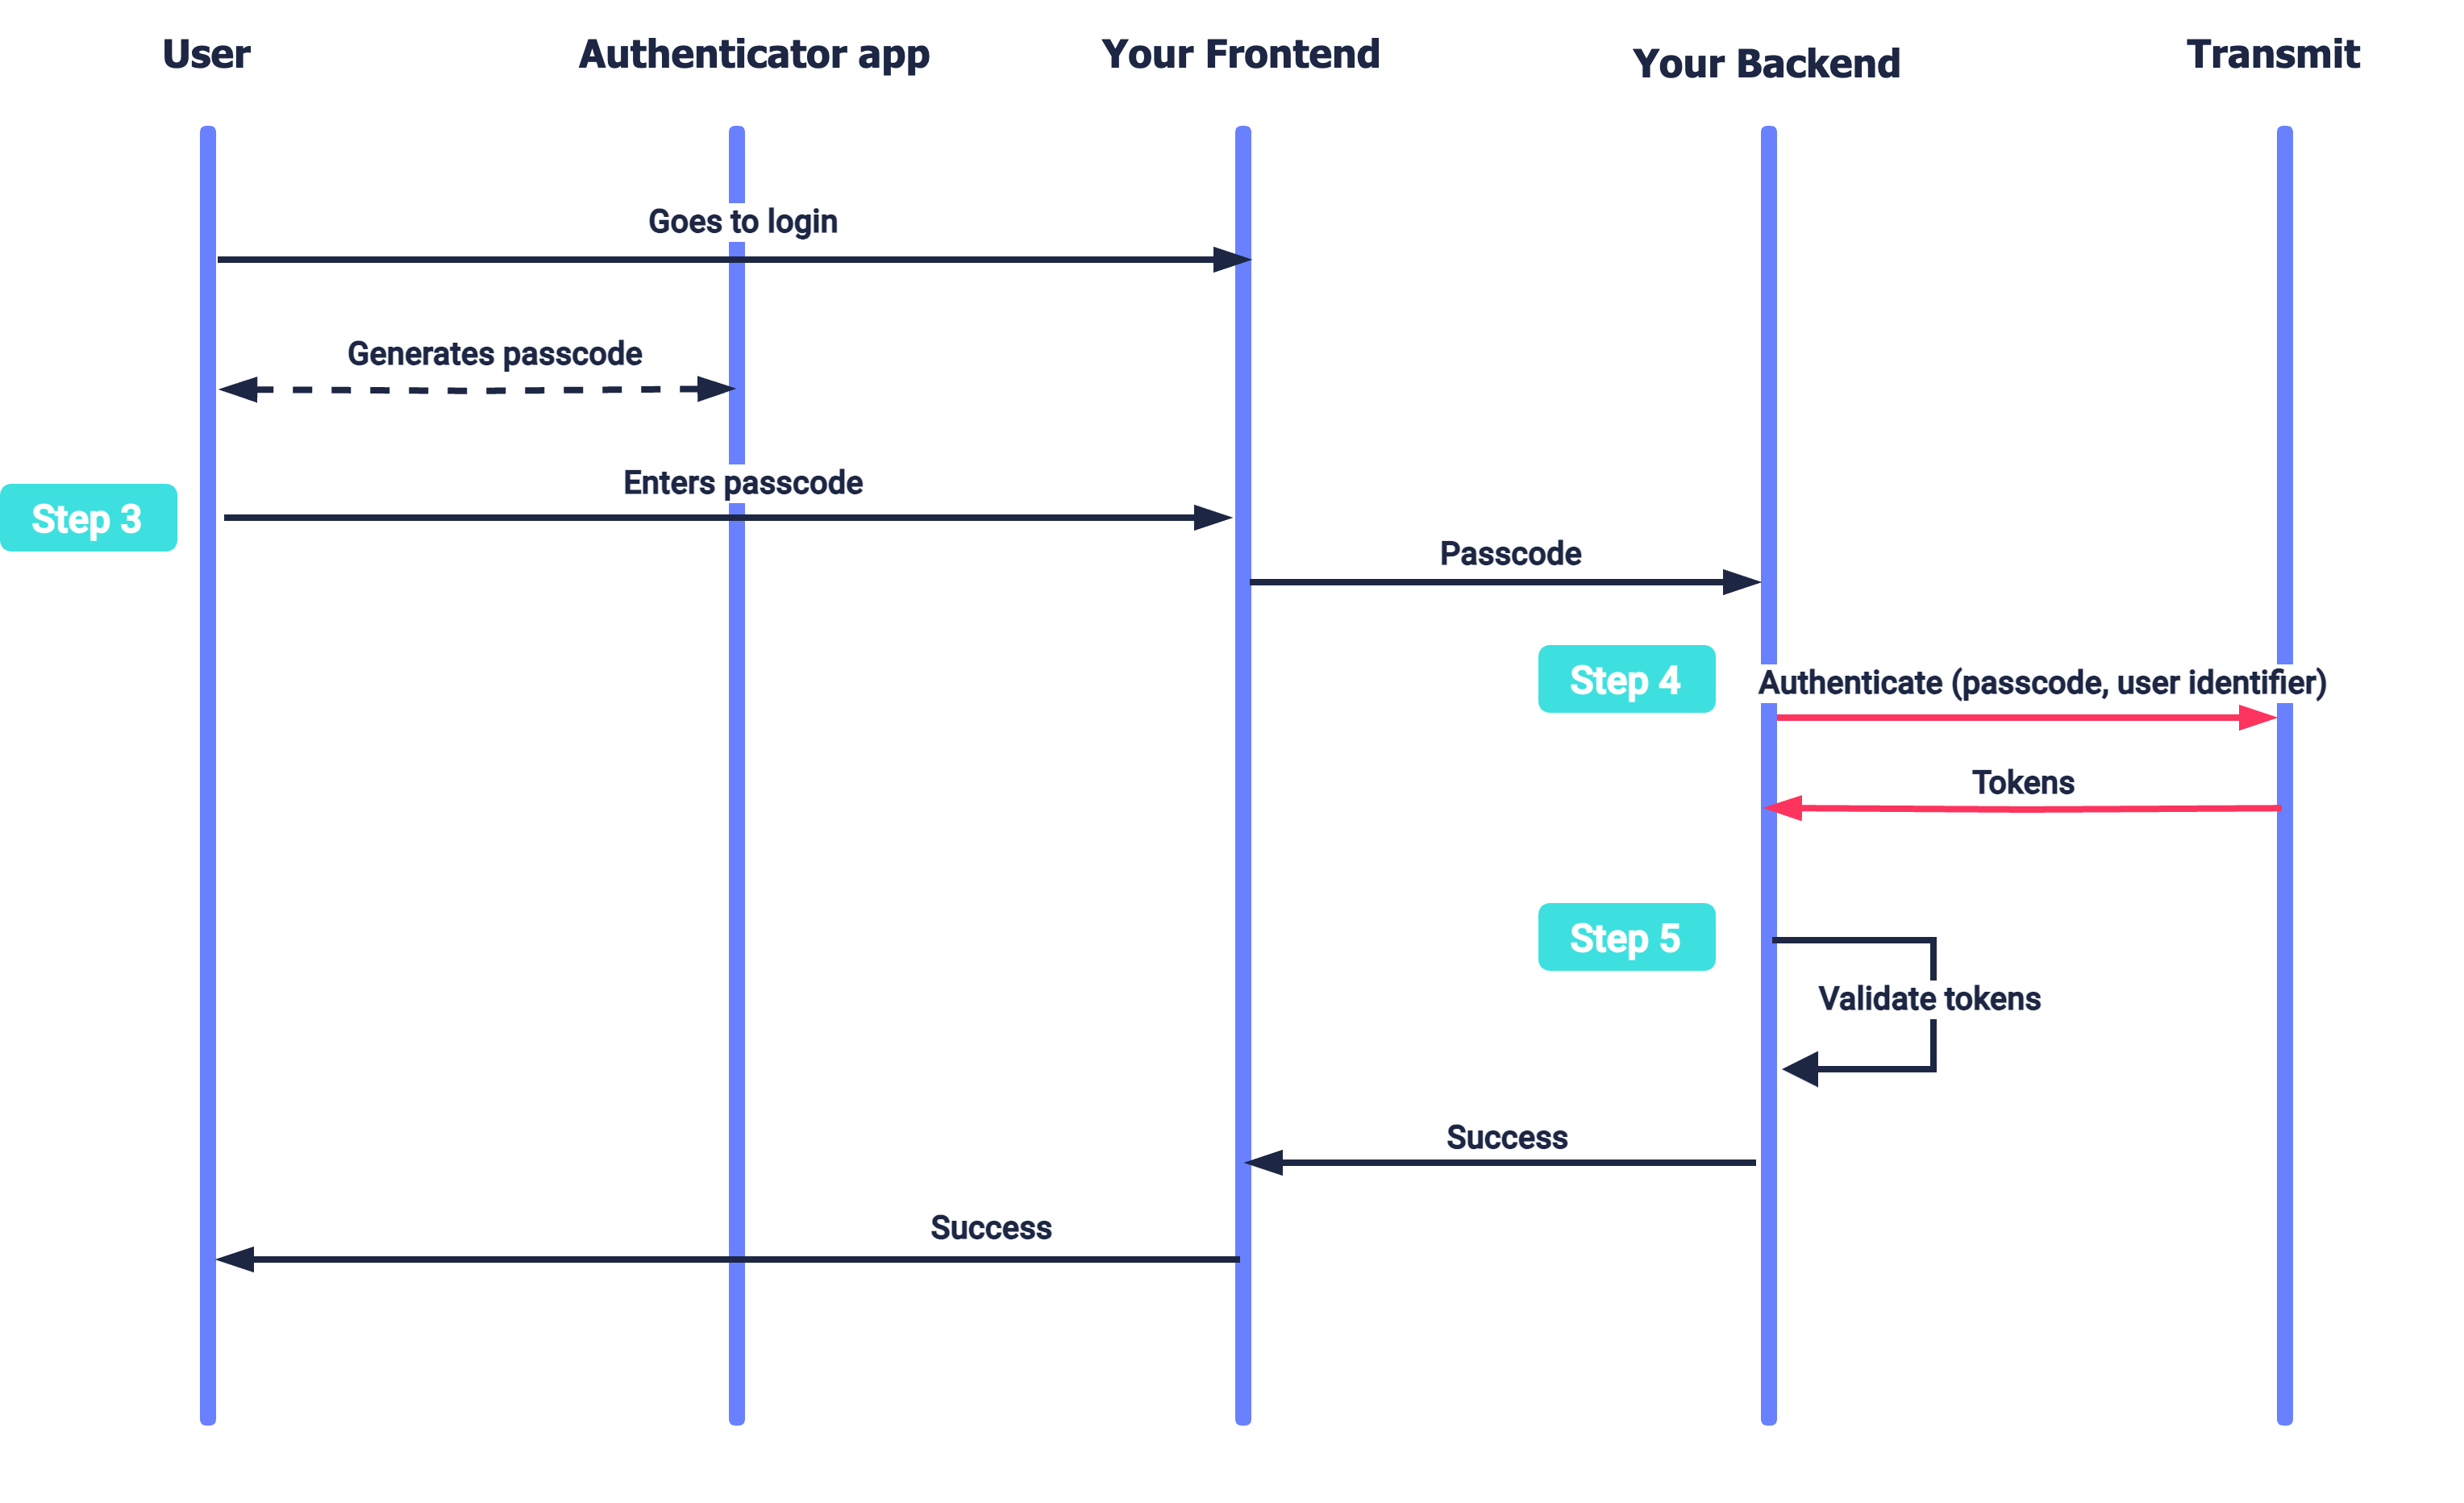
If this is your first time integrating with Mosaic, create an application in the Admin Portal as described here, then implement a login for the app using another backend-to-backend authentication method since TOTP can only be registered to a logged-in user.
The flow assumes that the user has already downloaded an authenticator app (Google Authenticator, Microsoft Authenticator, Twilio Authy, and others) on their mobile device and created an account. To build a custom authenticator app, see Custom TOTP generator (iOS) and Custom TOTP generator (Android).
Create a backend endpoint for registering TOTP. Your frontend should trigger this endpoint when a user wants to configure the TOTP method. Note that at this point the user must be already logged-in to the app using another authentication method.
Register a TOTP authenticator with Mosaic by sending a POST request to the /users/me/totp endpoint. This call returns a secret (string) and a uri (string) which you should forward to your frontend.
The authenticator registration is considered to be complete as soon as a secret is created. If the user chooses not to set up an authenticator app at this time (Step 2), the secret will remain associated with this user anyway. To re-register authenticator, you'll need to override the secret (see the code sample below) or first revoke the previous registration (see Next Steps).
import fetch from 'node-fetch';

async function run() {
  const resp = await fetch(
    `https://api.transmitsecurity.io/cis/v1/users/me/totp`,
    {
      method: 'POST',
      headers: {
        'Content-Type': 'application/json',
        Authorization: 'Bearer [USER_ACCESS_TOKEN]' // The user's token generated as a result of authentication with another backend-to-backend method
      },
      body: JSON.stringify({allow_override: true}) // If true, overrides the TOTP secret if one already exists
    }
  );

  const data = await resp.json();
  console.log(data);
}

run();Create a registration page that:
- instructs a user to set up an authenticator app
- prompts user to add a label for the authenticator
- presents a QR code with the embedded URI received from your backend in Step 1
- allows users to indicate when they've completed the setup (e.g., a "Done" button)
Create an authentication page that:
- instructs a user to generate a TOTP code using their authenticator app
- allows user to input the generated code
- collects a user identifier (e.g., email or phone number) if you don't already have it
- submits the form data (e.g., a "Continue" button)
Once the user submits the form, pass the user identifier and code to your backend (Step 4).
Once your backend receives the passcode, you can authenticate the TOTP code to obtain user tokens. Send a passcode along with the user identifier as a part of POST request to /auth/totp/authenticate. If successful, this call returns user tokens; otherwise, an error. The tokens must be validated as described here.
The user can be identified using different identifier types: email, phone_number, user_id, username, or a custom identifier if configured for B2C users in your tenant.
import fetch from 'node-fetch';

async function run() {
  const resp = await fetch(
    `https://api.transmitsecurity.io/cis/v1/auth/totp/authenticate`,
    {
      method: 'POST',
      headers: {
        'Content-Type': 'application/json',
        Authorization: 'Bearer [CLIENT_ACCESS_TOKEN]' // Generated using Client ID and Secret found in the app settings in the Admin Portal
      },
      body: JSON.stringify({
        token: '[PASSCODE]', // The passcode generated by authenticator app
        identifier_type: '[TYPE]', // The type of user's identifier (email, phone_number, user_id, username)
        identifier: '[USER_IDENTIFIER]' // User's email, phone number, id, or username
      })
    }
  );

  const data = await resp.json();
  console.log(data);
}

run();To view authenticators associated with the user, go to B2C Identity or B2B Identity > Users > select a user > Authenticators.
Once you've completed a basic integration, here are some customizations you can consider:
- Support multiple TOTPs
- Customize the TOTP behavior
- Implement MFA
- Revoke registration of TOTP authenticators
Allow multiple TOTP authenticators per user in your app. In the Admin Portal, go to B2C or B2B Identity (depending on your setup) > Authentication methods > select your app > TOTP, then set the maximum number of authenticators in the Max TOTPs field (from 1 up to 50 per user per app).
After you enable multiple TOTPs, the allow_override property in the Register TOTP API is ignored. Mosaic registers a new authenticator as long as the user has not reached the limit. Once the limit is reached, Mosaic will reject any registration attempt—the API call will fail, and no existing authenticator will be overridden or replaced. The user or an administrator must revoke an existing authenticator first. When adding a new authenticator, prompt the user to provide a meaningful label to help distinguish authenticators later.
During login, Mosaic validates the one-time passcode against all active TOTPs for the user. Authentication succeeds if the provided passcode matches any active TOTP within the allowed time window.
import fetch from 'node-fetch';

async function run() {
  const resp = await fetch(
    `https://api.transmitsecurity.io/cis/v1/users/me/totp`,
    {
      method: 'POST',
      headers: {
        'Content-Type': 'application/json',
        Authorization: 'Bearer [USER_ACCESS_TOKEN]'
      },
      body: JSON.stringify({
        label: 'My iPhone 17'
      })
    }
  );

  const data = await resp.json();
  console.log(data);
}

run();By default, the passcode includes 6 digits and changes every 30 seconds. You can adjust the passcode behavior, for example, set up a shorter rotation period or update the lockout duration in case the user entered the passcode incorrectly several times in a row. In the Admin Portal under B2C or B2B Identity (based on your setup) > Authentication methods > select your app > TOTP.
Configuration settings control the logic how Mosaic manages the login procedure:
- Max TOTPs: defines the maximum number of TOTP authenticators a user can have at the same time (from 1 to 50).
- Display: defines the issuer.
- Lockout: specifies the number of failed attempts before Mosaic will lockout the user for a certain period of time. For detailed information, including progressive lockout tiers, see Lockout policies.
Advanced settings affect token generation:
- Window: determines if the passcode can be used after a new passcode has been generated. This can be helpful in case a new code was generated while the user was inputting the old code, or if there are network delays. By default, Mosaic will accept a current code and also the previous code that was generated. If you want the user to input the code strictly within its token period, set the window to 0. To extend code validity for longer interval, increase the window setting up to 5.
- Hash algorithm: the algorithm for code generation.
- Token digits: the number of digits in the code.
- Token period: how often the code changes. The default period is 30 seconds which means a new code is generated every 30 seconds. Token period is used together with the window to determine if the code is valid.
Before changing advanced settings, verify which authenticator apps support this configuration and instruct your users to use them. If you pass the secret as a code for inputting it manually instead of presenting a QR code, your users might need to manually configure their authenticator app to match the configuration. These instructions should be presented on a page created in Step 2.
For complete information about the TOTP settings, see Customize login methods.
Typically, TOTP is used as a second factor in MFA flows as it provides an additional layer of security. For more details, see Use multi-factor authentication. When using the TOTP as a second factor, provide session_id within the TOTP authentication request to map it to an existing session. The returned ID token will include a claim that confirms that the MFA was satisfied and which methods were used.
import fetch from 'node-fetch';

async function run() {
  const resp = await fetch(
    `https://api.transmitsecurity.io/cis/v1/auth/totp/authenticate`,
    {
      method: 'POST',
      headers: {
        'Content-Type': 'application/json',
        Authorization: 'Bearer [CLIENT_ACCESS_TOKEN]' // Generated with Client ID and Secret found in the app settings in the Admin Portal
      },
      body: JSON.stringify({
        session_id: '[SESSION_ID]', // ID of the session created as a result of the first auth
        token: '[PASSCODE]', // The passcode generated by authenticator app
        identifier_type: '[TYPE]', // The type of user's identifier
        identifier: '[USER_IDENTIFIER]' // User's email, phone number, id, or username
      })
    }
  );

  const data = await resp.json();
  console.log(data);
}

run();User revokes TOTP authenticator
Users can initiate to revoke the registration of the TOTP authenticator by themselves. Once triggered, your server should send a POST request to /users/me/totp/revoke.
import fetch from 'node-fetch';

async function run() {
  const resp = await fetch(
    `https://api.transmitsecurity.io/cis/v1/users/me/totp/revoke`,
    {
      method: 'POST',
      headers: {
        Authorization: 'Bearer [USER_ACCESS_TOKEN]' // The user must be logged in
      }
    }
  );

  if (resp.status === 204) {
    console.log('success');
  } else {
    const data = await resp.text();
    console.log(data);
  }
}

run();
Admin revokes registration of TOTP authenticator
An admin can revoke the registration of TOTP authenticator on behalf of the user when a user's device is stolen or no longer available. Once triggered, your server should send a POST request to /users/${userId}/totp/revoke.
import fetch from 'node-fetch';

async function run() {
  const userId = '[USER_ID]'; // ID of the user to revoke the registration for
  const resp = await fetch(
    `https://api.transmitsecurity.io/cis/v1/users/${userId}/totp/revoke`,
    {
      method: 'POST',
      headers: {
        Authorization: 'Bearer [CLIENT_ACCESS_TOKEN]' // Generated with Client ID and Secret found in the app settings in the Admin Portal
      }
    }
  );

  if (resp.status === 204) {
    console.log('success');
  } else {
    const data = await resp.text();
    console.log(data);
  }
}

run();