Build a custom authenticator app for generating instant codes required for TOTP login. This guide describes how to integrate TOTP code generation in your iOS app with Mosaic Authentication SDK.
Mosaic TOTP login can work with any authenticator app. Creating a custom authenticator app is optional.

The TOTP authentication relies on the static code (seed) shared between the authenticator and authenticator app and other settings required to generate code and prove its validity (e.g., code length or validity period). Below are basic flows for connecting the TOTP authenticator with your custom authenticator app and generating TOTP codes.
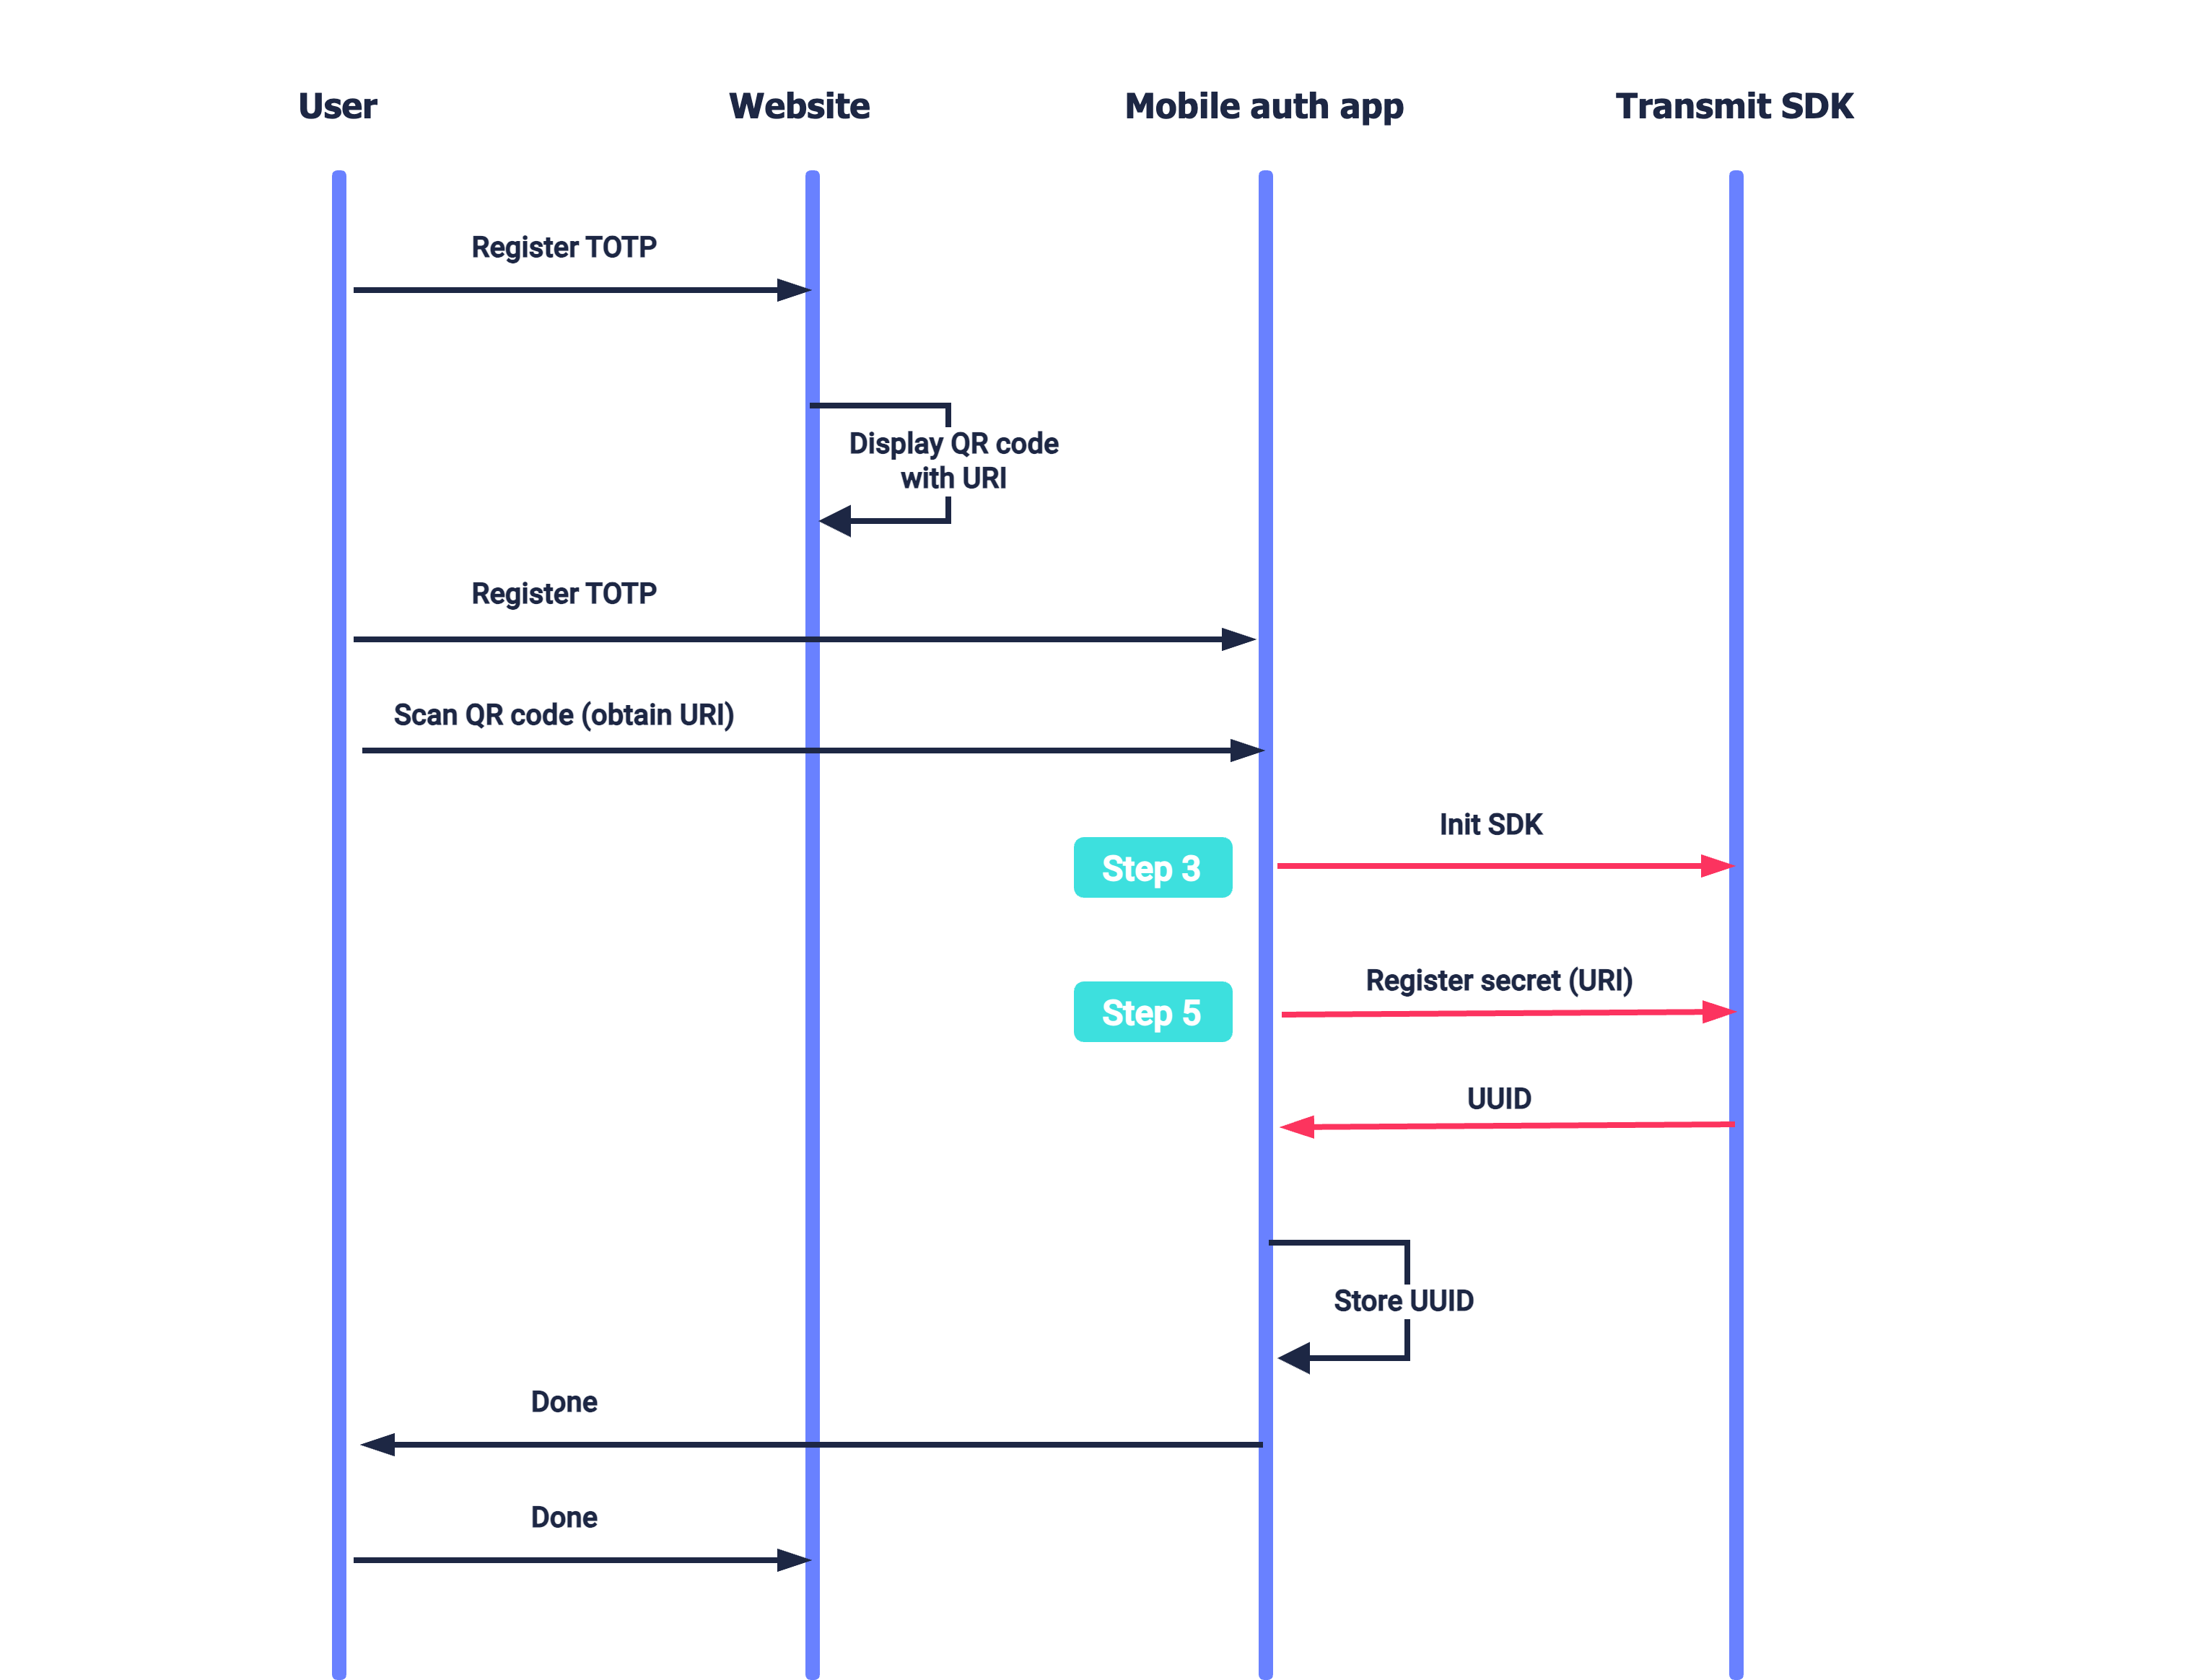
Suppose a user wants to enable TOTP login for your website (see Login with TOTP). The website presents a QR code that encodes the TOTP secret (and additional configuration). The user opens your authenticator app on their mobile device and scans the QR code. After initializing the SDK (Step 3), the authenticator app registers the secret for the user (Step 5). The user indicates to the website once the mobile flow is completed.
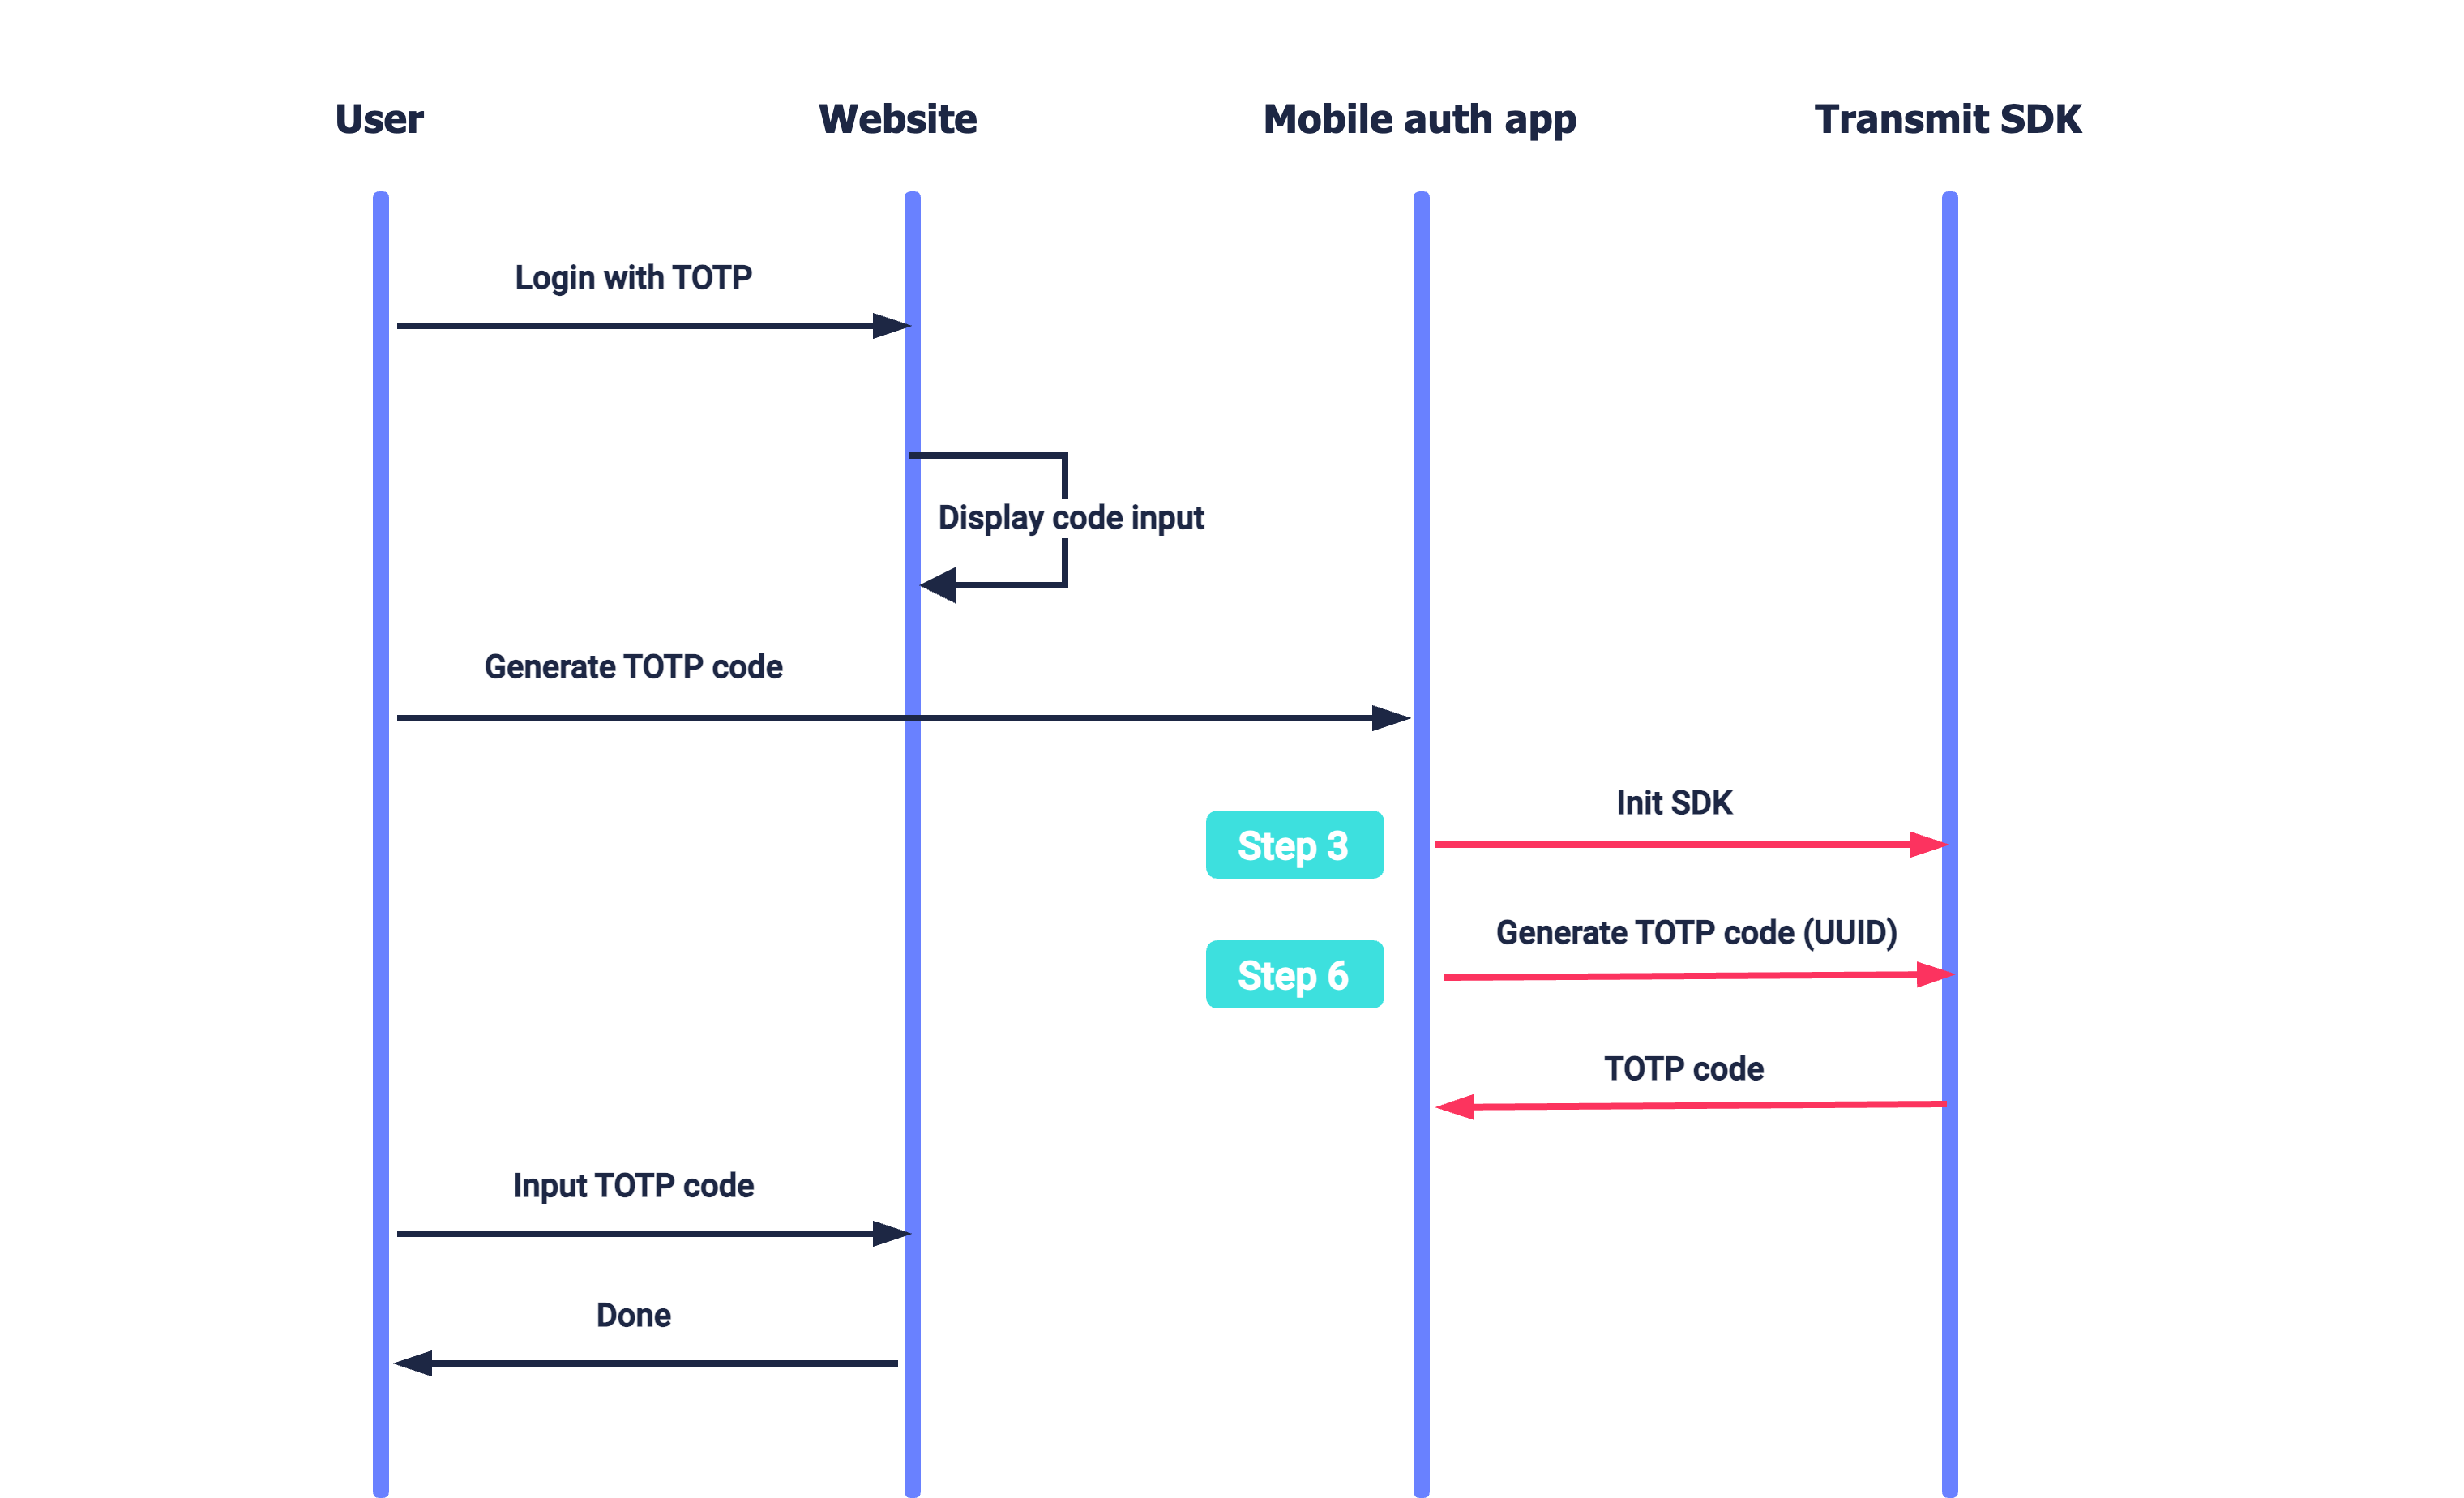
A user wants to log in to the website which requires TOTP code for authentication (see Login with TOTP). To obtain the TOTP code, the user proceeds to the authenticator app to generate the code. After initializing the SDK (Step 3), the app generates the TOTP code and displays it on the screen (Step 6). The user inputs this code on the website page.
- iOS 13.0+
- Xcode 11+
To integrate with Mosaic, you'll need to configure an application. From the Applications page, create a new application or use an existing one. From the application settings:
- For Client type, select native.
- For Redirect URI, enter your website URL. This is a mandatory field, but it isn't used for this flow.
- Obtain your client ID and secret, which are autogenerated upon app creation.
CocoaPods is a dependency manager for Cocoa projects. For usage and installation instructions, visit their website. To integrate TSAuthenticationSDK into your Xcode project using CocoaPods, specify it in your Podfile:
pod 'TSAuthentication', '~> 1.0'The Swift Package Manager is a tool for automating the distribution of Swift code and is integrated into the swift compiler. It is in early development, but TSAuthenticationSDK does support its use on supported platforms.
Once you have your Swift package set up, adding TSAuthenticationSDK as a dependency is as easy as adding it to the dependencies value of your Package.swift.
dependencies: [
    .package(url: "https://github.com/TransmitSecurity/authentication-ios-sdk", .upToNextMajor(from: "1.0.0"))
]If you prefer not to use any of the aforementioned dependency managers, you can integrate TSAuthenticationSDK into your project manually.
- Download the TSAuthenticationSDK framework manually, open the new
TSAuthenticationSDKfolder, and drag theTSAuthenticationSDK.xcframeworkinto the Project Frameworks directory of your application's Xcode project.
The TSAuthenticationSDK.framework is automatically added as a target dependency, linked framework and embedded framework in a copy files build phase which is all you need to build on the simulator and a device.
Initialize using PLIST configuration (recommended)
To do this, create a plist file named TransmitSecurity.plist in your Application with the following content. Where CLIENT_ID is your client ID (obtained in Step 1).
<?xml version="1.0" encoding="UTF-8"?>
<!DOCTYPE plist PUBLIC "-//Apple//DTD PLIST 1.0//EN" "http://www.apple.com/DTDs/PropertyList-1.0.dtd">
<plist version="1.0">
<dict>
    <key>credentials</key>
    <dict>
        <!-- Use api.eu.transmitsecurity.io for EU, api.ca.transmitsecurity.io for CA -->
        <key>baseUrl</key>
        <string>https://api.transmitsecurity.io/</string>
        <key>clientId</key>
        <string>CLIENT_ID</string>
    </dict>
</dict>
</plist>
Add the code below to your Application Class
Make sure to add the import TSAuthenticationSDK at the top of the implementation class.
class AppDelegate: UIResponder, UIApplicationDelegate {

    func application(_ application: UIApplication, didFinishLaunchingWithOptions launchOptions: [UIApplication.LaunchOptionsKey: Any]?) -> Bool {
        TSAuthentication.shared.initializeSDK()
        return true
    }
}
Initialize using SDK parameters
Add the code below to your Application Class. Where CLIENT_ID is your client ID (obtained in Step 1).
Make sure to add the import TSAuthenticationSDK at the top of the implementation class.
class AppDelegate: UIResponder, UIApplicationDelegate {

    func application(_ application: UIApplication, didFinishLaunchingWithOptions launchOptions: [UIApplication.LaunchOptionsKey: Any]?) -> Bool {
        let config = TSConfiguration(domain: YOUR_DOMAIN)
        TSAuthentication.shared.initialize(baseUrl: "https://api.transmitsecurity.io/", clientId: "CLIENT_ID", domain: "[YOUR_DOMAIN]") // Use api.eu.transmitsecurity.io for EU, api.ca.transmitsecurity.io for CA, api.au.transmitsecurity.io for AU, or your custom domain, if you're using one
        return true
    }
}Your app needs certain permissions to support QR scanning for registration or if you plan to require biometric authentication before allowing the user to generate a TOTP code (see Step 5). To collect these permissions, you should provide an explanation for using them. To do it, open the Info.plist file as a Property List,
- Add Privacy - Face ID Usage Description key and provide a reason, such as "This app uses Face ID to provide secure authentication". This is required for the
biometricanddevicePinOrBiometricsecurity types. ThedevicePinsecurity type uses the system passcode prompt and does not require this permission. - Add Privacy - Camera Usage Description key and provide a reason, such as "This app uses camera to scan QR codes".
The TOTP secret is used for generating TOTP codes for authentication. When registering the TOTP authenticator (see Login with TOTP), Mosaic returns this secret in a URI that also includes the TOTP configuration (found in the Admin Portal). This URI can be passed as is to the authenticator app to register the secret.
For example, suppose your website encodes the URI in a QR code. The authenticator app can allow the user to scan the code, extract the URI from the QR, and then pass it to the SDK using the registerTOTP() call below. You can optionally require device-level authentication before generating a code by setting the securityType parameter—biometrics, device PIN, or either. Note that adding new biometric credentials on the device does not invalidate the existing registration, and the generation will work with the new biometrics.
This is configured by the SDK upon registration. The call returns registration data that your app should store and use when generating codes in the future (see Step 6).
// Registers secret for a user in the app
// - URI: URI provided by Mosaic, embedded in a QR
// - SECURITY_TYPE: Controls device-level authentication before generating a code.
//   Can be set to: .none, .biometric, .devicePin, or .devicePinOrBiometric

TSAuthentication.shared.registerTOTP(URI: "URI", securityType: "SECURITY_TYPE") { [weak self] result in
    switch result {
        case .success(let response):
            // Handle success
            // Response object containing: ISSUER, LABEL, and UUID
               // - ISSUER: The application or organization's name (e.g., "MyApp")
               // - LABEL:  The user account (e.g., "johndoe@example.com", "John", "+972505555555")
               // - UUID:   The unique identifier for which the registration data is stored, it should be provided for generating TOTP code
        case .failure(let error):
            switch error {
            case .totpError(let error):
                // Handle TOTP error
            default:
                // Handle other errors
            }
        }
}Implement a button that generates a TOTP code. When triggered, it should execute the following SDK call by passing the UUID parameter obtained in Step 5:
// Generates TOTP code
// - UUID: The unique identifier returned in Step 5
TSAuthentication.shared.generateTOTPCode(UUID: "UUID") { [weak self] result in
    switch result {
        case .success(let response):
            // Handle success
            // Response object containing: CODE
            // - CODE: The generated TOTP code
        case .failure(let error):
            switch error {
            case .totpError(let error):
                // Handle TOTP error
            default:
                // Handle other errors
            }
        }
}Mosaic Authentication SDK accepts the configuration URI comprised of the following parameters, for example:
// Line breaks and spaces were added for readability

otpauth://totp/MyApp:user@myapp.com? // Application and user requesting the code (optional)
  secret=ABCWWLT3JVEDCXQJHY2XWTTDNE5QEXYZ& // Base 32 secret generated by TOTP authenticator
  issuer=MyApp& // Application requesting the code
  algorithm=SHA1& // Algorithm used for code generation such as "sha1", "sha256", or "sha512"
  digits=6& // Code length, between 1 and 9
  period=30 // Validity period, in seconds