Mosaic provides a solution for managing devices as part of identity management. In this article, you will learn how to implement basic device management tasks, such as identifying a returning device or deleting a device that is no longer in use.
This guide explains how to manage users' devices using identity journeys. For a quickstart, check out the Device management examples journey template in Admin Portal > B2C or B2B Identity based on your setup > Journeys.
If looking for API way, refer to Device keys APIs.
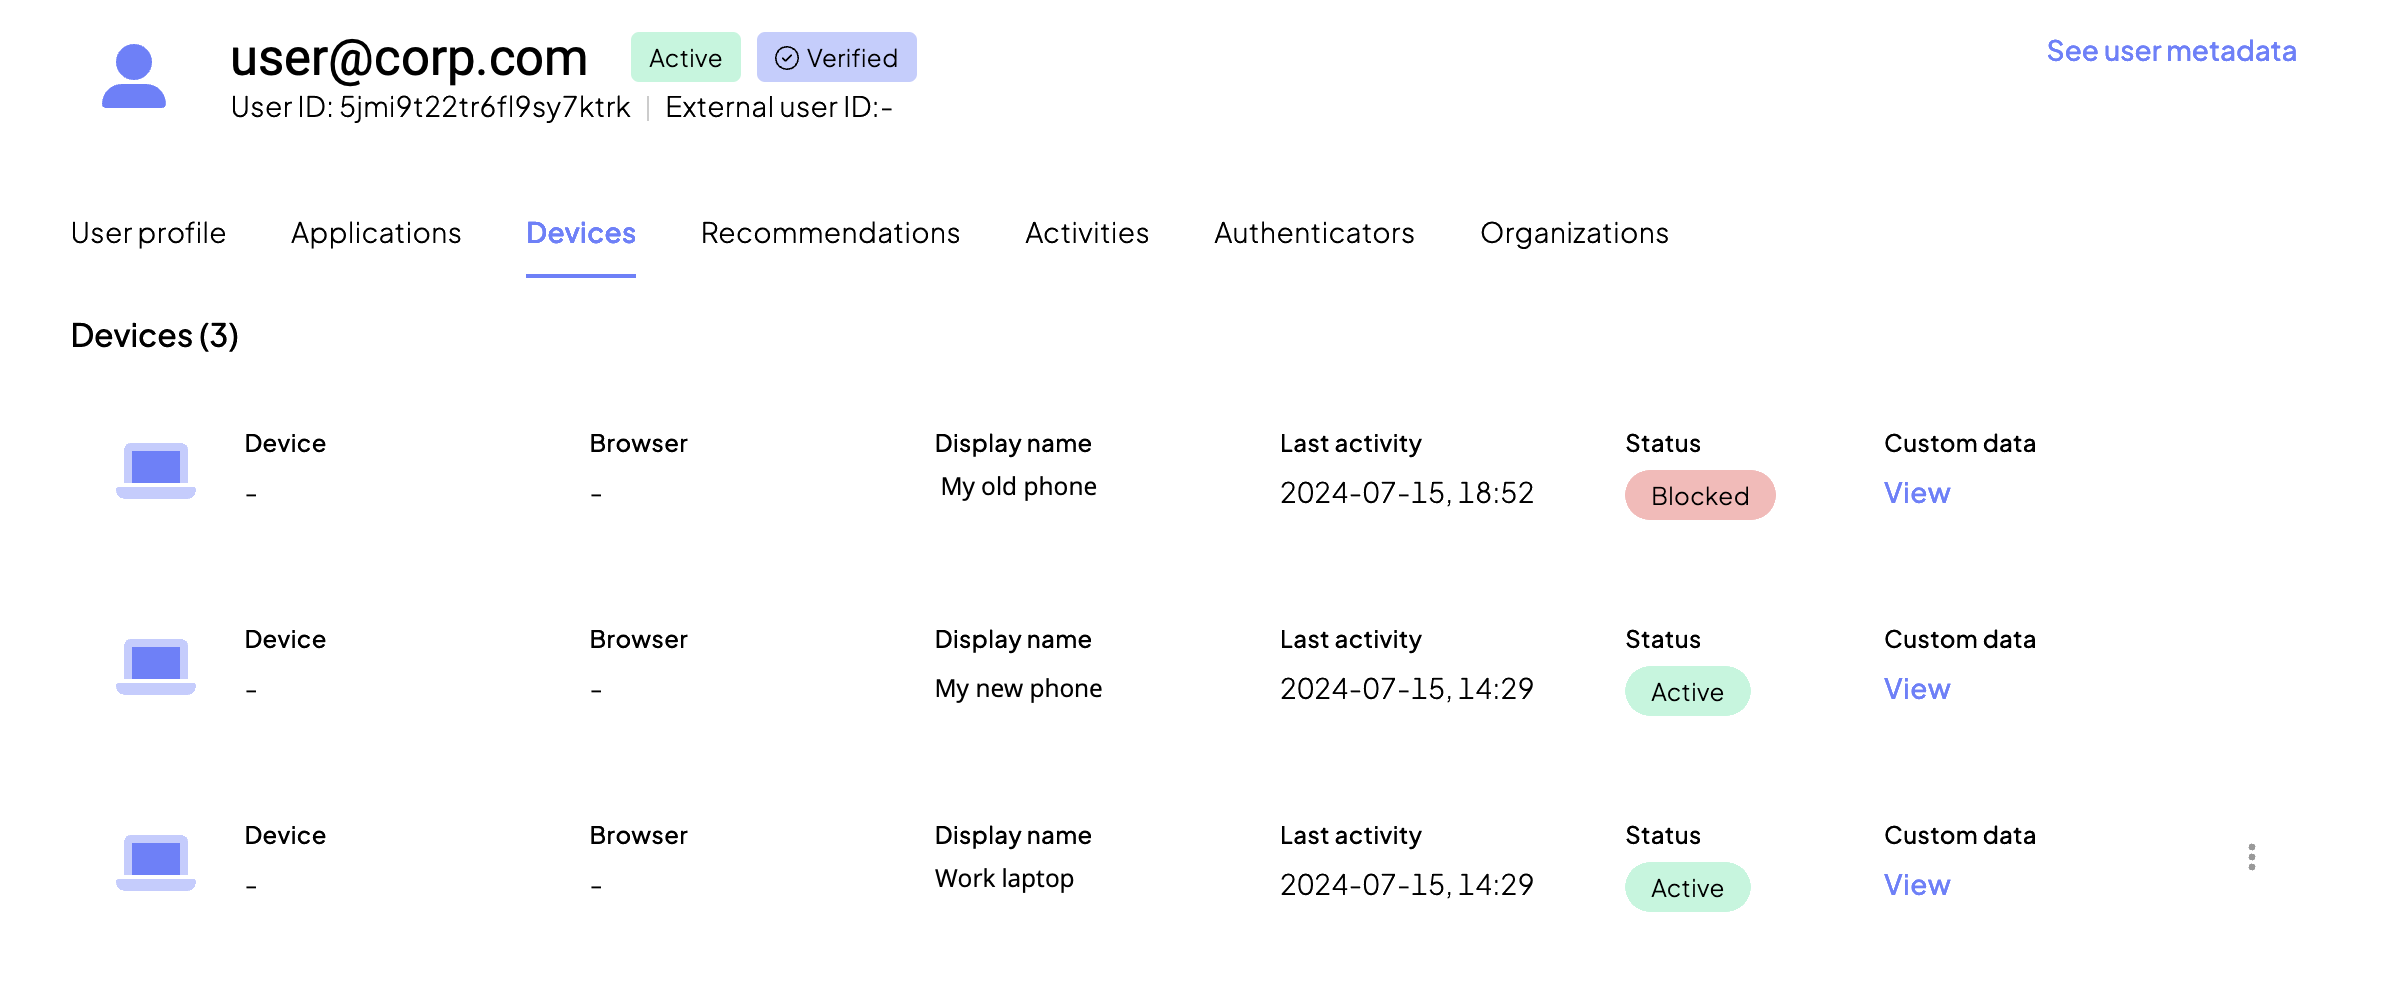
You can view devices associated with the user in the Admin Portal (Admin Portal > B2C Identity > Users > user > Devices).
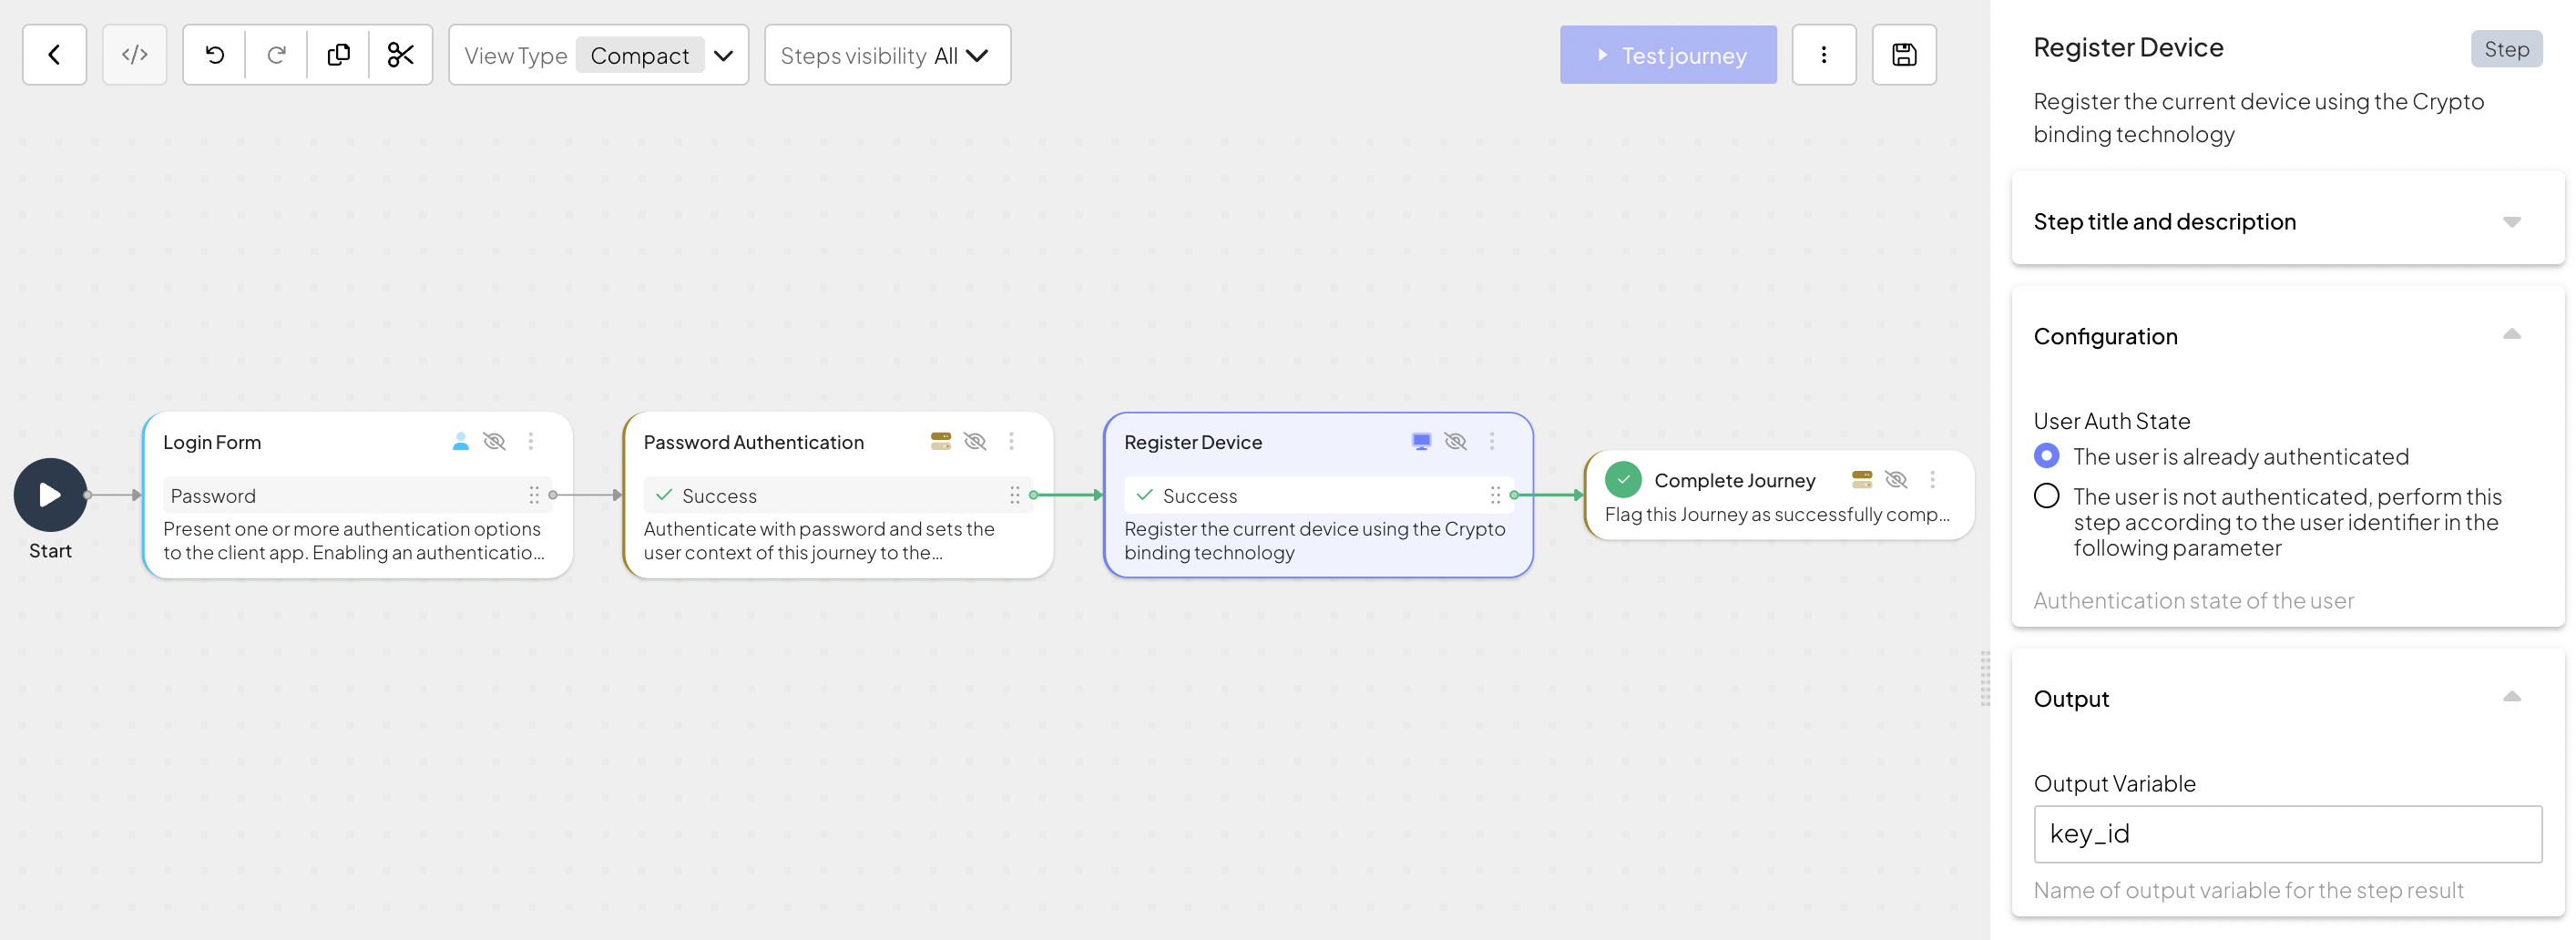
Establish a strong association between a device and a user using crypto-binding. After authenticating a user or onboarding a new user, include the Register Device step in the journey. During device registration, the SDK generates a cryptographic key pair on the device without requiring user interaction—though you can request the user's consent if needed. The device's public key is then exported and sent to Mosaic, while the private key remains securely on the device. As a result of device registration, Mosaic creates a unique device identity that can be tracked and managed using a device key ID (key_id).
Registering a device should generally occur after user authentication to avoid associating devices with unconfirmed identities. The only exception is during the user onboarding, where the user and device are registered together.
If you're interested in identifying devices before authentication, Mosaic Fraud Prevention collects other device identifiers, including device ID provided by manufacturer and device fingerprint. See Secure device identity with Fraud Prevention.
In the example journey below, the Register device is added after password authentication. After crypto-binding a device, Mosaic returns a device key ID (key_id) while the private key securely remains on device. Optionally, you can save the external user ID on the SDK side with the Save Data in SDK step to allow recognizing the device even before the user authenticates.
Identifying known devices early in a journey enhances security and allows you to build tailored user experiences. To check if this is a returning device, add the Known Device Status step to your journey. This step checks if the device is registered to a specific user in the app.
The validation process involves Mosaic issuing a challenge to the client to sign using the private key stored on the user's device. This process is handled implicitly by the client SDK and no user interaction is required. The client side sends back the signed challenge and a device key ID (key_id) which is used to locate the public key. If the signature is correctly validated with the public key, the step is successful, and the device key ID (key_id) is returned. For new or blocked devices, this returns an error.
The device can be recognized as known even if you haven't registered it using the Register device journey step. Other Mosaic services, such as Fraud Prevention, can also perform device binding as a part of integration.
This step could be used as part of two-factor authentication, leveraging something the user has (their device) in addition to something the user knows (such as a password). It can also be used to elevate trust for known devices, and reduce user friction accordingly.
To identify a known device, the journey needs the user identifier. You can obtain it in several ways:
After authenticating the user with Login form and subsequent steps. In this case, the user auth state is "authenticated" and the journey obtains the
user_idfrom the user context.By collecting an identifier with Collect information step.
By storing a user identifier on the client SDK side using the Save Data in SDK step in a previous journey and returning it using
@policy.sdkSavedData().
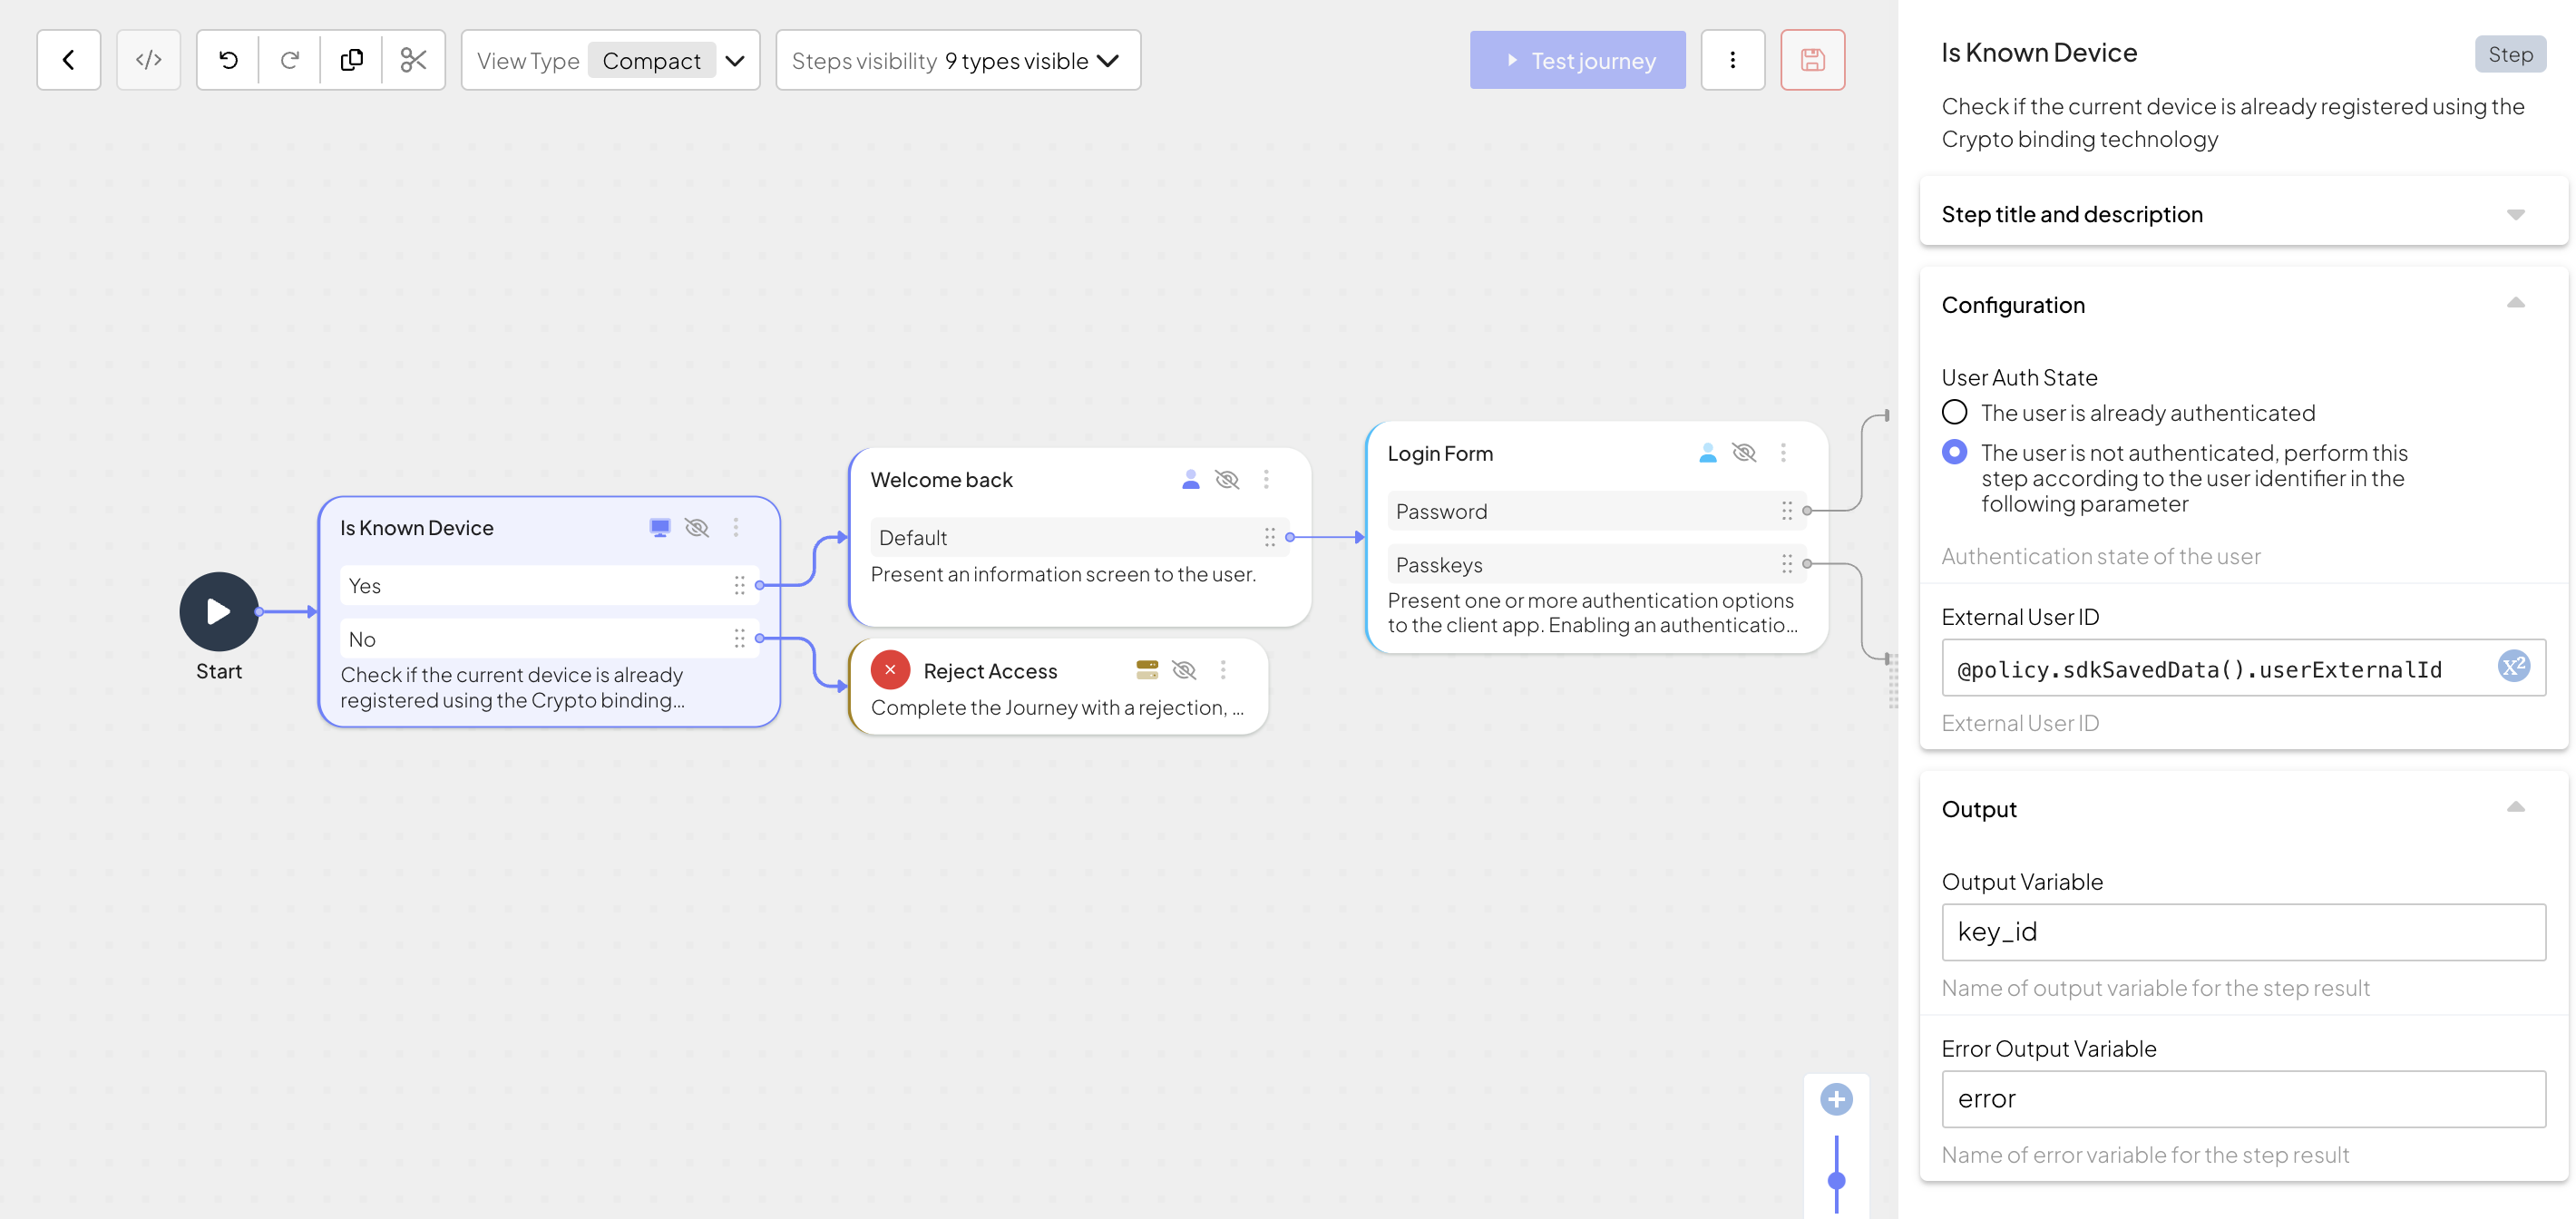
For example, your app allows logging in via registered devices only. Add the Known Device Status step as the first step in the authentication journey.
Since the user isn't known yet, the user authentication state should be set to "The user is not authenticated". The flow assumes that you've saved the user's external ID (as userExternalId) on the SDK side upon device registration, and now you can retrieve it using @policy.sdkSavedData().userExternalId.
If the device is recognized, the journey allows the user to log in. But if a user tries to log in from an unknown device, the journey rejects access.
Mosaic allows enriching device identity with additional data. This can be helpful if you're looking for a way to provide customized user experience depending on what user device is currently in use—you can configure journeys to read arbitrary information from the device record and proceed accordingly. These operations are performed with the "Device keys: Update device key API" and "Device keys: Get device key API" steps.
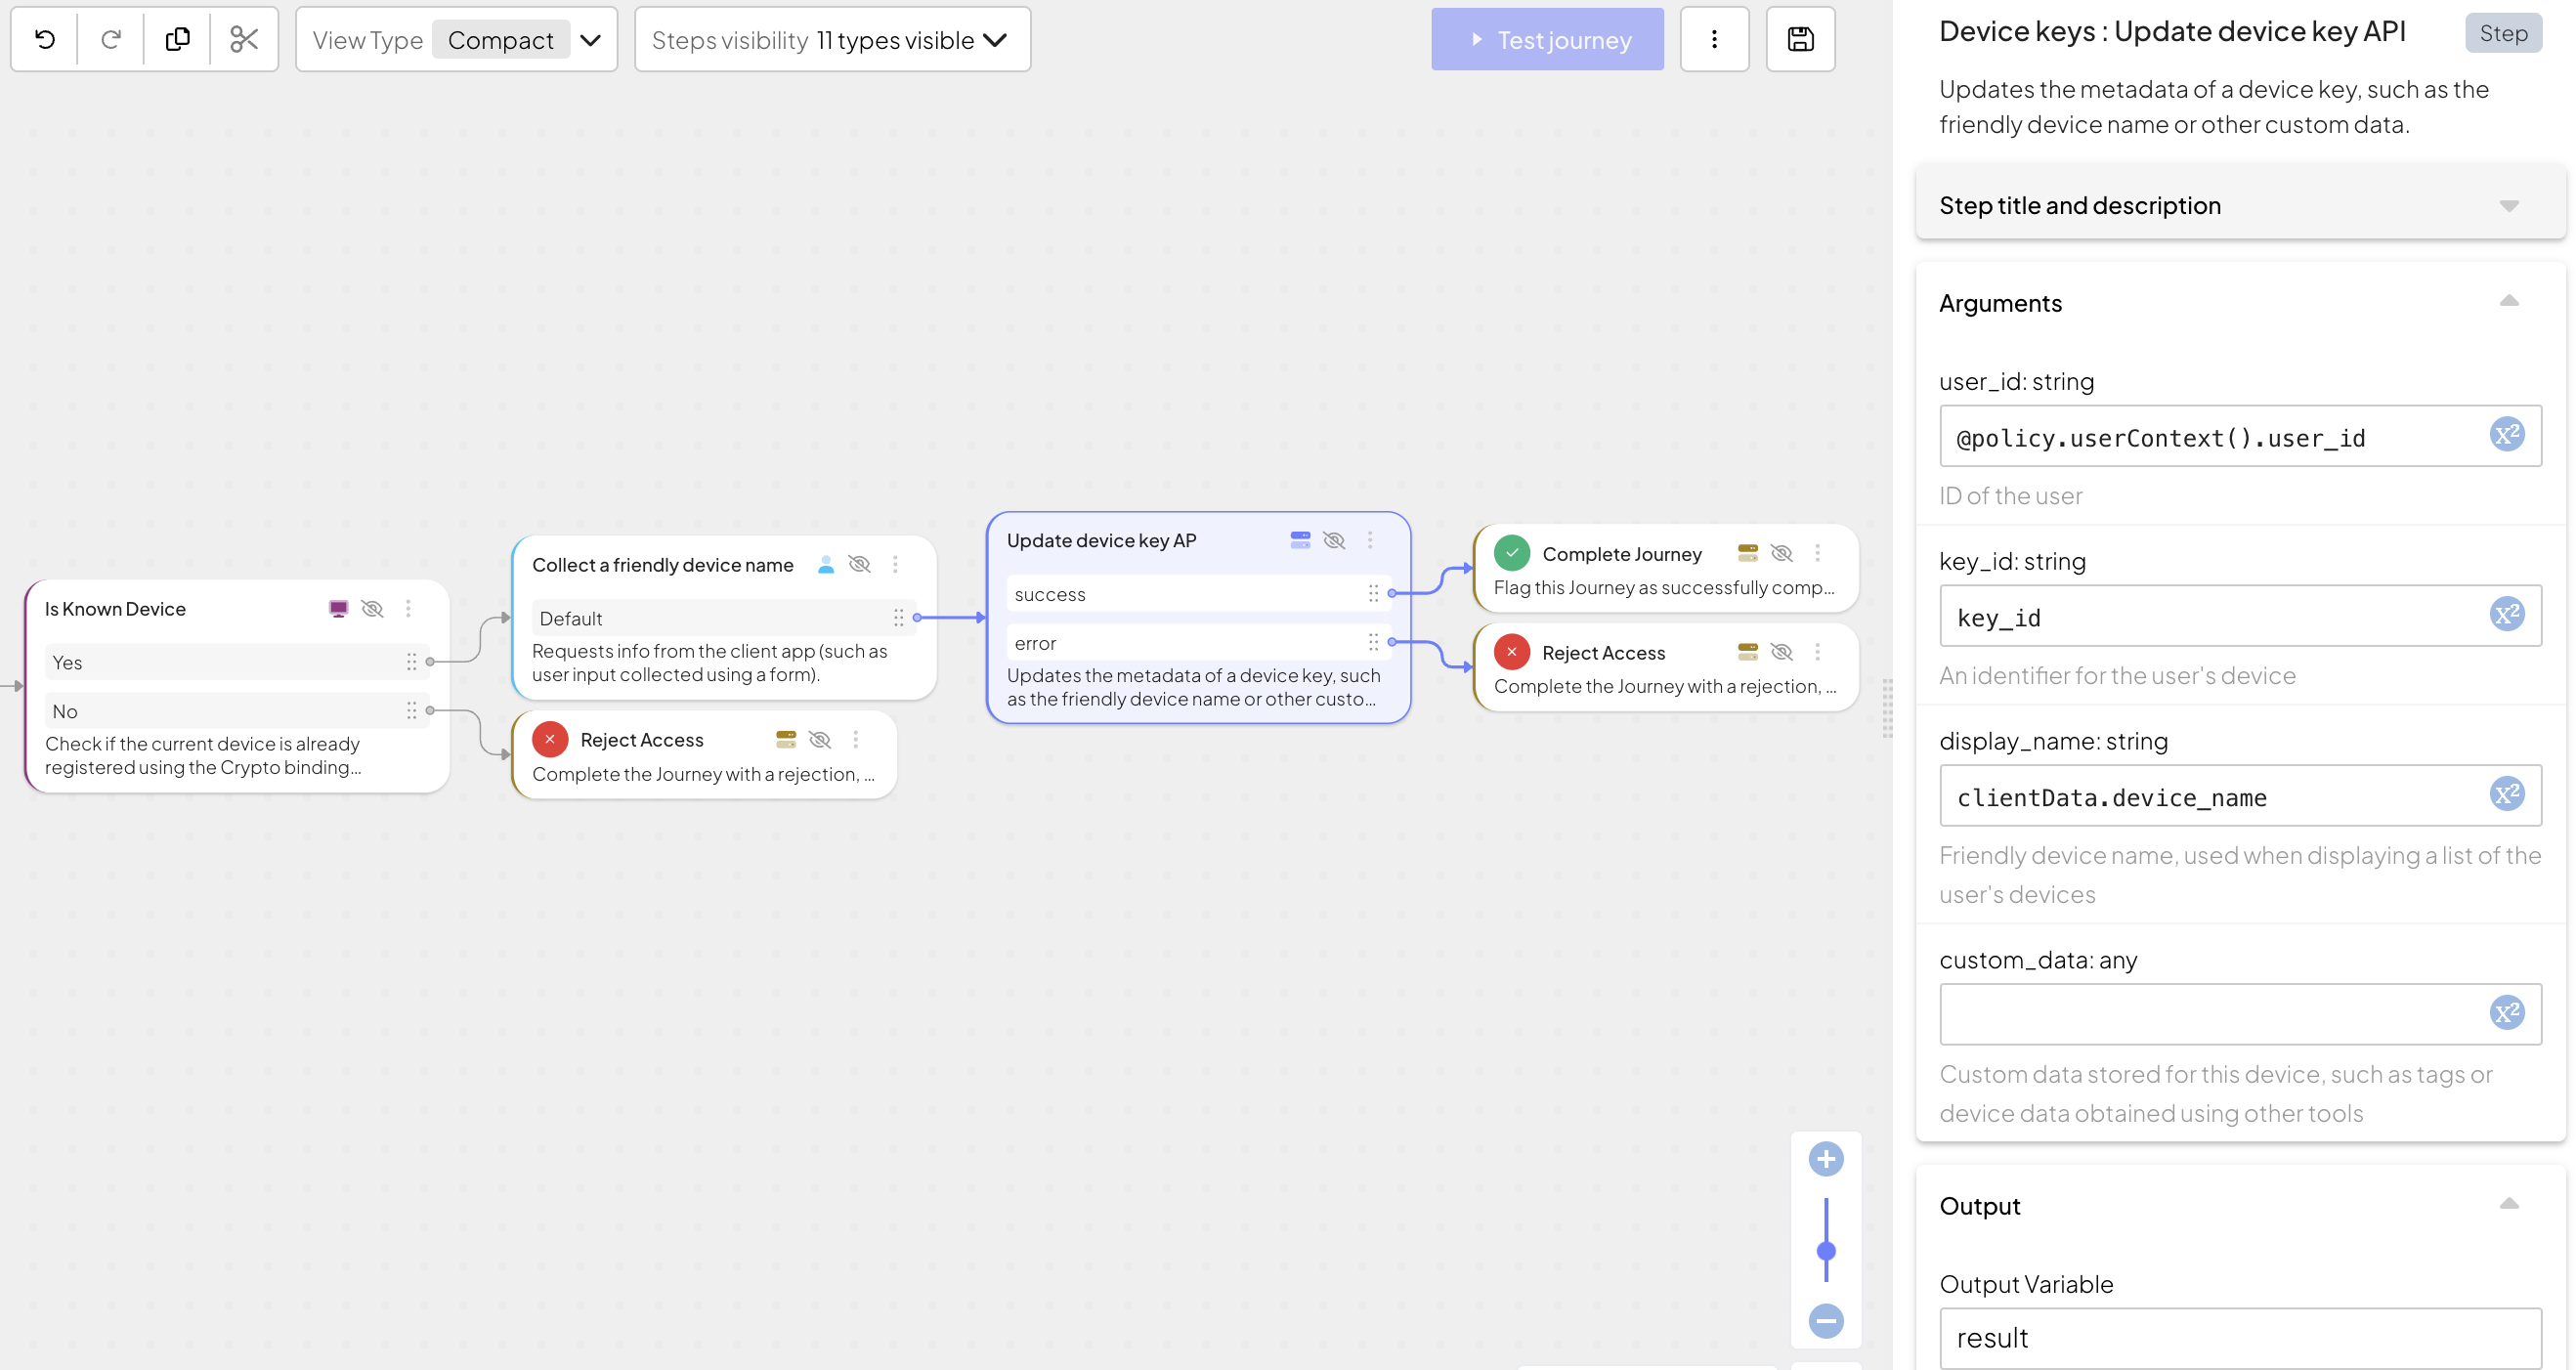
For example, a user wants to distinguish between their devices. To provide a user-friendly name for the current user device, add the following steps to the journey:
The journey assumes the user has already authenticated in the previous steps.
- Start by validating if the device is registered to the authenticated user by adding Known Device Status. If the device is recognized, the step returns the device key ID (
key_id). - Add the Collect information step to collect input from the user. For example, add the
device_namestring field to the schema. Once the user submits the name, it will be stored asdevice_namein the output variableclientData. - Add the "Device keys: Update device key API" step to update the device record. Provide the following arguments for the query:
key_idforkey_id,@policy.userContext().user_idforuser_id(retrieves the user ID from the user context), andclientData.device_namefordisplay_name.
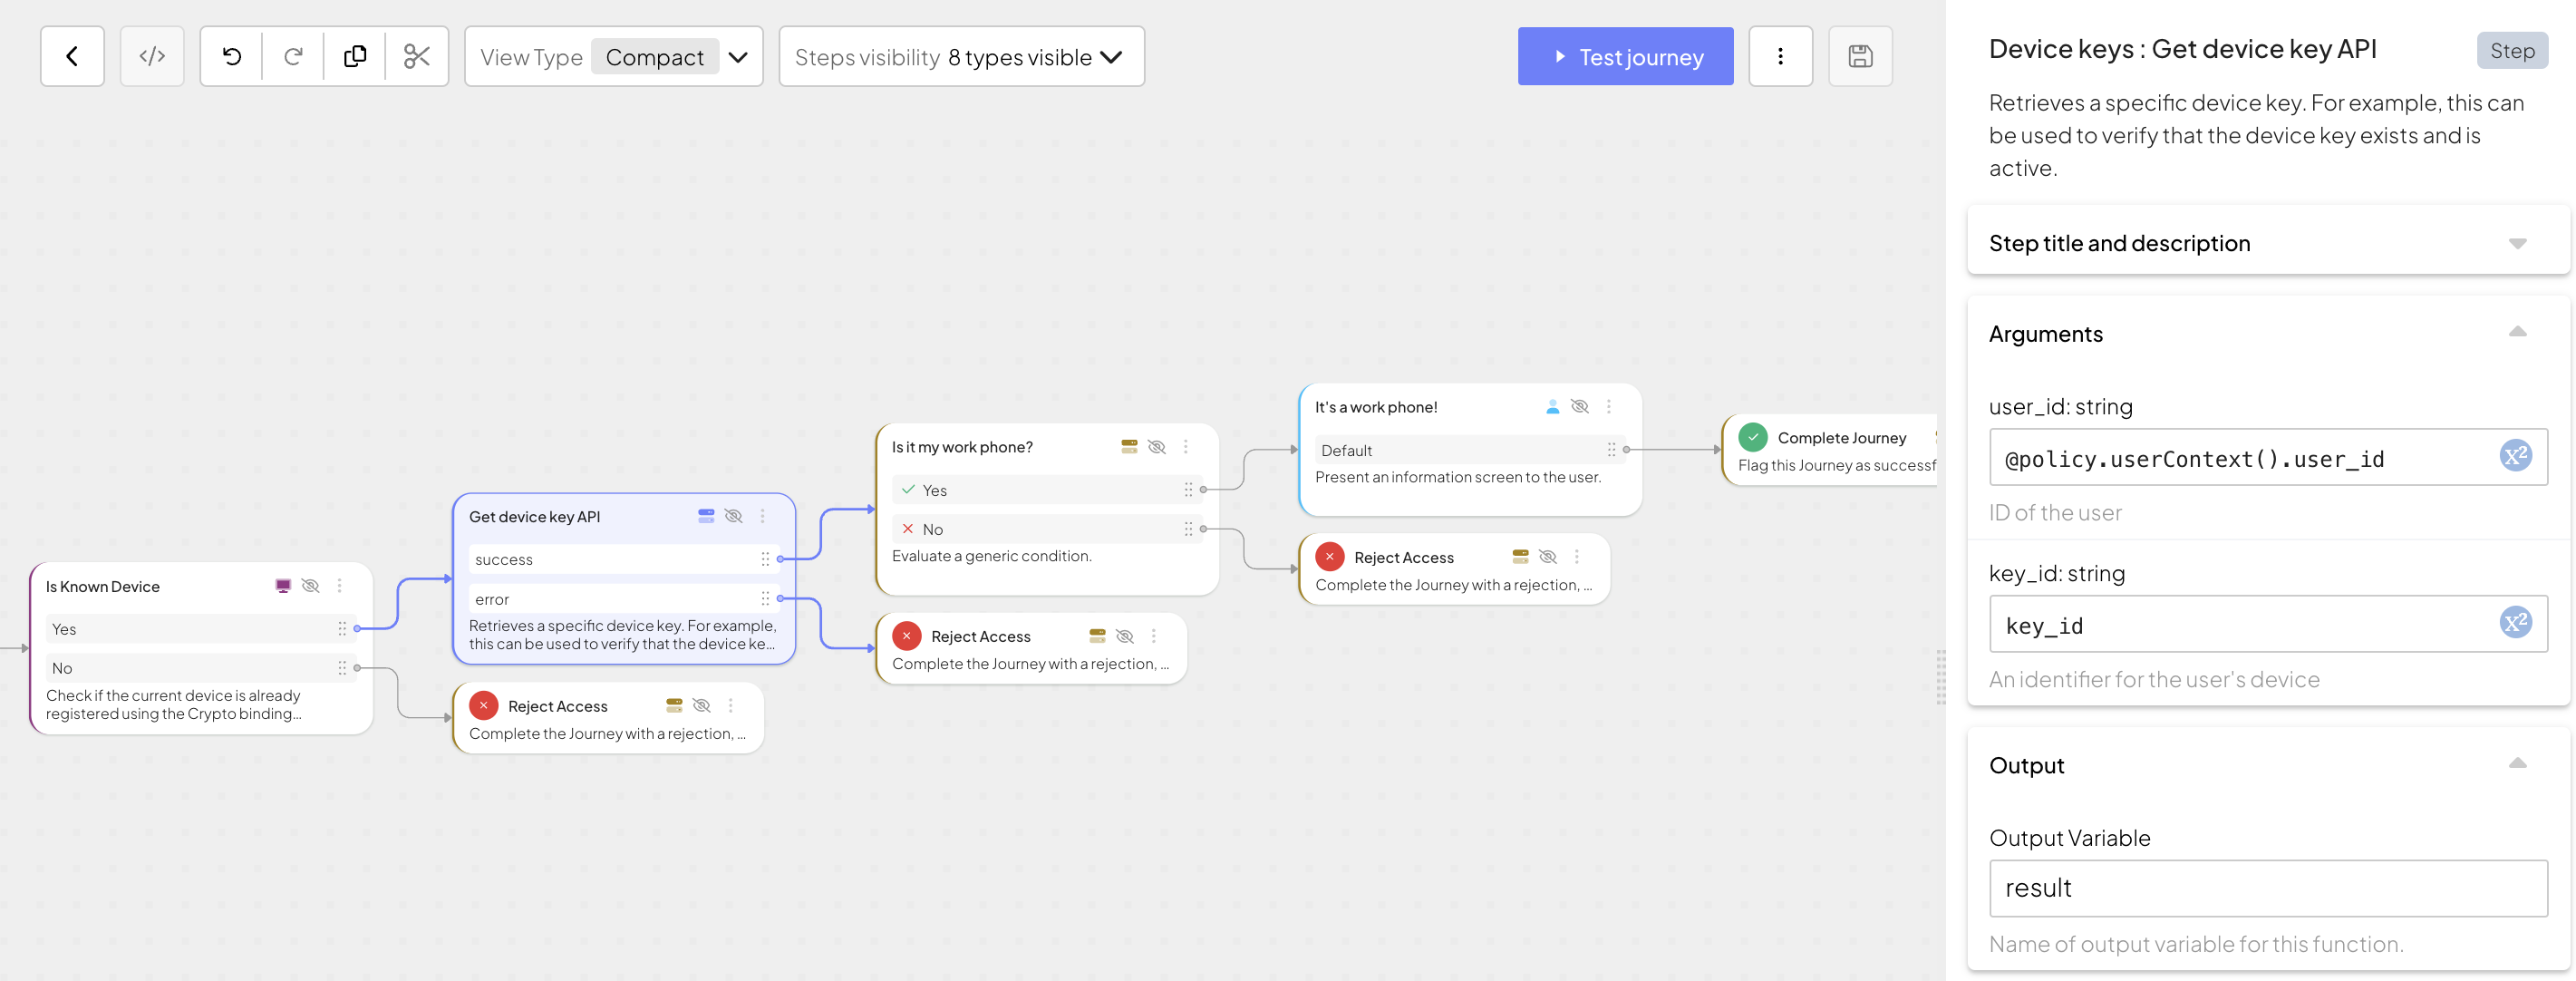
For example, a user wants to distinguish between their devices. To display a device name for the current user device, add the following steps to the journey:
The journey assumes the user has already authenticated in the previous steps.
- Start by validating if the device is registered to the authenticated user by adding Known Device Status. If the device is recognized, the step returns the device key ID (
key_id). - Add the "Device keys: Get device key API" step to read device information. This step requires both a
user_idand akey_idas input. Provide the following arguments for the query:key_idforkey_id,@policy.userContext().user_idforuser_id(retrieves user ID from the user context). - Add the Condition step to act depending on the device name returned by the previous step. For example, to check if the device name is "My work cellphone", use
result.display_name == "My work cellphone"expression. Display "It's a work phone" if true.
Keeping an inventory of devices linked to a user is helpful if you want to enforce policies, such as limiting the number of devices per user or implementing a single device policy. The "Device keys: Get all device keys API" step returns a list of device keys with information about each device.
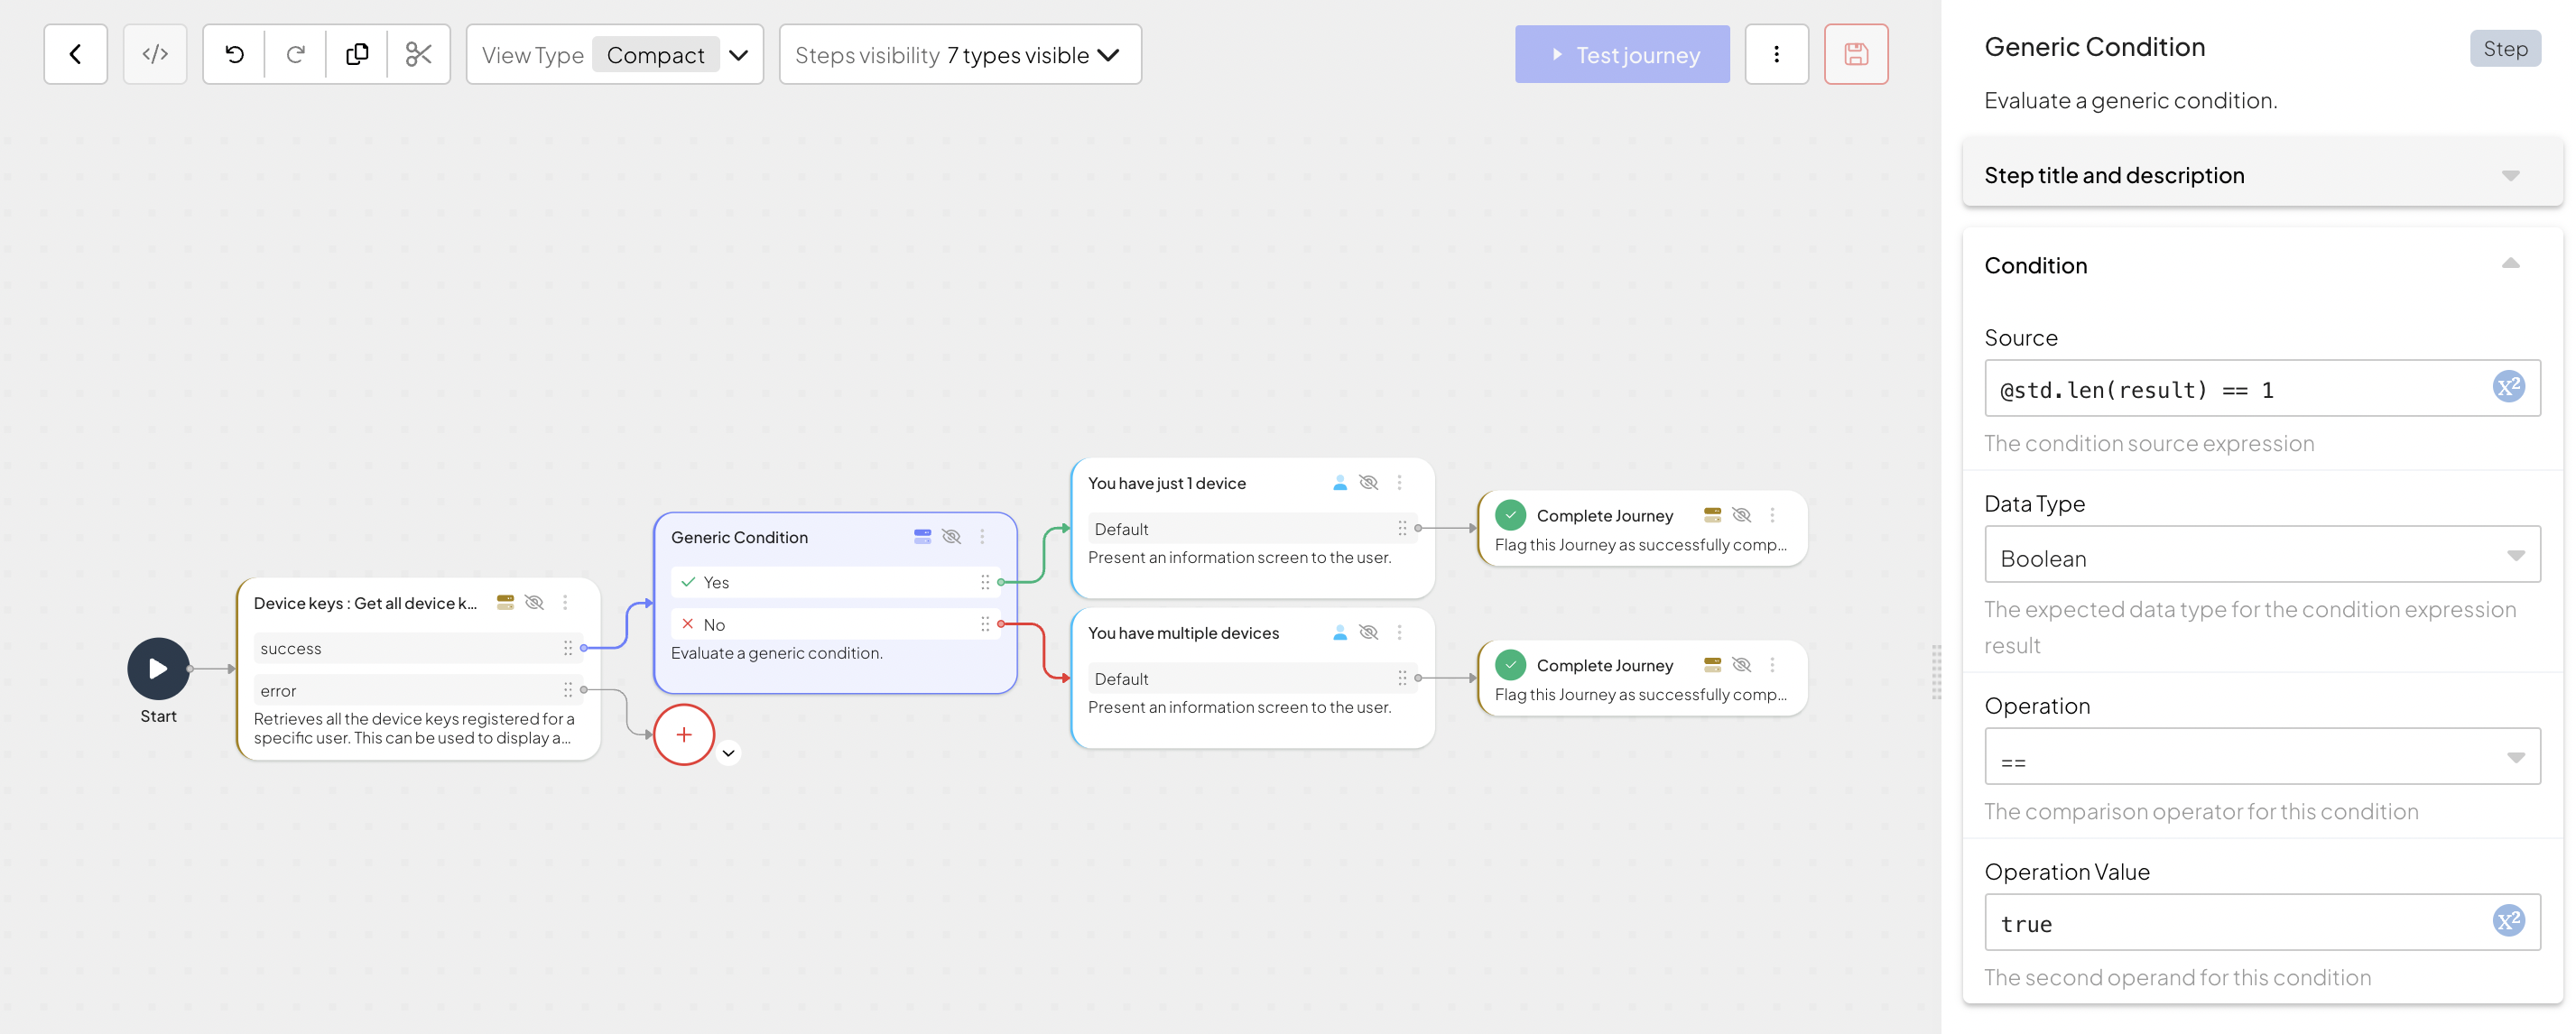
For example, your company is about to enforce a single device policy. Before limiting access from multiple devices, you might want to let the users check how many devices they have and display their names. Add the following steps to your jouney to count user devices and act accordingly depending on result.
The journey assumes the user has already authenticated in the previous steps.
Add the "Device keys: Get all device keys API" step to retrieve a list of all devices for a user. The step requires
user_idas an input. Since the user has already authenticated, the journey holds information about the user in the user context. You can retrieve user ID with@policy.userContext().user_id. This step returns an array of devices filtered by user.Add the Condition step to evaluate the output. In this example, the
@std.len(result) == 1condition is used to check if the user has one or more devices linked to them based on the result returned by the previous journey step. Depending on the output, you can customize a message for the user.
Deleting a device is the final step in its identity lifecycle. Deleting irrelevant devices enhances security and provides visibility into identity management. For example, you might want to delete a device key ID for a device that is no longer in the user's possession, or if you enforce a single device policy that doesn't allow users to access your app from several devices.
The "Device keys: Delete device key API" step deletes a public stored by Mosaic and removes a device from the user record. The next time the user tries to log in from this device, it will appear as new.
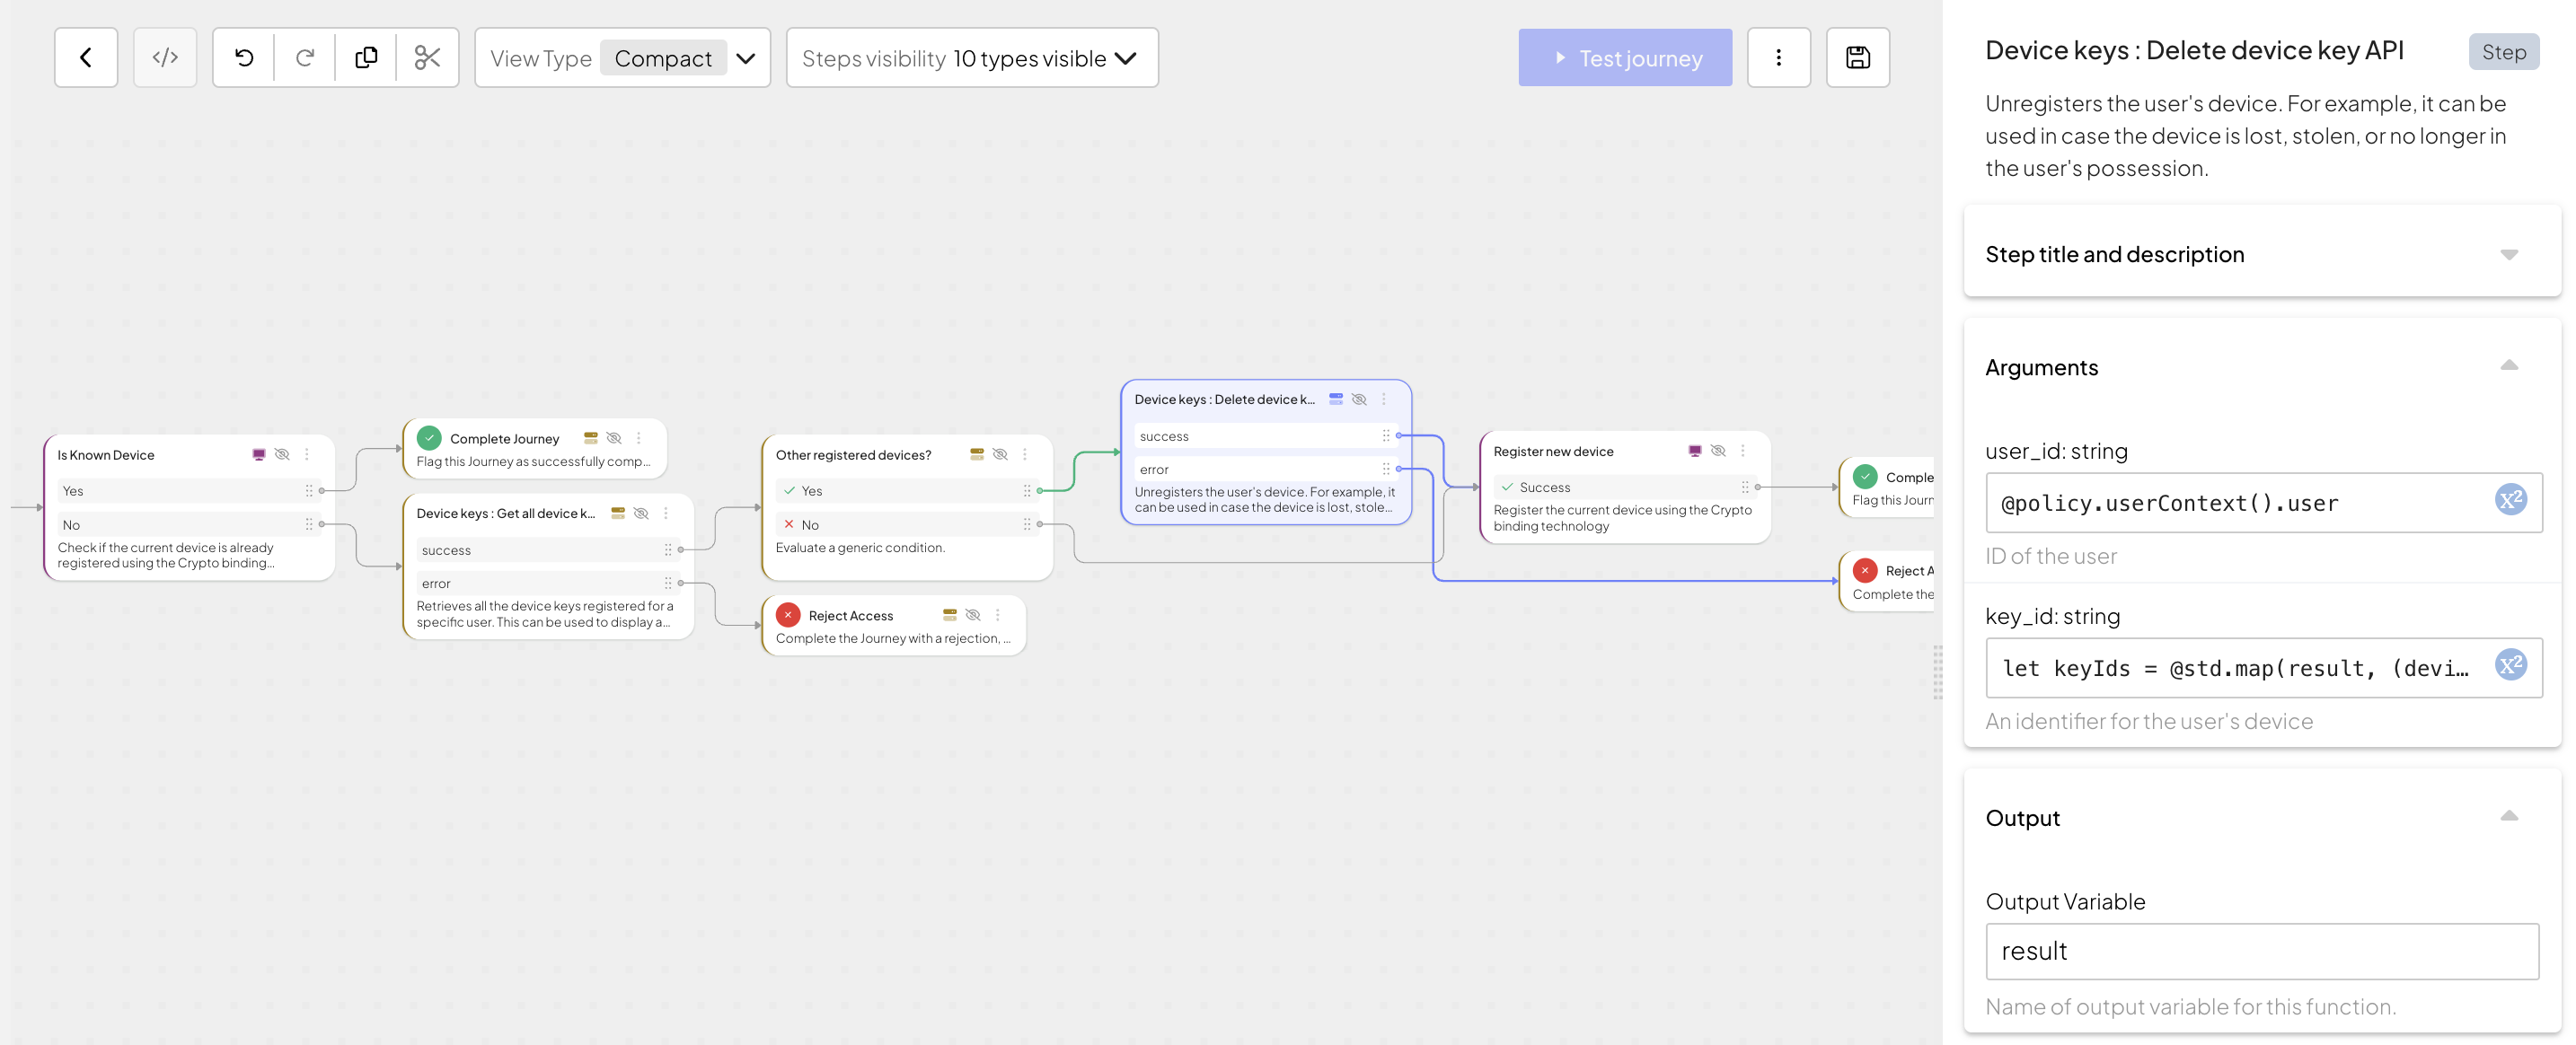
The example journey ensures the user can only have one device by registering a new device and removing the other device.
The journey below assumes the user has already authenticated and the user ID is saved in a variable userId.
Start by validating if the device is registered to the authenticated user by adding Known Device Status. If the device is recognized, the step returns a device key ID (
key_id). For this journey, it's saved in the output variablecurrent_key_id. If the device is recognized, the journey completes.In case of a new device, retrieve other user's device key IDs. Add the "Device keys: Get all device keys API" step to retrieve a list of all devices for a user. The step requires the
user_idas an input. Since the user has already authenticated, the journey holds information about the user in the user context, you can retrieve user ID with@policy.userContext().user_id. This step returns an array of devices filtered by user.Add the Condition step to evaluate the output. In this example, the
@std.len(result) > 0condition is used to check if the user has another device linked to their account.Remove a previously registered device by adding the "Device keys: Delete device key API" step. This step requires
user_IDandkey_idas an input. Since the user has already authenticated, you can retrieve the user ID with@policy.useContext().user_id. Inkey_idfield provide the following expression that gets key IDs from returned by the "Device keys: Get all device keys API" step:let keyIds = @std.map(result, (device) => device.key_id) return keyIds.If there are no devices associated with the user, register the current device with Register device step.
Blocking devices is crucial for establishing strong security and privilege management. You might want to permanently restrict a malicious device from accessing your app resources. Another example would be temporary blocking employee's work devices while not in use.
You can block devices in the Admin Portal or by adding the "Device keys: Block device key API" step to your journey.
Unlike "forgetting a device" (deleting a device key ID) that completely removes it from the user record, blocking a device keeps its device key ID (key_id) associated with the user. A blocked device is visible in the Admin Portal and can be discovered using the "Device keys: Get all device keys" journey step. Nonetheless, blocked devices fail validation performed by "Known Device Status" journey step as they aren't considered legit to use. Blocked devices can also be unblocked if necessary.
Create adaptive device management flows based on risk assessment data provided by Mosaic Fraud Prevention. See Secure device identity for more information. Elevate trust and reduce friction for known and trustworthy devices, enforce step-up authentication in case of device activity, and block malicious devices based on risk analytics.