This guide shows you how to build your own SSO login page with the Orchestration SDK to integrate Mosaic's SSO into your app.
This is similar to building web UI with orchestration, with modifications specific to handling SSO workflows. By following this guide, you can configure your web page to start and manage SSO journeys, handle user authentication, and manage the final redirection to the appropriate relying party (RP).

When you integrate Mosaic SSO using a self-hosted SSO login page, the process begins when the user interacts with a designated UI element to request login. This triggers a redirection to your self-hosted SSO login page, where Mosaic’s SSO journey is initiated using the StartSsoJourney method with the interaction ID. The SSO journey logic is handled externally by Mosaic as a black box. Upon completion of the journey, Mosaic returns a redirectUrl to the self-hosted SSO login page, which then redirects the authenticated user to a designated page of your app or resources. Mosaic APIs are shown in pink.
Before you begin integrating SSO using a self-hosted UI, ensure the following prerequisites are met:
- Configure the SSO Service using either the OIDC or SAML protocol in the Mosaic admin portal.
- Host your page on the same URL you have configured as the target of the SSO service. For testing purposes this can also be your localhost test server.
- Allow Mosaic IPs and domains on your network.
- Extend the
Content-Security-Policyheader, if CSP is enabled on your web server.
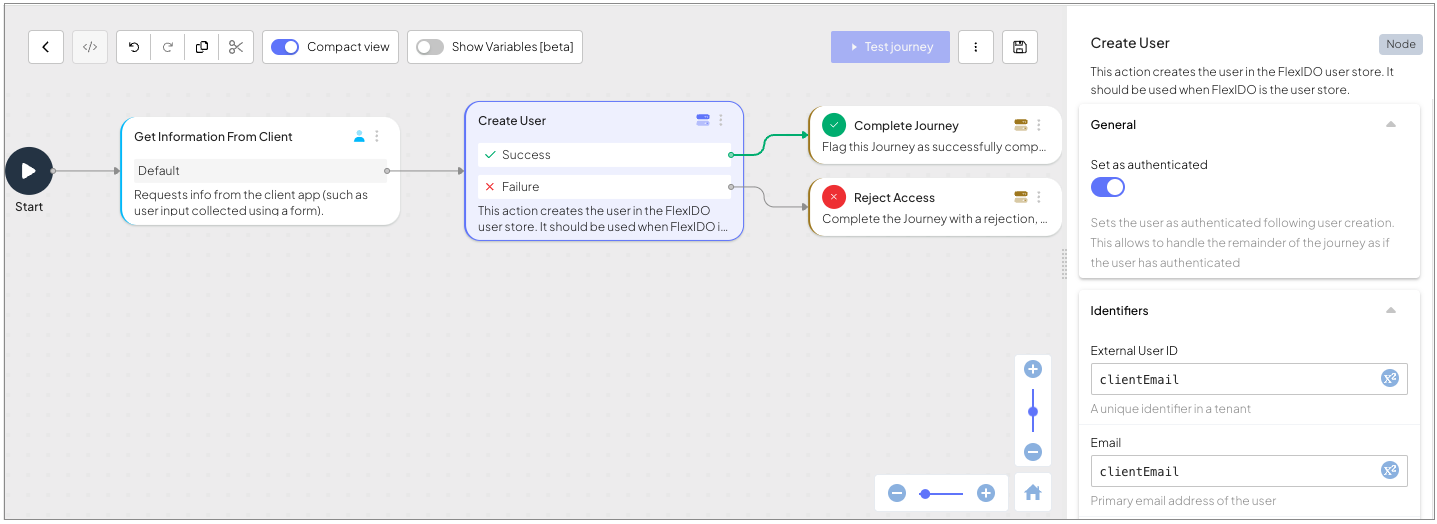
In the Mosaic admin portal (B2C or B2B Identity based on your setup > Journeys), create an SSO journey. This journey will handle the SSO flow of the page you are building. The journey for this tutorial will describe a trivial user creation, and should have the following two steps:
A Collect information step, where the client-side collects the user's email. This step is identified by a
journeyStepIdconfigured ascollect_email_form.A Create User step that uses the collected email to create a new user. Make sure to set the "Set user as authenticated" toggle to true. Also, use the email input from the form as the "External User ID" and "Email" of the Create User step.
Start by loading the SDK from the registry (recommended) or CDN.
npm install @transmitsecurity/platform-web-sdk@^2When using the script tag, all functions must be invoked inside window.tsPlatform. This applies only to the CDN method.
Initializing the SDK configures it to work with your client ID, which is the context under which the entire journey is executed. It also allows setting the base URL for the SDK to use, whether a Mosaic-provided path or your own proxy. For more details about available options and customizations, see the SDK reference.
// If you're using the SDK via script tag instead of an import, call:
// window.tsPlatform.initialize({ ... })
import { initialize } from '@transmitsecurity/platform-web-sdk';
import { ido } from '@transmitsecurity/platform-web-sdk';

// Initialize the SDK with your client ID and server path
initialize({
  clientId: 'my-client-id',  // Client ID from app settings in the Admin Portal
  ido: {
    serverPath: 'https://api.transmitsecurity.io/ido' // Required: Set serverPath based on your region or custom domain
  }
});Starting an SSO journey is typically a response to some user interaction, such as clicking a login or sign-up button. To start the SSO journey, use the startSsoJourney method. The interaction ID should be dynamically obtained from the URL parameters of the incoming SSO request and passed to the SDK. This ID is crucial for initiating the correct SSO journey associated with the user’s authentication request.
// Start a Journey with the Interaction ID
try {
  const interactionId = (new URLSearchParams(window.location.search)).get("src_interaction");
  const idoResponse = await ido.startSsoJourney(interactionId);
  // Handle Journey response
  ...
} catch(error) {
  switch(sdkError.errorCode) ...
}After starting the SSO journey, your client application will receive an IdoServiceResponse. This response contains the necessary information for determining the next steps in the journey, including whether to collect user input or to proceed with creating a new user.
To handle the service response, the client app needs to:
Upon receiving the IdoServiceResponse, determine the appropriate handler by evaluating the journeyStepId parameter. The journey in this tutorial has the following steps to handle:
- A Collect information step, where the client-side collects the user's email. This step is identified by a
journeyStepIdset ascollect_email_form. - Additionally, add handlers for Success and Rejection completions. These handlers will activate the redirect back.
Here's how the code would dispatch these handlers:
switch (idoServiceResponse.journeyStepId) {
    case 'collect_email_form':
        handleEmailCollection(idoServiceResponse);
        break;
    case IdoJourneyActionType.Success:
        handleSuccessfulCompletion(idoServiceResponse);
        break;
    case IdoJourneyActionType.Rejection:
        handleRejection(idoServiceResponse);
        break;
    default:
        throw "Unknown step ID";
}The following handler is used to collect the user's email as described in the Collect information step documentation. Specifically, this step will prompt the user to enter their email address.
// Display form to user and collect the required email
let data = {
    "email": collectedEmail
};

let idoResponse = await ido.submitClientResponse(
    ClientResponseOptionType.ClientInput,
    data
);
Once the email is collected and submitted, the journey proceeds to the next step, which is the creation of a new user. This step has no UI so the journey will move to completion.
When the SSO journey completes, Mosaic will signal this by setting the journeyStepId property to either Success or Rejection. Upon completion, your application should redirect the user to the resource provider (RP) using the redirectUrl provided by Mosaic at journey completion. This ensures that the user is properly redirected to the intended destination after authentication, or failure.
let url = idoServiceResponse.redirectUrl;
window.location.href = url;After creating a journey, configuring the SSO service, and managing the SSO authentication policies, you can use the Test button in the journey builder to test and validate your journey. This opens a dedicated page where you can observe each step in action. The page clearly shows the API calls made and the output returned for each step, allowing you to thoroughly test and debug the entire SSO process.