Deploying a hosted login to your application implies integrating the OIDC authentication logic and customizing your authentication flow and methods.
This guide shows how to deploy OIDC-based, single-factor authentication into your application using your Mosaic's default authentication settings. Customize your authentication experience following the Next steps.
Mosaic supports the OIDC authorization code flow for user authentication and the OIDC RP-initiated logout for logout.
Here's an example of a login flow that can be implemented using the steps in this guide. Mosaic APIs are shown in pink along with the relevant integration step, described below. Note that logout isn't shown.
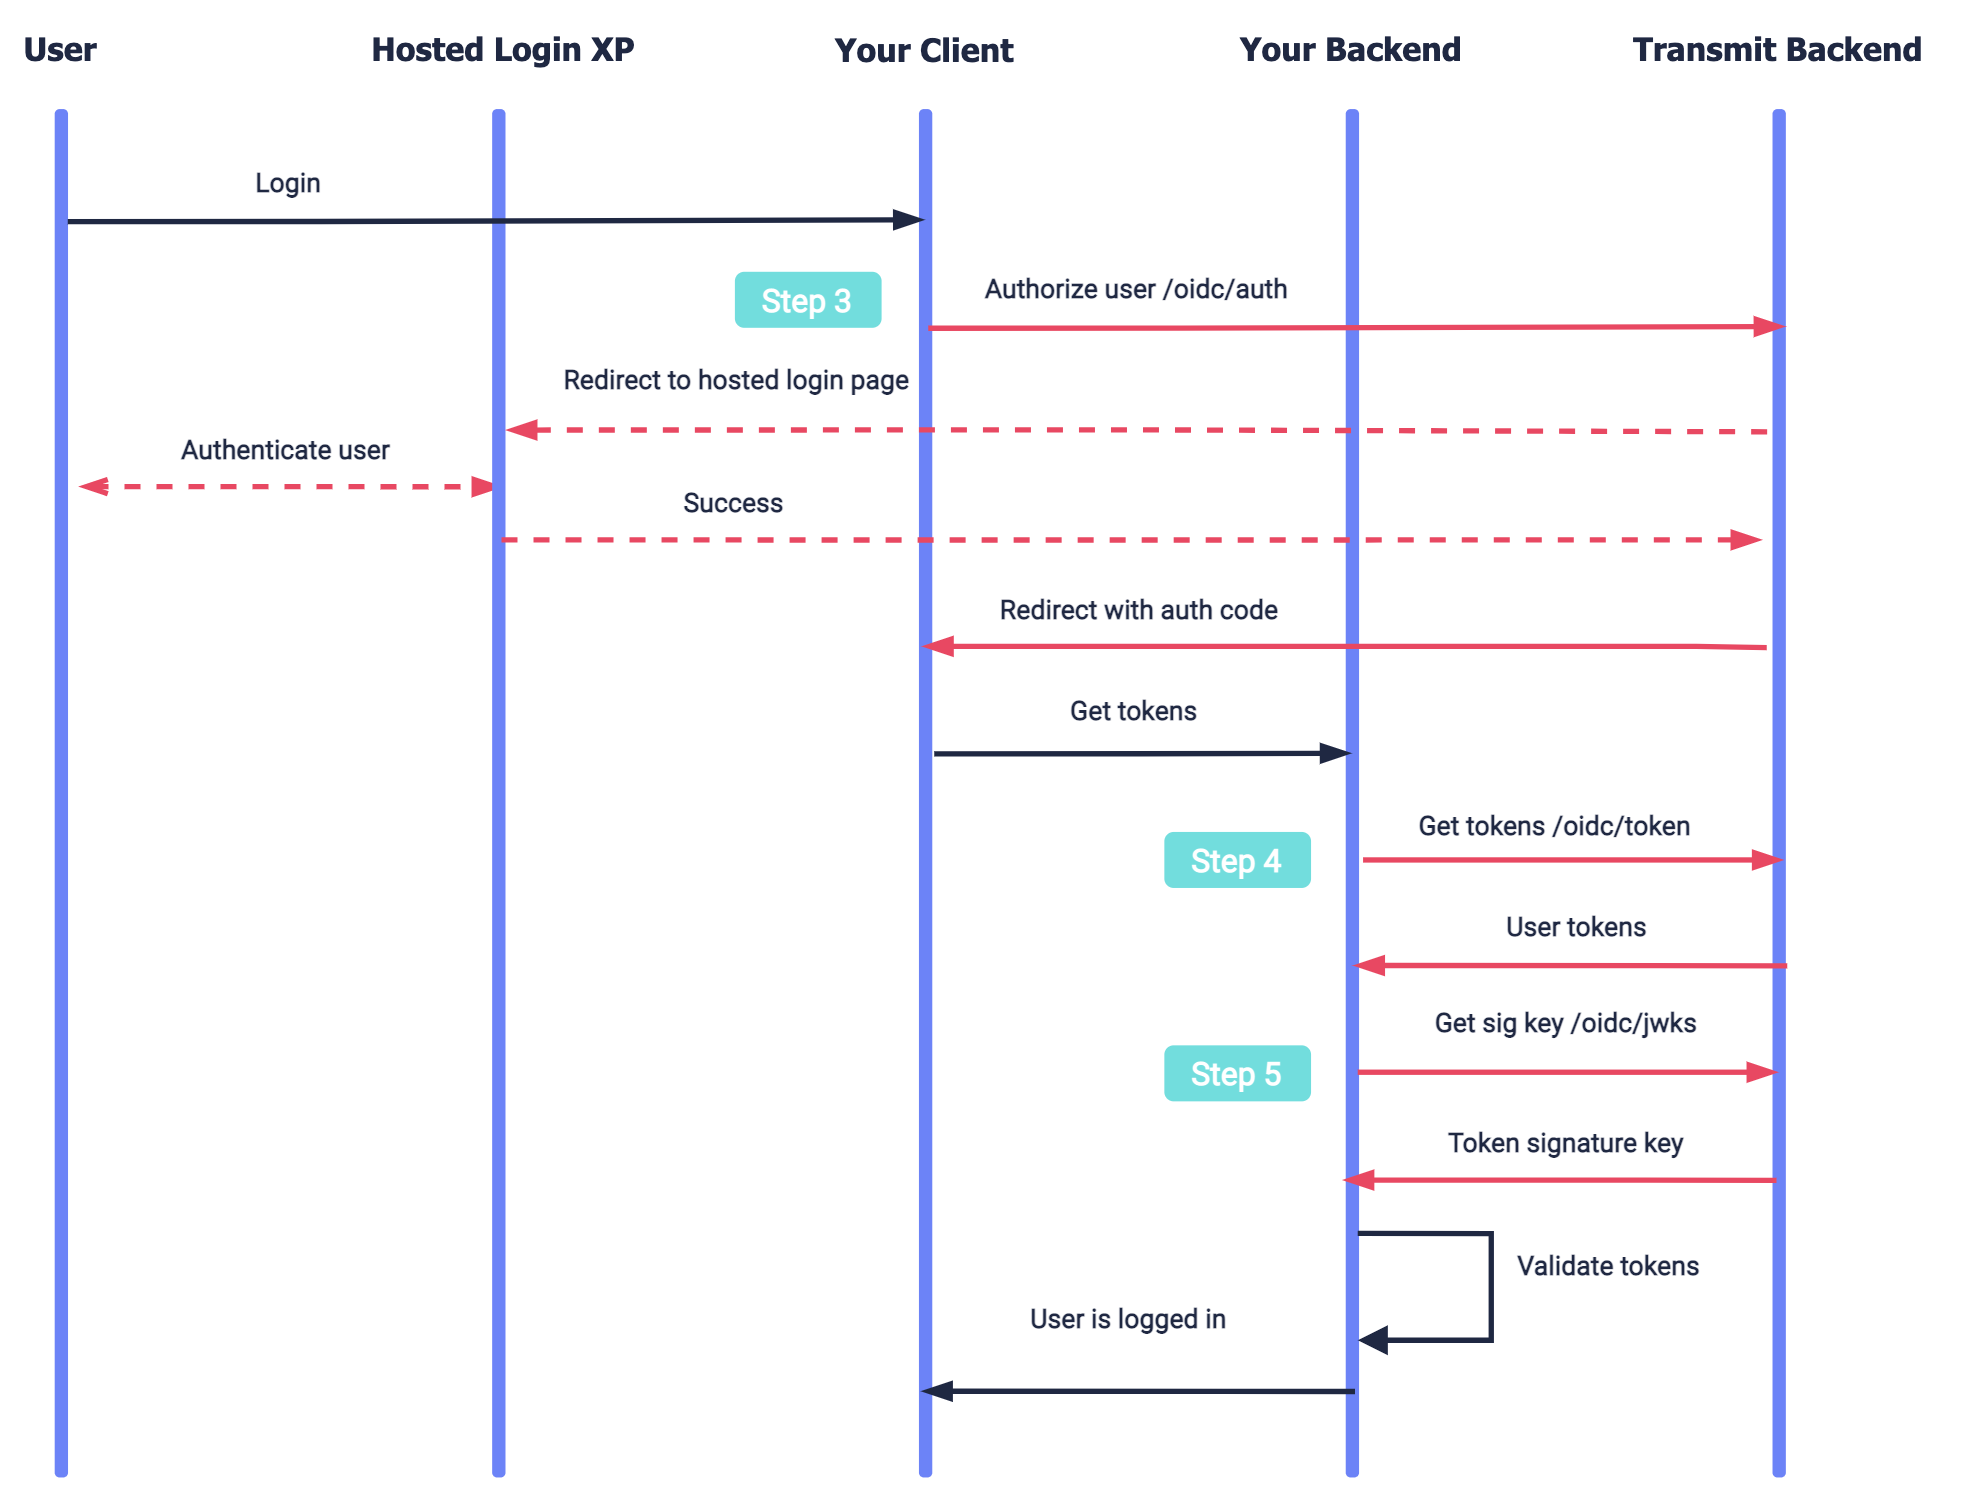
- The user requests to log in and your app sends an authorization request to Mosaic (Step 3).
- Mosaic redirects to the hosted login experience to authenticate the user.
- If successful, Mosaic redirects back to your app with an authorization code.
- Your app exchanges the authorization code for user tokens in the backend (Step 4).
- After validating the user tokens, your app logs in the user.
Create the redirect endpoint that will receive an authorization code. This code will later be exchanged for an ID and access token. The redirect URI should accept code as a query parameter. For example, if https://domain.com/verify is your redirect URI, then Mosaic will redirect to https://domain.com/verify?code=123abc.
The redirect endpoint should then use the oidc/token route to get an access token for the user (as described in Step 4).
Add the redirect URI (e.g., https://domain.com/verify) as an allowed redirect URI for your Mosaic application. This will also be the redirect_uri that you'll need to pass in the initial request. The redirect endpoint should then use the oidc/token route to get an access token for the user (as described in Step 4).
If you don't already have an application, create one first. Then open the application details page, go to the Clients tab, create or select the User authentication client used for this flow, configure it for OIDC, and add this URI under Redirect URIs. For details, see Manage clients.
Use a request like the one below to initiate a login flow. The client_id and redirect_uri correspond to the ones configured in the OIDC client settings in Mosaic's Admin Portal.
Upon successful authentication, the browser will be redirected to the redirect URI along with a code to exchange for tokens in the next step. For example, if https://domain.com/verify is your redirect URI, then Mosaic will redirect to https://domain.com/verify?code=123abc. However, if an authentication error occurs, the redirect URI will contain the error instead.
// Note: line breaks and notes were added for readability
https://api.transmitsecurity.io/cis/oidc/auth?
  client_id=CLIENT_ID&  // Client ID from the Mosaic app > client settings
  redirect_uri=REDIRECT_URI&  // Redirect URI created in Step 1
  scope=openid&
  response_type=code&
prompt=consent // Consent will be granted automaticallyFor B2B member login, Mosaic must resolve which organization the user is signing in to. When you initiate this authorization request, pass org_id if your app already knows it; if you omit it, the organization is often inferred from the member’s email domain (as configured on the organization in the Admin Portal). For B2B setup and other auth options, see Implement authentication (B2B).
To exchange the code received from Mosaic for an ID and access token, your server should send a POST request like the one below to the Mosaic /oidc/token endpoint. Replace placeholders with the code you received in Step 3, your redirect URI, and your client credentials from the client settings in the Mosaic Admin Portal (Applications > your app > Clients tab > your client).
This request returns user tokens that should grant user access to your resources. Before granting access, verify the tokens' validity, ensuring it was generated by Mosaic, is still valid, and is associated with the user. To know more, see Validate tokens to protect your APIs.
curl -i -X POST \
  https://api.transmitsecurity.io/oidc/token \
  -H 'Content-Type: application/x-www-form-urlencoded' \
  -d client_id=CLIENT_ID \
  -d client_secret=CLIENT_SECRET \
  -d code=CODE \
  -d grant_type=authorization_code \
-d redirect_uri=REDIRECT_URIOnce you've completed a basic deployment, you can consider:
- customizing the login flow.
- customizing the login methods (e.g., configure password policy, customize OTP expiration time, etc. ).
- branding the login screens.