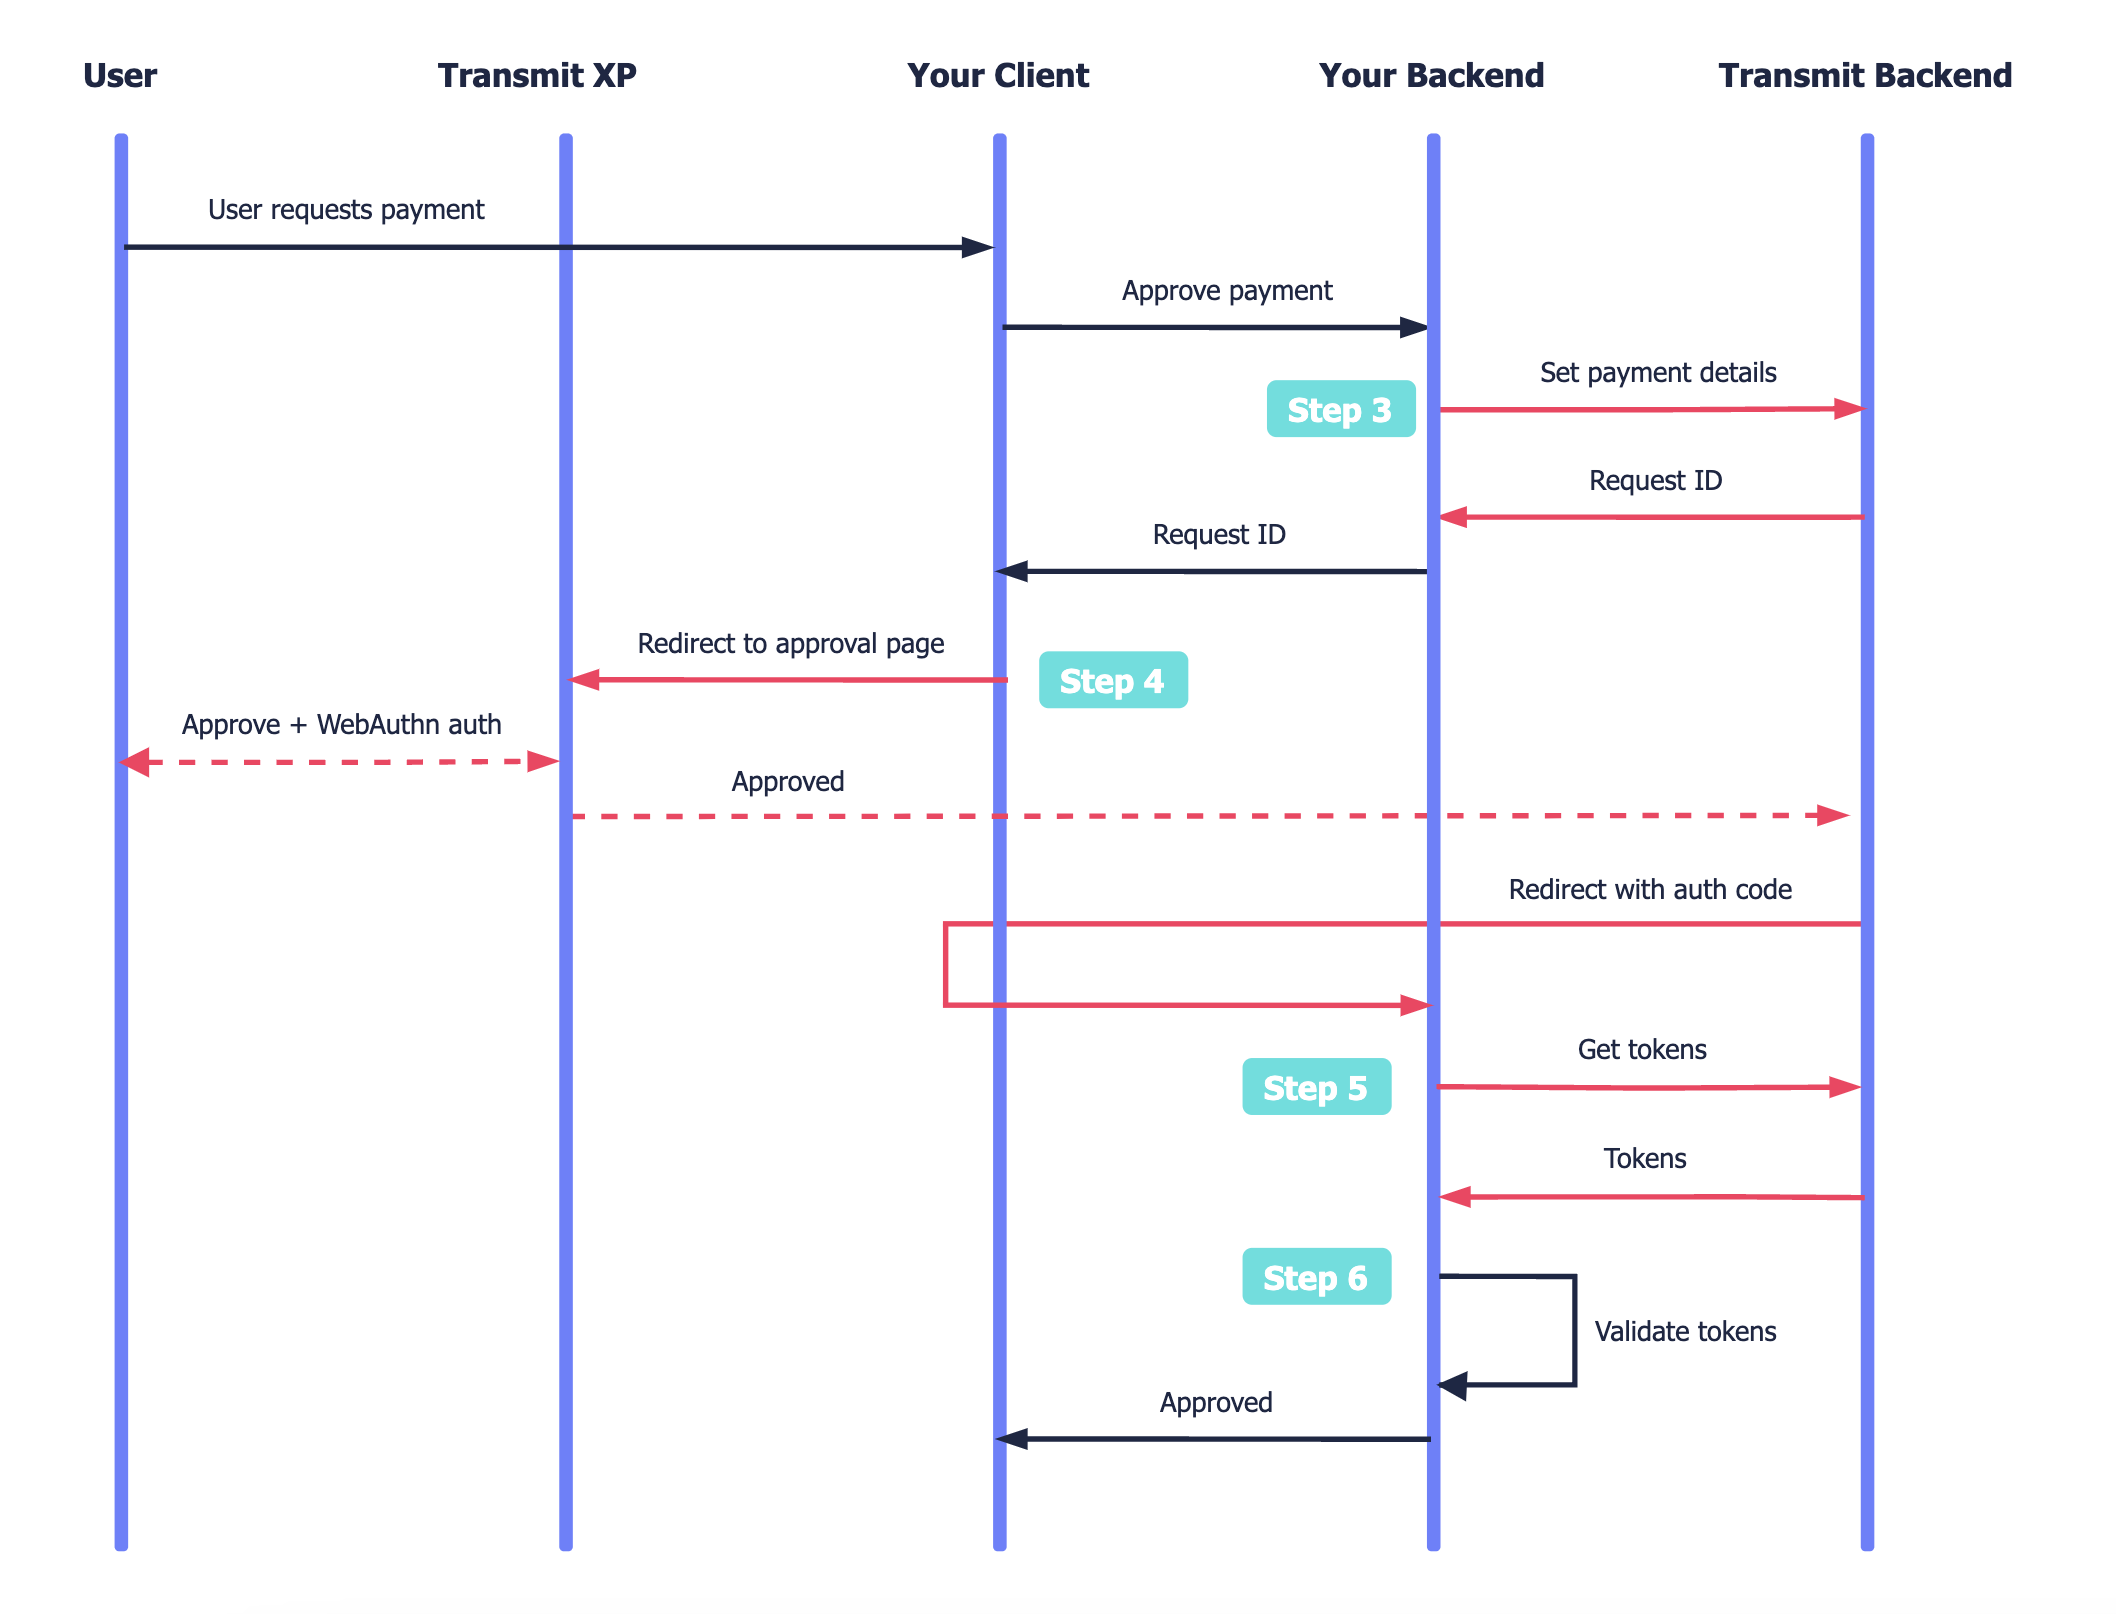
To enhance the security of financial transactions conducted within your app (using transaction signing per PSD2.0 SCA), Mosaic's hosted solution allows users to securely approve payments using WebAuthn biometrics. It involves using a cryptographic signature, like a biometric passkey, to verify the authenticity of a payment and ensure that it has not been tampered with. This guide illustrates how to integrate into your application WebAuthn-based payment approval with Mosaic's hosted solution.
To enable users to approve payments with biometrics, WebAuthn credentials must be registered in Mosaic using one of these flows:
- hosted login - if using Mosaic as your IDP
- hosted registration for logged-out users - if users are managed externally
Choose the appropriate guide based on your implementation of Mosaic services.
Here's the payment approval flow. Mosaic APIs are shown in pink along with the relevant integration step, described below.

- User requests to make a payment.
- Your backend sends a payment approval request to Mosaic that returns a request ID.
- Your client redirects to Mosaic's hosted XP payment approval page.
- User reviews the payment details and performs WebAuthn authentication to approve them.
- Your app backend receives a code and exchanges it for user tokens.
- Upon token validation, the transaction is approved.
Create the redirect endpoint that will receive an authorization code. This code will later be exchanged for an ID and access token. The redirect URI should accept code as a query parameter. For example, if https://domain.com/verify is your redirect URI, then Mosaic will redirect to https://domain.com/verify?code=123abc when the user completes the payment approval flow.
Add the redirect URI (e.g., https://domain.com/verify) as an allowed redirect URI for your Mosaic application. This will also be the redirect_uri that you'll need to pass in the initial request. The redirect endpoint should then use the oidc/token route to get user tokens (as described in step 5).
From the Admin Portal under Applications, click on your application to edit your application settings and add this URI under Redirect URIs.
Send to Mosaic a request like the one below with the payment details that the user should approve. The payment details must be passed as request claims in stringified format. This returns a request ID used to initiate the approval flow in the next step. The request ID links the payment details to the user session and remains valid for 60 seconds.
async function run() {
  const formData = {
    client_id: '[CLIENT_ID]',  // Client ID from the Mosaic app settings
    client_secret: '[CLIENT_SECRET]',   // Client secret from the Mosaic app settings
    redirect_uri: '[REDIRECT_URI]',  // URI to redirect to, created in step 1
    response_type: 'code',
    scope: 'openid',  // Must include openid
    claims: '[PAYMENT_DETAILS]'  // Payment details (stringified) for the user to approve
  };

  const resp = await fetch(
    `https://api.transmitsecurity.io/cis/oidc/request`,
    {
      method: 'POST',
      headers: {
        'Content-Type': 'application/x-www-form-urlencoded'
      },
      body: new URLSearchParams(formData).toString()
    }
  );

  const data = await resp.text();
  console.log(data);
}

run();
The value of the claims being requested in the ID token should be a stringified object with the following structure:
{
    "type" : "money_transfer",
    "payee" : "[PAYEE]",    // Name of the payment recipient
    "payment_amount" : "[PAYMENT_AMOUNT]",  // Such as "100"
    "payment_currency" : "[CURRENCY]",  // Such as "USD"
    "payment_method" : "[PAYMENT_METHOD]" // Such as "credit_card"
}With the request ID returned in step 3, your client must redirect to Mosaic's hosted approval page:
https://api.transmitsecurity.io/cis/oidc/auth?client_id=CLIENT_ID&request_uri=REQUEST_IDThe user reviews the transaction details. Upon granting consent, Mosaic initiates user authentication with WebAuthn. Following authentication, Mosaic redirects to the URI created in step 1 with an authorization code to exchange for user tokens in the next step.
To exchange the code received from Mosaic (in Step 4) for ID and access tokens, your server should send a POST request like the one below to Mosaic's /oidc/token endpoint.
import fetch from 'node-fetch';

async function run() {
  const formData = {
    client_id: '[CLIENT_ID]',  // Client ID from the Mosaic app settings
    client_secret: '[CLIENT_SECRET]',   // Client secret from the Mosaic app settings
    code: '[CODE]',  // Authorization code returned to your redirect URI in Step 4
    grant_type: 'authorization_code',
    redirect_uri: '[REDIRECT_URI]'   // URI that received the authorization code
  };

  const resp = await fetch(
    `https://api.transmitsecurity.io/cis/oidc/token`,
    {
      method: 'POST',
      headers: {
        'Content-Type': 'application/x-www-form-urlencoded'
      },
      body: new URLSearchParams(formData).toString()
    }
  );

  const data = await resp.text();
  console.log(data);
}

run();A successful authentication returns ID and access tokens that should be validated. Note that the ID token obtained during the payment approval flow will include the payment details presented to the user and approved. These should match the payment details requested in step 3.