To secure financial transactions conducted within your native Android application, Mosaic allows users to approve payments using WebAuthn biometrics. The transaction will be signed per the PSD2 standard for open banking scenarios. This describes how to integrate into your application WebAuthn-based payment approval using Mosaic's Android SDK.
This SDK implements Google's Credential Manager API for passkeys. It allows you to add passkeys-based biometric authentication to your Android app, while providing your users with a native experience instead of a browser-based one. With passkeys, credentials are securely stored by the device in Google Password Manager. These credentials must be associated with your domain, so they can be shared between your mobile app and your website (if you have one).
The requirements for passkey authentication include:
- Android 9+
- Device with registered biometrics (e.g., Face or Fingerprint)
compileSdk34 and onwardsminSdk23
The SDK is built with certain settings and incorporates additional libraries which may require conformance on the hosting application build environment (e.g., Retrofit libraries are usually required to have a conforming or even the same revision for all artifacts integrated into the same application). Below is a specification of these settings:
- androidx.core:core-ktx:1.8.0
- androidx.appcompat:appcompat:1.5.1
- com.squareup.retrofit2:converter-gson:2.9.0
- com.squareup.retrofit2:retrofit:2.9.0
- androidx.annotation:annotation:1.5.0
- androidx.credentials:credentials:1.2.0
- androidx.credentials:credentials-play-services-auth:1.2.0
- androidx.biometric:biometric:1.1.0
The sample flows demonstrate possible ways to implement payment approval with biometric authentication using Mosaic Android SDK. In the diagrams below, Mosaic APIs are shown in pink along with the relevant integration step.
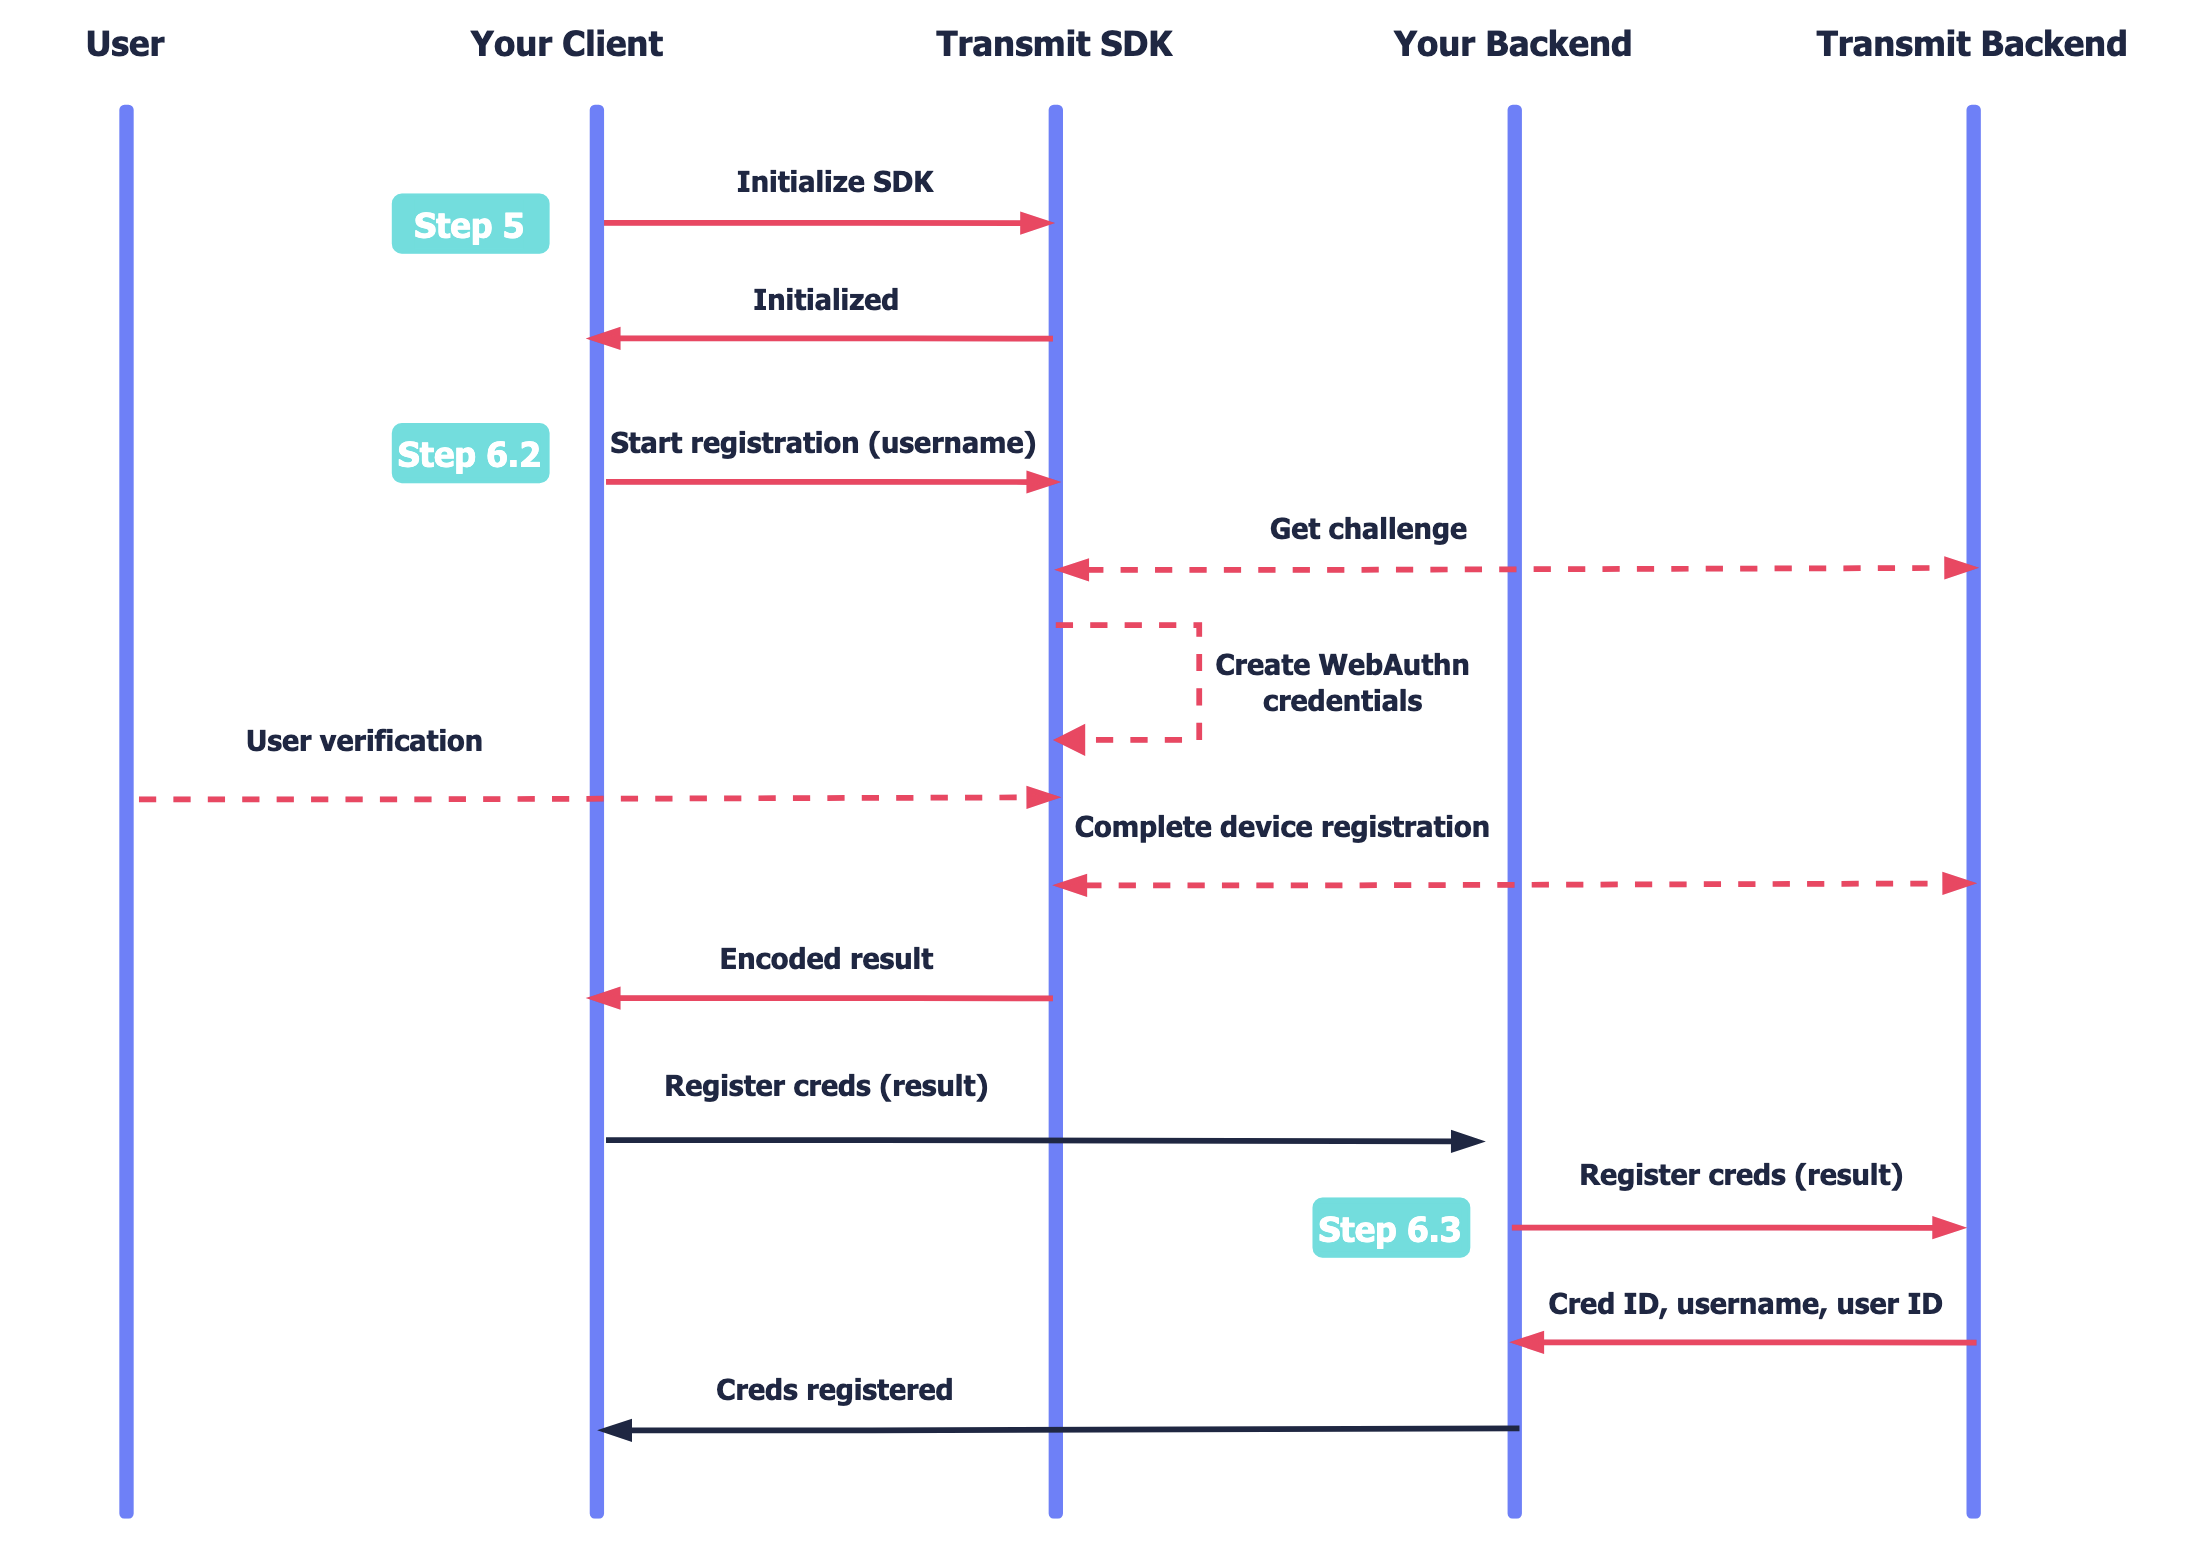
This flow represents a new user logging in from a device that supports passkeys. It assumes that you've collected and verified the username before initiating registration. The username should be a representation of the user in your system, such as their email, phone number, or another verifiable username known to the user (like account ID).
After initializing the SDK, the client validates that the platform authenticator is available. Once the user is ready to register their credentials, the SDK tells the device to create credentials, which may require the user to verify (e.g., via device biometrics). Once completed, the encoded WebAuthn result is returned to the client to complete the registration process via their backend. Once registration is completed, the user's credentials are registered and can be used to approve payments.
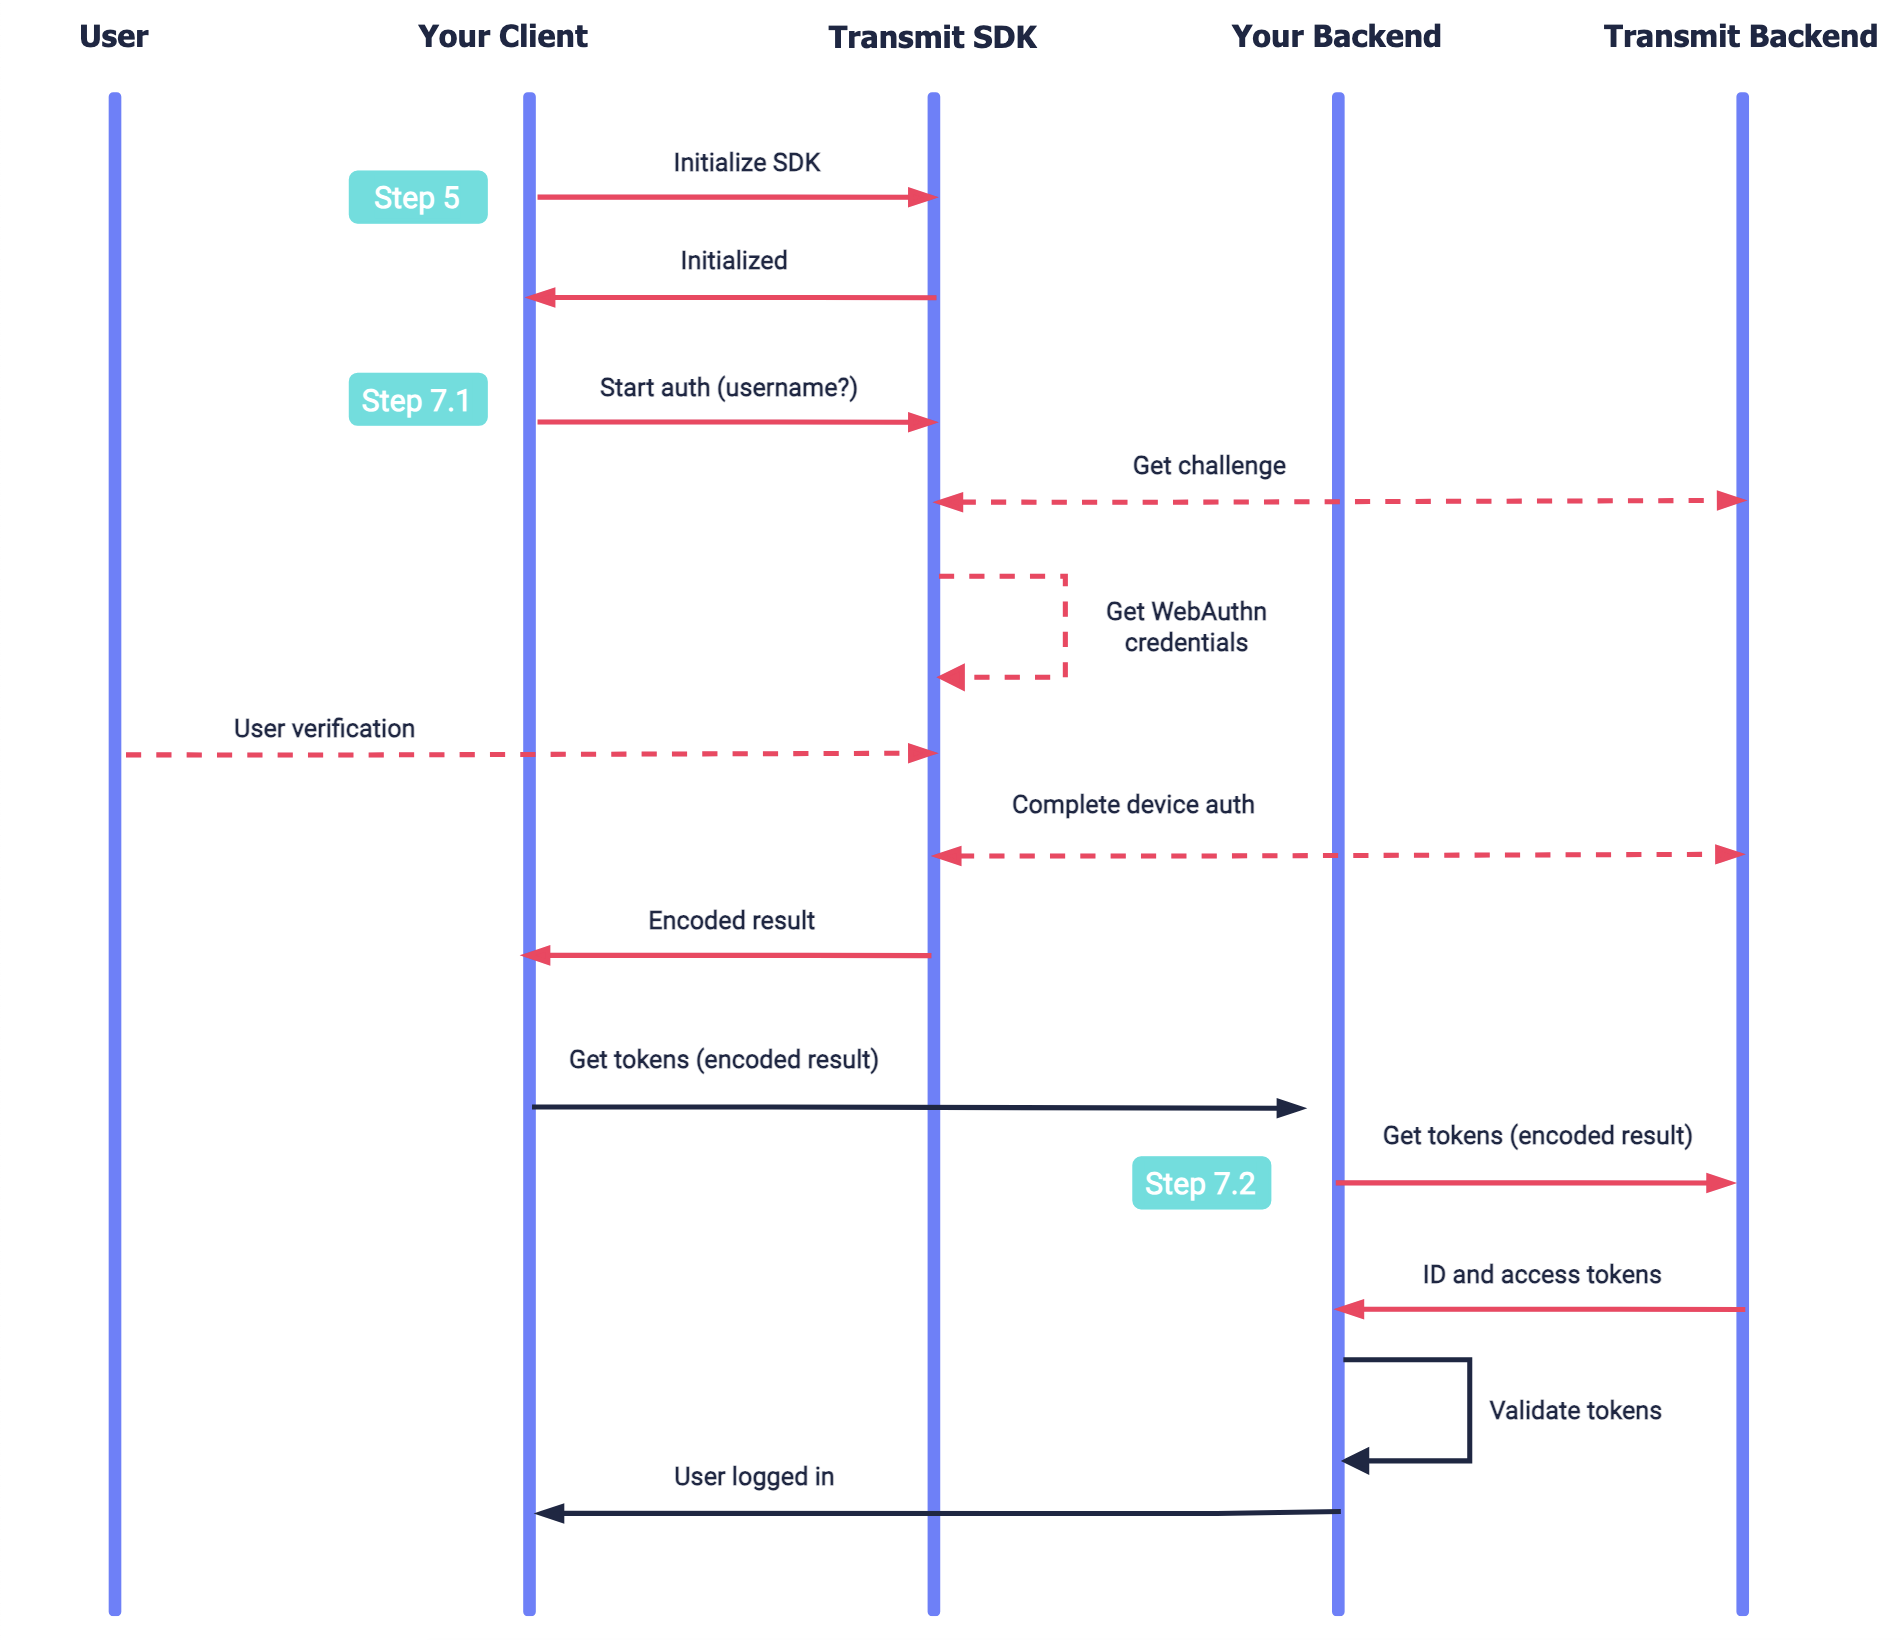
This flow represents an existing user authenticating to approve a payment using registered credentials which exist on the device.
The SDK is initialized. Once the user is ready to authenticate to approve some payment details, the SDK tells the device to get credentials, which may require the user to verify (e.g., via device biometrics). The SDK returns an encoded WebAuthn result to the client to complete the authentication process via their backend. Once completed, a user access token is returned to your client backend and the user is authenticated and the payment approved.
To integrate with Mosaic, you'll need to configure an application. From the Applications page, create a new application or use an existing one.
From the application settings:
- For Client type, select native
- For Redirect URI, enter your website URL. This is a mandatory field, but it isn't used for this flow.
- Obtain your client ID and secret for API calls, which are autogenerated upon app creation.
- Enable public sign-up if you manage users using an external system (e.g., external identity provider) or if you want to quickly test WebAuthn registration and authentication without first logging in using a different authentication method.
From the Authentication methods page, configure the WebAuthn login method for your application.
For Relying party ID, add your full website's domain (e.g., www.example.com). This is the domain that will be associated with your credentials in Step 3.
To specify Android mobile origins toggle the Relying Party Origins, and for Mobile origins use android:apk-key-hash:YOUR_APK_KEY_HASH, where YOUR_APK_KEY_HASH is your base64 encoded sha256 hash of your apk signing certificate. This is the origin that will be provided when requesting passkeys registration and authentication.
To obtain the apk key hash, you can use one of the following methods:
# Export the signing certificate in DER format, hash, base64 encode, trim  '=' and url encode

keytool -exportcert -alias <your-keystore-alias> -keystore <your-keystore> | openssl sha256 -binary | openssl base64 | sed 's/=//g'| sed s/\\+/-/g | sed s/\\//_/g | sed -E s/=+$//For complete information about passkey settings, see Customize login methods.
Google requires having a domain associated with the passkeys credentials. This is done by adding a Digital Asset Links JSON file (assetlinks.json) on your website. Learn more
Add the following lines in the shared build.gradle file (allprojects scope):
dependencyResolutionManagement {
    repositoriesMode.set(RepositoriesMode.FAIL_ON_PROJECT_REPOS)
    repositories {
        maven {
            url('https://transmit.jfrog.io/artifactory/transmit-security-gradle-release-local/')
        }
        mavenCentral()
        google()
    }
}
Add the following in the module build.gradle file (project scope):
dependencies {
    implementation 'com.ts.sdk:authentication:1.+'
}

// Required to compile against Android API level 34 or later
android {
    compileSdk 34
}Initialize using strings.xml configuration (recommended)
To do this, update the strings.xml file in your Application with the following content, where CLIENT_ID is your client ID (obtained in Step 1).
<resources>
    <!-- Mosaic Credentials -->
    <string name="transmit_security_client_id">[YOUR_CLIENT_ID]</string>
    <string name="transmit_security_base_url">https://api.transmitsecurity.io/</string>
</resources>The SDK can be configured to work with a different cluster by setting transmit_security_base_url to https://api.eu.transmitsecurity.io/ (for EU) or https://api.ca.transmitsecurity.io/ (for Canada).
Add the code below to your Application Class
class YourApplication: Application() {
    override fun onCreate() {
        super.onCreate()
        TSAuthentication.initializeSDK(this)
    }
}
Initialize using SDK parameters
Configure the SDK by calling the initialize() SDK method using a snippet like the one below, where CLIENT_ID is your client ID (obtained in Step 1), and BASE_SERVER_URL is your base server URL (which defaults to https://api.transmitsecurity.io/ if not provided).
class YourApplication: Application() {
   override fun onCreate() {
       super.onCreate()
       TSAuthentication.initialize(this,
            CLIENT_ID,
            BASE_SERVER_URL
       )
   }
}Before users can authenticate with WebAuthn, they'll need to register WebAuthn credentials. This assumes that the registration flow occurs only after the end-user has logged in to your mobile app (or at least performed an authentication process that verifies their identity), regardless of whether this is done using another Mosaic authentication method or using an authentication external to Mosaic. Credentials can be registered for existing Mosaic users or for new Mosaic users.
To implement a registration flow, you'll need to:
- Check that the device supports WebAuthn
- Register a credential on the device
- Register the credential in Transmit
Before initiating WebAuthn registration, use the isWebAuthnSupported() SDK call to check if the device supports WebAuthn.
val isWebAuthnSupported = TSAuthentication.isWebAuthnSupported()When the end-user requests to register biometrics, call the registerWebAuthn() SDK call as shown below. Username is required and additional optional properties like display name are supported. This will prompt the user for biometrics. If successful, it returns a result encoded as a base64 string, which is required to complete the registration via your backend.
USERNAME is a verified username, which should be a representation of the user in your system (such as their email, phone number, or another verifiable username known to the user like account ID).
TSAuthentication.registerWebAuthn(context, userName, displayName, object: TSAuthCallback<RegistrationResult, TSWebAuthnRegistrationError> {
   override fun success(registrationResult: RegistrationResult) {
       val encodedResult = registrationResult.result()
   }

   override fun error(error: TSWebAuthnRegistrationError) {
       //handle error
   }
})Once WebAuthn credentials have been registered on the device (via the SDK), they will need to be registered in Mosaic to the relevant user. This is done by taking the result parameter returned by the SDK (in step 6.2) and passing it to a backend API. This step varies based on whether the end-user logged into your app using a Mosaic authentication method or using an external one, as described below.
User is logged-in via Transmit
Complete WebAuthn credential registration for a user that is currently logged-in using a different Mosaic authentication method. This registration API must be called from the backend using the user access token returned upon login. If successful, the credential will be registered for the user that corresponds to the authorization token.
const resp = await fetch(
  `https://api.transmitsecurity.io/cis/v1/auth/webauthn/register`, // Use api.eu.transmitsecurity.io for EU, api.ca.transmitsecurity.io for CA
  {
    method: 'POST',
    headers: {
      'Content-Type': 'application/json',
      Authorization: 'Bearer [TOKEN]' // User access token from Mosaic login
    },
    body: JSON.stringify({
      webauthn_encoded_result: '[ENCODED_RESULT]' // Returned by registerWebAuthn() SDK call
    })
  }
);

const data = await resp.json();
console.log(data);
User isn't logged-in via Transmit
Complete WebAuthn credential registration for an end-user that logged into your app using a non-Mosaic authentication method. This registration API must be called from the backend using a client access token (See Get client access tokens). If successful, the credentials will be registered for the user corresponding to the external user ID in the request. If no user is found, a new user will be created.
- While an end-user may be logged-in to your app, if they didn't perform a Mosaic authentication (i.e., there is no active Mosaic session for the user), they are considered a logged-out Mosaic user.
- While an end-user may be registered to your app, if they've never logged in via Mosaic (or created as a Mosaic user), they are considered an existing user in your system but a new user in Mosaic.
const resp = await fetch(
  `https://api.transmitsecurity.io/cis/v1/auth/webauthn/external/register`, // Use api.eu.transmitsecurity.io for EU, api.ca.transmitsecurity.io for CA
  {
    method: 'POST',
    headers: {
      'Content-Type': 'application/json',
      Authorization: 'Bearer [TOKEN]'// Client access token
    },
    body: JSON.stringify({
      webauthn_encoded_result: '[ENCODED_RESULT]', // Returned by registerWebAuthn() SDK call
      external_user_id: '[EXTERNAL_USER_ID]'// Identifier of the user in your system
    })
  }
);

const data = await resp.json();
console.log(data);Once WebAuthn credentials are registered for a user, they can use them to authenticate. Users are identified by their username.
To implement an authentication flow, you'll need to:
After the user confirms the transaction details, proceed to authentication by calling the approvalWebAuthn() SDK method. Both username and approvalData are required parameters. The username is used to fetch the credentials matching it. The approvalData passes the payment details to be approved by the user. This should be the exact data displayed to the user, or be derived from it (e.g. a hash). It can contain up to 10 key-value pairs, and only alphanumeric characters, underscores, hyphens, and periods. The data will be returned in the ID token upon successful authentication.
This call will prompt the user to authenticate with biometrics. A successful authentication returns a callback containing a WebAuthnEncodedResult that should be passed to your backend to complete the flow using APIs. It contains a signed challenge derived from the transaction details and remains valid for 60 seconds.
For example:
  Map<String, String> map = new HashMap<>();
      map.put("key1", "approvalData1");
      map.put("key2", "approvalData2");

      TSAuthentication.approvalWebAuthn(context, "USERNAME", map, new TSAuthCallback<AuthenticationResult, TSWebAuthnAuthenticationError>() {
          @Override
          public void success(@NonNull AuthenticationResult result) {
              // Handle successful authentication result
              // Send the WebAuthnEncodedResult to the backend to complete the flow
          }
          @Override
          public void error(@NonNull TSWebAuthnAuthenticationError error) {
              // Handle authentication error
          }
      });
}Once the user has authenticated on the device via the SDK, call the authentication endpoint via your backend with the result parameter returned by the SDK (in step 7.1) and a client access token (See Get client access tokens).
If successful, ID and access tokens will be returned. The user tokens will identify the user via user_id. If set for the user, it will also include any other verified alias (such as email or phone number) and the external user ID (external_user_id).
const resp = await fetch(
  `https://api.transmitsecurity.io/cis/v1/auth/webauthn/authenticate`, // Use api.eu.transmitsecurity.io for EU, api.ca.transmitsecurity.io for CA
  {
    method: 'POST',
    headers: {
      'Content-Type': 'application/json',
      Authorization: 'Bearer [TOKEN]' // Client access token
    },
    body: JSON.stringify({
      webauthn_encoded_result: '[ENCODED_RESULT]' // Returned by approvalWebAuthn() SDK call
    })
  }
);

const data = await resp.json();
console.log(data);A successful authentication returns ID and access tokens that should be validated as described here. The ID token will include the approval_data claim that corresponds to the approvalData SDK parameter passed in step 7.1. This claim should be validated against the requested data, and the data presented to the user to approve. Here's an example of a decoded ID token returned upon a successful transaction approval flow.
{
  "tid": "8AEksjdhfkuwaefOrJ2",
  "email": "user@email.com",
  "groups": [],
  "new_user": false,
  "amr": [
    "webauthn"
  ],
  "roles": [],
  "auth_time": 1671471638,
  "at_hash": "f0MaRhWO9pLgFvuJVDhJqw",
  "aud": "83474278.8kjsdfuwe2.transmit",
  "exp": 1671475240,
  "iat": 1671471640,
  "iss": "https://userid.security",
  "approval_data": {
     "payment_amount": "200",
     "payee": "Acme",
     "payment_method": "Acme card"
   }
}Once you've tested your basic WebAuthn integration, you can complete your implementation. See Implement login scenarios for additional logic, like how to verify user identities before registering credentials.