Integrate login using OIDC
OpenID Connect (OIDC) is one of the most common identity authentication protocols used by SaaS products today. OIDC extends the authentication and authorization mechanisms of OAuth 2.0 with identity-focused security features like ID tokens and user profiles.
Mosaic supports an OIDC-based integration option for adding login to your website. This includes login using social providers like Google, Facebook, Apple, and LINE, as well as hosted login. If you've already implemented OIDC for other providers, this provides a faster and easier way to kick off your integration. For more, see our OIDC API Reference.
Tip
We recommend using an existing OIDC library, such as a certified open-source library like OpenID.net.
How it works
Mosaic supports the OIDC authorization code flow for user authentication and the OIDC RP-initiated logout for logout.
Here's an example of a login flow that can be implemented using the steps in this guide. Mosaic APIs are shown in pink along with the relevant integration step, described below. Note that refreshing tokens and logout aren't shown.
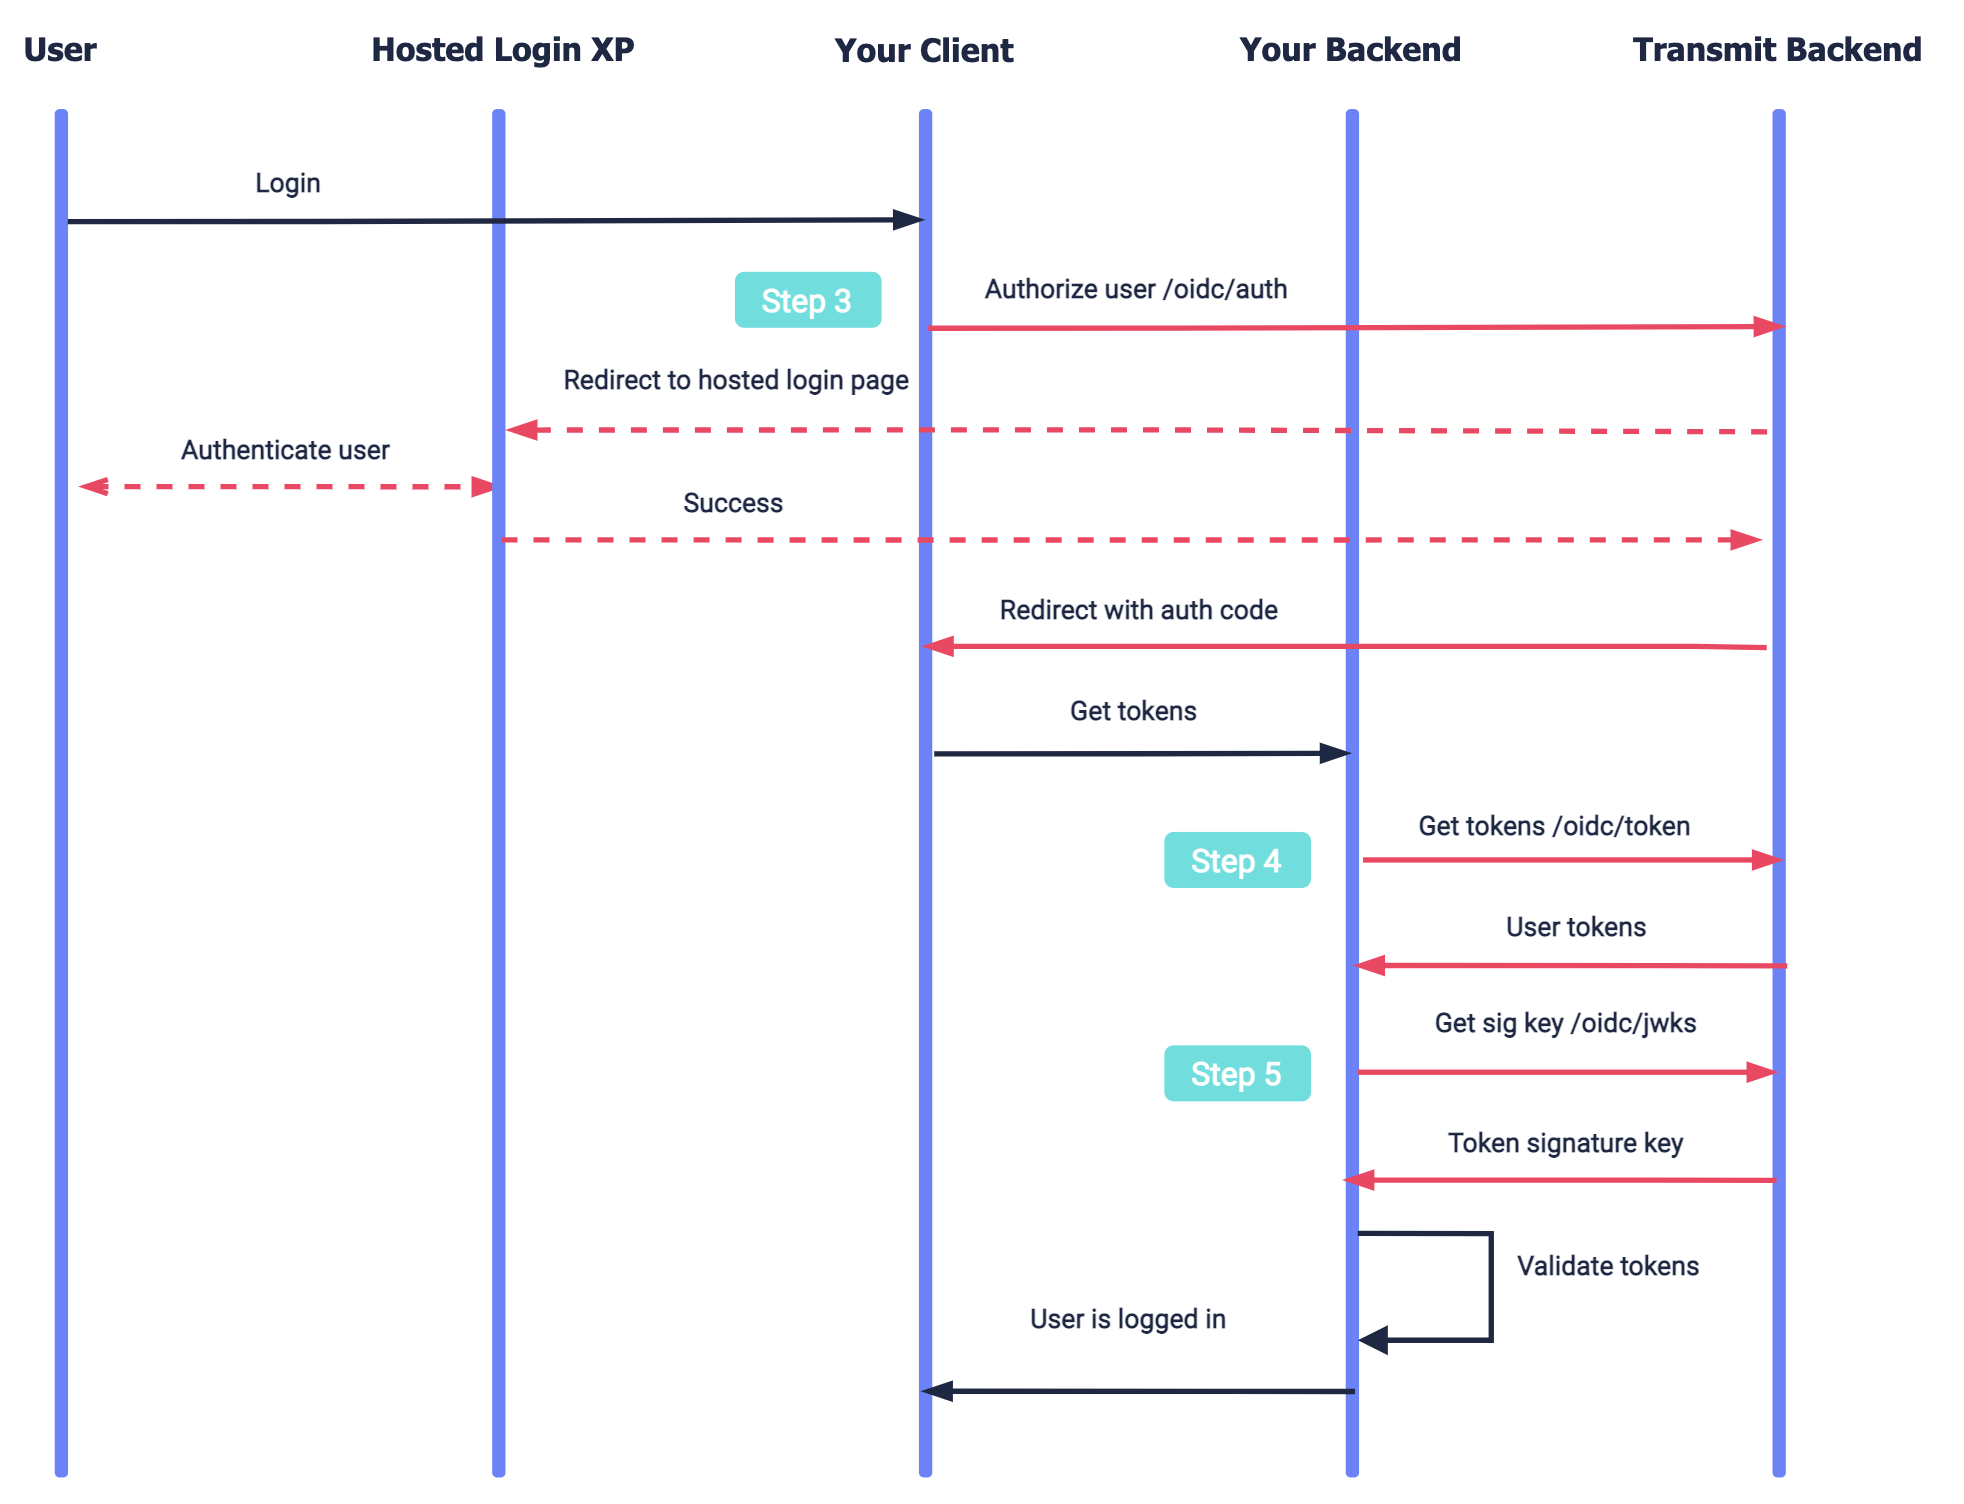
- The user requests to log in and your app sends an authorization request to Mosaic ( Step 3 ).
- Mosaic redirects to the hosted login experience to authenticate the user.
- If successful, Mosaic redirects back to your app with an authorization code.
- Your app exchanges the authorization code for user tokens in the backend ( Step 4 ).
- After validating the user tokens, your app logs in the user ( Step 5 ).
- If needed, your app refreshes the user access token and continues working while user if offline ( Step 6 ).
- Upon local session expiration or user logout, your app logs out the user from Mosaic ( Step 7 ).
Step 1: Set up login method
Before you add login to your application, set up the login method you plan to use by completing the provider-specific setup, as described in these dedicated guides:
- Google : Set up Google credentials and consent screen using steps 1-3
- Apple : Set up Apple credentials using steps 1-2
- Facebook : Set up Facebook credentials using steps 1-2
- LINE : Set up LINE credentials using steps 1-2
- Hosted login
Alternatively, you can use the SSO Service by Mosaic.
Step 2: Add redirect URI to app
After authentication is completed, the authentication result is returned to the redirect URI. This URI should be registered in client settings in the Mosaic Admin Portal.
- For pure OIDC implementation: from the Admin Portal under Applications , click your application and proceed to the client settings to enter this URI under Redirect URIs . If you don't already have an application, you'll need to create one first (see Create application ).
- If using SSO Service: from the Admin Portal under SSO and Federation , navigate to Configuration > Client groups and proceed to the client settings to enter this URI under Redirect URIs .
Note
Your application's settings contain the Client ID and Client Secret, which you'll need for Step 3, 4, and 6.
Step 3: Authorize user
Authorize the user by sending a GET request to /oidc/auth, which initiates an OIDC authorization code flow. This returns an authorization code to your redirect URI upon successful authentication; otherwise, an error.
Here are some basic parameters of the OIDC authorization request (see OIDC API Reference):
| Field | Description |
|---|---|
client_id |
Client ID. Can be obtained from client settings in the Mosaic Admin Portal. |
scope |
Scopes of the access (as a space-delimited string). May include openid (required), offline_access (to allow refreshing access tokens), email, and phone. |
response_type |
Should be set to code for an authorization code flow |
redirect_uri |
Redirect URI configured in Step 2 that will receive the authorization code (or error) |
prompt |
(Optional) Determines if to force re-authentication for every login (login) and/or to obtain user consent (consent) which is required for offline access. |
acr_values |
Used to specify the authentication method using either urn:transmit:google_direct,urn:transmit:apple_direct, urn:transmit:facebook_direct, or urn:transmit:line_direct. |
createNewUser |
(Optional) If true, a new user will be auto-created in Mosaic if one doesn't already exist, and an existing user will be associated with the application if the user isn't already. This requires enabling public sign-up for the application. |
Below is a sample request to log in with Google. It obtains the relevant user consents and doesn't re-authenticate the user if there's a valid session (since prompt doesn't include login). Based on the scope, the ID token will include the user's email address and the access token can be refreshed. In addition, since createNewUser is true, a new user will be automatically created if no user is found for the email address used in the Google authentication.
// Breaks and spaces were added for readability
  https://api.transmitsecurity.io/cis/oidc/auth?
    client_id=CLIENT_ID&
    scope=openid%20email%20offline_access&
    response_type=code&
    redirect_uri=REDIRECT_URI&
    prompt=consent&
    acr_values=urn:transmit:google_direct&
    createNewUser=true
Step 4: Get user tokens
The authorization code returned to your redirect URI upon successful authentication should be passed to your app backend. Your server can exchange this code for an ID and access token by sending a POST request like the one below to the /oidc/token endpoint, along with the following parameters:
| Field | Description |
|---|---|
code |
Authorization code received in Step 3. |
client_id |
Client ID. Can be obtained from client settings in the Mosaic Admin Portal. |
client_secret |
Client secret. Can be obtained from client settings in the Mosaic Admin Portal. |
grant_type |
Should be set to authorization_code for an authorization code flow |
redirect_uri |
Redirect URI that received the authorization code |
curl -i -X POST \
  https://api.transmitsecurity.io/oidc/token \
  -H 'Content-Type: application/x-www-form-urlencoded' \
  -d client_id=CLIENT_ID \
  -d client_secret=CLIENT_SECRET \
  -d code=CODE \
  -d grant_type=authorization_code \
  -d redirect_uri=REDIRECT_URI
Step 5: Validate tokens
The /oidc/token response includes an ID token with user profile data, and a user access token. These tokens must be validated as described here. Validate the token signatures using the public key retrieved from this request:
curl -i -X GET \
  'https://api.transmitsecurity.io/cis/oidc/jwks'
Note
Cache a response returned by /oidc/jwks for further reuse to avoid reaching API rate limits and prevent latency issues. Signing keys don't change often. Yet, if token validation fails due to a signature mismatch, try updating the cache first and then revalidating the token signature.
Step 6: Refresh access tokens
If the app has to keep operating on the user's behalf after the user has left, you can obtain a user access token using the refresh token, i.e., to extend access of logged-in users when the access token has expired. Both of these tokens are returned upon successful authentication (if offline_access is requested). To do this, send a POST request to the /oidc/token endpoint, along with the following parameters:
| Field | Description |
|---|---|
client_id |
Client ID. Can be obtained from client settings in the Mosaic Admin Portal. |
client_secret |
Client secret. Can be obtained from client settings in the Mosaic Admin Portal. |
grant_type |
Should be set to refresh_token |
refresh_token |
Refresh token associated with the access token you want to refresh |
curl -i -X POST \
https://api.transmitsecurity.io/oidc/token \
-H 'Content-Type: application/x-www-form-urlencoded' \
-d grant_type=refresh_token \
-d client_id=CLIENT_ID \
-d client_secret=CLIENT_SECRET \
-d refresh_token=REFRESH_TOKEN
Note
Alternatively, you can obtain a new access token by silently authenticating a user.
Step 7: Log out user
Once the user is authenticated, a new session is created and these tokens are returned: ID token, access token, and refresh token (if offline_access was requested). If the authorization request doesn't force re-authentication (by passing prompt=login), the user won't be re-authenticated if there's a valid session.
If the user requests to logout, redirect the User Agent to the /oidc/session/end endpoint below (defined by OIDC), which will terminate all the user's sessions for this tenant. We recommend specifying your client ID and the URI to which the user will be redirected once the sessions are terminated. If these parameters aren't passed, our default logout success page will be shown instead.
https://api.transmitsecurity.io/cis/oidc/session/end?post_logout_redirect_uri=LOGOUT_URI&client_id=CLIENT_IDTo complete the logout, revoke both their access token and refresh token so they can no longer gain access to your resources without authenticating. This is done by sending the POST /oidc/token/revocation request below (defined by OAuth) from your backend, along with the token you want to revoke and your client credentials.
curl -i -X POST \
https://api.transmitsecurity.io/oidc/token/revocation \
-H 'Content-Type: application/x-www-form-urlencoded' \
-d client_id=CLIENT_ID \
-d client_secret=CLIENT_SECRET \
-d token=TOKEN
Discovery
If needed, information for configuring Mosaic as an OIDC IDP is available using the discovery endpoint, including Mosaic OIDC endpoints and supported parameters. Send the following request:
curl -i -X GET \
  'https://api.transmitsecurity.io/cis/oidc/.well-known/openid-configuration'
Note
Cache returned metadata for further reuse to avoid reaching API rate limits.