Authorize browserless and input-limited devices
Devices—such as smart TVs or watches, printers, game consoles, media centers, and smart home appliances—are usually connected to the internet but don't have a browser or text input methods to authenticate users. Device flow (also called device authorization grant) provides decoupled authentication capabilities by enabling such devices to delegate user authentication to a different device, e.g., a smartphone, and then obtain the grant.
Example: a user wants to log in to a streaming service on their smart TV. The device displays a QR code for the user to scan and then authenticate on their phone. Once the user completes authentication, they get automatically logged in to their smart TV.
How it works
Below is an example of the device flow that leverages a QR code and that can be implemented using this guide. Transmit APIs are shown in pink along with the relevant implementation steps.
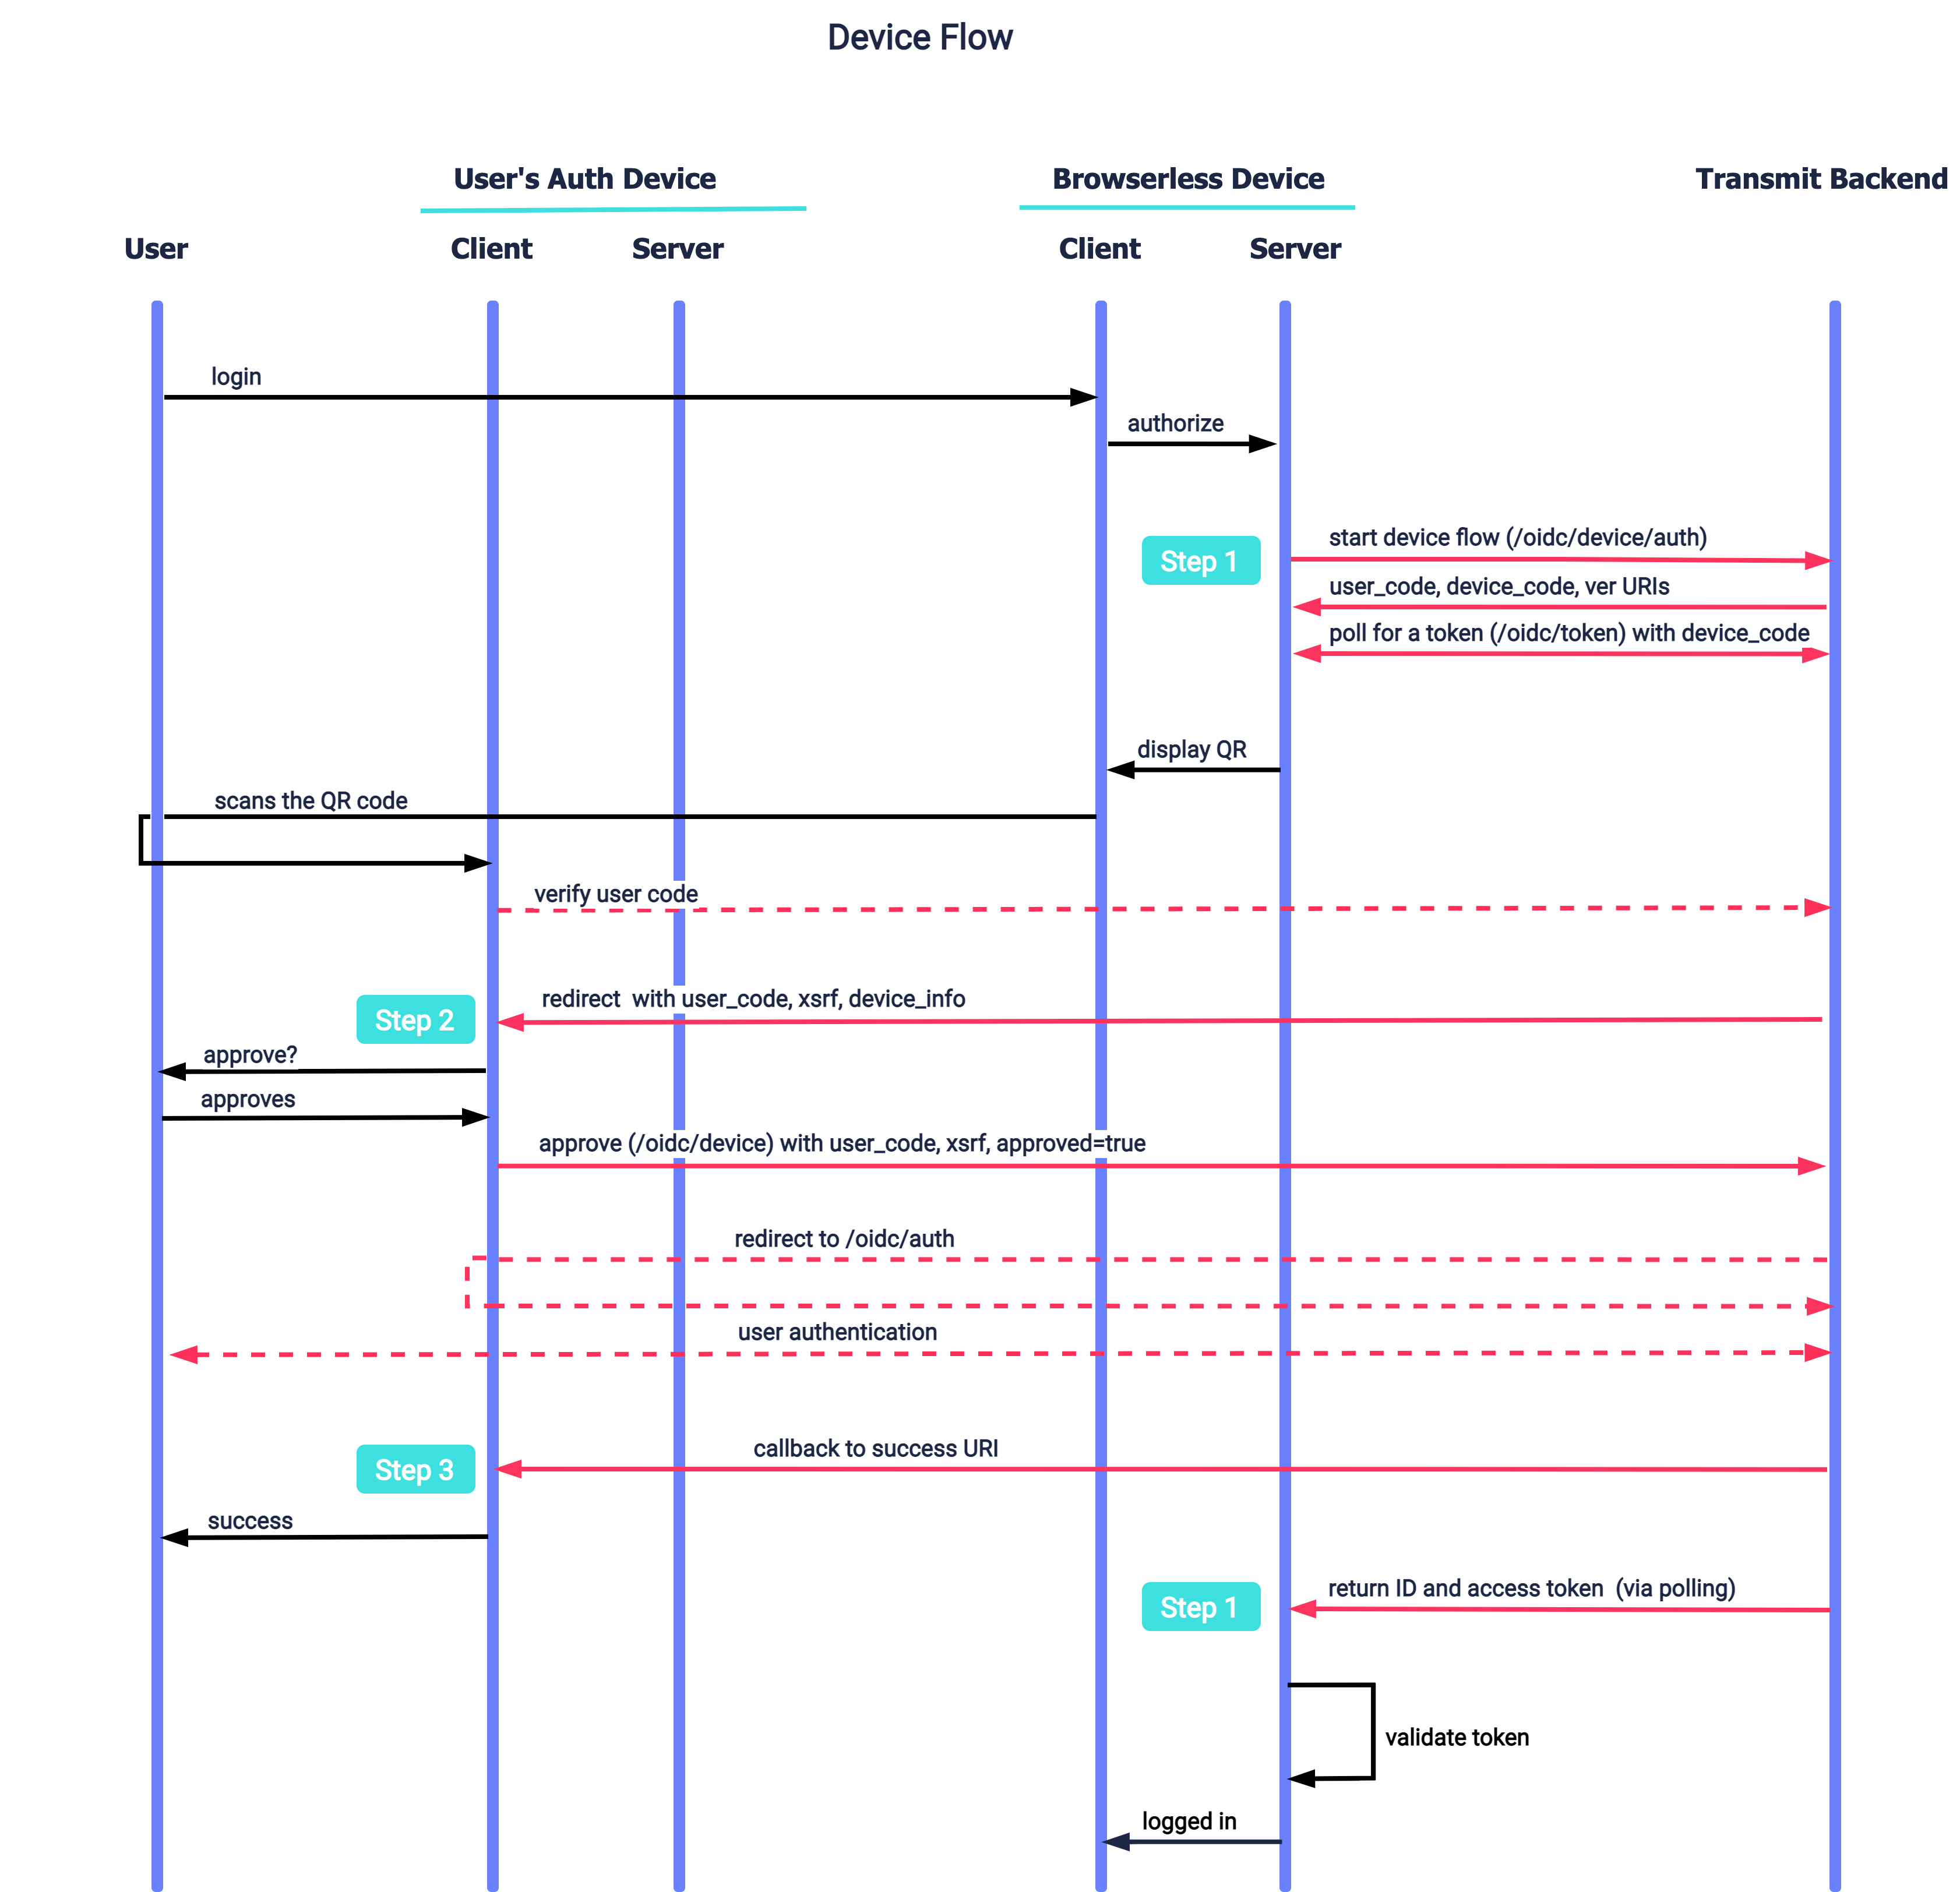
- A device client (e.g., a smart TV) wants to authenticate a user and sends a request to Transmit to initiate a device auth flow. Transmit returns a device code, user code, and URI for a user to follow and authenticate. The device communicates the URI and user code to the user, for example, displays a QR code.
- The device backend starts polling for a token.
- When a user follows the link on their other device (e.g., smartphone), they are taken to a page where they approve or deny further interaction.
- Once the user approves, they proceed to the login experience.
- After the user logs in, Transmit sends a notification that the authentication finished successfully.
- With the next polling, the device (a smart TV) receives a token and logs the user in.
Before you start
Before you can start implementing this flow, make sure all prerequisites are in place. You'll need:
- An application created within Transmit (see Create application ). Your application's settings contain the Client ID and Client Secret, which you'll need later.
- An authentication method configured for your application, for example, Google login or Apple login. For implementation details, refer to step 1 of this guide .
Supported login methods
Social login (Apple, Facebook, Google, Line) and WebAuthn.
Step 1: Authorize device
The device flow is initiated by the browserless or input-constrained device when a user requests to login. Implement a backend endpoint that will be used to perform the device code flow, as specified by OAuth 2.0 Device Authorization Grant. When invoked, the endpoint should be able to perform the following operations:
1. Initiate device authorization
When the user requests to login to the app on the browserless or input-limited device, initiate a device authorization flow by sending a POST request to /oidc/device/auth. The request should specify the login method to authenticate the user. See API reference
A successful response includes user_code, verification_uri, and verification_uri_complete parameters for initiating the verification process (Step 1.2) and device_code used to obtain user tokens (Step 1.3).
Below is a sample request that allows authenticating with Apple. Replace placeholders with values before executing.
curl -i -X POST \
  https://api.transmitsecurity.io/cis/oidc/device/auth \
  -H 'Content-Type: application/x-www-form-urlencoded' \
  -d client_id=CLIENT_ID \
  -d client_secret=CLIENT_SECRET \
  -d scope=openid \
-d acr_values=urn:transmit:apple_direct| Field | Description |
|---|---|
client_id |
Client ID. Can be obtained from your application settings in the Transmit Admin Portal. |
client_secret |
Client secret. Can be obtained from your application settings in the Transmit Admin Portal. |
acr_values |
Specifies the user login method to prompt on the authentication device: urn:transmit:google_direct, urn:transmit:apple_direct, urn:transmit:facebook_direct, urn:transmit:webauthn_direct, urn:transmit:line_direct, or urn:transmit:centralized (for Authentication Hub). With the device flow, you cannot leverage one-time passwords and links. |
2. Initiate user verification process
To initiate the verification process, the user’s browser needs to redirect to the OAuth verification endpoint with the user code. This is the endpoint corresponding to the verification_uri, where the user_code is passed as a query parameter, for example, https://api.transmitsecurity.io/cis/oidc/device?user_code=ABCD-ABCD.
There are different ways to communicate the link to the user. For example, the browserless or input-constrained device can display a QR code that embeds verification_uri_complete (returned in Step 1.1) so that the user can scan the QR code to open the link on the browser of their mobile device.
3. Obtain token
As soon as your device receives a response from /oidc/device/auth, you can start polling for the user token with at least 5 seconds between each request until the client receives it or until the authentication request expires. To poll for a token, implement a code that sends a POST request to the OIDC token endpoint (/oidc/token) with the same device_code you received in the /oidc/device/auth response in Step 1.1.
Below is a sample request that polls for a token. Replace placeholders with values before executing.
curl -i -X POST \
  https://api.transmitsecurity.io/oidc/token \
  -H 'Content-Type: application/x-www-form-urlencoded' \
  -d client_id=CLIENT_ID \
  -d client_secret=CLIENT_SECRET \
  -d device_code=DEVICE_CODE \
  -d grant_type=urn:ietf:params:oauth:grant-type:device_code
You can expect the following responses from Transmit and here is how to handle them:
| Response | Description | Action |
|---|---|---|
| 400 "authorization_pending" | A user hasn't completed authentication yet | Keep polling |
| 400 "slow_down" | The token is polled too frequently | Increase polling interval, keep polling |
| 400 "expired_token" | A user hasn't completed authentication within the backchannel request lifespan | Stop polling |
| 200 | A user completed an authentication procedure | Receive a token, stop polling |
4. Validate token
The /oidc/token response includes an ID token with user profile data, and a user access token. These tokens must be validated as described here. Implement the code that validates the token signatures using the public key retrieved from this request:
curl -i -X GET \
  'https://api.transmitsecurity.io/cis/oidc/jwks'
Step 2: Obtain user approval
After initiating the device flow, you need to explicitly obtain user's approval to authorize the browserless or input-limited device and then report the approval to Transmit to initiate the authentication process. Create a frontend endpoint that when invoked will perform the following operations:
1. Receive approval request
Upon receiving the device authorization request and verifying the user_code, Transmit will redirect the browser to your approval endpoint. It should be able to receive POST requests with the following query parameters:
| Parameter | Description |
|---|---|
user_code |
The user code that was passed to the verification endpoint and has been accepted as valid. |
xsrf |
The token that is used to ensure that the verification process takes place on a single device. User interactions should occur on the same authentication device throughout the entire flow. |
device_info |
Details of the browser that’s used to perform the approval. |
Below is a sample request sent by Transmit to your approval endpoint.
curl -i -X POST \
  'https://APPROVAL_URI' \
  -H 'Content-Type: application/x-www-form-urlencoded' \
  -d user_code=USER_CODE \
  -d xsrf=XSRF_SECRET_CODE \
  -d 'device_info={"id": "IP_ADDRESS", "ua": "USER_AGENT"}'
2. Collect user approval
After receiving an approval request, prompt a user to approve or deny authorization. For example, collect approval from the user by displaying an approval screen.
3. Initiate authentication
To initiate the login process, send a callback to Transmit by running the POST request to /oidc/device. It should include the user_code and xsrf parameters, which are used to identify the user and the device, respectively, as well as define if the user approved the access (approved=true).
If the request is successful, Transmit will redirect the user to authenticate using the authentication method requested in Step 1.
Note
In case there is a valid session for this user within your tenant and provided they authenticated using the same method you specified in loginType in Step 1, Transmit won't prompt the user to login and will perform silent authentication.
Below is a sample request that notifies Transmit that the user has granted approval. Replace placeholders with values before executing.
curl -i -X POST \
  'https://api.transmitsecurity.io/cis/oidc/device' \
  -H 'Content-Type: application/x-www-form-urlencoded' \
  -d user_code=USER_CODE \
  -d xsrf=XSRF_SECRET_CODE \
  -d approved=true
Step 3: Handle success
Once the user is successfully authenticated, Transmit redirects to your success endpoint. Create a success endpoint that receives POST requests and accepts device_info parameter. When invoked, it should display a success confirmation to the user.
Step 4: Handle errors
If an error occurs after the device flow has been initiated, Transmit will forward error details to the input endpoint.
Create the frontend endpoint that will receive the errors and handle them accordingly. The endpoint should accept POST requests with the body that includes {error: "Error message"}.
These are the types of errors that Transmit can return to this endpoint:
| Error | Description |
|---|---|
| The code you entered is incorrect. Try again | Occurs when a user submits an expired user code to the verification endpoint. See Step 1.2 |
| The sign-in request was interrupted | The user has denied access or failed to authenticate. |
Step 5: Enable device flow
In order to perform the device flow for your client, it should be enabled in the app's client settings. To do it, update your client by sending a PUT request to /applications/{appId}/clients/{clientId}. The request should contain approval_uri (Step 2), success_uri (Step 3), and input_uri (Step 4) that you have already created in the previous steps. See API reference
Below is a sample request that enables the device flow. Replace placeholders with values before executing.
Note:
Make sure you have a valid client access token to authorize the request. If not, you'll need to get one. Learn more
curl -i -X PUT \
  'https://api.transmitsecurity.io/cis/v1/applications/{APP_ID}/clients/{CLIENT_ID}' \
  -H 'Authorization: Bearer ACCESS_TOKEN' \
  -H 'Content-Type: application/json' \
  -d '{
      "device_authorization": {
        "enabled": true,
        "approval_uri": "APPROVAL_URI",
        "success_uri": "SUCCESS_URI",
        "input_uri": "INPUT_URI"
    }
  }'