Create a seamless single sign-on (SSO) experience across your apps. You can silently authenticate the user (without user interaction) if the user is already logged into any app in your tenant. This removes friction from the login process without compromising on security.
This guide describes SSO across multiple apps or clients within your tenant using Mosaic as the IDP. For SSO that involves third-party apps or other identity providers, see Identity federation.
For information about how to implement SSO using Mosaic's Journeys, refer to the relevant documentation.
Your app can manage user sessions based on the local session created by the application, and the IDP session created by Mosaic. When possible, users are granted access to the app silently, i.e., without re-authentication based on an existing access token (if valid). If the access token has expired, your app will need to authenticate the user.
By layering session management with silent authentication, your app can re-authenticate the user without any user interaction based on a valid IDP session. See Session management for details. Since an IDP session is shared across apps in the tenant, the session may have been created in the context of a different app, which provides the SSO login experience.
Here's an example of login logic that supports this, which begins with checking the local application session:
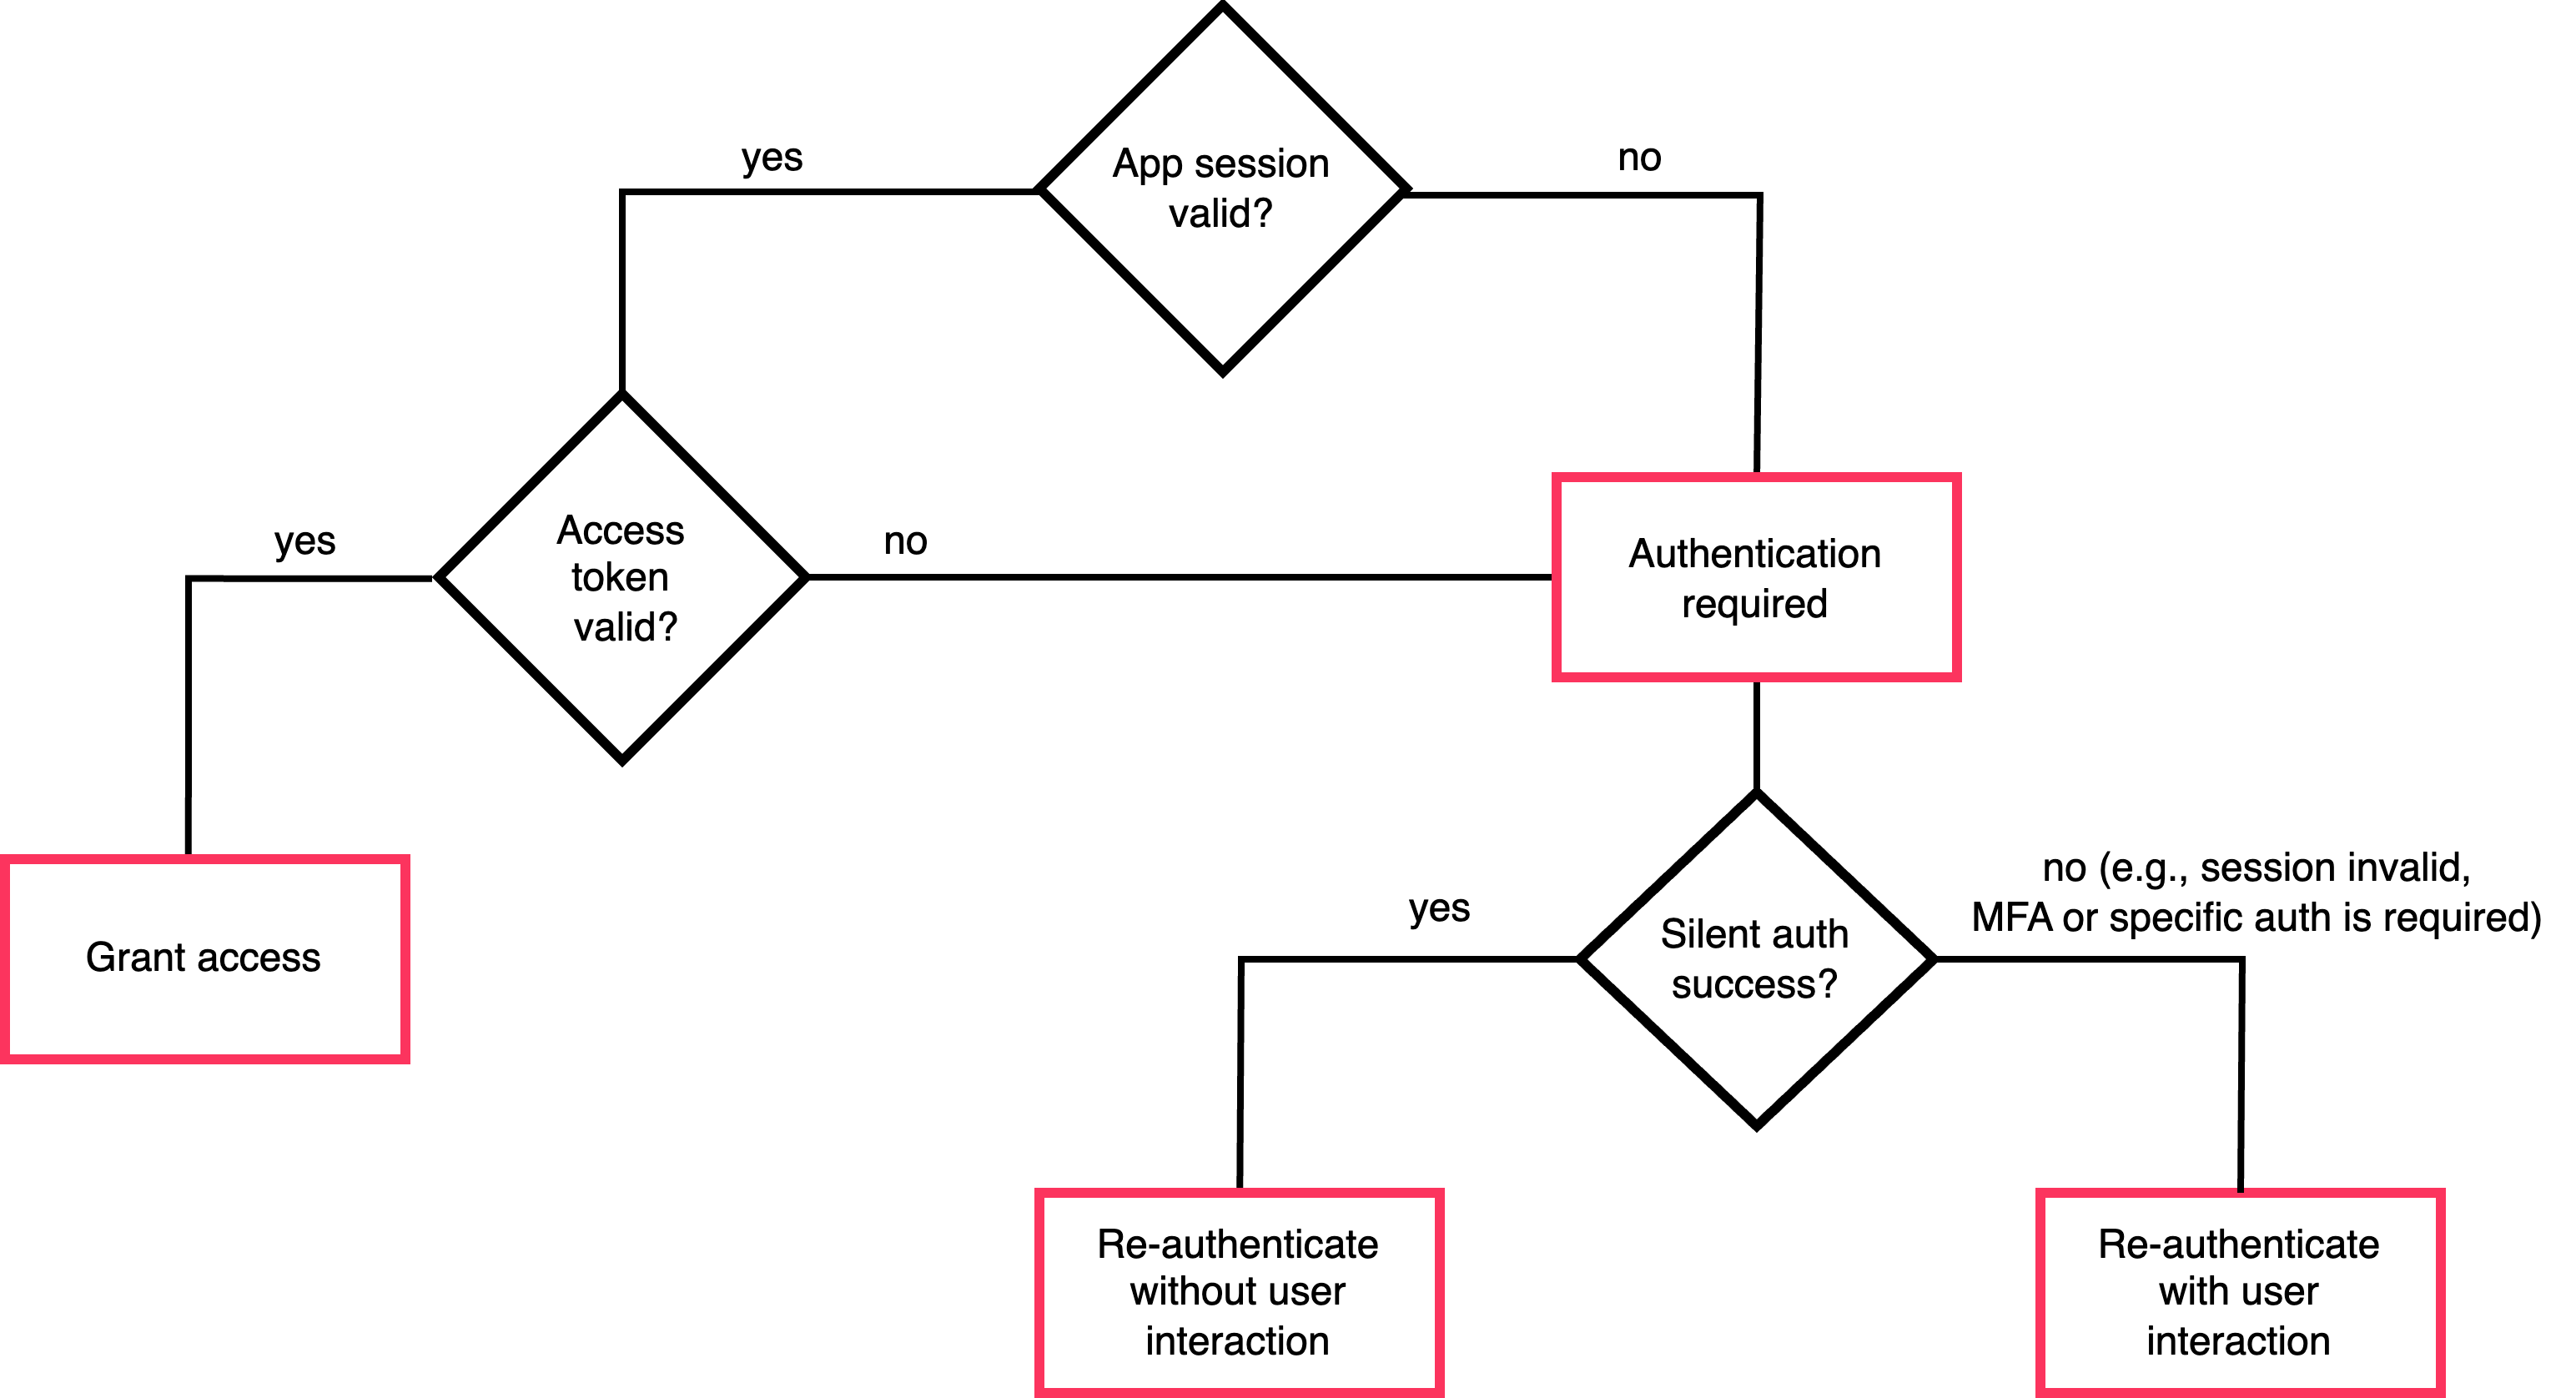
The diagram below illustrates the integration flow for a silent authentication process. When authentication is required, your app will first try to obtain an authorization code without prompting the user to authenticate, performing silent authentication based on an existing IDP session. If there's no valid IDP session (i.e., the user is logged out), the user will need to actively authenticate.
For example: 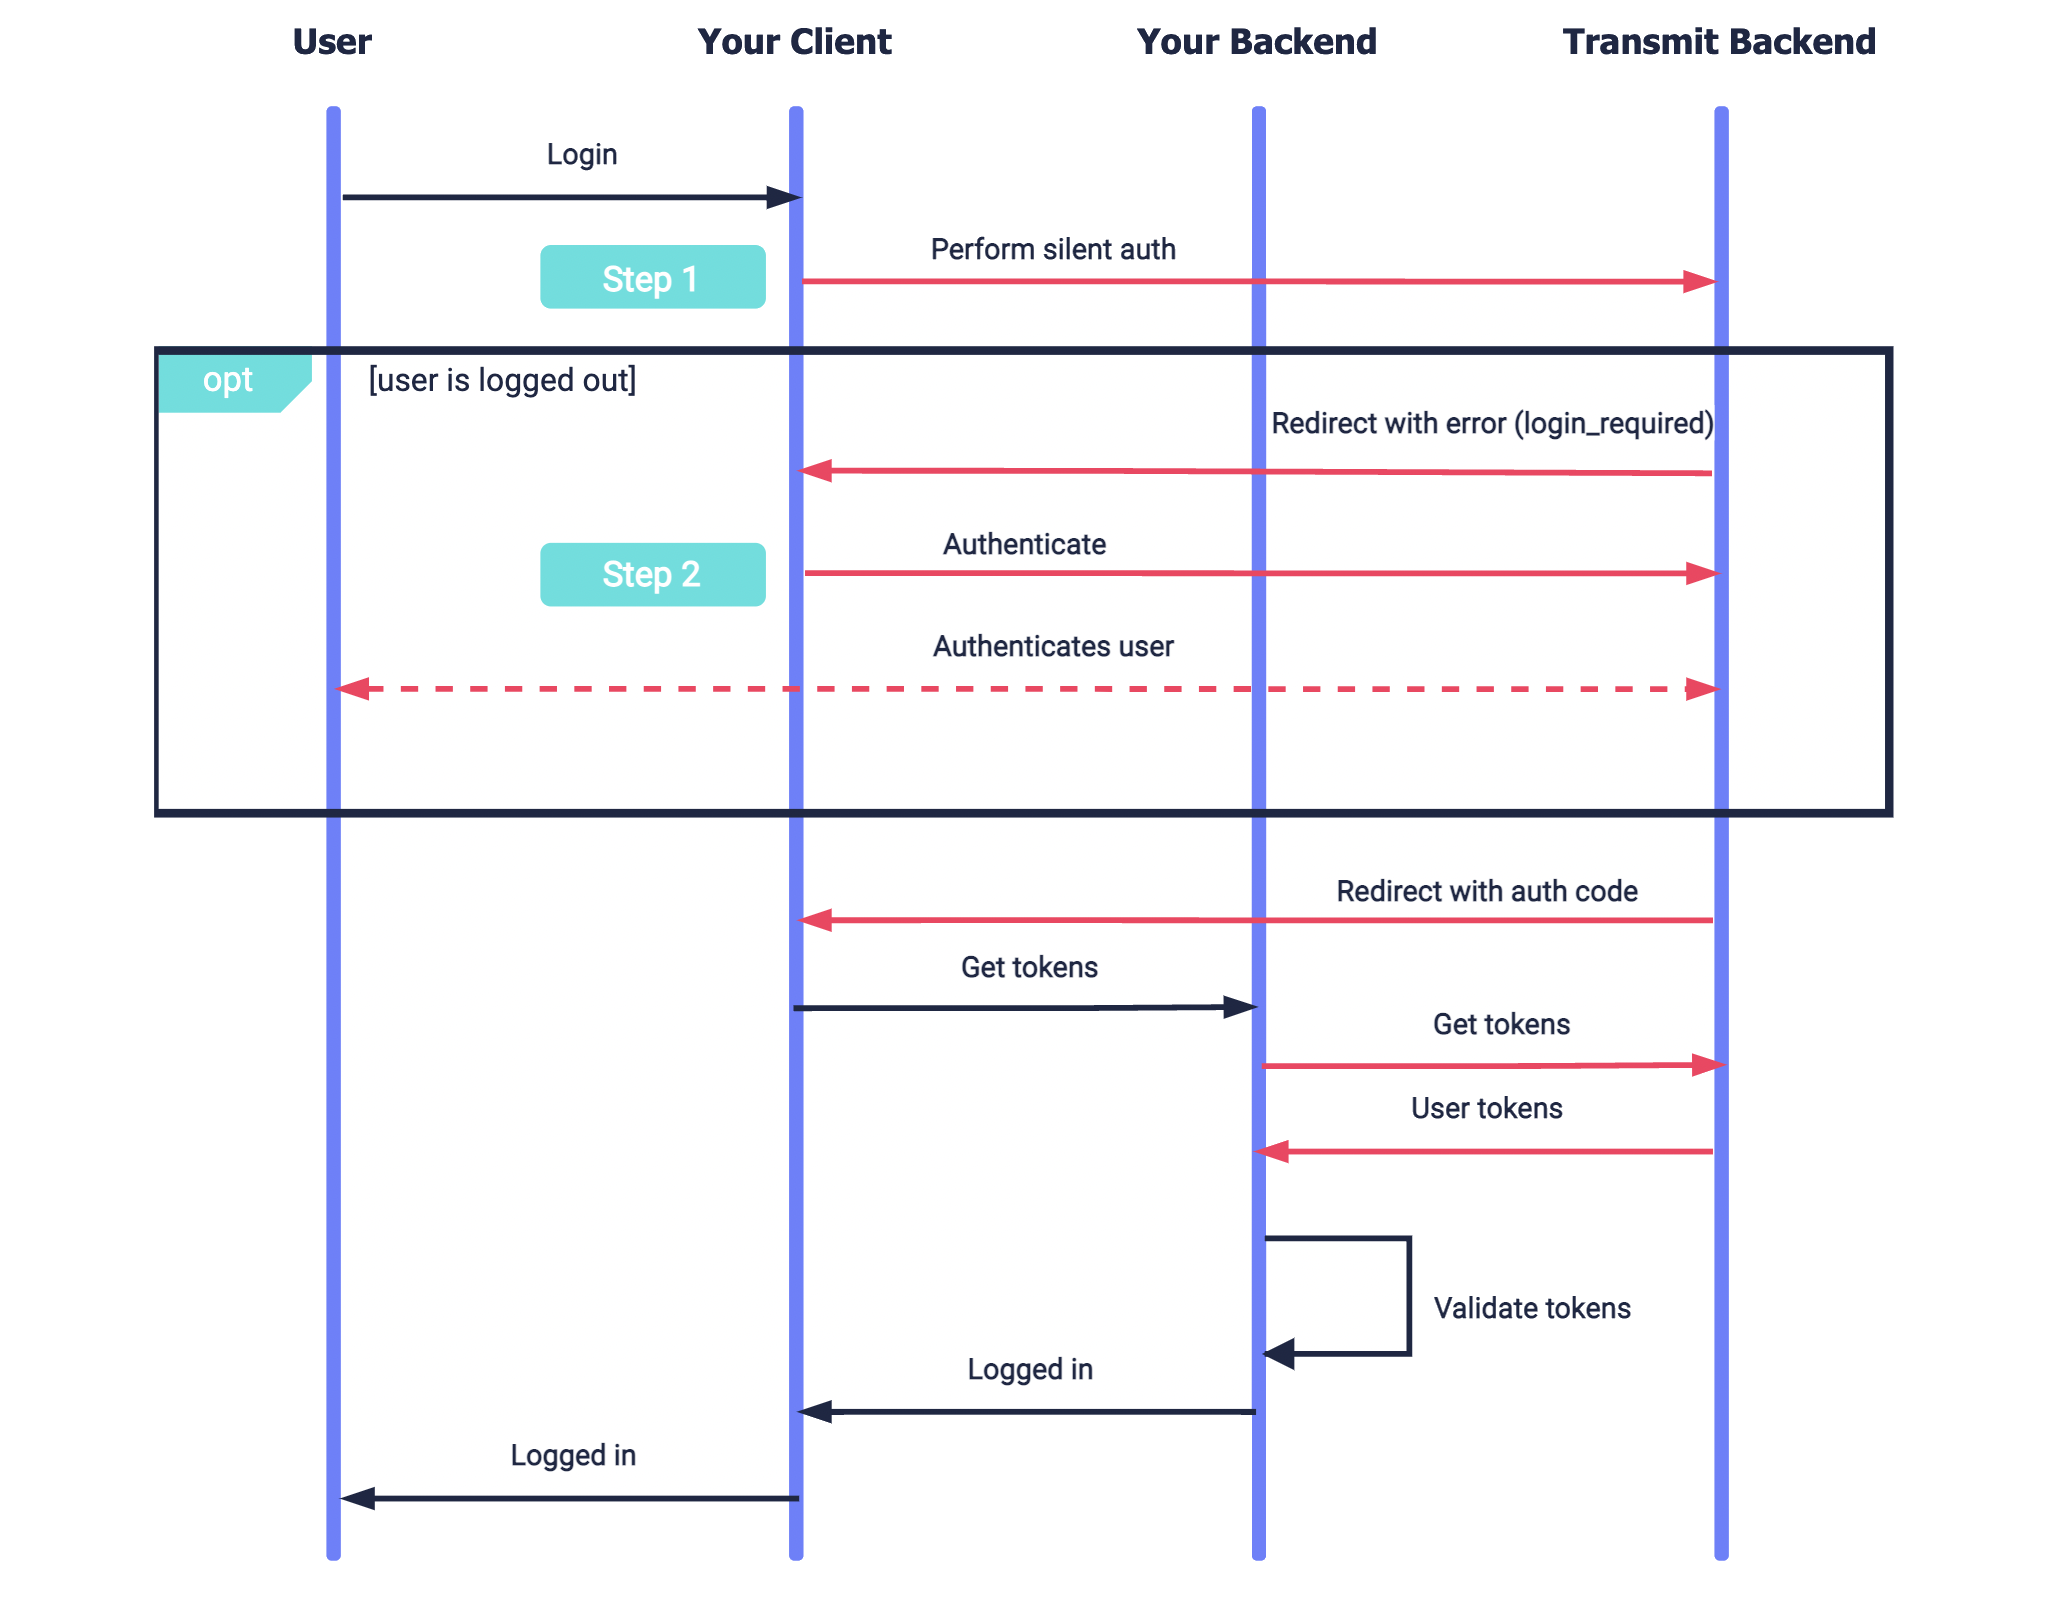
This solution relies upon both session management and silent authentication. Session management is used to log in users without authentication based on an existing access token. By default, sessions are valid for two weeks unless authentication occurs, and the session timeout can be configured up to 1 year in the client settings. With each new authentication, the session expiration is updated. Silent authentication should be requested only in case authentication is required, to provide a better user experience by performing an SSO login without any user interaction whenever possible.
The steps below describe how to implement silent authentication. Before you start, implement the session management flow described in Manage Sessions.
Excessive silent authentication requests are subject to rate limits. Polling for session status isn't supported, and excessive calls should be avoided.
To support SSO across your apps, you'll need to ensure that the end-user won't be asked to re-authenticate if they're currently logged in (even if that login occurred in the context of another app). You can do this by first trying to perform a silent authentication to get an authorization code without prompting the user to authenticate.
To request silent authentication, send an OIDC authorization call like the one below (line breaks and spaces were added for readability):
https://api.transmitsecurity.io/cis/oidc/auth?
  client_id=CLIENT_ID& // Client ID found in the app settings
  scope=openid&
  prompt=consent& // Consent will be granted automatically
  response_type=code&
  redirect_uri=REDIRECT_URI  // URI to receive a code if session is valid
The response is one of the following:
- If there is a valid session, the user is not prompted to authenticate and an authorization code is returned to your redirect URI in the
codequery parameter. This code should be exchanged for user tokens as part of the authentication flow. - If there isn't a valid session, a
login_requirederror is returned to the redirect URI in theerrorquery parameter. The user will need to be prompted to authenticate as described in Step 2.
To be able to perform a silent authentication, the session must satisfy all the requirements requested via acr_values; otherwise, an error will be returned and the user will need to authenticate. For example:
- If MFA is requested, the session must satisfy the MFA requirements (see Use multi-factor authentication).
- If a specific authentication method is requested, the session must include an authentication with the requested method.
If silent authentication fails, you'll need to authenticate the user to obtain the authorization code, which is required to complete the login flow. You can do this using any of the supported authentication methods.
For a hosted login method like social login, you can implement an OIDC-based integration. This involves configuring the relevant authentication method for the application (see OIDC guide), and sending an OIDC authorization request with prompt set to login (see OIDC guide).
Alternatively, you can implement any authentication method of your choice using the authentication guides.
When the user requests to logout from your app, the user should be logged out of the IDP session. This will ensure the session can no longer be used for an SSO login. You can use the logout step described in the OIDC guide, or use the logout API as shown below:
import fetch from 'node-fetch';

async function run() {
  const resp = await fetch(
    `https://api.transmitsecurity.io/cis/v1/auth/logout`,
    {
      method: 'POST',
      headers: {
        Authorization: 'Bearer [TOKEN]' // User's access token
      }
    }
  );

  const data = await resp.text();
  console.log(data);
}

run();