You can use identity verification to securely verify the identity of your customers using documents like their driver’s license or passport—such as before allowing them to open a new bank account online or pick up a rental car. This guide describes how to quickly integrate identity verification into your iOS application using our iOS SDK, including both the client-side and backend integration.

If you want to leverage Mosaic UI for your integration, follow this guide
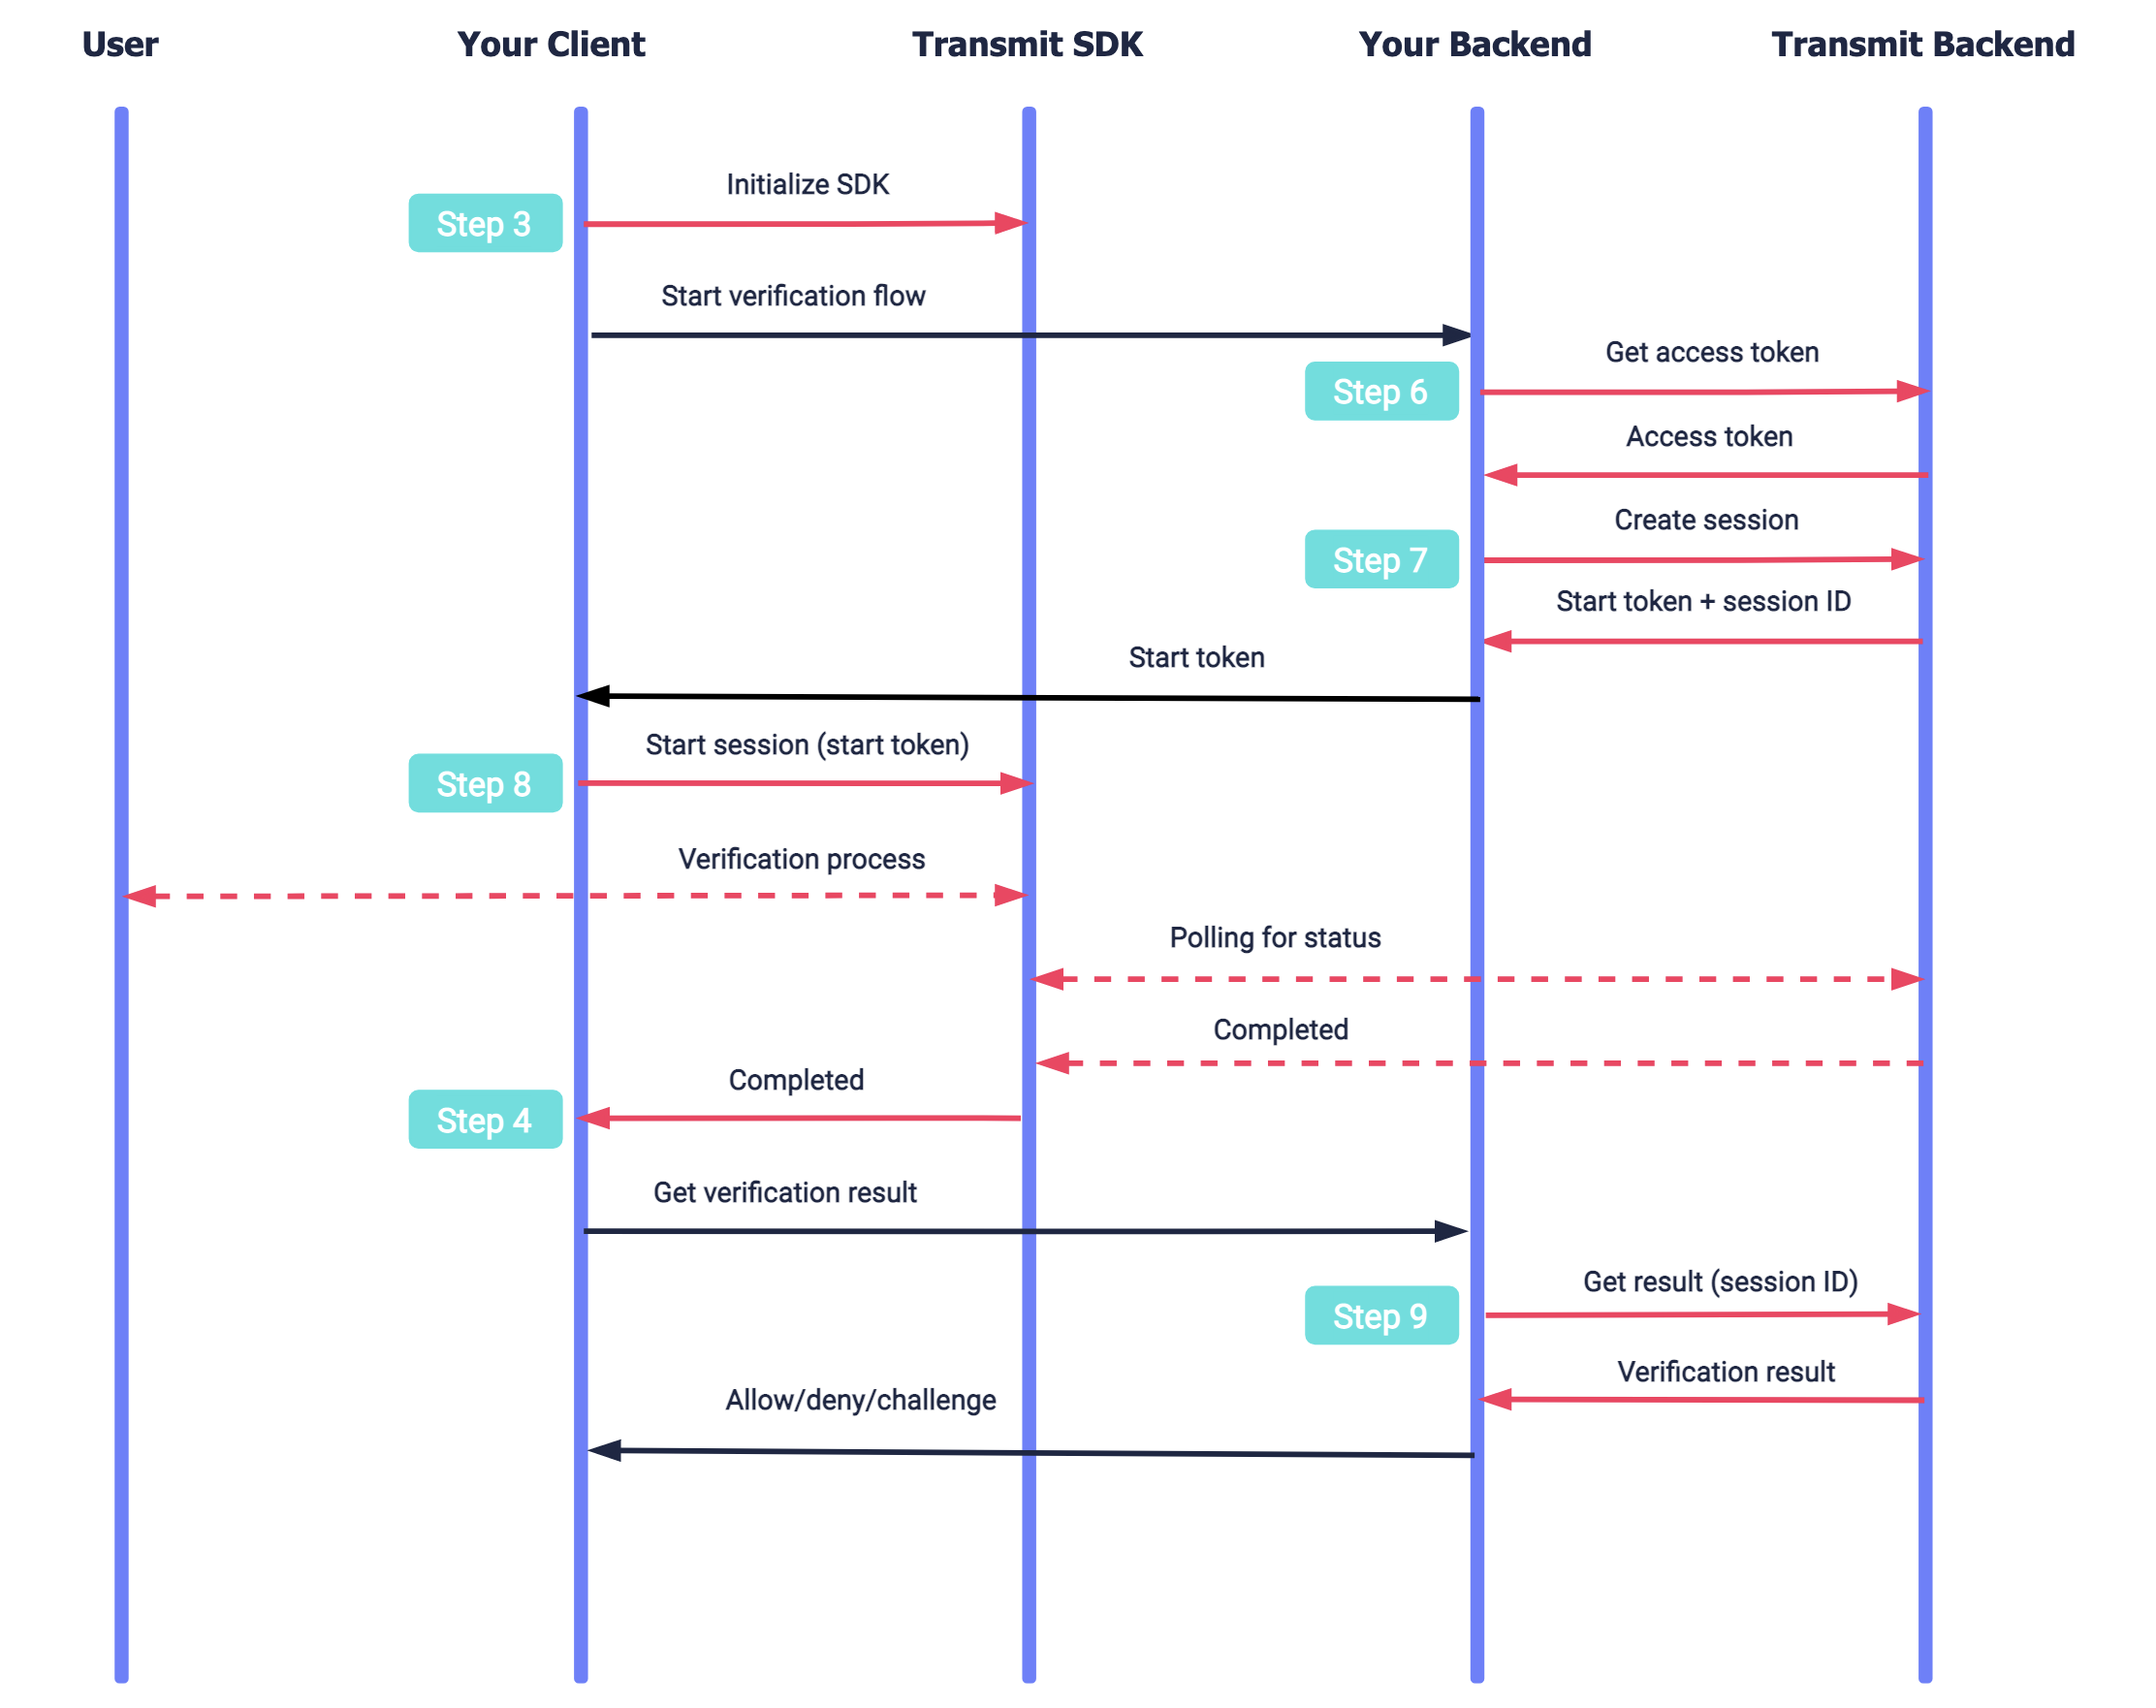
Here's an example of a basic integration flow. Mosaic APIs are shown in pink along with the relevant integration step.
After initializing the SDK (Step 3), your app starts a verification flow by creating a session in the backend to establish a secure context (Step 6 and Step 7) and then starting the session (Step 8). The SDK executes the verification process with the user using the Mosaic identity verification experience. Once all the required images are submitted, Mosaic starts processing the verification while the SDK polls for its status. Once processing is completed, the SDK notifies the app (Step 4) so it can obtain the verification result (Step 9) and proceed accordingly (Step 10).
- iOS 13+
- Xcode 11+
To integrate with Mosaic, you'll need to configure an application.
From the Applications page, create a new application or use an existing one. From the application settings:
- For Client type, select native
- For Redirect URI, enter your website URL. This is a mandatory field, but it isn't used for this flow.
- Obtain your client ID and secret for API calls, which are autogenerated upon app creation.
Add the SDK to your Xcode project so your application can access all the identity verification functionality.
- To use Swift Package Manager: install the SDK as a dependency in your
Package.swift. - To use CocoaPods: specify the SDK in your
Podfile.
dependencies: [
    .package(url: "https://github.com/TransmitSecurity/identityVerification-ios-sdk.git", .upToNextMajor(from: "1.0.0"))
]Initialize using PLIST configuration (recommended)
To do this, create a plist file named TransmitSecurity.plist in your Application with the following content. The [CLIENT_ID] should be replaced with your client ID from step 1 (Step 1)
<?xml version="1.0" encoding="UTF-8"?>
<!DOCTYPE plist PUBLIC "-//Apple//DTD PLIST 1.0//EN" "http://www.apple.com/DTDs/PropertyList-1.0.dtd">
<plist version="1.0">
<dict>
	<key>credentials</key>
	<dict>
		<key>baseUrl</key>
		<string>https://api.transmitsecurity.io/</string>
		<key>clientId</key>
		<string>[CLIENT_ID]</string>
	</dict>
</dict>
</plist>
Add the code below to your Application Class
- To use UIKit: add the code to your
AppDelegateor yourSceneDelegate. - To use SwiftUI: add the code to your main app file.
class AppDelegate: UIResponder, UIApplicationDelegate {

    func application(_ application: UIApplication, didFinishLaunchingWithOptions launchOptions: [UIApplication.LaunchOptionsKey: Any]?) -> Bool {
        TSIdentityVerification.initializeSDK()
        TSIdentityVerification.delegate = self
        return true
    }
}- Make sure to add
import IdentityVerificationat the top of the implementation class. - The SDK can be configured to work with a different cluster by setting the
baseUrlparameter within the TransmitSecurity.plist tohttps://api.eu.transmitsecurity.io/(for EU) orhttps://api.ca.transmitsecurity.io/(for Canada).
Initialize using SDK parameters
Configure the SDK using one of the snippets below, where CLIENT_ID is your client ID (obtained in Step 1):
- To use UIKit: add the code to your
AppDelegateor yourSceneDelegate. - To use SwiftUI: add the code to your main app file.
class AppDelegate: UIResponder, UIApplicationDelegate {

    func application(_ application: UIApplication, didFinishLaunchingWithOptions launchOptions: [UIApplication.LaunchOptionsKey: Any]?) -> Bool {
        TSIdentityVerification.initialize(clientId: [CLIENT_ID])
        TSIdentityVerification.delegate = self
        return true
    }
}- Make sure to add
import IdentityVerificationat the top of the implementation class. - The SDK can be configured to work with a different cluster by setting the first initialization parameter to
baseUrl : 'https://api.eu.transmitsecurity.io/'(for EU) orbaseUrl : 'https://api.ca.transmitsecurity.io/'(for Canada).
Once a verification process has been initiated (as described in Step 8), the verification moves through different statuses. For example, the status will indicate if the process was completed successfully so the app can fetch the verification result. To observe status changes, add the extension shown below to the main class of your app.
Here are examples of adding the extension to your AppDelegate or SceneDelegate class:
extension AppDelegate: TSIdentityVerificationDelegate {

     /** Notifies when user has started to capture images. */
    func verificationDidStartCapturing() {
         ...
    }

    /** Notifies when user has finished uploading images and the verification is being processed. */
    func verificationDidStartProcessing() {
         ...
    }

    /** Notifies when verification process couldn't be completed, but the user can try again. (Step 11) */
    func verificationRequiresRecapture(reason: TSRecaptureReason) {
         ...
    }

    /** Notifies when verification process completed, and the result can be obtained (via backend request). (Step 9) */
    func verificationDidComplete() {
         ...
    }

    /** Notifies when verification process being canceled by user */
    func verificationDidCancel() {
         ...
    }

    /** Notifies when verification error occurs. */
    func verificationDidFail(with error: TSIdentityVerificationError) {
        print("Verification error: \(error)")
    }
}Make sure to add import IdentityVerification at the top of the implementation class.
Your app requires camera permissions in order to capture the images required for the verification process.
Open the
Info.plistfile as a Property List and add the following key: Privacy - Camera Usage Description. The key value contains an explanation for why the permission is needed, which will be displayed to the user to approve. For example: This is needed to capture images for the verification process.To handle camera permissions, your client app should implement code like the snippet below.
switch AVCaptureDevice.authorizationStatus(for: .video) {
case .authorized: // User has already authorized camera access
    // Start Identity Verification here
    break
case .notDetermined: // User hasn't yet authorized camera access
    AVCaptureDevice.requestAccess(for: .video) { (granted) in
        if granted { // User has granted camera access
            // Start Identity Verification here
        } else {
            // Handle unauthorized state
        }
    }
    break

case .denied:
    // Handle authorization state
    break
case .restricted:
    // Handle authorization state
    break
@unknown default:
    // Handle unauthorized state
    break
}An access token is required to authorize the backend API calls, such as for creating a verification session (Step 7) and obtaining the result (Step 9). When needed, obtain an access token using the /token request below.
import fetch from 'node-fetch';

async function run() {
  const formData = {
    client_id: '[CLIENT_ID]', // Replace with client ID obtained in Step 1
    client_secret: '[CLIENT_SECRET]', // Replace with client secret obtained in Step 1
    grant_type: 'client_credentials',
    resource: 'https://verify.identity.security'
  };

  const resp = await fetch(
    `https://api.transmitsecurity.io/oidc/token`,
    {
      method: 'POST',
      headers: {
        'Content-Type': 'application/x-www-form-urlencoded'
      },
      body: new URLSearchParams(formData).toString()
    }
  );

  const data = await resp.text();
  console.log(data);
}

run();- The token must be requested for the
https://verify.identity.securityresource, which will appear in the audience claim of the generated token (in the future we’ll block access to tokens without this audience). - The token must remain secure on your server, and must only be used for backend requests.
Before your mobile app can initiate the verification process, your backend must create a session in order to provide a secure context for the flow. Create a session by sending the /verification request below.
import fetch from 'node-fetch';

async function run() {
  const resp = await fetch(
    `https://api.transmitsecurity.io/verify/api/v1/verification`,
    {
      method: 'POST',
      headers: {
        'Content-Type': 'application/json',
        Authorization: 'Bearer [ACCESS_TOKEN]' // Replace with access token obtained in Step 6
      }
    }
  );

  const data = await resp.json();
  console.log(data);
}

run();
The response contains a start_token that will be used to start the verification on the client side (in Step 8), and the session_id required to obtain the verification result (in Step 9). For example:
{
  "start_token": "ca766ed78c8c0b7824dfea356ed30b72",
  "session_id": "H1I12oskjzsdhskj4",
  "expiration": "2023-07-18T09:57:46.950Z",
  "missing_images": [
    "document_front",
    "document_back",
    "selfie"
  ]
}Once a session is created, initiate the verification process using the start() SDK method. Add the code below to your mobile app, passing the start_token value returned in the previous step. If successful, the SDK will start a verification process for the user and guide them through the entire identity verification flow using the Mosaic experience.
TSIdentityVerification.start(startToken: [START_TOKEN])Make sure to add import IdentityVerification at the top of the implementation class.
Once the verification process starts, your mobile app can track its status using the extension added in Step 4.
After all the required images are successfully submitted, Mosaic automatically starts processing the verification and the SDK starts polling to check the status. If the status is completed, your backend should send the request below to obtain the verification result (see API reference):
import fetch from 'node-fetch';

async function run() {
  const sid = '[SESSION_ID]'; // Replace with session ID returned in Step 7
  const resp = await fetch(
    `https://api.transmitsecurity.io/verify/api/v1/verification/${sid}/result`,
    {
      method: 'GET',
      headers: {
        Authorization: 'Bearer [ACCESS_TOKEN]' // Replace with access token obtained in Step 6
      }
    }
  );

  const data = await resp.text();
  console.log(data);
}

run();See Step 11 for how to handle the recapture status, in case it's returned.
Your service should define the user experience based on the verification result, indicated by the recommendation field:
- If
ALLOW: the identity verification process was completed successfully. The response includes user details collected from the document (like their name and birthday), which can be used to enrich the user's profile, and details about the document used to prove their identity. - If
CHALLENGE: the identity verification process didn’t succeed, since at least one verification check didn’t pass. The response includes extracted (yet unverified) info and indicates which checks didn't pass and why. This info can be used to review unsuccessful sessions or analyze failed verification attempts. You should proceed as suitable for your use case, typically by initiating a manual review process. - If
DENY: the identity verification indicates a high likelihood of attempted fraud. The response includes the extracted (yet unverified) info and indicates which checks didn't pass and why. You should block the user or initiate an in-depth manual review to avoid onboarding a fraudulent user.
The recommendation is supplemented with risk_details object, containing the risk score, recommendation reasons, and device and network risk signals.
Collected information is arranged inside nested objects: person, document, and additional_info.
Besides the composite verification result, the response provides information about individual checks inside the nested checks object.
Here's a response example for successful ID verification:
{
  "session_id": "H1I12oskjzsdhskj4",
  "status": "complete",
  "recommendation": "ALLOW",
  "risk_details": {
    "general": {
      "action_type": "identity_verification",
      "correlation_id": "_Rtp6SsIdFCxCeE",
      "recommendation": "Pass",
      "risk_score": 3.2
    },
    "device": {
      "device_type": "mobile",
      "device_model": "iPhone",
      "os": "iOS",
      "browser": "Mobile Safari",
      "timezone": "Asia/Jerusalem",
      "device_timestamp": "2026-03-12T09:57:51Z",
      "device_id": "xxx",
      "device_fingerprint": "xxx",
      "incognito": false,
      "tampered": false,
      "emulated": false,
      "spoofed": false,
      "esim": null
    },
    "network": {
      "network_country": "IL",
      "timezone": "Asia/Jerusalem",
      "ip_type": "isp",
      "ip_organization": "EURONET",
      "vpn": false,
      "tor": false,
      "proxy": false,
      "anonymizer": false
    },
    "recommendation_reasons": []
  },
  "person": {
    "full_name": "Marie Salomea Skłodowska-Curies",
    "given_name": "Marie",
    "surname": "Curies",
    "national_id": "123ABC",
    "date_of_birth": "1867-11-07T00:00:00.000Z"
  },
  "document": {
    "country": "US",
    "region": "NY",
    "type": "national_id",
    "number": "1234567",
    "serial_number": "1234567",
    "issue_date": "1867-11-07T00:00:00.000Z",
    "expiration_date": "1867-11-07T00:00:00.000Z"
  },
  "additional_info": {
    "address": {
      "country": "USA",
      "region": "Indiana",
      "city": "Indianapolis",
      "street": "Snowy Ridge Road",
      "house_number": "1234",
      "apartment_number": "12",
      "postcode": "56789",
      "full_address": "1234 Snowy Ridge Road Indianapolis, IN 56789"
    },
    "national_status": {
      "citizen": true,
      "resident": true
    },
    "employment": {
      "profession": ""
    }
  },
  "checks": {
    "document_validation": {
      "recommendation": "ALLOW"
    },
    "document_authentication": {
      "recommendation": "ALLOW"
    },
    "document_liveness": {
      "recommendation": "ALLOW"
    },
    "biometric_matching": {
      "recommendation": "ALLOW"
    },
    "biometric_liveness": {
      "recommendation": "ALLOW"
    },
    "flagged_identity": {
      "recommendation": "ALLOW"
    },
    "risk_recommendation": {
      "recommendation": "ALLOW"
    }
  }
}
The response indicates when checks fail and why:
{
  "session_id": "string",
  "status": "complete",
  "recommendation": "DENY",
  // EXTRACTED DATA...
  "checks": {
    "document_validation": {
      "recommendation": "ALLOW"
    },
    "document_authentication": {
      "recommendation": "ALLOW"
    },
    "document_liveness": {
      "recommendation": "DENY",
      "reasons": [ "presentation_attack" ]
    },
    "biometric_matching": {
      "recommendation": "CHALLENGE",
      "reasons": [ "biometric_mismatch" ]
    },
    "biometric_liveness": {
      "recommendation": "DENY",
      "reasons": [ "mask detected" ]
    },
    "flagged_identity": {
      "recommendation": "DENY",
      "reasons": [ "multiple_same_identity_attempts" ]
    },
    "risk_recommendation": {
      "recommendation": "DENY",
      "reasons": [ "action_is_suspected_fraud" ]
    }
  }
}The recapture status is returned in certain cases, such as if some data couldn't be extracted due to poor image quality. When this happens, your app can allow the user to try again by calling the recapture() SDK call, which will recapture only the required images. Once the SDK submits the required images, the processing status will be returned until the processing is completed. The app can then fetch the verification result as described in Step 9.
TSIdentityVerification.recapture()