Login with SMS OTP
One-time passcodes (OTPs) can be sent to users by SMS in order to authenticate existing users.

Note
This implements a backend-to-backend integration for authentication. See Backend Authentication APIs.
How it works
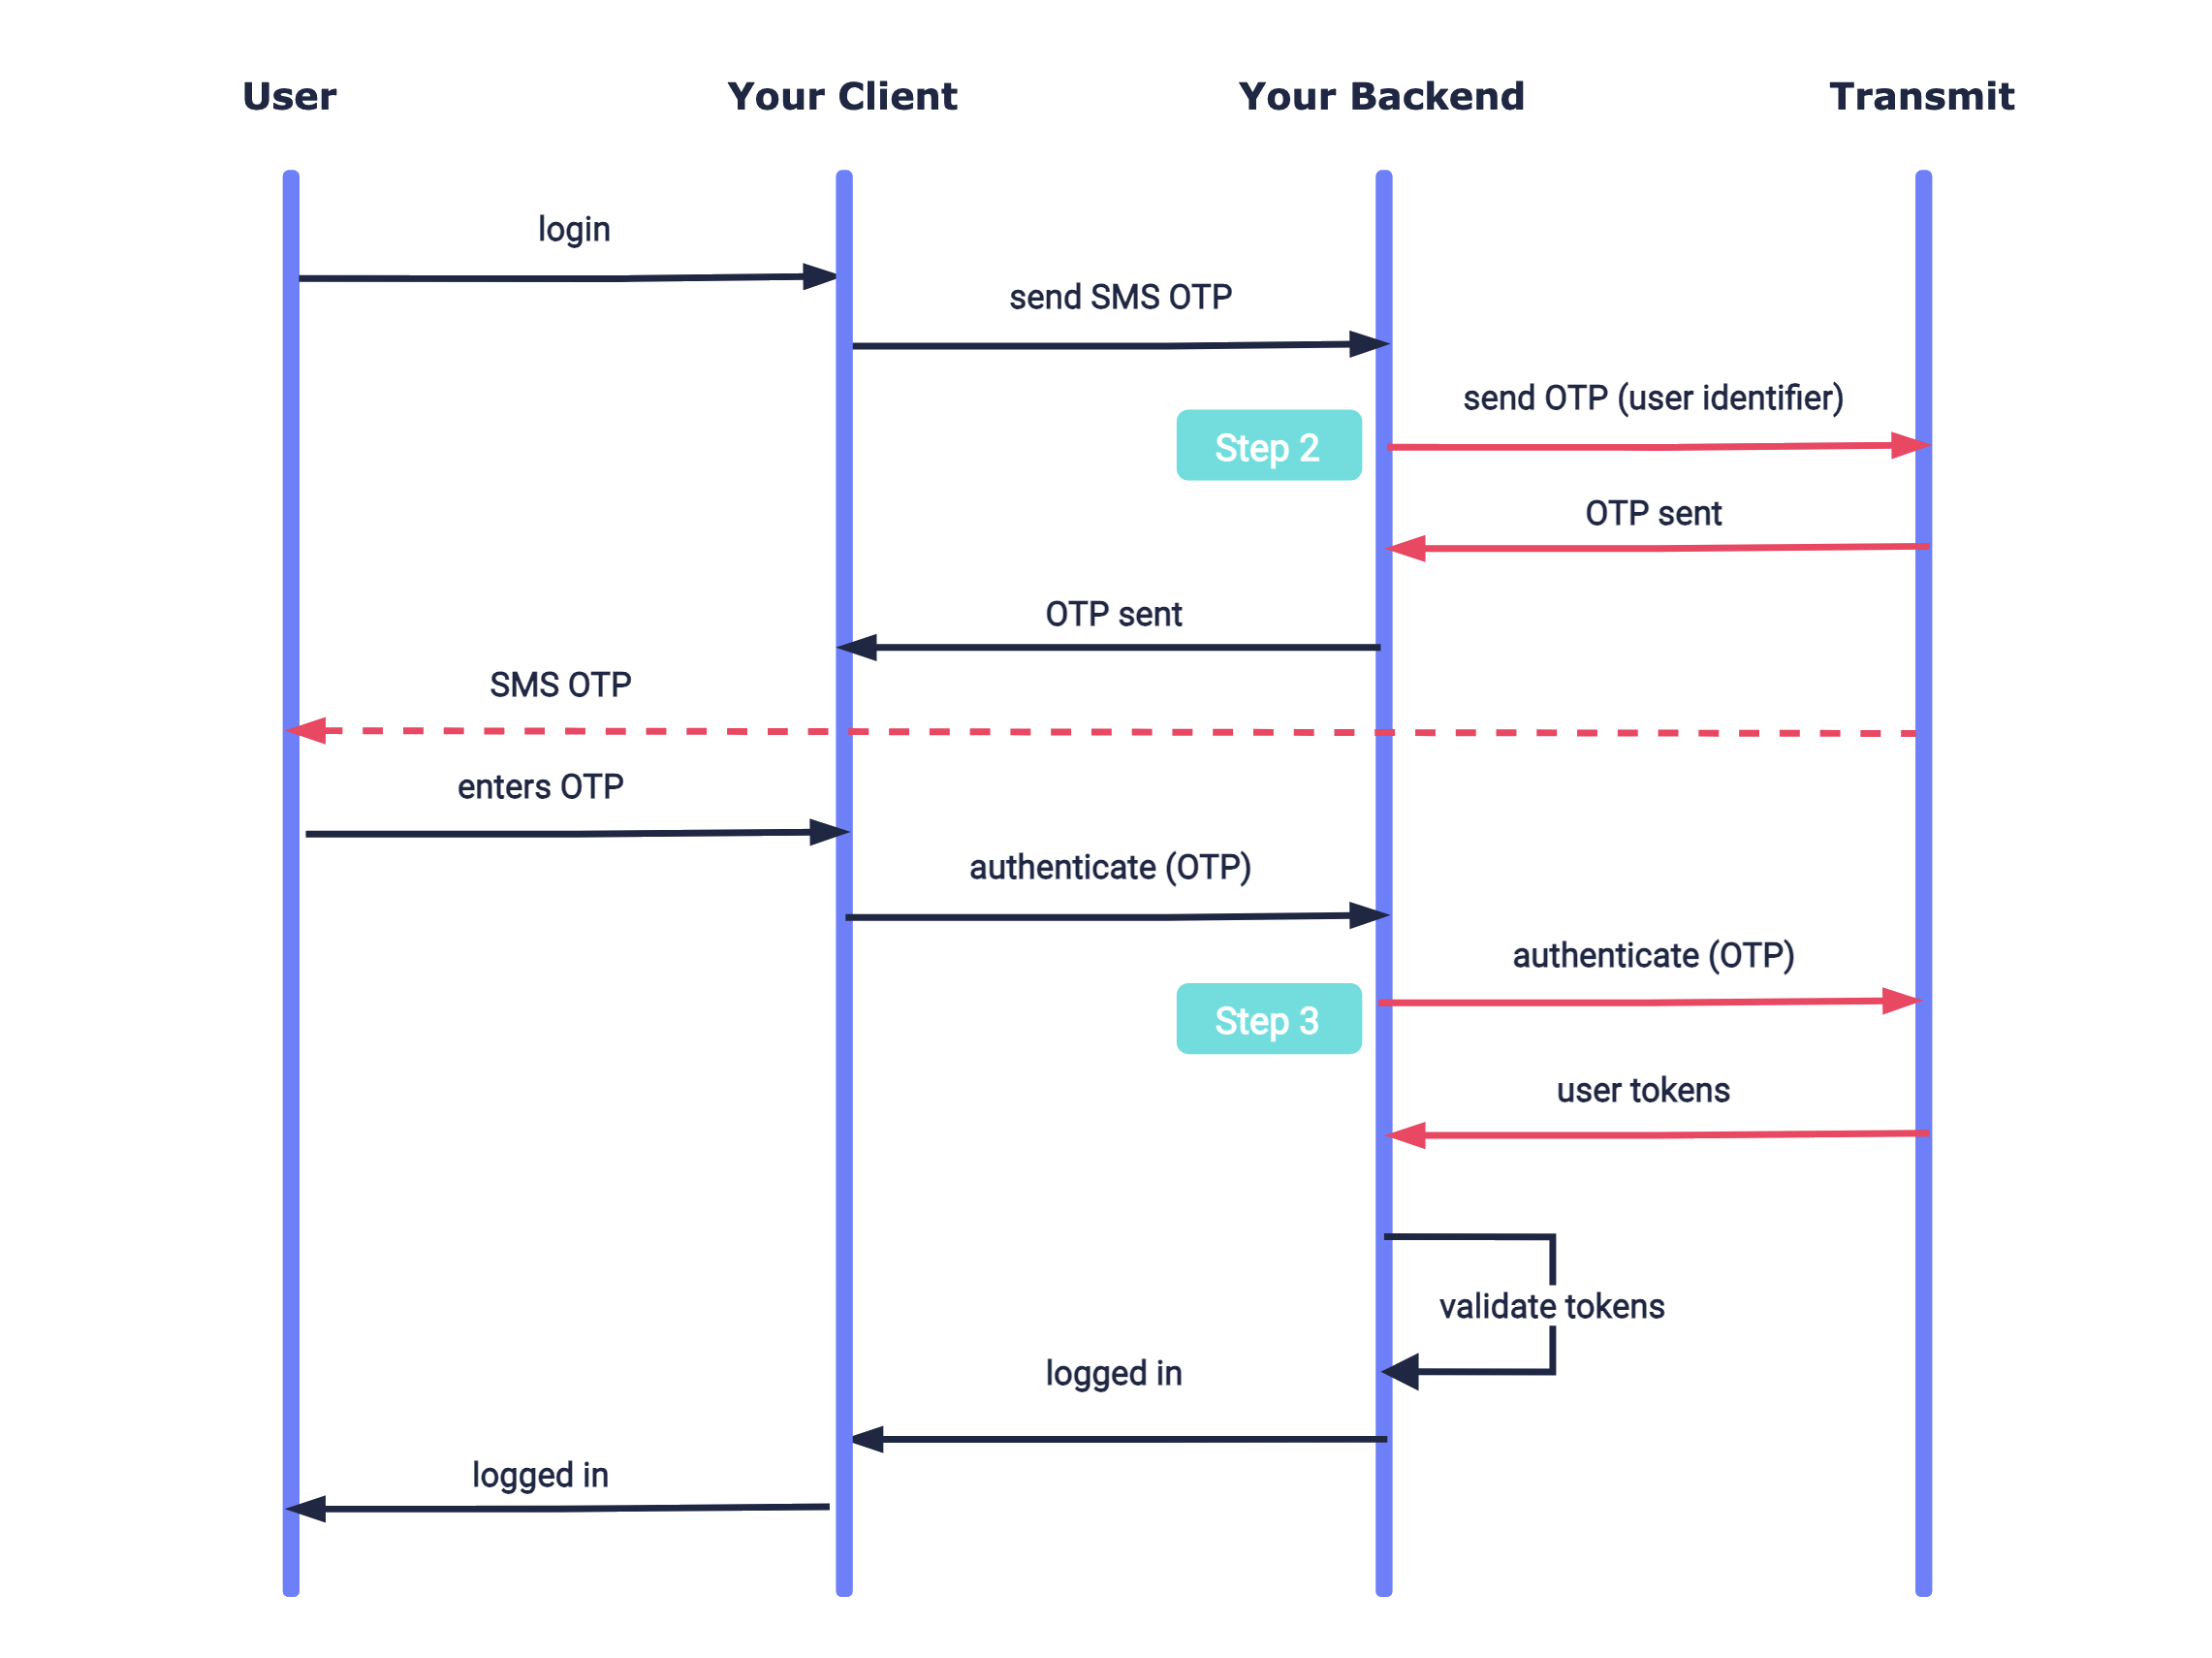
Here's an example of an SMS OTP integration. Mosaic APIs are shown in pink along with the relevant integration step.
Before you start
Before you start your integration, you'll need a Mosaic application with an OIDC client. See create an application.
Note:
When creating an application, Redirect URIs is a required field. This flow doesn't use a redirect URI so you can simply add your website URL (e.g., https://your-domain.com).
Step 1: Sign up users
Before you can log in users into your app, they will need to be created in your Mosaic tenant and associated with your app. New users can be created using a POST /users request, which must include the user's phone number. If the user already exists in your Mosaic tenant but isn't yet associated with your app, this request will just add the user to your app (but won't update any other details).
Note:
- You'll need a valid client access token to authorize the request. See Get client access tokens .
- The user's phone number will marked as verified upon their first SMS-based authentication.
Step 2: Send SMS OTP
Use a backend send request like the one below to send an SMS OTP to the user's phone number. To customize the message or sender name, see Next steps. If the request succeeds, an OTP will be sent to the user's phone and a 200 response is returned.
Note:
- You'll need a valid client access token to authorize the request. See Get client access tokens .
- The example below identifies the user using their phone number, but other identifier types can be used instead (email, user ID, or username).
import fetch from 'node-fetch';

async function run() {
  const resp = await fetch(
    `https://api.transmitsecurity.io/cis/v1/auth/otp/send`,
    {
      method: 'POST',
      headers: {
        'Content-Type': 'application/json',
        Authorization: 'Bearer [ACCESS_TOKEN]' // Client access token generated
      },
      body: JSON.stringify({
        channel: 'sms',
        identifier_type: 'phone_number', // User is identified by phone (other options available)
        identifier: '[PHONE_NUMBER]' // User's phone number (unless another type is used)
      })
    }
  );

  const data = await resp.json();
  console.log(data);
}

run();
Step 3: Authenticate SMS OTP
Once the user enters the OTP they received, your client should send it to your app backend so it can be used to obtain user tokens. Create your backend endpoint that will receive this code and then send an OTP auth request like the one below. If successful, a 200 response will be returned with the user tokens, which should be validated as described here.
Note
You'll need a valid client access token to authorize the request. See Get client access tokens.
import fetch from 'node-fetch';

async function run() {
  const resp = await fetch(
    `https://api.transmitsecurity.io/cis/v1/auth/otp/authenticate`,
    {
      method: 'POST',
      headers: {
        'Content-Type': 'application/json',
        Authorization: 'Bearer [ACCESS_TOKEN]' // Client access token
      },
      body: JSON.stringify({
        passcode: '[OTP]', // OTP entered by the user
        identifier_type: 'phone_number', // Same as the type in the send request
        identifier: '[PHONE_NUMBER]' // Same as the identifier in the send request
      })
    }
  );

  const data = await resp.json();
  console.log(data);
}

run();
Here's an example of a successful response:
{
  "access_token": "string",
  "id_token": "string",
  "refresh_token": "string",
  "token_type": "string",
  "expires_in": 3600,
  "session_id": "string"
}
Next steps
Once you've completed a basic integration, here are some customizations you can consider:
SMS customization
To create a custom SMS message, use the custom_message field in the send request, which must include these placeholders:
-
{app}which will be replaced with your app name and prevent phishing attacks -
{otp}which will be replaced with the code
You can also specify the sender_id, which is the name of the message sender (see limitations).
OTP settings
From the Admin Portal ( B2C or B2C Identity based on your setup > Authentication methods > One-time passcodes), you can configure the OTP policy for your app:
- Expiration time : set the OTP expiration period in minutes.
- Failed attempts lockout policy : set the number of failed login attempts that trigger a temporary user lockout and specify the lockout duration in minutes.
- Code length : set the length of the one-time code.
For complete information about SMS OTP settings, see Customize login methods.
Custom SMS provider
In the Admin Portal (from Settings > SMS Provider), you can configure to use your custom SMS provider (e.g., Twilio or Salesforce Marketing Cloud) instead of the Mosaic default. For example, this allows you to customize the sender name per country. For more, see Use custom SMS providers.
Security considerations
To secure your OTP implementation, here are some recommendations.
Guidelines
- Verify the user's phone number upon sign up. For example, perform an SMS OTP authentication as part of the onboarding flow (after creating the user in Transmit).
- To prevent credential harvesting, your backend shouldn't indicate to the client if the user wasn't found.