Login with SMS OTP
Overview
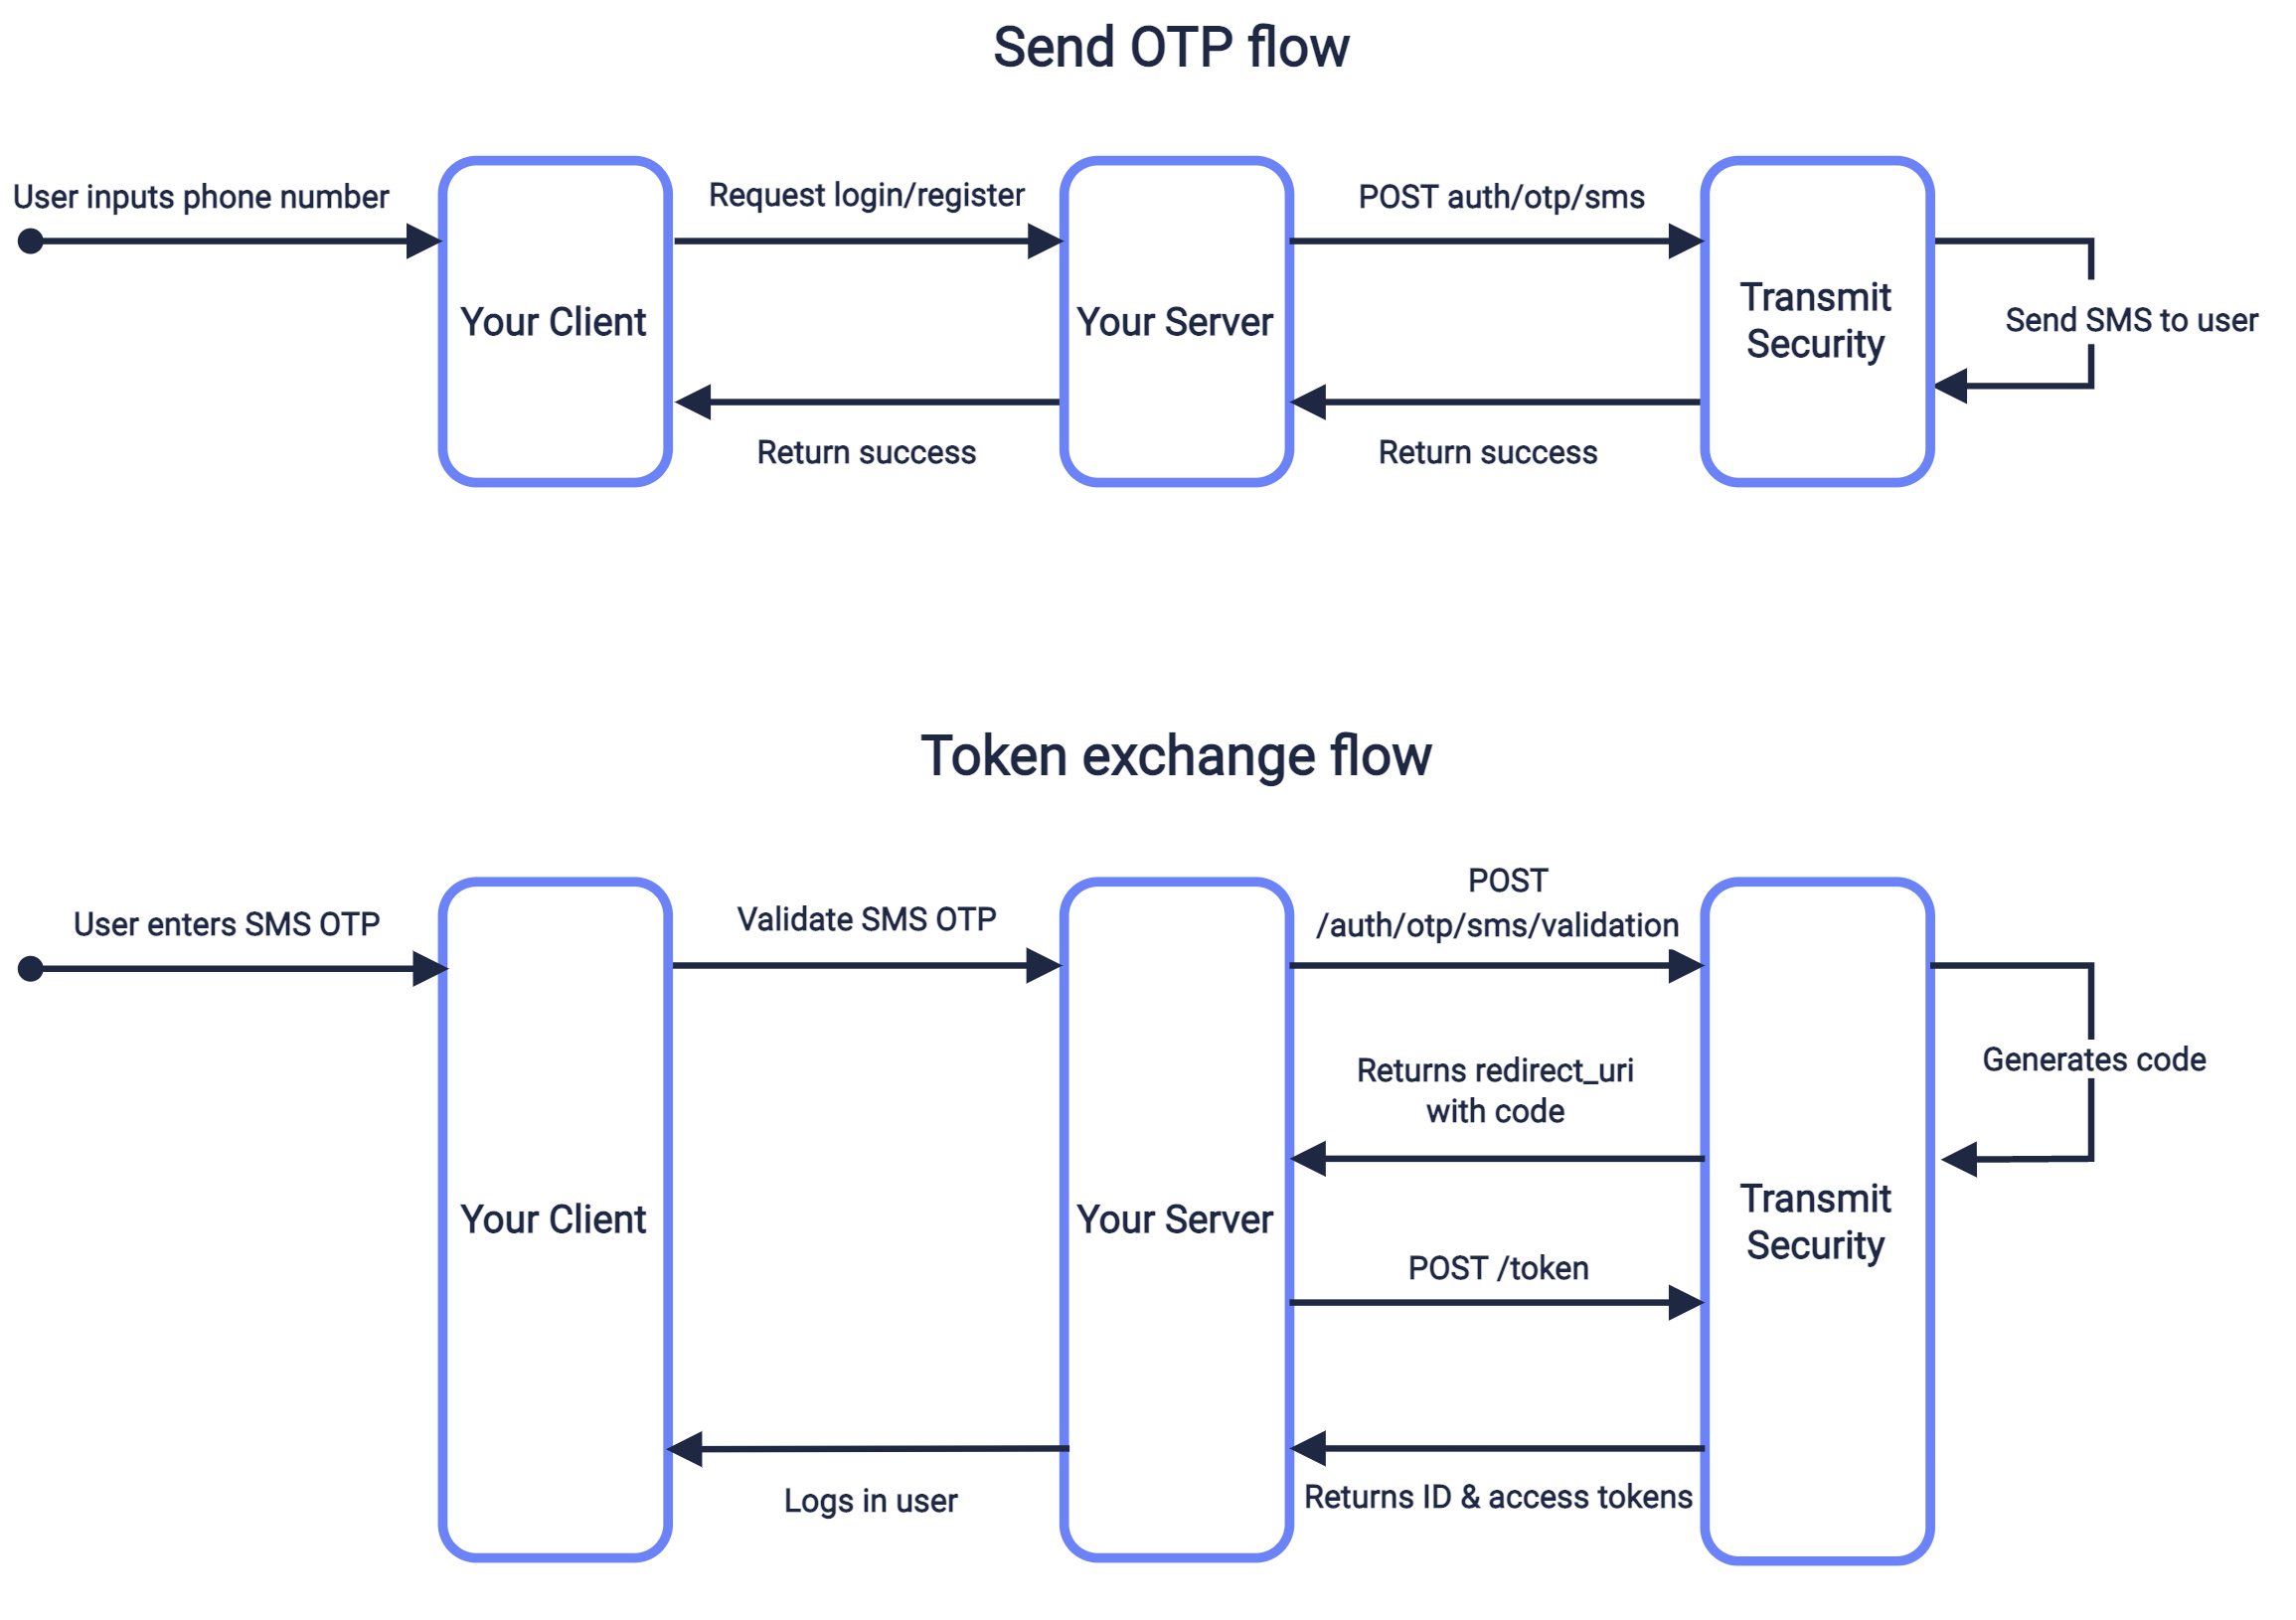
One-time passcodes (OTPs) can be sent to users by SMS in order to authenticate existing users or create new users.

Step 1: Create redirect URI
Create the redirect endpoint that will receive an authorization code once the SMS OTP is validated. This code will later be exchanged for an ID and access token. The redirect URI should accept code as a query parameter. For example, if https://domain.com/verify is your redirect URI, Mosaic will return https://domain.com/verify?code=123abc when the OTP is validated.
Step 2: Add redirect URI to app
Add the redirect URI (e.g., https://domain.com/verify) as an allowed redirect URI for your Mosaic application. This will also be the redirect_uri that you'll need to pass in the send request.
From the Admin Portal under Applications, click on your application to edit your application settings and add this URI under Redirect URIs. If you don't already have an application, create a new application.
Step 3: Send SMS OTP
Use a send request like the one below to send an SMS OTP to the specified phone number. The create_new_user parameter will determine if this flow applies to new users, or only to existing ones. If set to true (and public sign-ups are enabled for this application), a new user is created once the code is exchanged if no user is found for the specified phone. The redirect_uri should correspond to the redirect endpoint you created in step 1 and added as a redirect URI in step 2.
This flow is described in the sequence diagram above.
Note
Make sure you have a valid client access token to authorize the request. If not, you'll need to get one. Learn more
curl -i -X POST \
  https://api.transmitsecurity.io/cis/v1/auth/otp/sms \
  -H 'Authorization: Bearer 91827321837bdfjf' \
  -H 'Content-Type: application/json' \
  -d '{
    "phone_number": "+16175551212",
    "create_new_user": true,
    "redirect_uri": "https://domain.com/verify",
  }'
If you want to customize the message or the name of the message sender, see Next steps.
Step 4: Validate SMS OTP
Once the user enters the SMS OTP they received, it should be validated by sending a validation request like the one below. This endpoint validates the passcode against the specified phone number. If successful, a response returns a URI in the result field—your client should send a GET request to this URI to get forwarded to your redirect URI with the code that you should exchange for the token in the next step.
curl --request POST \
     --url https://api.transmitsecurity.io/cis/v1/auth/otp/sms/validation \
     --header 'Authorization: Bearer 91827321837bdfjf' \
     --header 'Content-Type: application/json' \
     --data '
{
     "phone_number": "+16175551212",
     "passcode": "123456"
}
'
Step 5: Obtain user token
Upon sending a GET request to the URI returned by the SMS OTP validation endpoint, the browser is redirected to the redirect URI specified in send request. The URI will include a code in the query that you'll need to exchange for ID and access tokens by sending the /oidc/token request like the one below. Replace placeholders with the code you received in Step 4, your redirect URI, and your client credentials that can be found in your application settings from the Mosaic Admin Portal.
curl -i -X POST \
  https://api.transmitsecurity.io/oidc/token \
  -H 'Content-Type: application/x-www-form-urlencoded' \
  -d client_id=CLIENT_ID \
  -d client_secret=CLIENT_SECRET \
  -d code=CODE \
  -d grant_type=authorization_code \
  -d redirect_uri=REDIRECT_URI
Next steps
Once you've completed a basic integration, here are some customizations you can consider:
SMS customization
To create a custom SMS message, use the custom_message field in the send request, which must include these placeholders:
-
{app}which will be replaced with your app name and prevent phishing attacks -
{otp}which will be replaced with the code
You can also specify the sender_id, which is the name of the message sender (see limitations).
Here's an example of a request that includes a custom SMS message:
curl -i -X POST \
  https://api.transmitsecurity.io/cis/v1/auth/otp/sms \
  -H 'Authorization: Bearer 91827321837bdfjf' \
  -H 'Content-Type: application/json' \
  -d '{
    "phone_number": "+16175551212",
    "create_new_user": true,
    "redirect_uri": "https://domain.com/verify",
    "custom_message": "Your {app} verification code is: {otp}",
    "sender_id": "ACME"
  }'
OTP settings
From the Admin Portal ( B2C or B2C Identity based on your setup > Authentication methods > One-time passcodes), you can configure the OTP policy for your app:
- Expiration time : set the OTP expiration period in minutes.
- Failed attempts lockout policy : set the number of failed login attempts that trigger a temporary user lockout and specify the lockout duration in minutes.
- Code length : set the length of the one-time code.
Custom SMS provider
In the Admin Portal (from Settings > SMS Provider), you can configure to use Twilio as your SMS provider instead of the Mosaic default. For example, this allows you to customize the sender name per country. For more, see Use custom SMS providers.