Federate SSO with Mosaic SAML IDP
Security Assertion Markup Language (SAML) is an XML-based open standard that allows identity providers (IdPs) to securely pass identity data to service providers (SPs). It's commonly used to federate authentication and identity management, as well as enable single sign-on across different applications and organizations.
Mosaic supports SAML-based identity federation for third-party providers. This allows you to use SSO to log in authenticated users into the third-party services integrated with your application. This simplifies identity management, and gives users a seamless identity experience.
Note
This guide describes an integration that relies on an external SP with Mosaic as SAML IDP. For Mosaic-native implementation leveraging journeys, see Mosaic SSO & Federation.
For example, suppose the user is logged into your app and needs help, and you offer Slack as a support channel. Instead of having the user login to Slack, you can use their login to your app to perform SSO. Now suppose users can access this support option without first logging into your app. You can log in users with Mosaic instead of having them log in directly via Slack and needing to introduce additional identity workflows.

Note
Mosaic supports SAML-based federation for third-party providers (like Slack), including SP-initiated SSO and IdP-initiated SSO. SAML-based authentication for first-party apps (like yours) is not currently supported.
How it works
Here's an example of an IdP-initiated SSO flow that can be implemented using the steps in this guide. Mosaic APIs are shown in pink along with the relevant integration step, described below. The diagram assumes the user is already logged in, hence retrieves a user access token stored in your backend. However, a new user access token can be retrieved if needed by completing a new Mosaic authentication instead.
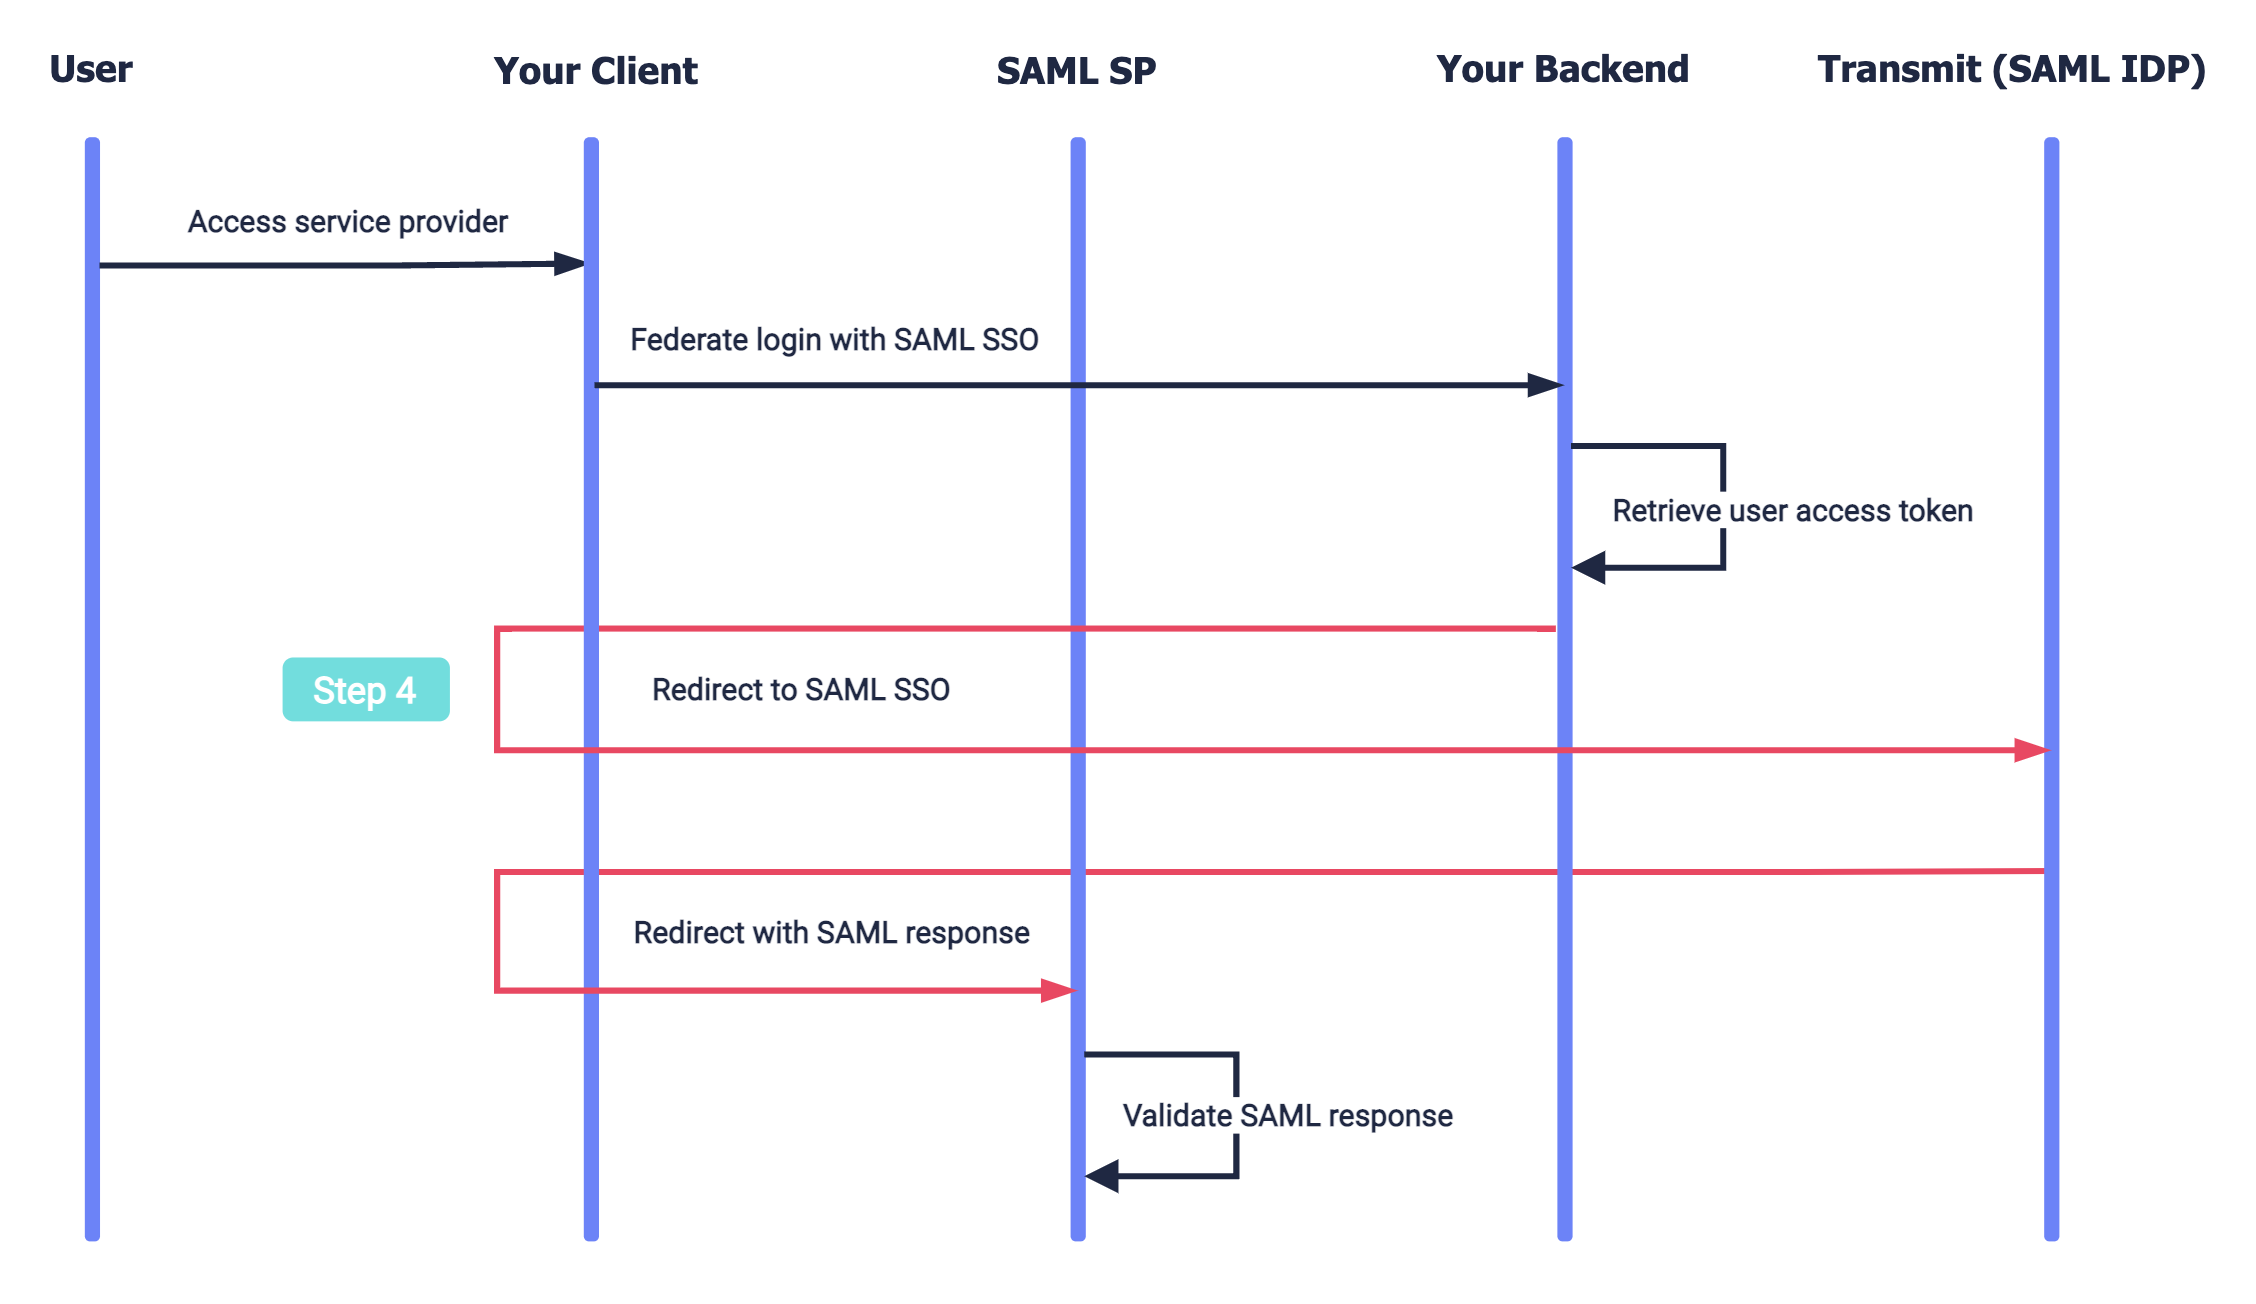
- Your user wants to access a third-party service (SAML service provider).
- Your app obtains a user access token (from a previous Mosaic auth or by authenticating the user).
- Your app redirects to Mosaic's SAML SSO endpoint with the user access token.
- After validating the token, Mosaic returns a SAML response, which is relayed to the provider.
- The provider validates the SAML response (including the signed assertion), and the user gains access.
Step 1: Get provider details
To configure a SAML service provider in Mosaic, you'll need to first obtain the details from the third-party service (such as from their documentation), including:
- Assertion consumer service URL - URL that Mosaic should send the SAML response to
- Entity ID - Uniquely identifies the SAML service provider
- Name qualifier - Security or administrative domain that qualifies the name
Step 2: Create service provider
Create a new service provider via the Mosaic Admin Portal (Applications > Service Providers), or by sending a create request like the one below. Add a friendly name for the provider along with the details you obtained in Step 1.
Note
Make sure you have a client access token to authorize the request. If not, you'll need to get one. Learn more
curl -i -X POST \
  https://api.transmitsecurity.io/cis/v1/serviceprovider/saml2 \
  -H 'Authorization: Bearer TOKEN' \
  -H 'Content-Type: application/json' \
  -d '{
    "name": "FRIENDLY_NAME",
    "assertion_consumer_service_URL": "ACS_URL",
    "entity_id": "ENTITY_ID",
    "name_qualifier": "NAME_QUALIFIER"
  }'
Once the provider is created, Mosaic's SAML IDP details are returned. Save them since you'll need them later:
- SAML 2.0 endpoint (HTTP) - URL used by your app to request SAML SSO federation with Transmit
- Identity provider issuer - Identifies Mosaic as the SAML IDP, configured in the third-party's system
- X.509 certificate - Contains the public key to validate the SAML response, configured in the third-party's system
Step 3: Add provider to app
To allow your third-party service to federate login via your application, it must be added to the list of service providers for your application either from the Mosaic Admin Portal or via API.
From the Applications page of the Admin Portal, click your application to enter its settings and select the service provider under Service Providers. If you don't already have an application, create a new application. Alternatively, you can update your application by sending the update request below with the service provider ID returned in Step 2.
Note
Make sure you have a valid access token to authorize the request. If not, you'll need to get one. Learn more
curl -i -X PUT \
  'https://api.transmitsecurity.io/cis/v1/applications/APP_ID' \
  -H 'Authorization: Bearer TOKEN' \
  -H 'Content-Type: application/json' \
  -d '{
    "service_providers": [
      "SERVICE_PROVIDER_ID"
    ]
  }'
Step 4: Request SAML SSO
To perform a SAML-based SSO with Mosaic, you'll need to send a GET request to Mosaic's SAML SSO endpoint. This is the endpoint that was returned when the service provider was created in Step 2. The SSO request must include a user access token. If the user is currently logged-in to your app, use the corresponding access token; otherwise, authenticate the user via Mosaic to get one.
curl -i -X GET \
  'https://api.transmitsecurity.io/cis/v1/serviceprovider/saml2/sso/SERVICE_PROVIDER_ID' \
  -H 'Authorization: Bearer TOKEN'
Note
This request must include the SAML request and relay state (created by the service provider) only for an SP-initiated SSO flow, for example, if the user requests access to the third-party provider directly. Otherwise, the user access token is all you need.
Step 5: Add Mosaic as SAML IDP
Finally, you'll need to set up Mosaic as a SAML IDP in the service provider's system. This means configuring:
- Your SAML SSO endpoint, which will receive the SAML request in an SP-initiated SSO flow (e.g., your login page)
- Mosaic issuer obtained in Step 2, used to validate the SAML response
- Mosaic certificate obtained in Step 2, used to validate the signature of the SAML assertion
Before saving the SAML IDP configuration, the provider typically initiates a flow to test it and doesn't allow saving until it succeeds. This is why this is the last step in the integration guide.
Heads up
Make sure to configure the app's SAML SSO endpoint, and not Mosaic's. For an SP-initiated flow, the service provider will redirect to your login page with the SAML request and relay state, and your app will be responsible to pass them on to Mosaic's SSO endpoint.
Slack example
Here's an example of configuring SAML-based SSO for Slack (see Slack docs).
When configuring Slack as a new service provider in Mosaic, use these details (replacing YOURDOMAIN with yours):
-
Assertion consumer service URL
:
https://YOURDOMAIN.slack.com/sso/saml -
Entity ID
:
https://slack.com - Name qualifier : YOURDOMAIN.slack.com
When configuring Mosaic as the SAML IDP in Slack, use these details:
- SAML SSO URL : Your SAML SSO endpoint to receive the SAML request (login page)
- Identity Provider Issuer : Identity provider issuer returned in Step 2
- x.509 Certificate : x.509 Certificate returned in Step 2