Federate SSO with your SAML IDP
Security Assertion Markup Language (SAML) is an XML-based open standard that allows identity providers (IdPs) to securely pass identity data to service providers (SPs). It's commonly used to federate authentication and identity management, as well as enable single sign-on across different applications and organizations.
Mosaic supports SAML-based identity federation using an external SAML identity provider (IDP). For example, B2B apps can allow their business customers or partners to provide SSO login for their members. This simplifies identity management, and gives users a seamless identity experience.
Note
This guide describes an integration that relies on an external IDP. For Mosaic-native implementation leveraging journeys, see Mosaic SSO & Federation.
How it works
Here's an example of an SP-initiated SSO flow that can be implemented for your app. Mosaic APIs are shown in pink along with the relevant integration step, described below.
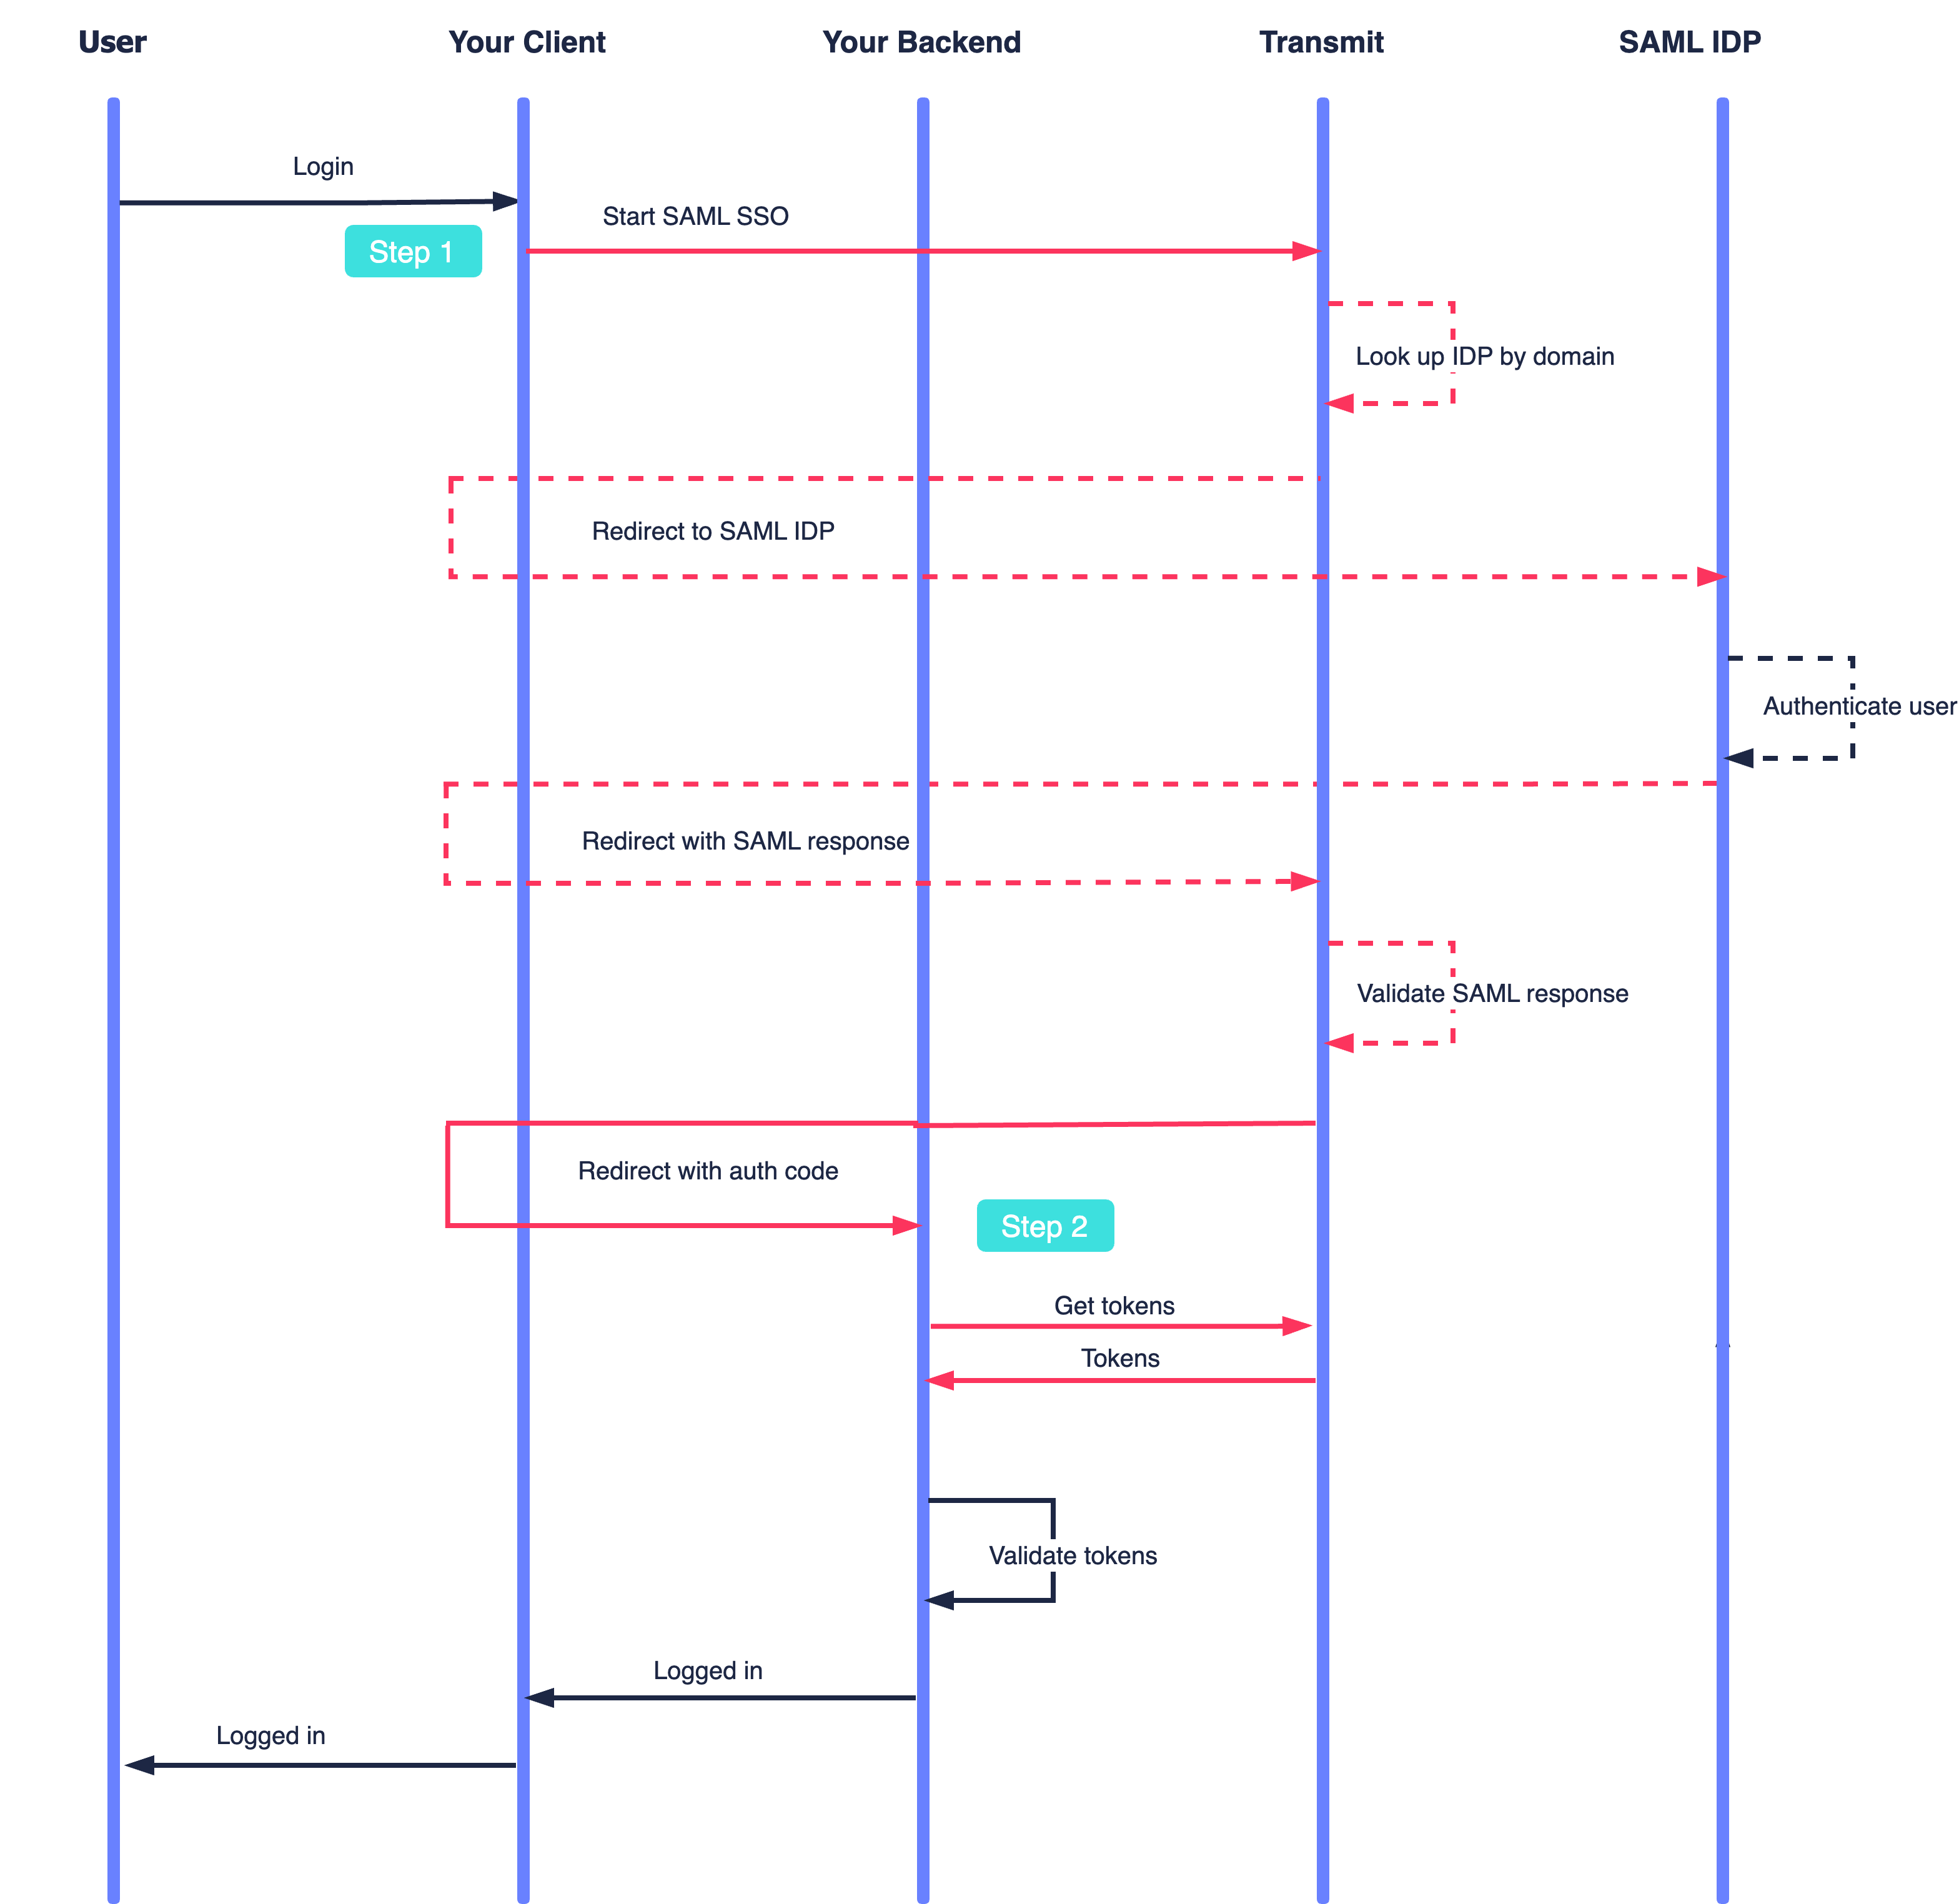
- A user wants to log in, and your app requests to start an SSO login flow.
- If the user is a member of an organization configured for SAML SSO, Mosaic redirects to their SAML IDP.
- After authenticating the user, the SAML IDP returns the SAML response to Mosaic.
- Mosaic validates and processes the SAML response.
- Mosaic provides the app with a code to exchange for a token, and the user logs in.
Before you start
Before a B2B app can use SAML SSO to log in users, the tenant must have the following:
- An application - representing the B2B app, and must integrate SAML SSO
- Organizations - representing the business customers or partners, and assigned to the app
- Members - users that are created or added as members of the organization
Note
Each member must have a primary email address with the organization's domain. Members must also be assigned to the app unless the app is enabled for public signups (in which case the user is automatically added to the app upon their first login).
Step 1: Start SAML SSO
When a user requests to log in to the app, initiate a SAML SSO by redirecting the browser to the /v1/auth/sso/start endpoint using a request like the one below (line breaks and spaces were added for readability). If the email domain corresponds to an organization that's configured for SAML SSO, Mosaic responds with a POST redirect to the configured SAML identity provider (IDP). Otherwise, an error is returned and the app can proceed with a regular authentication flow.
https://api.transmitsecurity.io/cis/v1/auth/sso/start?
  client_id=CLIENT_ID& // Client ID (B2B app settings) found in the Admin portal
  email=EMAIL& // User's email address
  redirect_uri=REDIRECT_URI // Mosaic redirects to this URI after completing this request. Found in the app setting in Admin Portal
Step 2: Obtain tokens
To complete the login flow, your B2B app should create the server GET endpoint used to obtain user tokens. It should accept code as a query parameter, and be configured as an allowed redirect URI in the Mosaic Admin Portal.
After receiving and validating the SAML response, Mosaic will send the authentication code to your redirect URI. Once invoked, it should send a /oidc/token request like the one below to exchange the code for user tokens. For improved security, validate the tokens. The ID token includes the organization and the email of the user who completed the authentication (make sure this matches the user email you requested).
import fetch from 'node-fetch';

async function run() {
  const formData = {
    client_id: '[CLIENT_ID]', // Client ID found in your app settings
    client_secret: '[CLIENT_SECRET]', // Client secret found in your app settings
    code: '[CODE]',  // Code returned to your redirect URI
    grant_type: 'authorization_code',
    redirect_uri: '[REDIRECT_URI]' // URI that accepted the code
  };

  const resp = await fetch(
    `https://api.transmitsecurity.io/cis/oidc/token`,
    {
      method: 'POST',
      headers: {
        'Content-Type': 'application/x-www-form-urlencoded'
      },
      body: new URLSearchParams(formData).toString()
    }
  );

  const data = await resp.text();
  console.log(data);
}

run();
Step 3: Configure your IDP
The SAML SSO flow is initiated by the B2B app on behalf of the organization. The organization has to configure SAML integration in the system of the SAML identity provider. This includes the following details from Mosaic. These values are auto-generated by Mosaic and can be obtained in the Admin Portal (B2B Identity > Organizations > Single sign-on).
-
Assertion consumer service URL
- ACS URL that the SAML IDP should send the SAML response to. The URI includes the organization ID and application ID and has the following structure:
https://api.transmitsecurity.io/cis/v1/auth/sso/organizations/{org_id}/applications/{app_id}/complete(refer to API reference for available regions). -
Service provider entity ID
- Uniquely identifies the SAML service provider, and issuer of the SAML request. The SP entity ID includes the application ID and has the following structure:
https://api.transmitsecurity.io/cis/{app_id}(refer to API reference for available regions).
Step 4: Configure Transmit
The organization needs to configure SAML SSO in the Mosaic system. This can be done in the organization's settings in the Admin Portal (B2B Identity > Organizations > Single sign-on). In addition to the SAML SP details provided by the B2B app, the organization needs to obtain these details from your SAML IDP (such as from their documentation):
- Entity ID - Uniquely identifies the SAML identity provider, which is the issuer of the SAML response
- SSO URL - SAML 2.0 endpoint (HTTP) URL used by Mosaic to request SAML SSO federation
- Signing certificates - X.509 certificate that contains the public key for validating the SAML response
Okta example
Here's an example of configuring SAML SSO using Okta as your identity provider (see Okta docs).
When configuring in Mosaic, use these details:
- SAML SSO URL : See IDP metadata from Okta Admin Console from Applications, Sign On tab
- IDP Entity ID : See IDP metadata from Okta Admin Console from Applications, Sign On tab
- Signing Certificates : Under SAML Signing Certificates from Okta Admin Console from Applications, Sign On tab
When configuring Okta, use these details:
- Single Sign-On URL : ACS URL, generated by Transmit
- Audience URI (SP Entity ID) : Entity ID, generated by Transmit