# Verify documents using Web SDK
With Mosaic's identity verification (IDV), you can reliably check your customers' identity against their documents, for example, a driver’s license or a passport. After successful check, you can enable their further transactions, for example, allowing them to open a new bank account online or to pick up a rental car.
Follow this guide to integrate Mosaic IDV into your website.
Note
If you use Mosaic's hosted identity experience, follow a different guide: [Web quick start for a hosted experience](/guides/verify/quick_start_web)
## How it works
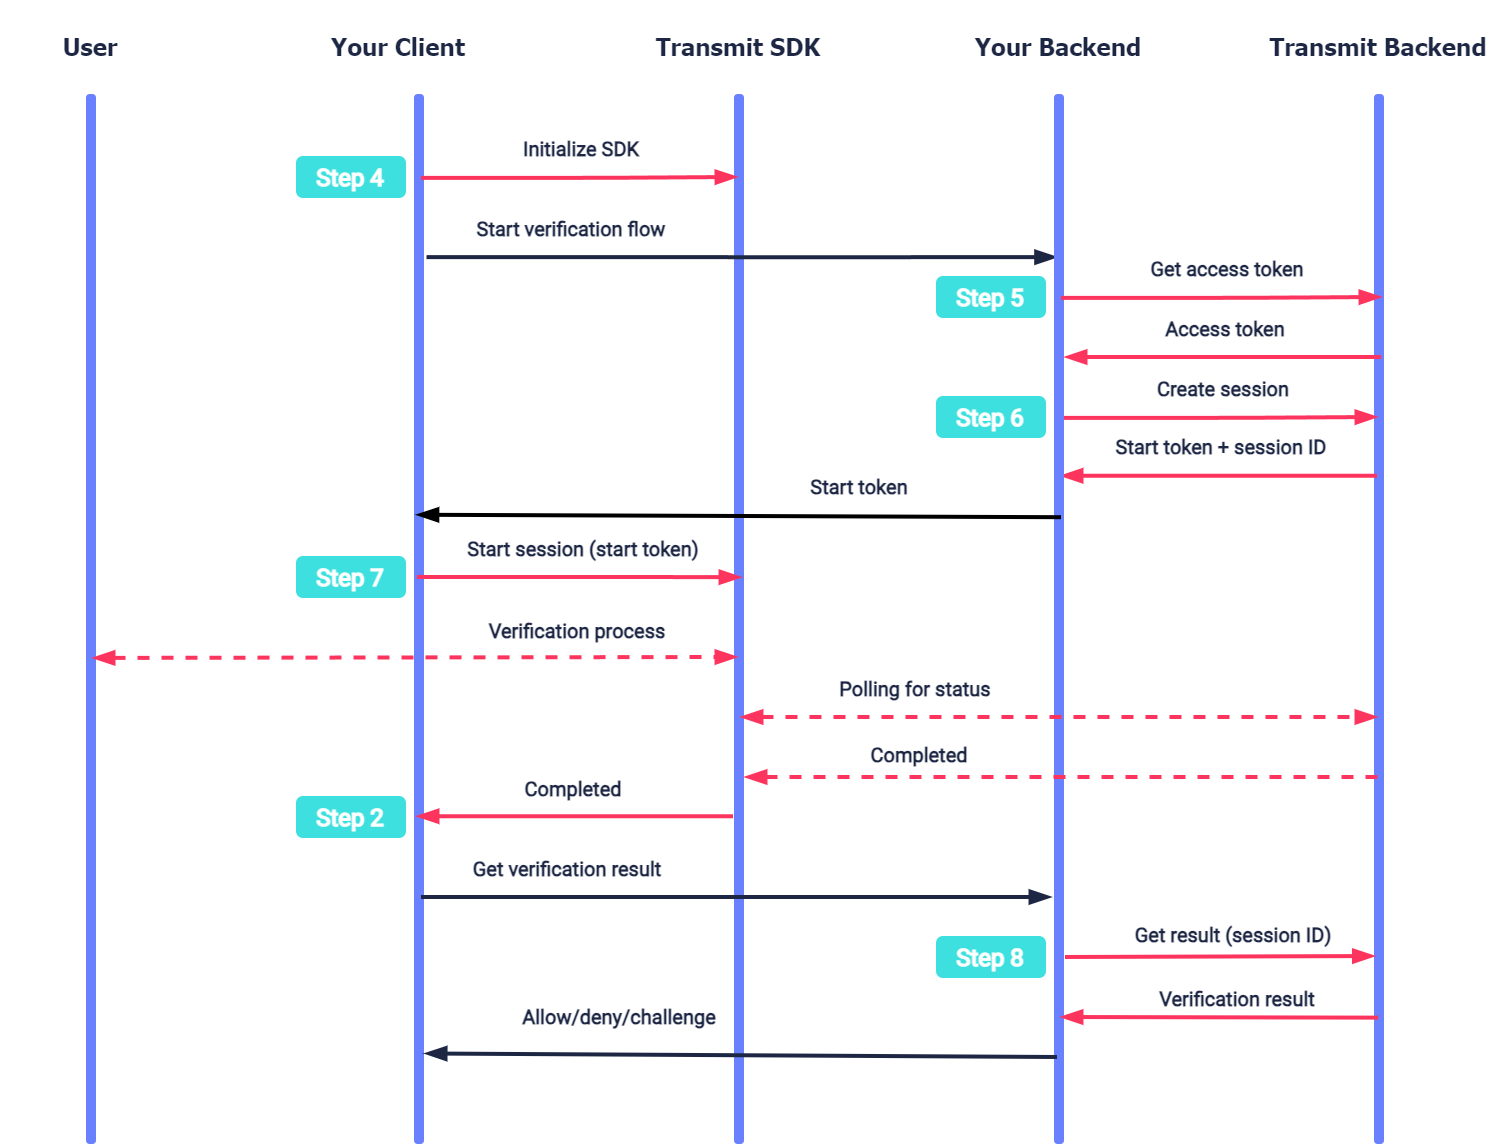
Here's an example of an IDV process. Interaction with Mosaic APIs is shown in pink; the table also shows related integration steps.
After initializing the SDK ([Step 4](#step-4-initialize-the-sdk)), your backend continues by getting an access token ([Step 5](#step-5-get-access-token)) and creating a session ([Step 6](#step-6-create-session)). After this, your client starts a session ([Step 7](#step-7-start-session)). The SDK executes the verification process with the user using the Mosaic identity verification experience. Once all the required images are submitted, Mosaic starts processing the verification while the SDK polls for its status. Once processing is completed, the SDK notifies the app ([Step 2](#step-2-implement-callback)) so it can obtain the verification result ([Step 8](#step-8-get-verification-result)).
The diagram below maps the IDV process stages with the required implementation steps:
## Before you start
Before you start integrating the SDK, you need to ensure effective communication with Mosaic's assets. This includes:
* Enabling Mosaic's IPs and URLs on your network
* Extending the `Content-Security-Policy` header (if you have enabled [Content Security Policy](https://developer.mozilla.org/en-US/docs/Web/HTTP/CSP) (MDN) on your web server). If using a [custom domain](/guides/deployment/custom_domains), update your CSP to include your custom domain.
* Allowlisting your domains with Mosaic. Contact Transmit Security support for assistance.
See [Enable communication with Mosaic APIs](/guides/quick_start/enable_communication) for additional information.
## Step 1: Configure your app
div
div
Admin Portal
To integrate your app with Mosaic, you'll need to configure an application in the Admin Portal.
From the [Applications](https://portal.transmitsecurity.io/applications) page, [create an application](/guides/user/create_new_application) or use an existing application. Enter the following settings:
1. For **Client type** , select **Web**.
2. For **Redirect URI** , enter your website URL. This is a required field.
Your client ID and client secret for API calls are auto generated upon app creation.
## Step 2: Implement callback
div
div
client
After starting the session (see [Step 7: Start session](#step-7-start-session)), the verification moves through different events and statuses. For example, the status will indicate if the process was completed successfully so the backend can fetch the verification result. For every change, the SDK will invoke a callback method defined by your application. You need to implement these callback methods.
```js
const sdkCallBacks = {
// Notifies when user has started an image capturing session.
sessionStarted: ({ sessionId }) => {},
// Notifies when user has uploaded an image.
imageSubmitted: ({ sessionId }, type) => {},
// Notifies when user has finished uploading images and the verification has started.
processing: ({ sessionId }) => {},
// Notifies when verification process completed, and the result can be obtained (via backend request).
completed: ({ sessionId }) => {},
// Notifies when we require re-capturing an image.
recapture: ({ sessionId }) => {},
// Notifies when an error occurs.
error: ({ sessionId }, error) => {},
};
```
## Step 3: Load SDK
div
div
client
Start by loading the SDK from the registry (recommended) or CDN.
npm
```bash
npm install @transmitsecurity/platform-web-sdk@^2
```
yarn
```bash
yarn add @transmitsecurity/platform-web-sdk@^2
```
script tag (CDN)
```html
```
When using the script tag, all functions must be invoked inside `window.tsPlatform`. This applies only to the CDN method.
## Step 4: Initialize the SDK
div
div
client
Import the Identity Verification and Fraud Prevention modules and then initialize the SDK by calling the SDK's `initialize()` method. The `[CLIENT_ID]` should be replaced with your client ID from [Step 1](#step-1-configure-your-app). For more details about available options and customizations, see the [SDK reference](/sdk-ref/platform/installation).
```js
import { idv, drs, initialize } from '@transmitsecurity/platform-web-sdk';
// Initialize the SDK with your client ID and configuration for DRS and IDV modules
// If SDK was loaded via script tag, use: window.tsPlatform.initialize({...})
await initialize({
clientId: '[CLIENT_ID]', // Client ID from app settings in the Admin Portal
drs: {
serverPath: 'https://api.transmitsecurity.io/risk-collect/' // Required: Set serverPath based on your region or custom domain
},
idv: {
serverPath: 'https://api.transmitsecurity.io/verify', // Required: Set serverPath based on your region or custom domain
consentVersion: '[CONSENT_VERSION]', // ID of the consent document approved by the user
callbacks: [CALLBACKS] // Callback methods implemented in Step 2
}
});
```
Note
- The SDK should be initialized only once on each relevant page.
- The ID of the consent document is stored by Mosaic (see [User consent for identity verification](/guides/verify/idv_user_consent)).
- For the SDK to work properly, the regions specified in `serverPath` must match across modules.
- By default, the verification UI will be available in English. However, the IDV object supports a `language` param, which can also be set to `pt` for Portuguese or `es` for Spanish.
- The IDV object supports an optional `rootElement` string param to specify the ID of a DIV container with the SDK's IDV GUI. If unspecified, the SDK will insert a new DIV container with IDV GUI elements inside the HTML body.
## Step 5: Get access token
div
div
backend
An access token is required to authorize the backend API calls, such as for [creating a verification session](#step-6-create-session) and [obtaining the result](#step-8-get-verification-result). When needed, obtain an access token using the /token request below. See [Get client access tokens guide](/guides/user/retrieve_client_tokens) for more information.
```javascript
import fetch from 'node-fetch';
async function run() {
const formData = {
client_id: '[CLIENT_ID]', // Replace with client ID obtained in Step 1
client_secret: '[CLIENT_SECRET]', // Replace with client secret obtained in Step 1
grant_type: 'client_credentials',
resource: 'https://verify.identity.security'
};
const resp = await fetch(
`https://api.transmitsecurity.io/oidc/token`,
{
method: 'POST',
headers: {
'Content-Type': 'application/x-www-form-urlencoded'
},
body: new URLSearchParams(formData).toString()
}
);
const data = await resp.text();
// Process the response
}
run();
```
## Step 6: Create session
div
div
backend
Before your app can initiate the verification process, your **backend** must create a session in order to provide a secure context for the flow. Create a session by sending a `/v1/verification` request.
```javascript
import fetch from 'node-fetch';
async function run() {
const resp = await fetch(
'https://api.transmitsecurity.io/verify/api/v1/verification',
{
"method": "POST",
"headers": {
"Content-Type": "application/json",
"Authorization": "Bearer " // Replace with access token obtained in Step 3
}
}
);
const data = await resp.json();
// Process the response
}
run();
```
The response contains a `start_token` that will be used to start the verification on the client side (in [Step 7: Start Session](#step-7-start-session)), and the `session_id` required to obtain the [verification result](#step-8-get-verification-result).
For example:
```json
{
"start_token": "ca766ed78c8c0b7824dfea356ed30b72",
"session_id": "H1I12oskjzsdhskj4",
"expiration": "2023-07-18T09:57:46.950Z",
"missing_images": [
"document_front",
"document_back",
"selfie"
]
}
```
## Step 7: Start session
div
div
client
Once a session is created, initiate the verification process using the `start()` SDK method. Add the code below to your app, passing the `start_token` value returned in the previous step. If successful, the SDK will start a verification process for the user and guide them through the entire identity verification flow using the Mosaic experience.
Calling this method will add the verification UI to the DOM, allowing the user to start the verification process, and activate a callback method with data indicating the status of the verification (see [Step 2: Implement callback](#step-2-implement-callback)).
```javascript
idv.start(startToken);
```
## Step 8: Get verification result
div
div
backend
Once the verification process starts, your application can track it using the callback methods implemented in step 2.
After all the required images are successfully submitted, Mosaic automatically starts processing the verification and the SDK starts polling to check the status. If the status is `completed`, your backend should send the request below to obtain the verification result (see [Get verification results API reference](/openapi/verify/verifications.openapi/other/getresult)):
```javascript
import fetch from 'node-fetch';
async function run() {
const sid = '[SESSION_ID]'; // Replace with session ID returned in Step 7
const resp = await fetch(
`https://api.transmitsecurity.io/verify/api/v1/verification/${sid}/result`,
{
method: 'GET',
headers: {
Authorization: 'Bearer [ACCESS_TOKEN]' // Replace with access token obtained in Step 6
}
}
);
const data = await resp.text();
// Process the response
}
run();
```
## Step 9: Handle verification result
div
div
client
Your service should define the user experience based on the verification result, indicated by the `recommendation` field:
- If `ALLOW`: the identity verification process was completed successfully. The response includes user details collected from the document (like their name and birthday), which can be used to enrich the user's profile, and details about the document used to prove their identity.
- If `CHALLENGE`: the identity verification process didn’t succeed, since at least one verification check didn’t pass. The response includes extracted (yet unverified) info and indicates which checks didn't pass and why. This info can be used to review unsuccessful sessions or analyze failed verification attempts. You should proceed as suitable for your use case, typically by initiating a manual review process.
- If `DENY`: the identity verification indicates a high likelihood of attempted fraud. The response includes the extracted (yet unverified) info and indicates which checks didn't pass and why. You should block the user or initiate an in-depth manual review to avoid onboarding a fraudulent user.
Collected information is arranged inside nested objects: `person`, `document`, and `additional_info`.
Besides the composite verification result, the response provides information about individual checks inside the nested `checks` object.
Here's a response example for successful ID verification:
```json
{
"session_id": "H1I12oskjzsdhskj4",
"status": "complete",
"recommendation": "ALLOW",
"person": {
"full_name": "Marie Salomea Skłodowska-Curies",
"given_name": "Marie",
"surname": "Curies",
"national_id": "123ABC",
"date_of_birth": "1867-11-07T00:00:00.000Z"
},
"document": {
"country": "US",
"region": "NY",
"type": "national_id",
"number": "1234567",
"serial_number": "1234567",
"issue_date": "1867-11-07T00:00:00.000Z",
"expiration_date": "1867-11-07T00:00:00.000Z"
},
"additional_info": {
"address": {
"country": "USA",
"region": "Indiana",
"city": "Indianapolis",
"street": "Snowy Ridge Road",
"house_number": "1234",
"apartment_number": "12",
"postcode": "56789",
"full_address": "1234 Snowy Ridge Road Indianapolis, IN 56789"
},
"national_status": {
"citizen": true,
"resident": true
},
"employment": {
"profession": ""
}
},
"checks": {
"document_validation": {
"recommendation": "ALLOW"
},
"document_authentication": {
"recommendation": "ALLOW"
},
"document_liveness": {
"recommendation": "ALLOW"
},
"biometric_matching": {
"recommendation": "ALLOW"
},
"biometric_liveness": {
"recommendation": "ALLOW"
},
"flagged_identity": {
"recommendation": "ALLOW"
},
"risk_recommendation": {
"recommendation": "ALLOW"
}
}
}
```
The response indicates when checks fail and why:
```json
{
"session_id": "string",
"status": "complete",
"recommendation": "DENY",
// EXTRACTED DATA...
"checks": {
"document_validation": {
"recommendation": "ALLOW"
},
"document_authentication": {
"recommendation": "ALLOW"
},
"document_liveness": {
"recommendation": "DENY",
"reasons": [ "presentation_attack" ]
},
"biometric_matching": {
"recommendation": "CHALLENGE",
"reasons": [ "biometric_mismatch" ]
},
"biometric_liveness": {
"recommendation": "DENY",
"reasons": [ "mask detected" ]
},
"flagged_identity": {
"recommendation": "DENY",
"reasons": [ "multiple_same_identity_attempts" ]
},
"risk_recommendation": {
"recommendation": "DENY",
"reasons": [ "action_is_suspected_fraud" ]
}
}
}
```
## Step 10: Recapture the images
div
div
client
Recapture the required images in case the recapture status is returned. For example, if some data can't be extracted because of poor image quality.
User will return to the beginning of the flow and go through the verification process again. Data regarding their stage will be delegated to a callback method.
```javascript
idv.recapture(sessionId);
```
## Example HTML implementation
This example demonstrates the flow with the SDK loaded via `