This guide describes how to integrate Fraud Prevention into your web app using AWS CloudFront and Lambda@Edge. For more information about AWS CloudFront and Lambda@Edge, see AWS documentation.
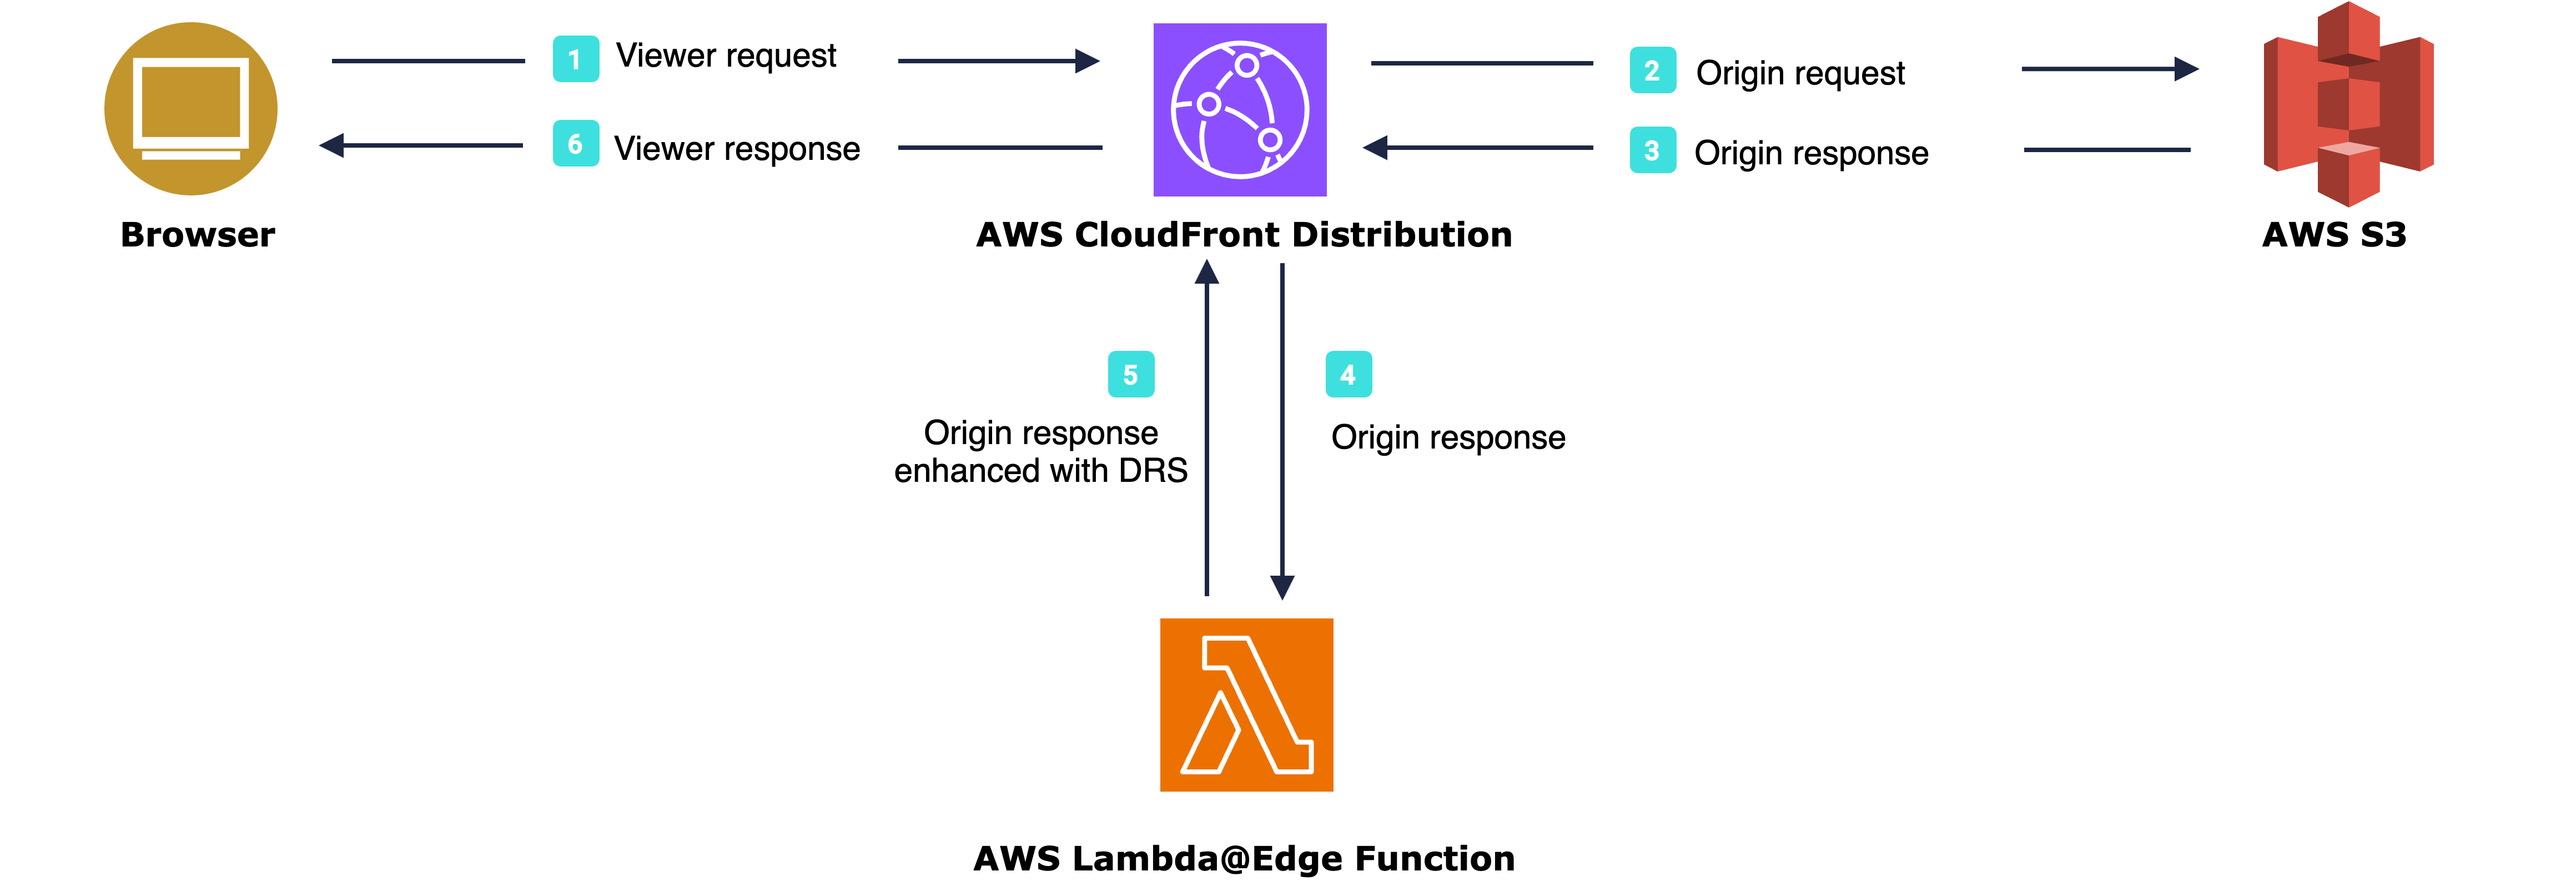
The flow starts with the user navigating to the webpage. In order to fetch the content, a browser sends a request to the origin server (AWS S3 in our example), passing through AWS CloudFront (1 & 2). Before returning the content, CloudFront triggers the Lambda@Edge function (4) which modifies the content by adding a script containing Fraud Prevention integration (5). The browser receives an augmented page that is integrated with Fraud Prevention (6) and presents it to the user.
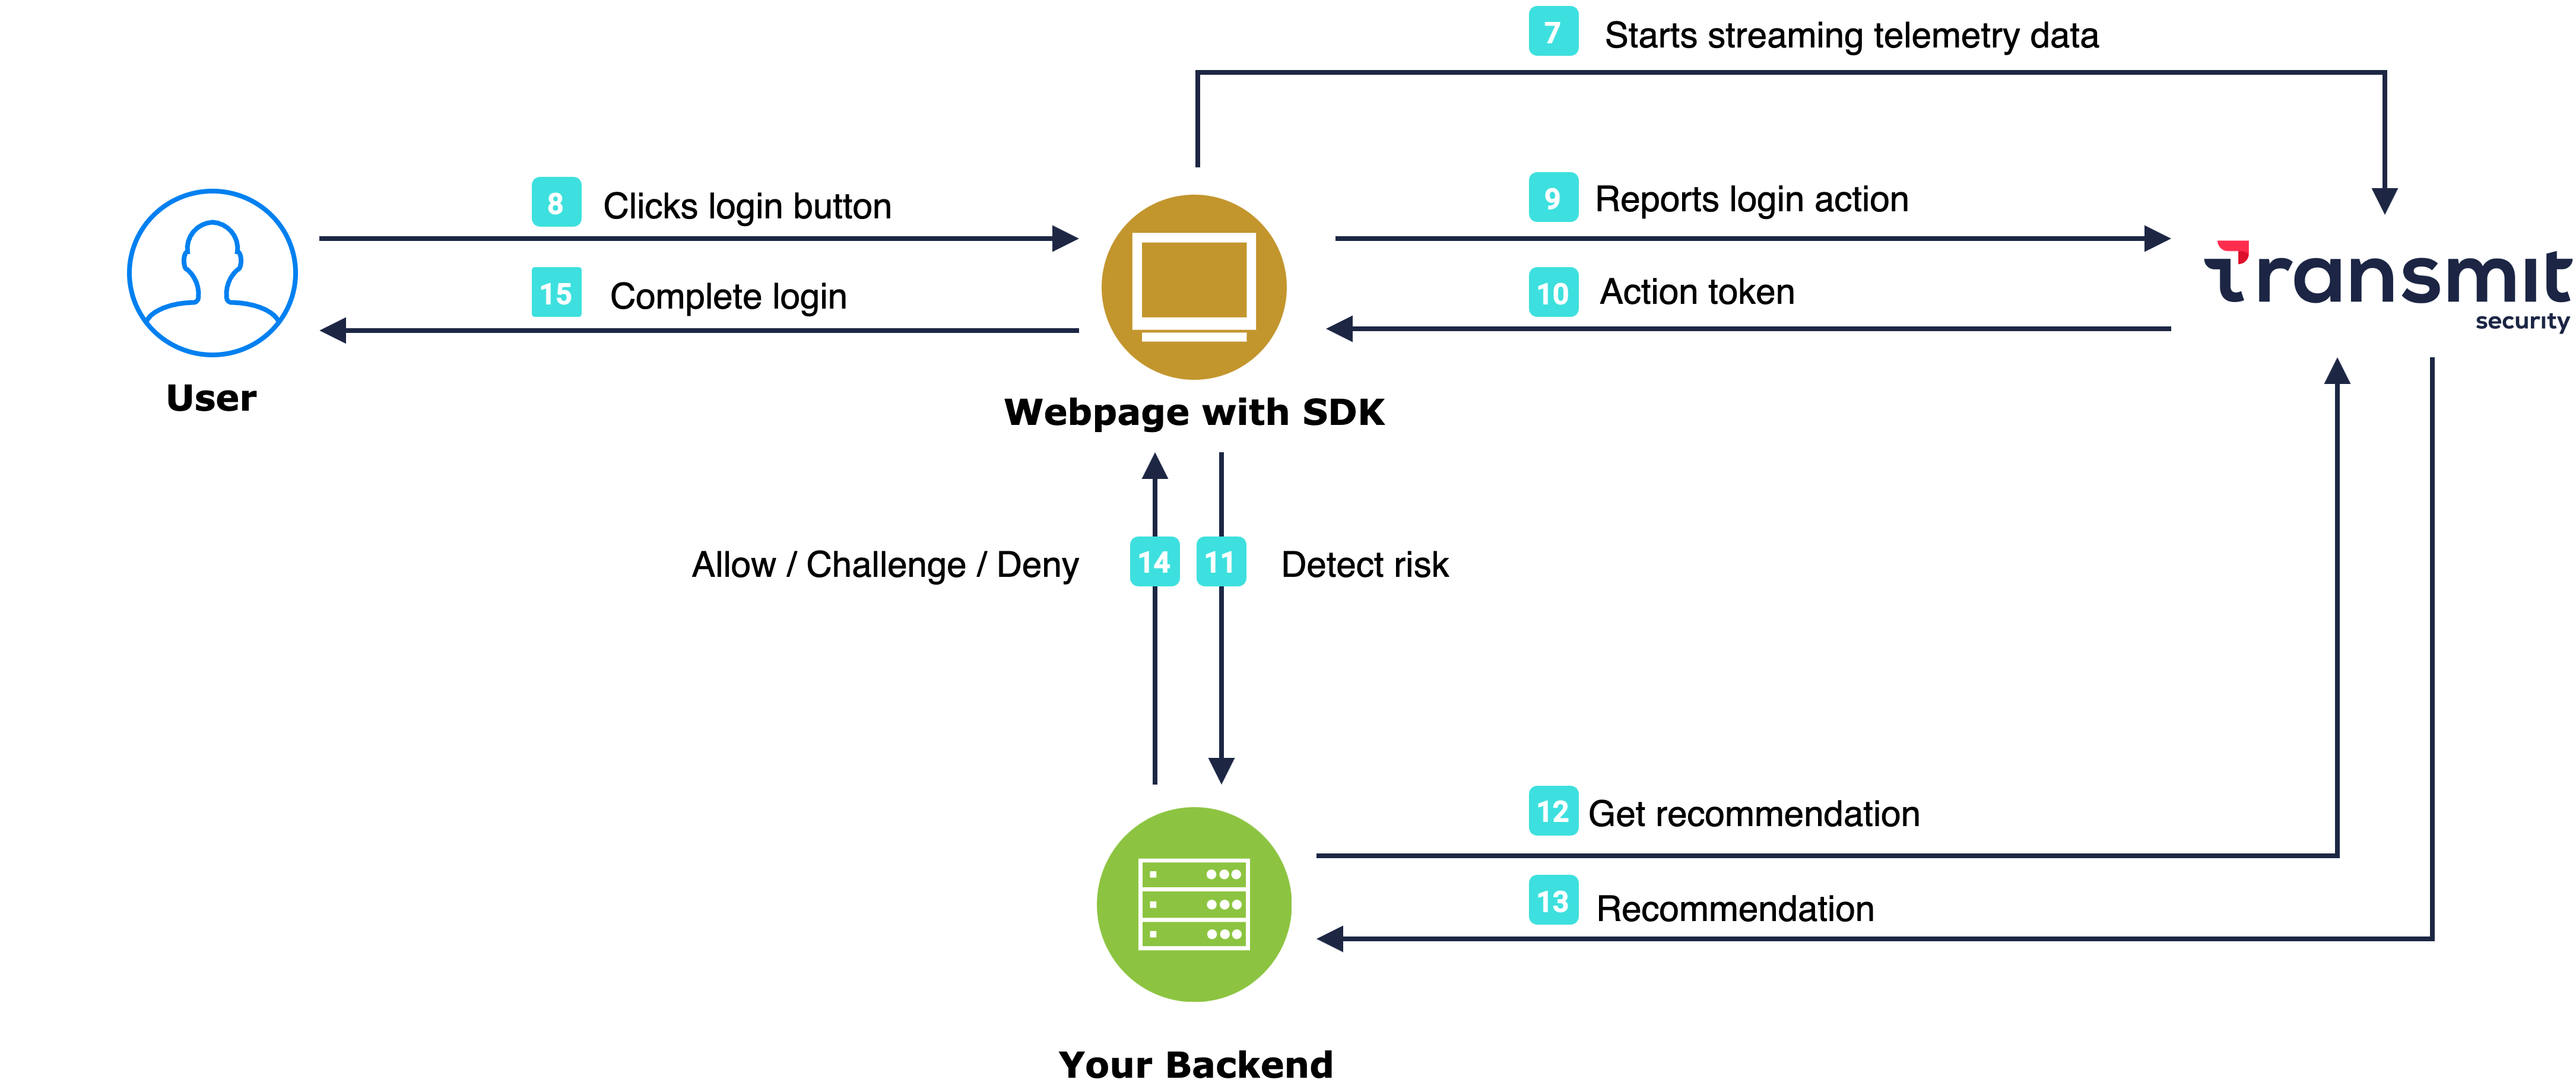
As soon as the browser loads the page, the Platform SDK gets initialized and starts sending telemetry to Mosaic (7). When a user performs an action, for example, clicks a login button (8), the SDK triggers an action event (9) and obtains an action token (10) which you should pass to the backend to be able to assess risk (11). Having received an action token, the application backend uses it to fetch recommendation from Mosaic (12 & 13) and instructs the webpage to act accordingly (14) in order to complete the login procedure (15).
- Fraud Prevention enabled as the risk engine for your tenant. Identity Threat Protection and Fraud Prevention are mutually exclusive—contact your Customer Success Manager to enable the appropriate engine.
- For simplicity, the flow assumes your app is stored with Amazon S3 bucket. Your web application must be integrated with CloudFront and you should be able to create Lambda@Edge functions.
Client credentials are used to identify your app and generate access tokens for authorizing Mosaic requests. To obtain them, you'll need to create an application in the Admin Portal (if you don’t have one yet).
From Applications, click Add application.
Add the friendly application name to display in the Admin Portal.
Add a client display name, and your website URL as a redirect URI (e.g.,
https://your-domain.com). These fields are required for all Mosaic apps, but won’t be used for Fraud Prevention.Click Add to create your application. This will automatically generate your client credentials.
Start by creating a new Lambda@Edge function that will execute the Fraud Prevention code.
- Open the AWS Lambda console and create a new Lambda@Edge function. See AWS tutorial for more details.
Make sure you are in the US-East-1 (N. Virginia) region as Lambda@Edge can be created in this region only.
Add the code below to the function. This will add the Fraud Prevention script to the
<head>section of HTML responses. The sample code below does the following:- Initializes Platform SDK. You'll need to replace
[CLIENT_ID]with the ID you've acquired in Step 1. SDK starts collecting telemetry data, and feeds it to Mosaic. - triggers an action event for login action, but you can adjust the script to report other sensitive actions. For the complete list of action types, see our recommendations page. To improve Fraud Prevention, optionally pass the correlation ID, and claimed user ID and its type (for users that haven't authenticated yet). Make sure to pass the received
actionTokento your backend. - Sets the user upon the SDK initialization if the user ID is known. Also sets the user for all subsequent events in the browser session once the user has fully authenticated (including, for example, any required 2FA that was done), e.g., takes user ID from the local storage. The user identifier must be reported to Mosaic and shouldn't contain personal user identifiers, such as email. To set the user, replace the
[USER_ID]with the actual user ID. - Clears the user once they log out or the browser session expires.
- Initializes Platform SDK. You'll need to replace
The sample below uses setAuthenticatedUser() for simplicity. If the code that completes a successful login still has the original actionToken returned by triggerActionEvent(), prefer reporting the final login result with reportActionResult(). This both sets the user for the browser session and ties the authenticated user and final outcome to the original login action. Use setAuthenticatedUser() when the login flow no longer has that token.
import { GetObjectCommand, S3Client } from '@aws-sdk/client-s3';
const client = new S3Client();

function getObject(Bucket, Key) {
  return new Promise(async (resolve, reject) => {
    const getObjectCommand = new GetObjectCommand({ Bucket, Key })

    try {
      const response = await client.send(getObjectCommand)
      let responseDataChunks = [];

      response.Body.once('error', err => reject(err));
      response.Body.on('data', chunk => responseDataChunks.push(chunk));

      // Once the stream has no more data, join the chunks into a string and return the string
      response.Body.once('end', () => resolve(responseDataChunks.join('')));
    } catch (err) {
      // Handle the error or throw
      return reject(err);
    }
  })
}

export const handler = async (event) => {
    const response = event.Records[0].cf.response;
    const request = event.Records[0].cf.request;
    const headers = response.headers;
    const contentType = response.headers['content-type'][0].value;
    let path = request.uri;

    if (contentType && contentType?.startsWith("text/html")) {
        if (path == '/') {
          path = "index.html";
        }
        const object = await getObject('<S3_BUCKET_NAME>', path); // fetching the proper html file from the S3 bucket according to the request uri

        const tsPlatformSDK = `
          <script src="https://platform-websdk.transmitsecurity.io/platform-websdk/2.x/ts-platform-websdk.js" defer="true" id="ts-platform-script"></script>
          <script>
             console.log("Setting up event listener for script loading");
             // Initialize the Platform SDK
             // See changelog for details and update version if necessary
             document.getElementById("ts-platform-script").addEventListener("load", function() {
                 window.tsPlatform.initialize({
                    clientId: "[CLIENT_ID]", // Obtained in Step 1
                    drs: {
                      userId: "[USER_ID]", // If user ID is known
                      serverPath: "https://api.transmitsecurity.io/risk-collect/", // Required: Set serverPath based on your region or custom domain
                    }
                 });
             });

            // Trigger the specific actions per page:
            const url = window.location.href;

            document.addEventListener('DOMContentLoaded' , async function() {
              if (url.includes("/login")) { // Example: your login page URL
                // Add code here to delay script execution until the relevant DOM elements are rendered

                // Trigger events for the login button and get the actionToken
                // (Optional) correlationId and claimedUserId help improve Fraud Prevention
                document.getElementById("login_button").addEventListener('click', async function(e) {
                  const actionResponse = await window.tsPlatform.drs.triggerActionEvent("login", { correlationId: "[CORRELATION_ID]", claimedUserId: "[CLAIMED_USER_ID]" });
                  const actionToken = actionResponse.actionToken;
                  // Add code here to send the received actionToken to your backend
                });

                // Set the user for all subsequent events in the browser session
                const userId = window.localStorage.getItem("userID"); // Get a user identifier, for example from the local storage
                if (userId) {
                  await window.tsPlatform.drs.setAuthenticatedUser('userId');
                }
              } else {
                  // When on a page with a logout button
                  // Clear the set user after the user logs out or the user session expires

                  async function onUserLogout() {
                    await window.tsPlatform.drs.clearUser();
                  }
                  let logoutButton = document.getElementById("logout");
                  if (logoutButton) {
                    logoutButton.addEventListener('click', onUserLogout);
                  }
              }
            });
          </script>
        `;

        // Consider appending the script to </body> instead of </head> if it's relevant for your use case
        const modifiedBody = object.replace('</head>', tsPlatformSDK + '</head>');
        if (modifiedBody) {
            response.body = modifiedBody;
        }
    }
    return response;
};Create a CloudFront trigger to invoke Lambda@Edge function. For details, see AWS documentation.
In the AWS Lambda console, on the Function overview page for your function, choose the Versions tab.
Specify the latest version of the function.
Navigate to the Triggers tab and select Add trigger.
In Trigger configuration, choose CloudFront and Deploy to Lambda@Edge with the following settings:
- Distribution: select the distribution that you want to add the trigger to
- CloudFront event: origin response
- Include body: yes
Confirm deploying to Lambda@Edge.
Select Deploy. AWS suggests you wait for the status to change from “Deploying” to the date and time of deployment.
Make sure Lambda has access to the S3 bucket content. Allow access by creating an IAM policy and attaching it to the Lambda execution role (see AWS documentation). It should include the following permissions:
{
  "Version": "2012-10-17",
  "Statement": [
    {
      "Sid": "ListObjectsInBucket",
      "Effect": "Allow",
      "Action": [
                "s3:Get*",
                "s3:List*",
                "s3:Describe*",
                "s3-object-lambda:Get*",
                "s3-object-lambda:List*"
      ],
      "Resource": [
        "arn:aws:s3:::<S3_BUCKET_NAME>" // Replace with your S3 bucket name
      ]
    },
    {
      "Sid": "AllObjectActions",
      "Effect": "Allow",
      "Action": "s3:*Object*",
      "Resource": [
        "arn:aws:s3:::<S3_BUCKET_NAME>/*" // Replace with your S3 bucket name
      ]
    }
  ]
}You can fetch recommendations for the reported action using the Recommendation API.
These APIs are authorized using an OAuth access token so you'll need to fetch a token using your client credentials (from Step 1). To do this, send the following request:
  const resp = await fetch(
    `https://api.transmitsecurity.io/oidc/token`,
    {
      method: 'POST',
      headers: {
        'Content-Type': 'application/x-www-form-urlencoded'
      },
      body: new URLSearchParams({
        grant_type: 'client_credentials',
        client_id: '[CLIENT_ID]', // Obtained in Step 1
        client_secret: '[CLIENT_SECRET]' // Obtained in Step 1
      })
    }
  );
  const { access_token } = await resp.json();
From your backend, invoke the Recommendation API by sending a request like the one below. The [ACCESS_TOKEN] is the authorization token you obtained using your client credentials and [ACTION_TOKEN] is the actionToken received from the SDK.
const query = new URLSearchParams({
  action_token: '[ACTION_TOKEN]', // Returned by SDK
}).toString();

const resp = await fetch(
  `https://api.transmitsecurity.io/risk/v1/recommendation?${query}`,
  {
    method: 'GET',
    headers: {
      Authorization: 'Bearer [ACCESS_TOKEN]', // Obtained using Client ID and Secret
    },
  }
);In your application, add code that performs the appropriate identity protection steps based on the Mosaic risk recommendation. For example, proceed normally if Mosaic returns 'allow', terminate and inform the user of the issue if 'deny', or trigger a step-up authentication process if 'challenge'.