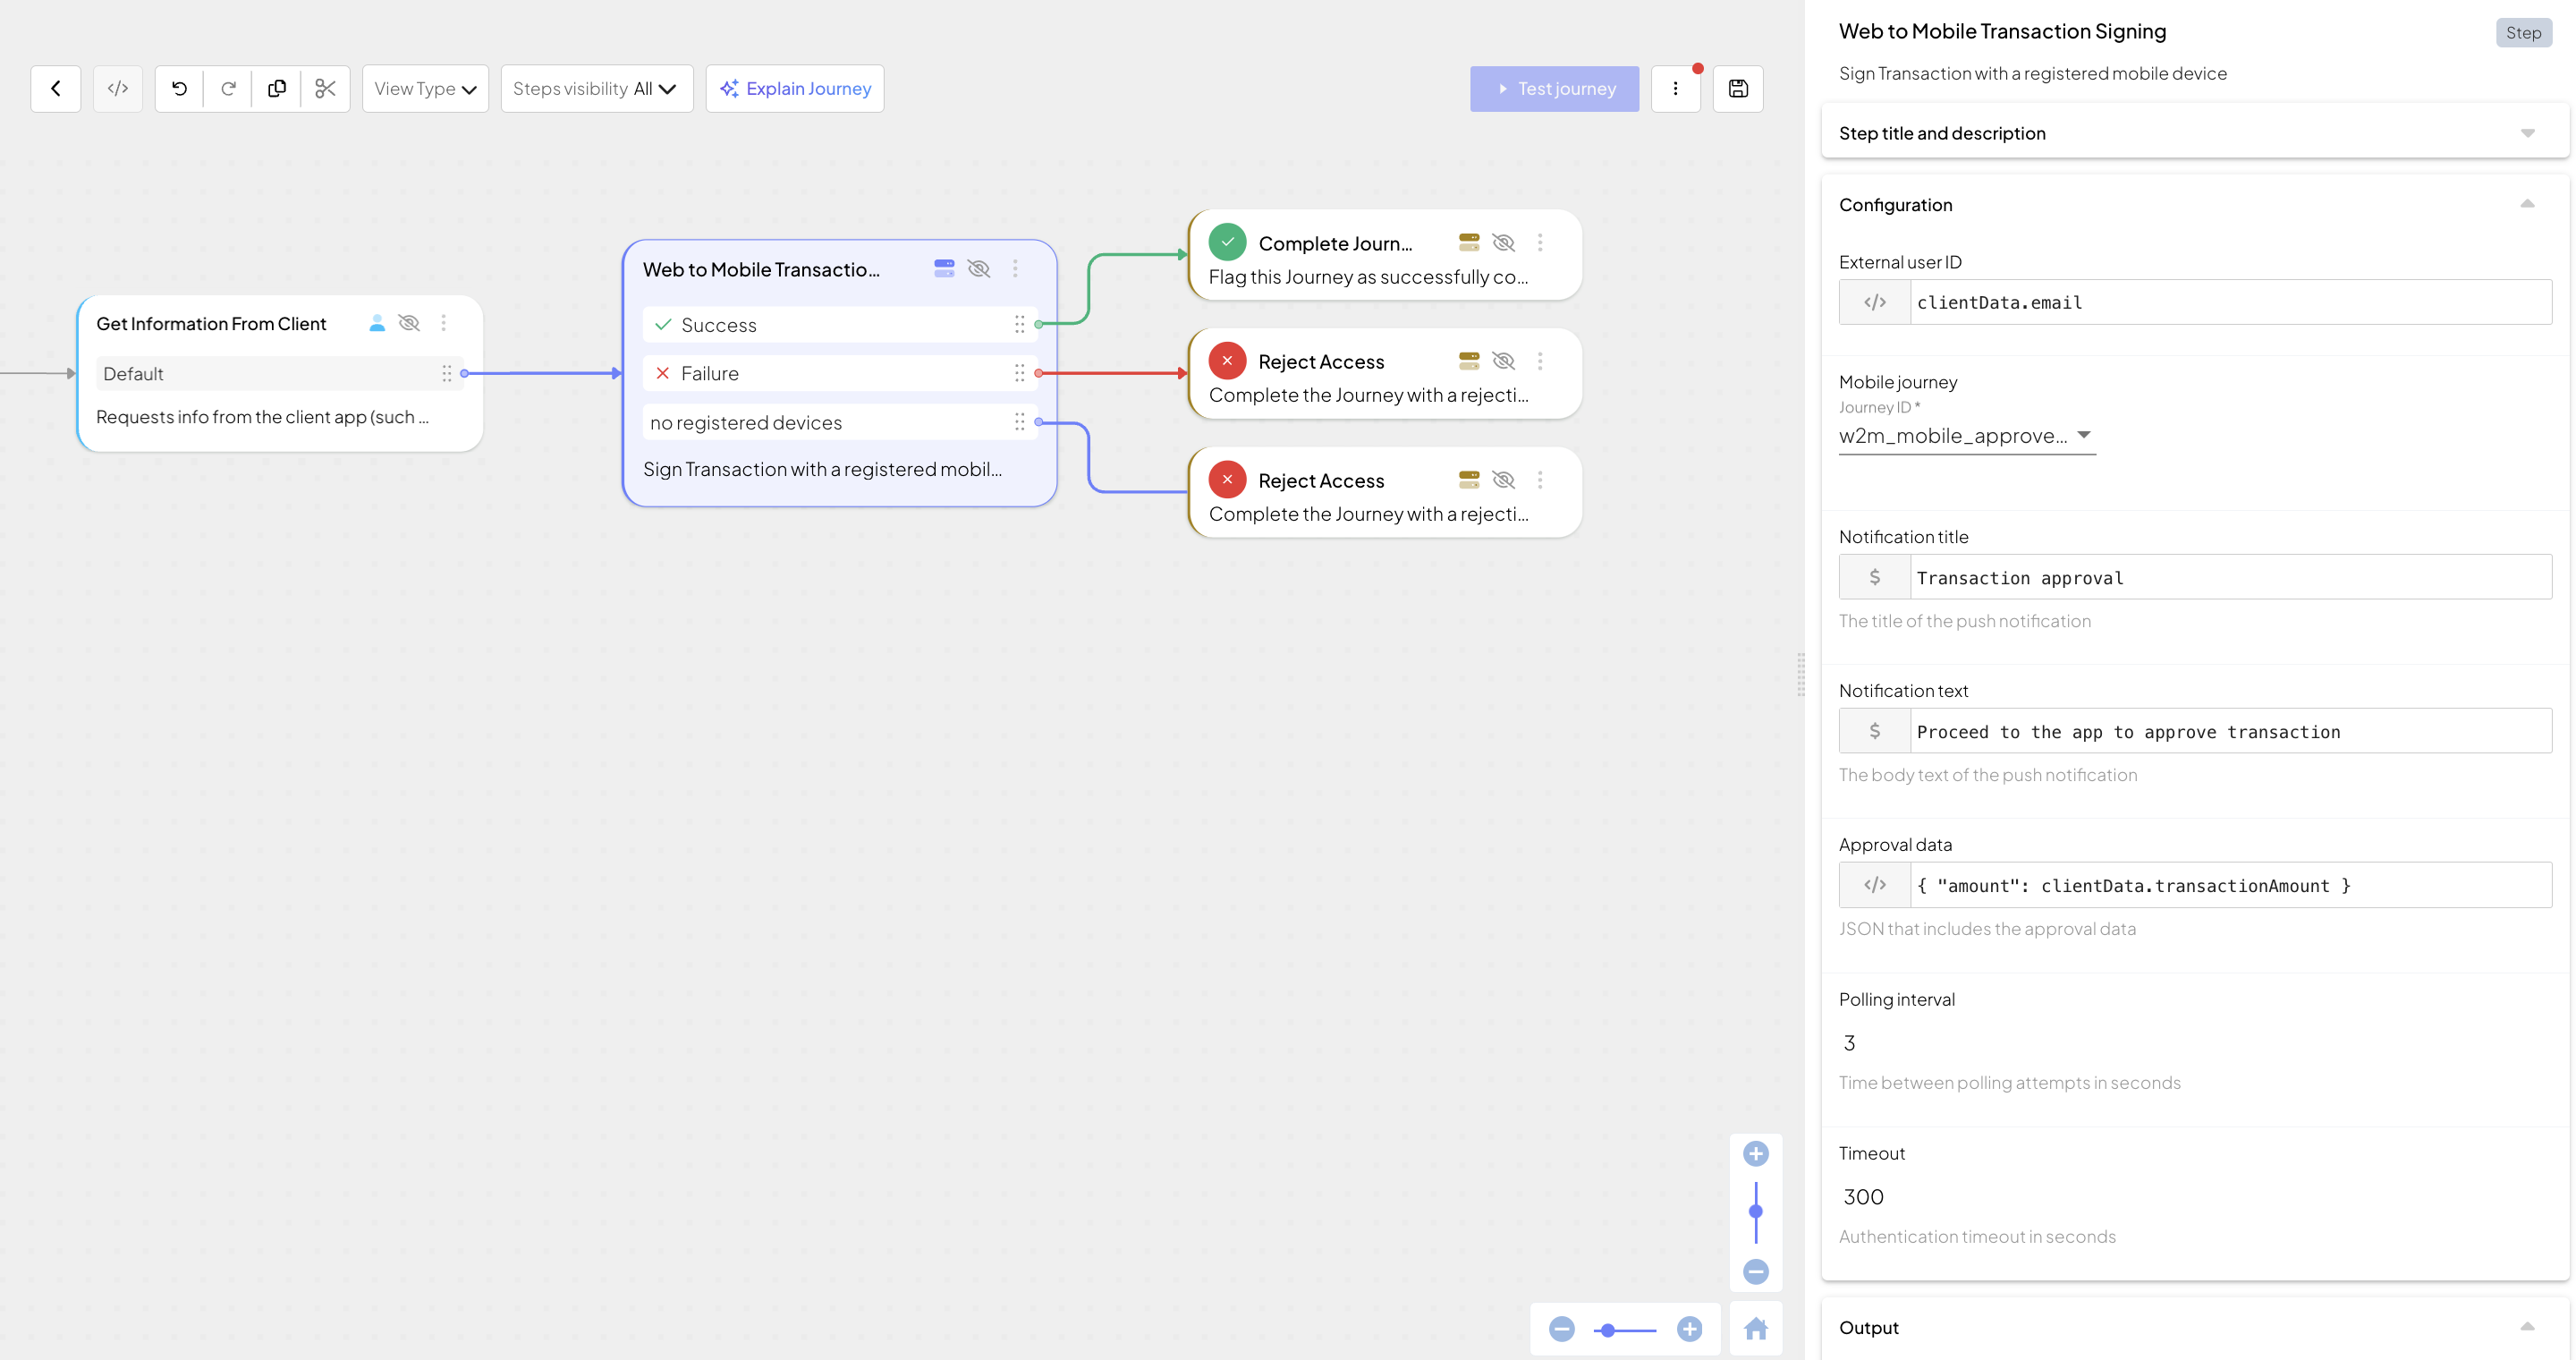
Mosaic enables a "web to mobile" authentication and approval flow that uses a mobile device to authenticate into a web app. Instead of starting and completing the process in a web browser, the user receives a push notification on their preregistered iOS or Android device. From the push notification, they're prompted to validate a one-time passcode (OTP) to authenticate and approve the action in the mobile app. After completing authentication, the user can seamlessly return to the web app and continue their operations.
This approach enhances security by introducing a second factor (the OTP) that validates the user's identity on a trusted mobile device, making it a preferred method for securing sensitive operations, such as logins, approving transactions, or authorizing account changes (e.g., updating a mailing address).
This guide explains how to implement authentication with push notifications using Journeys and Orchestration SDKs. To learn more about SDKs integration, see Orchestration quickstarts.
When a user requests to log in to the web app, the web app invokes a journey that passes this request to Mosaic (Step 7). In response, Mosaic sends a push notification to the preregistered mobile device (Step 4) which triggers the mobile journey (Step 5). The user then enters the OTP displayed on the web into their mobile device, and once the code is successfully validated, the flow completes and the user is logged into the web app.
In the Admin Portal, create an application and then create or select two User authentication clients configured for OIDC within it: one with Client type set to Web app and one with Client type set to Native app. Obtain both client IDs (see Create applications and Manage clients). If using SSO and Federation service, use its client IDs instead. Make sure to execute the flow within the context of the same Mosaic application.
Before you add a new login type to your application, configure the push notifications settings for your app (Admin Portal > Applications > your app > Authentication methods > Push notifications).
- Apple: in Apple Push Notifications Service (APN), provide the Apple push key, APN key ID, and Team ID which can be obtained from your Apple developer account.
- Android: in Firebase Cloud Messaging (FCM), provide the Firebase service account key that can be obtained in the Google Cloud console.
Mosaic supports multiple push notification configurations for Apple devices only. This is because APNs requires explicitly the app’s bundle ID to verify the destination app. In contrast, Android (FCM) doesn’t require a package ID—the push token already includes the app identity, and validation is handled via the FCM server key.
Journeys handle the business logic responsible for this flow. To facilitate journey development, you can build your journeys based the following journey templates (Admin Portal > B2C Identity or B2B Identity based on your setup > Journeys > Templates > Guides):
- Web to mobile flow: mobile app registration journey
- Web to mobile flow: mobile approve journey
- Web to mobile flow: web login journey
Store the journey IDs as you will need them later.
To support you in following this guide, we recommend generating code for each journey from the journey editor, making sure you choose the format that matches your working environment ( Integration code). For more about generating code, see Code generation for local testing.
This client SDK journey runs on the user's mobile device and ensures the device is ready to be used for authentication in the web to mobile flow. It includes the following actions:
- Obtains the user's email (Collect information step).
- Checks if the user exists and creates a new user (Create user step) if necessary.
- Cryptographically binds a mobile device to the user record (Register or Update Device step) and registers a push token for this device. The user context for the device registration journey is provided by the journey itself. This step ensures Mosaic can recognize this device as trusted for push notifications.
- Depending on results, successfully completes the journey (Complete journey step) or rejects access (Reject access step).
This mobile approval journey automatically validates the registered device and then facilitates the OTP validation as part of the approval granting in the mobile app. It includes the following actions:
- The Validate OTP step, which prompts the user to enter the OTP in the mobile app's user interface. This step then validates the code against the one generated by the web journey.
- Depending on results, successfully completes the journey (Complete journey step) or rejects access (Reject access step).
Mosaic allows accessing parameters sent from the initiating web journey using @policy.getMobileApproveParameters(). For example, you can set the external user identifier to @policy.getMobileApproveParameters().external_user_id.
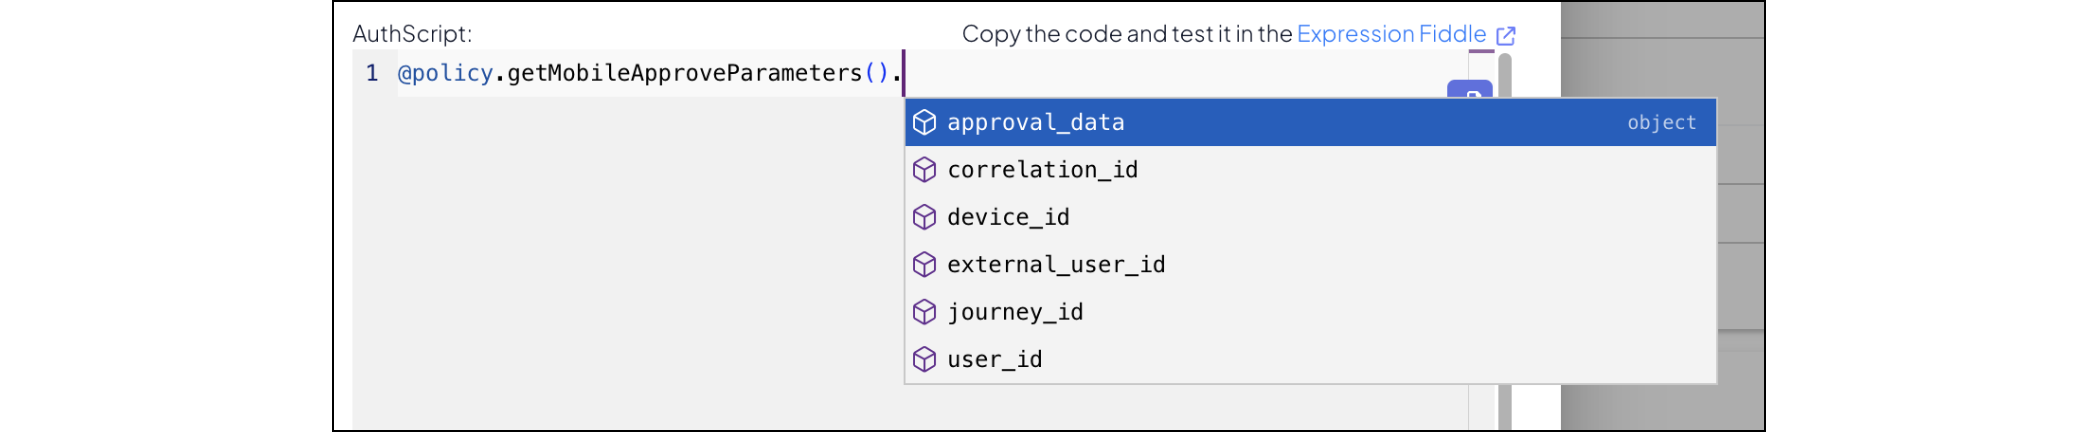
| Parameter | Description |
|---|---|
approval_data | JSON object containing the transaction details to approve as specified in the Web login journey in the Web to mobile transaction signing step. For details about transaction signing, see Transaction signing. |
additional_data | JSON object containing additional data passed from the web journey. |
correlation_id | ID of the flow obtained from Web login journey that helps relate user interactions, if available. |
device_id | ID of the user's mobile device running the mobile approve flow. |
external_user_id | External user ID specified in the Web login journey, if known. |
journey_id | Web login journey ID. |
user_id | User ID specified in the Web login journey, if known. |
Once the user approves the action by validating the OTP in the mobile app, this will resume the Web login journey—the user can return back to the browser to complete the flow. The web login journey will reject access unless the user authenticated on mobile.
This client SDK journey runs in the browser app and starts the web to mobile authentication flow. It includes the following actions:
- Obtains an external user ID (Login form step) and enables web to mobile authentication.
- Initiates the web to mobile authentication flow (Web to mobile authentication step) and logs in the user after they approve the request on mobile.
- (Optional) If you enabled the Display Web OTP option in the Web to Mobile Authentication step, you must also add a Validate OTP step to the mobile approve journey. This ensures the user enters and validates the code displayed in the web journey as part of the authentication flow.
- Depending on results, successfully completes the journey (Complete journey step) or rejects access (Reject access step).
Having created a journey from the "Web to mobile flow: web login journey" template, link it to the mobile approve journey. To do this, in the Web to mobile authentication step locate the Mobile journey drop-down and select the mobile approve journey you've created before.
In case of successful journey completion, user access token will become available with @policy.userContext().

To run this flow, your integration needs the Orchestration SDK (for iOS and Android) and Authentication SDK (for iOS and Android) to enable your application to use mobile biometrics and invoke journeys.
Make sure to initialize mobile SDKs within the context of the same client ID.
For Android, see instructions here:
- Adding to project: Orchestration SDK and Authentication SDK
- Initializing: Orchestration SDK and Authentication SDK
For iOS, see instructions here:
- Loading: Orchestration SDK and Authentication SDK
- Initializing: Orchestration SDK and Authentication SDK
Implement the client-side code needed to register a mobile app on the device (see Mobile app registration journey). Note that this code must be executed on the first run of the mobile app.
Registration is a prerequisite to authenticating with push notifications. Mosaic cannot send push notifications to a user's device unless the user exists and their mobile app was registered.
In a nutshell, you have to implement:
For example, implement a switch (or other routing mechanism) that invokes a handler responsible for a specific journey step (returned in idoServiceResponse.journeyStepId parameter). Each handler processes data, displays whatever UI is needed, and calls submitClientResponse() when the interaction is concluded.
The journey loops back to the switch unless Mosaic signals journey completion by setting the journeyStepId property to Rejection.type or Success.type. The idoServiceResponse.token property contains a JWT token as a proof of journey completion.
For more guidance on mobile development with the Orchestration SDK, refer to these quickstarts: Android or iOS.
Implement a controller for registering the mobile device as a target for push notifications and setting the push token in the Orchestration SDK. Design your app in the way that this code gets executed right after the SDK initialization. This step is needed to later receive push notifications in the Mobile approve journey. See a sample code below:
  import UIKit
  import UserNotifications

  @main
  class AppDelegate: UIResponder, UIApplicationDelegate {

      var window: UIWindow?

      func application(
          _ application: UIApplication,
          didFinishLaunchingWithOptions launchOptions: [UIApplication.LaunchOptionsKey: Any]?
      ) -> Bool {

          // Request notification authorization
          UNUserNotificationCenter.current().requestAuthorization(options: [.alert, .badge, .sound]) { granted, error in
              if granted {
                  debugPrint("[DEBUG]: Permission granted for notifications.")
                  DispatchQueue.main.async {
                      // Register for remote notifications
                      application.registerForRemoteNotifications()
                  }
              } else {
                  debugPrint("[DEBUG] Notification permission denied: \(error?.localizedDescription ?? "No error information")")
              }
          }

          return true
      }

      // Called when the user grants permission and the app successfully registers for notifications
      func application(_ application: UIApplication, didRegisterForRemoteNotificationsWithDeviceToken deviceToken: Data) {
          // Convert the token to a string
          let token = deviceToken.map { String(format: "%02.2hhx", $0) }.joined()
          debugPrint("[DEBUG] Device token: \(token)")

          // Provide push token to the Orchestration SDK
          do {
              try TSIdo.setPushToken(token)
          } catch {
              debugPrint("[DEBUG] Error while setting push token: \(error)")
          }
      }

      // Called if the registration fails
      func application(_ application: UIApplication, didFailToRegisterForRemoteNotificationsWithError error: Error) {
          debugPrint("[DEBUG] Failed to register for remote notifications: \(error.localizedDescription)")
      }
}Implement a handler that starts the journey on the first application run. Use the following call to start the journey:
  do {
      try TSIdo.startJourney(journeyId: "YOUR_JOURNEY_ID")
  } catch {
      debugPrint("[DEBUG] Failed to start journey: \(error)")
}Implement code that obtains user's email from a form and passes it to the Orchestration SDK.
  // Presenting view controller
  let formViewController = FormViewController()
  navigationController?.pushViewController(formViewController, animated: true)

  // Inside the View Controller:
   @IBAction func onSubmitForm() {
      // Collect the form data
      let email = emailInput.text

      // Convert form data to JSON format
      let formData =  {
         email: "john@doe.com"
      }

      // Submit the data to the SDK
      TSIdo.submitClientResponse(clientResponseOptionId: .clientInput, data: formData)
}Implement collection and registration of user's biometrics.
  guard let userId = response.data?["user_identifier"] as? String else {
              return debugPrint("[DEBUG]: No user identifier found in response")?
          }

          // Registers biometric credentials on the device using the Authentication SDK
          TSAuthentication.shared.registerNativeBiometrics(username: userId) { result in
              switch result {
              case .success(let response):

                  var data: [String: Any] = [
                      "publicKey": response.publicKey,
                      "publicKeyId": response.publicKeyId,
                      "os": "ios"
                  ]

                  if let attestation = response.attestation {
                      data["attestation"] = attestation
                  }

                  // Submits the registration result back to the journey using the Orchestration SDK
                  do {
                      try TSIdo.submitClientResponse(clientResponseOptionId: .clientInput, data: data)
                  } catch {
                      debugPrint("[DEBUG] Failed to submit biometric registration result: \(error)")
                  }
              case .failure(let error):
                  debugPrint("[DEBUG] Error: \(error)")
                  do {
                      try TSIdo.submitClientResponse(clientResponseOptionId: .fail)
                  } catch {
                      debugPrint("[DEBUG] Failed to submit biometric registration failure: \(error)")
                  }
              }
}Implement client-side code that processes the push notification sent by Mosaic and executes the Mobile approval journey with the parameters retrieved from notification.
In a nutshell, you have to implement:
- Processing push notification and starting mobile approve jourey
- Authenticating with mobile biometrics
For example, implement a switch (or other routing mechanism) that invokes a handler responsible for a specific journey step (returned in idoServiceResponse.journeyStepId parameter). Each handler processes data, displays whatever UI is needed, and calls submitClientResponse() when the interaction is concluded.
The journey loops back to the switch unless Mosaic signals journey completion by setting the journeyStepId property to Rejection.type or Success.type. The idoServiceResponse.token property contains a JWT token as a proof of journey completion.
For more guidance on mobile development with the Orchestration SDK, refer to these quickstarts: Android or iOS.
Add the following code to read the push notification payload and retrieve parameters for invoking the mobile journey.
Unlike regular journeys, Mobile approve journeys are invoked with a special SDK call: startMobileApproveJourney().
  // Called when the user taps the notification or interacts with it
  func userNotificationCenter(_ center: UNUserNotificationCenter, didReceive response: UNNotificationResponse, withCompletionHandler completionHandler: @escaping () -> Void
  ) {
      // Get the custom data associated with the notification.
      let userInfo = response.notification.request.content.userInfo

      // Read the approval payload
      guard let approvalPayload = userInfo["data"] as? [String: Any] else {
          debugPrint("[DENUG]: No approval data found in push notification")
          return
      }

      // Start mobile approve journey providing push notification approval payload
      TSIdo.startMobileApproveJourney(payload: approvalPayload)

      debugPrint("[DEBUG]: approvalPayload: \(approvalPayload)")

      completionHandler()
}For example, to support authenticating with mobile biometrics, implement the following on the client side. See Mosaic Authentication SDK reference for iOS or Android for more details.
  // Authentication challenge provided by the journey
  guard let challenge = serverResponse?.data["biometrics_challenge"] as? String else {
      return
  }

  // Authenticates the user with their biometric credentials using the Authentication SDK
  TSAuthentication.shared.authenticateNativeBiometrics(username: "[USER_ID]", challenge: challenge) { result in
      switch result {
      case .success(let response):
          let data: [String: Any] = [
              "publicKeyId": response.publicKeyId,
              "signedChallenge": response.signature,
              "userIdentifier": "[USER_ID]"
          ]

          // Submits the authentication result to the journey using the Orchestration SDK
          do {
              try TSIdo.submitClientResponse(clientResponseOptionId: .clientInput, data: data)
          } catch {
              debugPrint("[DEBUG] Failed to submit biometric authentication result: \(error)")
          }
      case .failure(let error):
          debugPrint("[DEBUG] Error: \(error)")
          do {
              try TSIdo.submitClientResponse(clientResponseOptionId: .fail)
          } catch {
              debugPrint("[DEBUG] Failed to submit biometric authentication failure: \(error)")
          }
      }
}To run this flow from the web app, you need integration with the Orchestration SDK.
In particular, you'll need to:
Ensure that the Web SDK is initialized within the Client ID that belongs to the same application as the client ID used to initialize the Mobile SDKs.
Implement the client-side code for the Web login journey. In a nutshell, you have to implement:
For example, implement a switch (or other routing mechanism) that invokes a handler responsible for a specific journey step (returned in idoServiceResponse.journeyStepId parameter). Each handler processes data, displays whatever UI is needed, and calls submitClientResponse() when the interaction is concluded.
The journey loops back to the switch unless Mosaic signals journey completion by setting the journeyStepId property to Rejection.type or Success.type. The idoServiceResponse.token property contains a JWT token as a proof of journey completion.
For more guidance on web development with the Orchestration SDK, refer to this quickstart: Web.
Starting a Web login journey is usually a response to a user interaction, such as clicking a login button.
const idoResponse = await window.tsPlatform.ido.startJourney(
      'YOUR_JOURNEY'
);Implement obtaining user's email. For example, your application should present a form that collects a user email and passes it the Orchestration SDK.
function handleGetInformationFromClient(idoResponse) {
  // Generate the form's HTML
  const formHtml = `<form id="updateForm">
    <input type="email" id="email" name="email" placeholder="email" />
    <button>Submit</button>
  </form>`;

  // Render the form
  document.body.innerHTML = formHtml;

  document.querySelector('#updateForm').addEventListener('submit', function(event) {
    event.preventDefault();

    // Collect the form data
    const form = event.target;
    const formData = new FormData(form);

    // The data will look like this:
    // {
    //   "email": "john@doe.com"
    // }
    const data = Object.fromEntries(formData.entries());

    // Submit the data to the SDK
    window.tsPlatform.ido.submitClientResponse(ClientResponseOptionType.ClientInput, data);
  });
}Implement the handler for the Web to Mobile Authentication journey step. Your client side should account for the following:
- If the user has more than one device registered, the SDK will return the list of user's devices. Present a screen to let user decide which device to use for authentication.
- Implement polling. To avoid being rate limited, make sure to poll in accordance with the polling interval set in the journey settings (2-5 seconds).
- While the journey polls SDK for the mobile journey outcome, present a spinner or any other UI element to notify the user that the process is on hold and will resume later.
- Implement ability to cancel authentication.
- Implement ability to resend a push notification.
This flow completes successfully and the user is granted access to the web app only if they have authenticated on the mobile device (see Mobile approve journey).
For example:
function handleWebToMobileAuthentication(idoResponse) {
  // Check if devices are present in the idoResponse
  if (idoResponse.data.devices) {
    // If devices are present, handle device selection
    handleDeviceSelection(idoResponse);
  } else {
    // If devices are not present, handle polling
    handlePolling(idoResponse);
  }
}

function handleDeviceSelection(idoResponse) {
  const html = `
    <div>
      <h1>Select a device</h1>
      <select id="device_select">
        ${idoResponse.data.devices
          .map(
            (device) => `<option value="${device.code}">${device.name}</option>`
          )
          .join("")}
      </select>
      <button id="select_device_button">Continue</button>
    </div>
  `;

  document.body.innerHTML = html;

  document
    .querySelector("#select_device_button")
    .addEventListener("click", () => {
      const deviceCode = document.querySelector("#device_select").value;

      // Submit the selected device code to the SDK
      window.tsPlatform.ido.submitClientResponse(
        ClientResponseOptionType.ClientInput,
        {
          selected_device_code: deviceCode,
        }
      );
    });
}

function handlePolling(idoResponse) {
  const pollingInterval = idoResponse.data.polling_interval * 1000; // Convert seconds to milliseconds
  const resendAttemptsLeft = idoResponse.data.resend_attempts_left;

  const html = `
    <div>
      <h1>Waiting for Approval</h1>
      <p>Please approve the transaction on your mobile device.</p>
      <button id="cancel_button">Cancel</button>
      <button id="resend_button" ${
        resendAttemptsLeft === 0 ? "disabled" : ""
      }>Resend</button>
    </div>
  `;

  document.body.innerHTML = html;

  document.querySelector("#cancel_button").addEventListener("click", () => {
    // Submit the cancel response to the SDK
    window.tsPlatform.ido.submitClientResponse(ClientResponseOptionType.Cancel);
  });

  document.querySelector("#resend_button").addEventListener("click", () => {
    // Check if there are resend attempts left
    if (resendAttemptsLeft > 0) {
      // Submit the resend response to the SDK
      window.tsPlatform.ido.submitClientResponse(ClientResponseOptionType.Resend);
    }
  });

  setTimeout(() => {
    // Submit a response back to the SDK
    // As long as the mobile device has not approved, we will keep receiving the same idoResponse with polling data
    window.tsPlatform.ido.submitClientResponse(ClientResponseOptionType.ClientInput, {});
  }, pollingInterval);
}Implement transaction signing with push notifications by swapping the Web to mobile athentication step with the Web to mobile transaction signing step in the Web login journey and passing along the transaction details for the user to approve in the mobile journey. The approval data is a JSON object, its fields may include expressions. The keys and values of approval data can only contain digits, characters and special symbols: -._. For example:
After the user approves the transaction on their mobile device, the web journey output includes signing artifacts (for example, the approval data, signed data, signature, and public key). Retain these data as evidence of the approval for later audit and independent verification. You can view the output in Journey Analytics. For field definitions, see Offline transaction signing verification.
{
  "amount": clientData.transactionAmount,
  "currency": "USD",
  "payee": clientData.payee
}