Angular SDK quick start
This guide describes how to quickly integrate Fraud Prevention into your web application. This Angular library is the wrapper of the Mosaic Fraud Prevention JavaScript SDK. The guide covers the client-side integration as well as the backend API integration required to complete the flow.
Note
Client-side integrations are recommended for POCs and testing. For production environments, consider implementing Backend integration. Learn more about integration options: Client-side integration vs Backend integration.
How it works
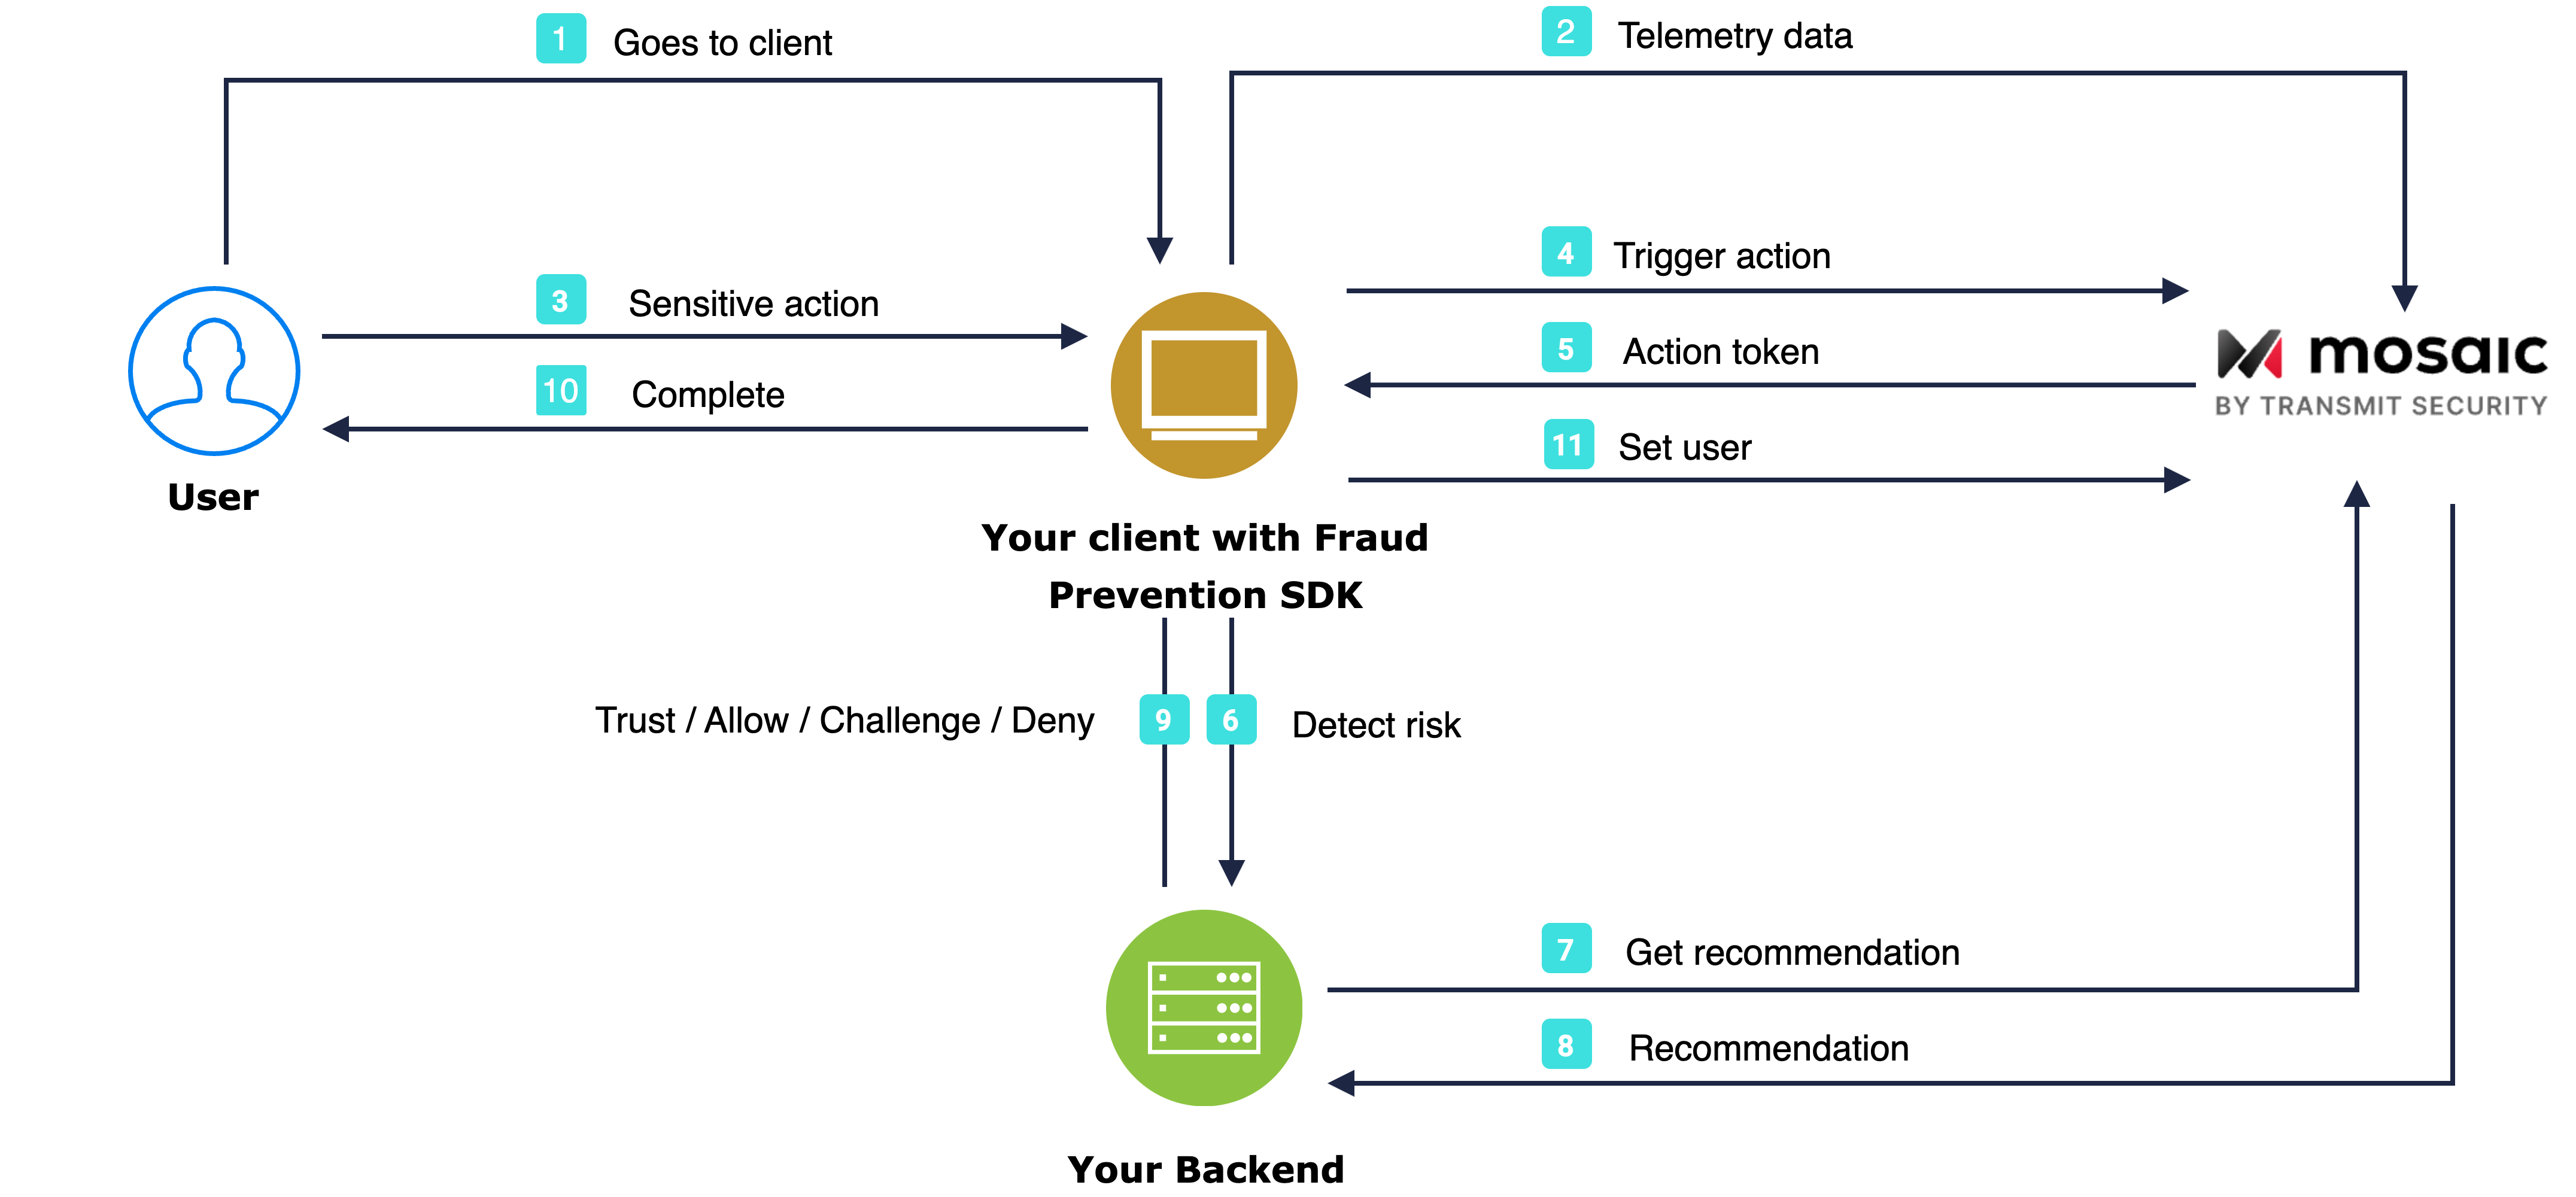
The flow starts with the user navigating to the webpage (1). The SDK gets initialized and starts sending telemetry to Mosaic (2). When a user performs an action, for example, clicks a login button (3), the SDK triggers an action event (4) and obtains an action token (5) which then forwards to the backend (6). Having received an action token, the application backend uses it to fetch recommendation from Mosaic (7 & 8) and instructs the client to act accordingly (9) in order to complete the login procedure (10). Upon successful login, the client sets the user (11).
Step 1: Get client credentials
Client credentials are used to identify your app and generate access tokens for authorizing Mosaic requests. To obtain them, you'll need to create an application in the Admin Portal (if you don’t have one yet).
- From Applications , click Add application .
- Add the friendly application name to display in the Admin Portal.
-
Add an OIDC client, specify the client secret as an authentication method, and your website URL as a redirect URI (e.g.,
https://your-domain.com).Note
These fields are required for all Mosaic apps, but won’t be used for Fraud Prevention.
- Click Add to create your application. This will automatically generate your client credentials.
Step 2: Add library to project
Use npm or yarn to install the Angular wrapper library (@transmitsecurity/ngx-ts-riskid).
npm install @transmitsecurity/ngx-ts-riskid --saveyarn add @transmitsecurity/ngx-ts-riskidStep 3: Import and configure module
Import the NgxTsRiskidModule and add a provider for RISKID_SDK_CONFIG into the root module (typically called AppModule) of your Angular app. The provider expects a value of type RiskidSdkConfig which includes:
-
clientId: (required) your client ID from step 1 -
userId: (optional) an opaque identifier of your user if the library is loaded in the context of an authenticated user session -
onError: a callback to be called in case of unexpected errors originating from the library
import { NgxTsRiskidModule, RiskidSdkConfig, RISKID_SDK_CONFIG } from '@transmitsecurity/ngx-ts-riskid';

@NgModule({
  declarations: [AppComponent],
  imports: [BrowserModule, FormsModule, HttpClientModule, NgxTsRiskidModule],
  providers: [
    {
      provide: RISKID_SDK_CONFIG,
      useValue: {
        clientId: 'CLIENT_ID',
        userId: 'USER_ID', // optional, in case the userId is known
        onError: (err: Error) => {
          console.log(err);
        }
      } as RiskidSdkConfig,
    }
  ],
  bootstrap: [AppComponent],
})
export class AppModule { }
Step 4: Trigger actions
To obtain risk recommendations for sensitive actions, your application should report these actions. The Angular library provides an injectable NgxTsRiskidService that allows reporting on events such as logins and password resets.
Note
For an alternative approach that directly utilizes our backend API instead, refer to our Backend API implementation guide.
Below is an example that reports on a login request. Similarly, you can implement calls to report on other actions.
-
NgxTsRiskidService.ACTION_TYPESis an enum of action types. For the complete list of action types, see our recommendations page. -
triggerAction(actionType: string): Promise<ActionResponse | null>receives an action type and returns a response that includes theactionTokento be used for evaluation in step 6. To improve Fraud Prevention, optionally pass correlation ID and claimed user ID (for users that haven't authenticated yet). Make sure to pass the receivedactionTokento your backend along with the actual action invocation.
app.component.ts

import { Component } from '@angular/core';
import { NgxTsRiskidService } from '@transmitsecurity/ngx-ts-riskid';

@Component({
  selector: 'app-root-demo',
  templateUrl: './app.component.html',
  styleUrls: ['./app.component.css']
})
export class AppComponent {

  constructor(private riskidService: NgxTsRiskidService) {}

  async loginTriggered() {
    const actionResponse = await this.riskidService.triggerAction(NgxTsRiskidService.ACTION_TYPES.LOGIN);
    const actionResponse = await this.riskidService.triggerAction(NgxTsRiskidService.ACTION_TYPES.LOGIN, { correlationId: '[CORRELATION_ID]', claimedUserId: '[CLAIMED_USER_ID]' } );
    const actionToken = actionResponse.actionToken;
      // Add code here to send the received actionToken to your backend
  }
}<section id="demo">
<div>
<div class="main_container text-center">
<div class="logo_header">
<img src="../assets/logo.png" alt="RiskID logo"/>
<h2 class="header_title">
SDK Demo App
</h2>
</div>
<div class="events_container">
<div class="section_block">
<div class="inputs_container">
<input id="user_name" #input1 class="default_input" type="text" placeholder="username (or some other input)"/>
<input id="user_password" class="default_input" type="text" placeholder="password (or some secondary input)"/>
</div>
<div class="events_buttons_container">
<button class="event_btn green_button" (click)="loginTriggered()">Login</button>
</div>
</div>
</div>
</div>
</div>
</section>Step 5: Fetch recommendation
You can fetch recommendations for the reported action using the Recommendation API. This is the same API that's also used for mobile integrations.
Mosaic APIs are authorized using an OAuth access token so you'll need to fetch a token using your client credentials (from step 1). The token should target the following resource: https://risk.identity.security. To do this, send the following request:
  const { access_token } = await fetch(
    `https://api.transmitsecurity.io/oidc/token`,
    {
      method: 'POST',
      headers: {
        'Content-Type': 'application/x-www-form-urlencoded'
      }
      body: new URLSearchParams({
        grant_type: client_credentials,
        client_id: [CLIENT_ID],
        client_secret: [CLIENT_SECRET],
        resource: 'https://risk.identity.security'
      })
    }
  );
From your backend, invoke the Recommendation API by sending a request like the one below. The [ACCESS_TOKEN] is the authorization token you obtained using your client credentials and [ACTION_TOKEN] is the actionToken received in step 4.
const query = new URLSearchParams({
  action_token: '[ACTION_TOKEN]',
}).toString();

const resp = await fetch(
  `https://api.transmitsecurity.io/risk/v1/recommendation?${query}`,
  {
    method: 'GET',
    headers: {
      Authorization: 'Bearer [ACCESS_TOKEN]',
    },
  }
);
Step 6: Set and clear user
The NgxTsRiskidService can also be used in the context of other services. A user identifier must be reported to Mosaic after you've fully authenticated the user (including, for example, any required 2FA that was done). This will set the user for all subsequent events in the current device session, or until the app prompts the user to re-login, or until the user is explicitly cleared.
The example below demonstrates setting a user once they authenticated and clearing a user once they log out.
Note
For an alternative approach that directly utilizes our backend API instead, refer to our Backend API implementation guide.
-
identify()sets the user context for all subsequent events for the session (or until the user is explicitly cleared). It should be set only after you've fully authenticated the user (including, for example, any 2FA that was required). Receives an opaque identifier of the user in your system. -
unidentify()clears the user context for all subsequent events. The user gets automatically cleared once the session expires or in case of the a new login action.
import { Injectable } from '@angular/core';
import { NgxTsRiskidService } from '@transmitsecurity/ngx-ts-riskid';

@Injectable()
export class UserSessionService {

  constructor(private riskService: NgxTsRiskidService) {}

  async onSessionEstablished(userIdentifier: UUID) {
    await this.riskService.identify(userIdentifier);
    // Business logic here
  }

  // Logout or expire
  async onSessionRevoked() {
    // Business logic here
    this.riskService.unidentify();
    const actionResponse = await this.riskService.triggerAction(NgxTsRiskidService.ACTION_TYPES.LOGOUT);
    const actionToken = actionResponse.actionToken;
    // Add code here to send the received actionToken to your backend
  }
}