Login with passwords
Mosaic supports authenticating users with a username (or email) and password, which allows migrating customers from passwords to a passwordless solution. For example, you can provide your customers with a temporary password to use for their first login to Mosaic. They can then set their own password to use for subsequent logins. You can allow them to reset a forgotten password via email or SMS flows, or to change their password upon expiration or whenever needed.

Step 1: Create redirect URI
Create the redirect endpoint that will receive an authorization code when users login with their username and password. This code will later be exchanged for an ID and access token. The redirect URI should accept code as a query parameter. For example, if https://domain.com/verify is your redirect URI, then Mosaic will redirect to https://domain.com/verify?code=123abc.
Step 2: Add redirect URI to app
Add the redirect URI (e.g., https://domain.com/verify) as an allowed redirect URI for your Mosaic application. This will also be the redirect_uri that you'll need to pass in the login request.
From the Admin Portal under Applications, click on your application to edit your application settings and add this URI under Redirect URIs. If you don't already have an application, create a new application.
Step 3: Register password
Before users can login with passwords, they'll need to register their first password. You can allow the user to choose their first password, or set a temporary password that the user will need to update the first time they login. Password credentials consist of the password and a user identifier that can be either their username, email, phone number, or user ID.
A user's first password can be set in several ways:
The request below sets a password for an existing user. In this example, the user sets both the username and password (hence not temporary). If successful, the password credentials are set for the user and a 201 response is returned.
Note
- A custom username isn't required since users can be identified by email, phone, or user ID instead.
-
If username is set, it will be set as their
username(an app-level attribute) in their user profile and must be unique per application. The username is not associated with the email or phone number attributes, which are tenant-level. You can search users by username via API .
import fetch from 'node-fetch';

async function run() {
  const userId = 'YOUR_user_id_PARAMETER';
  const resp = await fetch(
    `https://api.transmitsecurity.io/cis/v1/users/[USER_ID]/password`, // User ID of the existing user
    {
      method: 'POST',
      headers: {
        'Content-Type': 'application/json',
        Authorization: 'Bearer [CLIENT_ACCESS_TOKEN]' // Token generated using Client ID and Secret of the app
      },
      body: JSON.stringify({
        password: '[PASSWORD]', // Password chosen by the user
        force_replace: false,  // Indicates that the password isn't temporary
        username: '[USERNAME]', // Username chosen by the user (if username is set at all)
      })
    }
  );

  const data = await resp.json();
  console.log(data);
}

run();
Step 4: Authenticate user
When users enter their username and password, they should be validated by sending a login request like the one below. The redirect_uri is the one added in Step 2, and the client_id can be found in the application settings.
curl -i -X POST \
  https://api.transmitsecurity.io/cis/v1/auth/password/login \
  -H 'Content-Type: application/json' \
  -d '{
    "username": "user@email.com",
    "password": "ABC123",
    "client_id": "c35ab2a.xVShlOVGsUMh3Cqk73K1O.transmit",
    "redirect_uri": "https://domain.com/verify"
}'
If the provided credentials are valid, one of the following responses will be returned:
-
A
200response that contains a URL (result.url) like below. Your client should send a GET request to this URL. This will redirect the browser to your redirect URI with the code that you'll exchange for user tokens in Step 5 .
{
   "result": {
     "url": "https://api.transmitsecurity.io/cis/oidc/auth?client_id..."
   }
}-
A
403response that contains a reset token (reset_token) like below. When this occurs (e.g., when a password expires or they attempted to log in with their initial password), users must update their password using Step 7 .
{
    "reset_token": "eyJhbGciOiJIUzI1NiIsI...VDyvwfO11Lw",
    "message": "temporary_password",
    "error_code": 403
}
Step 5: Get user tokens
The URL returned upon successful authentication in Step 4 or reset in Step 7 redirects the browser to your redirect URI with a code query parameter. Exchange this code for ID and access tokens by sending a /oidc/token request like the one below. Replace placeholders with the code you received earlier, your redirect URI, and your client credentials that can be found in your application settings from the Mosaic Admin Portal.
curl -i -X POST \
  https://api.transmitsecurity.io/oidc/token \
  -H 'Content-Type: application/x-www-form-urlencoded' \
  -d client_id=CLIENT_ID \
  -d client_secret=CLIENT_SECRET \
  -d code=CODE \
  -d grant_type=authorization_code \
  -d redirect_uri=REDIRECT_URI
Step 6: Start password reset
Users might need to change their password, such as when a password expires or is forgotten. To start any password reset flow, the user must authenticate to obtain a reset token, which will be used to reset the password in Step 7.
A password reset flow can be initiated in several ways:
- By logging in using an expired or temporary password
- By sending an email magic link
- By sending an email OTP
- By sending an SMS OTP
- By providing the current password
Note
The user must have a verified phone number for an SMS reset flow and a verified email for an email-based reset flows. For example, you can verify their phone number via SMS OTP and their email via email magic link or email OTP.
The example below shows a request used to start a reset flow by sending an email magic link. The email will be sent to the verified email address of the user (corresponding to the email.value field in the user's profile). When the user clicks the email link, the redirect_uri will receive the reset token as the code query param. The reset token is used to reset the password, as described in Step 7. For examples of additional reset flows, see Next Steps.
curl -i -X POST \
https://api.transmitsecurity.io/cis/v1/auth/password/reset/email/link \
-H 'Authorization: Bearer 91827321837bdfjf' \
-H 'Content-Type: application/json' \
-d '{
    "username": "user@email.com",
    "redirect_uri": "https://domain.com/update-password"
}'
Step 7: Reset password
After user enters a new password and you've obtained a reset token, send a reset request like the one below. Pass the reset_token received in Step 4 or Step 6 and the new password.
Optionally, you can also pass a redirect URI (redirect_uri) to login the user after successfully updating the password (see Step 5). If the URI isn't provided, the response will simply indicate whether the reset succeeded or failed.
curl --request POST \
     --url https://api.transmitsecurity.io/cis/v1/auth/password/reset \
     --header 'Content-Type: application/json' \
     --data '
{
    "reset_token": "eyJhbGciOiJIUzI1NiIsInR5cCI6...fO11Lw",
    "new_password": "EFG468!abc",
    "redirect_uri": "https://domain.com/verify"
}
'
Next steps
Once you've completed a basic integration, here are some customizations and additional options to consider:
- Fine-tune password settings
- Email customization
- Start reset via SMS OTP
- Start reset via email OTP
- Change passwords
Fine-tune password settings
Various password settings are available from the Admin Portal and via API. From the Authentication > Authentication methods > Passwords page of the Admin Portal, you can configure the following:
- Complexity : configure the strength of your password policy by selecting its length and other requirements including uppercase and lowercase letters, special characters, numbers, and more.
- Expiration time : set the password expiration period in days.
- Reuse of recent passwords : enable/disable the reuse of recent passwords
- Failed attempts lockout policy : set the number of failed login attempts that trigger a temporary user lockout and specify the lockout duration in minutes.
- Reset policy : set the reset link expiration period in minutes, the length of the reset OTP.
- Temporary password : set the validity period for temporary passwords in hours.
Email customization
Mosaic allows you to customize reset email look&feel, including the sender address, the email subject, and its color schema. This can be done in one of the following ways:
Admin Portal
You can customize the color of the button that appears in the message from the Admin Portal (Authentication > Authentication methods > Passwords). The email message will use the application's logo and name.
Admin API
You can customize the email subject and sender address in addition to color by sending a PUT request to Login Preferences API with the updated message object. Fetch the auth method configuration before sending a PUT request since you'll need to specify the entire password configuration along the message object.
Passwords API
You can customize the reset email look & feel at the moment of sending by specifying the email_content object within the Start reset by email link request (email magic link flow) or Start reset by email OTP request (email OTP flow). For example, this modifies the reset email in the email magic flow:
Note
If you pass the email_content object, all the email branding will be taken from there and the default template won't be used at all. This means that if a field is not specified, it will be treated as empty.
import fetch from 'node-fetch';
async function run() {
const resp = await fetch(
`https://api.transmitsecurity.io/cis/v1/auth/password/reset/email/link`,
{
method: 'POST',
headers: {
'Content-Type': 'application/json',
Authorization: 'Bearer [CLIENT_ACCESS_TOKEN]' // Token generated using Client ID and Secret of the app
},
body: JSON.stringify({
username: '[USERNAME]', // Username chosen by the user; 'email' can be used instead
redirect_uri: '[REDIRECT_URI]', // URI to send the code to
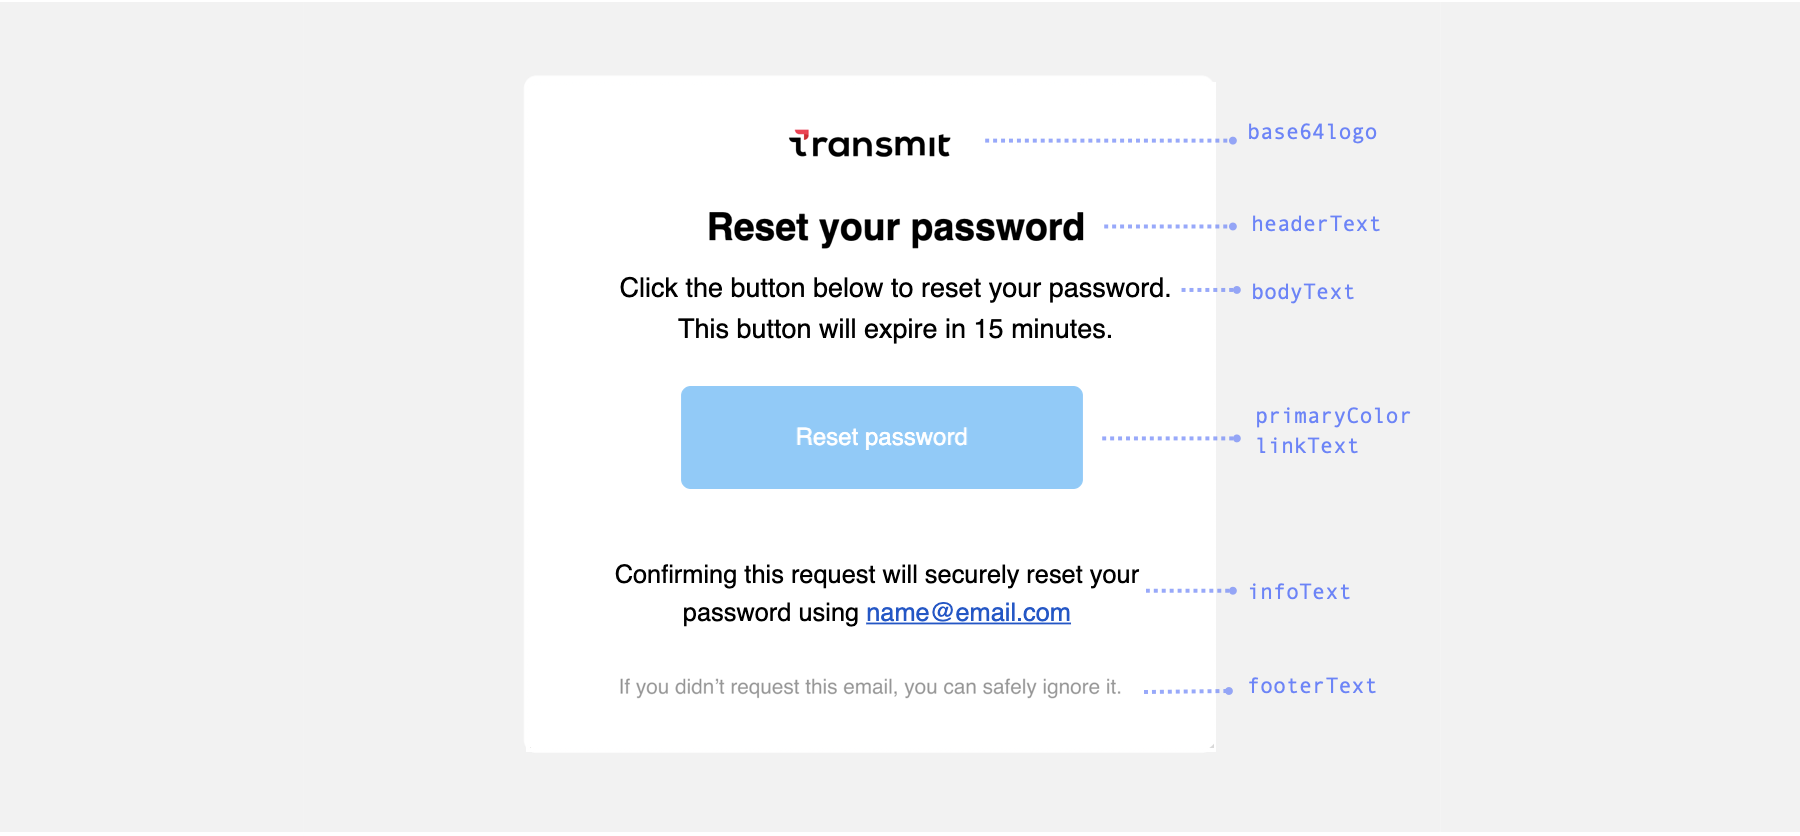
email_content: {
subject: 'Reset your password',
primaryColor: '#83cbfc',
base64logo: 'data:image/png;base64,iVBORw0KGgoAA...XEzGmCC',
headerText: 'Reset your password',
bodyText: 'Click the button below to reset your password. This button will expire in 15 minutes.',
linkText: 'Reset password',
infoText: 'Confirming this request will securely reset your password using ',
footerText: 'If you didn\'t request this email, you can safely ignore it.'
}
})
}
);
const data = await resp.json();
console.log(data);
}
run();Here is a screenshot of the email template with customizable field names:
Start reset via email OTP
You can initiate a password reset flow using an email OTP. The user must have a verified email.
- Send a start reset request like the one below to send an SMS OTP to the specified user:
import fetch from 'node-fetch';

async function run() {
  const resp = await fetch(
    `https://api.transmitsecurity.io/cis/v1/auth/password/reset/email/otp`,
    {
      method: 'POST',
      headers: {
        'Content-Type': 'application/json',
        Authorization: 'Bearer [CLIENT_ACCESS_TOKEN]' // Token generated using Client ID and Secret of the app
      },
      body: JSON.stringify({
        email: '[USER_EMAIL]' // The email to send OTP to
      })
    }
  );

  const data = await resp.json();
  console.log(data);
}

run();-
After the user enters the OTP, send a
validation request
like the one below. The response includes a
resultparameter containing the reset token for the password reset request (see Step 7 ).
import fetch from 'node-fetch';

async function run() {
  const resp = await fetch(
    `https://api.transmitsecurity.io/cis/v1/auth/password/reset/email/otp/validate`,
    {
      method: 'POST',
      headers: {
        'Content-Type': 'application/json',
        Authorization: 'Bearer [CLIENT_ACCESS_TOKEN]' // Token generated using Client ID and Secret of the app'
      },
      body: JSON.stringify({
        email: '[USER_EMAIL]', // User's email where the OTP was sent
        passcode: '[PASSCODE]' // The code received in reset email
      })
    }
  );

  const data = await resp.json();
  console.log(data);
}

run();
Start reset via SMS OTP
You can initiate a password reset flow using an SMS OTP. The user must have a verified phone number.
-
Send a
start reset request
like the one below to send an SMS OTP to the specified user:
curl -i -X POST \ https://api.transmitsecurity.io/cis/v1/auth/password/reset/sms/otp \ -H 'Authorization: Bearer 91827321837bdfjf' \ -H 'Content-Type: application/json' \ -d '{ "phone_number": "+972111111111" }' -
After the user enters the OTP, send a
validation request
like the one below. The response includes a
resultparameter containing the reset token for the password reset request (see Step 7 ).curl -i -X POST \ https://api.transmitsecurity.io/cis/v1/auth/password/reset/sms/otp/validate \ -H 'Authorization: Bearer 91827321837bdfjf' \ -H 'Content-Type: application/json' \ -d '{ "phone_number": "+972111111111", "passcode": "725927" }'
Change current password
A user can change their password as needed. Send a start reset request like the one below, with the client_id, username, and current password (password). The response includes a result parameter containing the reset token for the password reset request (see Step 7).
curl -i -X POST \
https://api.transmitsecurity.io/cis/v1/auth/password/reset/password/validate \
-H 'Authorization: Bearer 91827321837bdfjf' \
-H 'Content-Type: application/json' \
-d '{
    "username": "user",
    "password": "current_password",
    "client_id": "c35ab2a.xVShlOVGsUMh3Cqk73K1O.transmit"
}'