Login with email magic links
Magic links can be sent to users by email in order to authenticate existing users.

Note
This implements a backend-to-backend integration for authentication. See Backend Authentication APIs.
How it works
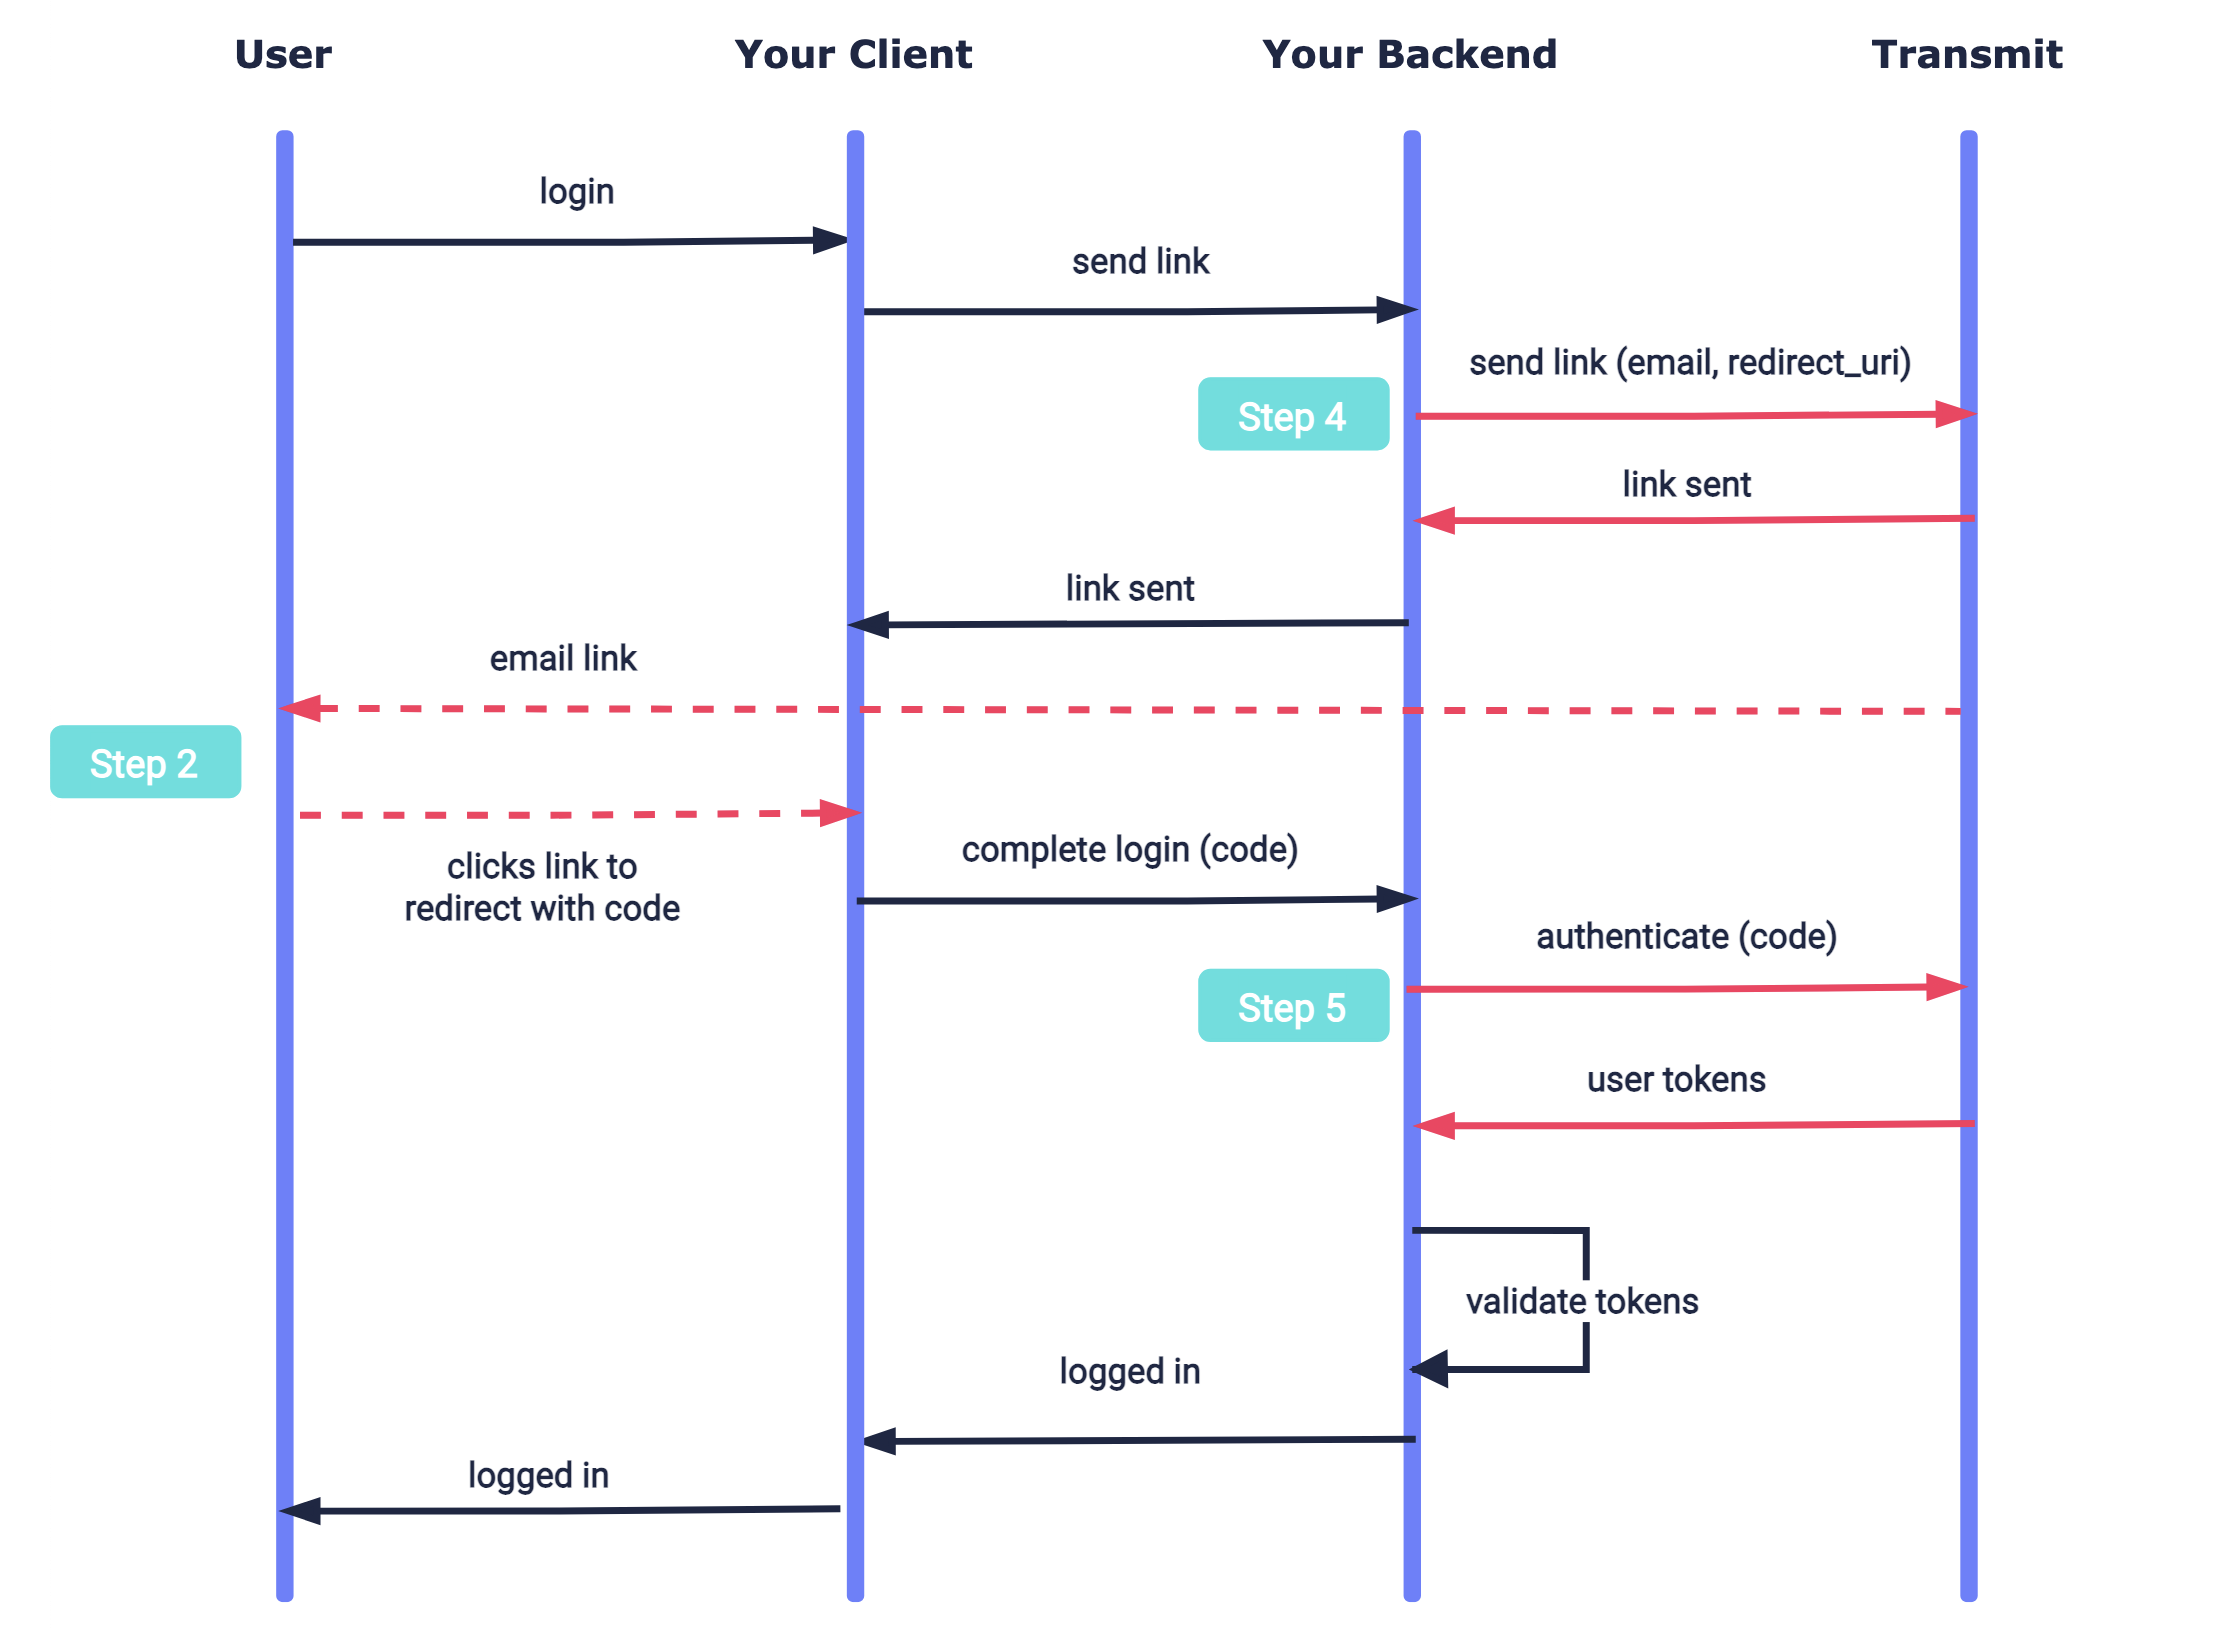
Here's an example of a magic link integration. Mosaic APIs are shown in pink along with the relevant integration step.
Before you start
Before you start your integration, you'll need a Mosaic application with an OIDC client. See create an application.
Step 1: Sign up users
Before you can log in users into your app, they will need to be created in your Mosaic tenant and associated with your app. New users can be created using a POST /users request, which must include the user's email address. If the user already exists in your Mosaic tenant but isn't yet associated with your app, this request will just add the user to your app (but won't update any other details).
Note
- You'll need a valid client access token to authorize the request. See Get client access tokens .
- The user's email address will be marked as verified upon their first email-based authentication.
Step 2: Create redirect URI
Create the client-side redirect endpoint that will receive a code when the user clicks the magic link in their email. The redirect URI should accept code as a query parameter. For example, if https://domain.com/verify is your redirect URI, then Mosaic will redirect to https://domain.com/verify?code=123abc when the user clicks the link. Your endpoint should pass the code it receives to your backend, where it will be used to obtain user tokens, as described in Step 5.
Step 3: Add redirect URI to app
Add the redirect URI (e.g., https://domain.com/verify) as an allowed redirect URI for your Mosaic application. This will also be the redirect_uri that you'll need to pass in the send request. From the Admin Portal under Applications, click on your application to edit client settings and add this URI under Redirect URIs.
Step 4: Send magic links
Use a send request like the one below to send a magic link to the specified email address. The redirect_uri should correspond to the redirect endpoint you created in step 2 and added as a redirect URI in step 3. To customize the email, see Next steps. If the request succeeds, a 200 response is returned.
Note
You'll need a valid client access token to authorize the request. See Get client access tokens.
import fetch from 'node-fetch';

async function run() {
  const resp = await fetch(
    `https://api.transmitsecurity.io/cis/v1/auth/link/email/send`,
    {
      method: 'POST',
      headers: {
        'Content-Type': 'application/json',
        Authorization: 'Bearer [ACCESS_TOKEN]' // Client access token
      },
      body: JSON.stringify({
        email: '[EMAIL]', // User's email address
        redirect_uri: '[REDIRECT_URI]' // URI that receives a code when the link is clicked
      })
    }
  );

  const data = await resp.json();
  console.log(data);
}

run();
Step 5: Authenticate magic links
When the magic link is clicked, your redirect URI receives a code which your client will then pass to your backend so it can be used to obtain user tokens. Create your backend endpoint that will receive this code and then send a magic link auth request like the one below. If successful, a 200 response will be returned with the user tokens, which should be validated as described here.
Note
You'll need a valid client access token to authorize the request. See Get client access tokens.
import fetch from 'node-fetch';

async function run() {
  const resp = await fetch(
    `https://api.transmitsecurity.io/cis/v1/auth/link/email/authenticate`,
    {
      method: 'POST',
      headers: {
        'Content-Type': 'application/json',
        Authorization: 'Bearer [ACCESS_TOKEN]' // Client access token
      },
      body: JSON.stringify({
        code: '[CODE]' // Code returned to your client-side redirect endpoint
      })
    }
  );

  const data = await resp.json();
  console.log(data);
}

run();
Here's an example of a successful response:
{
  "access_token": "string",
  "id_token": "string",
  "refresh_token": "string",
  "token_type": "string",
  "expires_in": 3600,
  "session_id": "string"
}
Next steps
Once you've completed a basic integration, here are some customizations you can consider:
Email customization
The default email template for Login can be customized either from the Admin Portal or via API (but not both). From the Admin Portal (B2C or B2B Identity based on your setup > Authentication methods > Email magic links), you can customize the color of the button and email address that appear in the message. The email message will use the application's logo and name (see screenshots below for default texts). The subject, text and appearance can also be customized using the email_content object in the send request.
Note
If you pass the email_content object, all the email branding will be taken from there and the default template won't be used at all. This means that if a field is not specified, it will be treated as empty.
Here is a screenshot of the email templates with their customizable field names:

Link settings
From the Admin Portal (B2C or B2B Identity based on your setup > Authentication methods > Email magic links), you can customize settings for the selected app:
- Expiry time in minutes for the link sent in the email
- Email sender name ("from" name)
If needed, this expiration time can be overwritten for a specific request using the expiration_time parameter.
Custom email provider
In the Admin Portal (from Settings > Email Provider), you can configure to use your custom email provider (e.g., SMTP or SendGrid) instead of the Mosaic default.
Security considerations
To secure your magic link implementation, here are some recommendations.
Guidelines
-
To prevent phishing attacks, ensure that the login is initiated and completed from the same device. Validate that the user agent that requested the link matches the one that redirects to your URI when it's clicked. Use the
stateparameter in the send request so you can associate it with the callback. - Verify the user's email address upon sign up. For example, perform a magic link authentication as part of the onboarding flow (after creating the user in Transmit).
- To prevent credential harvesting, your backend shouldn't indicate to the client if the user wasn't found.