Login with passwords
Mosaic supports password authentication, which allows migrating customers to a passwordless solution.

Note
This implements a backend-to-backend integration for authentication. See Backend Authentication APIs
How it works
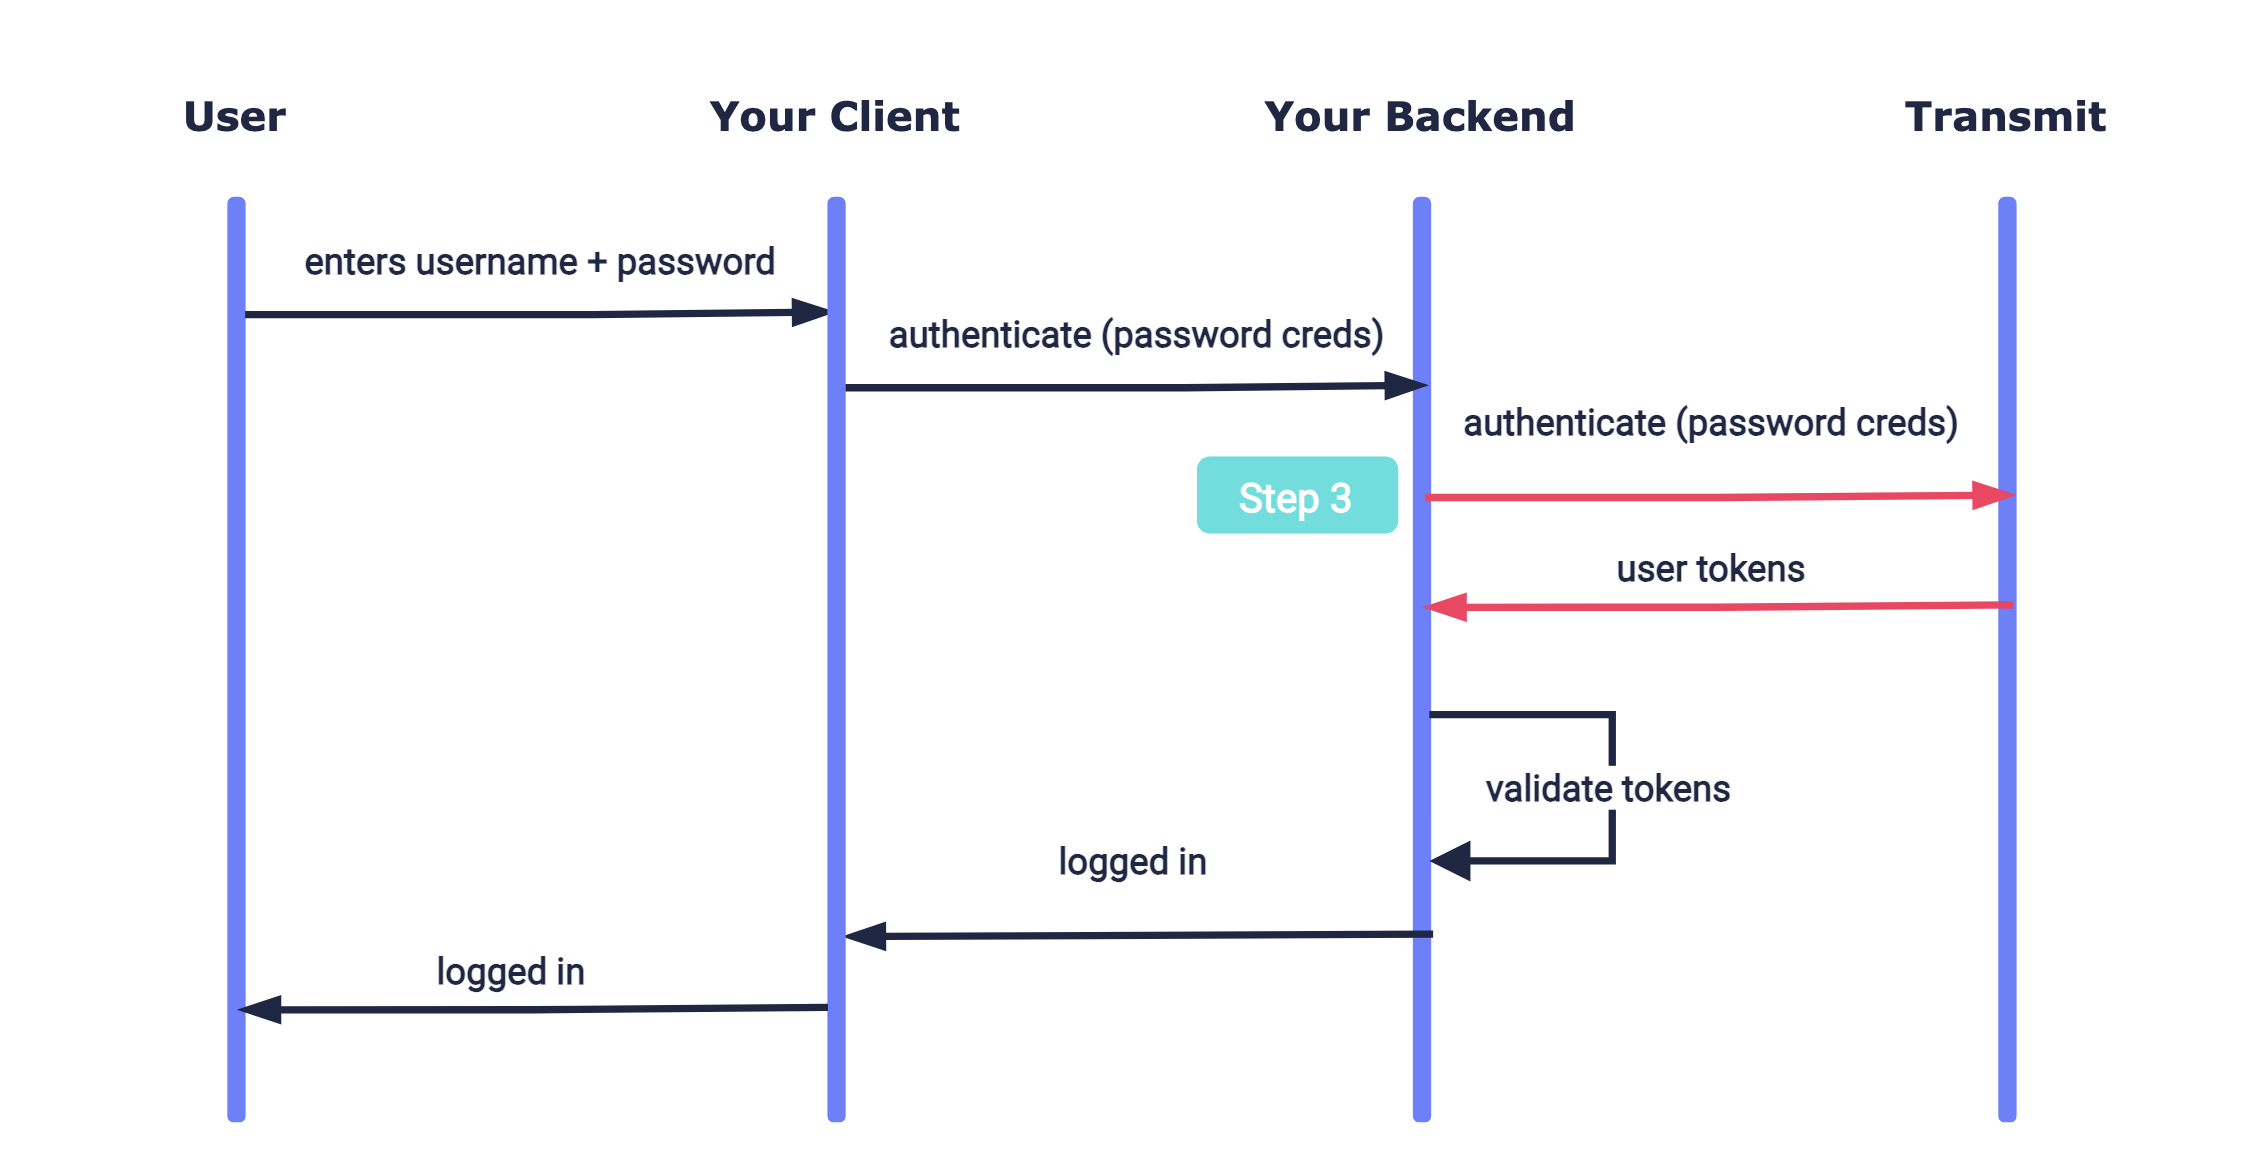
Here's an example of a password integration. Mosaic APIs are shown in pink along with the relevant integration step.
Before you start
Before you start your integration, you'll need a Mosaic application. See create an application
Note
When creating an application, Redirect URIs is a required field. This flow doesn't use a redirect URI so you can simply add your website URL (e.g., https://your-domain.com)
Step 1: Sign up users
Before you can login users into your app, they will need to be created in your Mosaic tenant and associated with your app. New users can be created using a POST /users request. If the user already exists in your Mosaic tenant but isn't yet associated with your app, this request will just add the user to your app (but won't update any other details).
Note
You'll need a valid client access token to authorize the request. See Get client access tokens
Step 2: Register passwords
Before users can login with passwords, they'll need to register their first password. You can allow the user to choose their first password, or set a temporary password that the user will need to update the first time they login. Password credentials consist of the password and a user identifier that can be either be their username, email, phone number, or user ID.
A user's first password can be set in several ways:
The request below sets a password for an existing user. In this example, the user sets both the username and password (hence not temporary). If successful, the password credentials are set for the user and a 201 response is returned.
Note
- A custom username isn't required since users can be identified by email, phone, or user ID instead.
-
If username is set, it will be set as their
username(an app-level attribute) in their user profile and must be unique per application. The username is not associated with the email or phone number attributes, which are tenant-level. You can search users by username via API .
import fetch from 'node-fetch';

async function run() {
  const userId = 'YOUR_user_id_PARAMETER';
  const resp = await fetch(
    `https://api.transmitsecurity.io/cis/v1/users/[USER_ID]/password`, // User ID of the existing user
    {
      method: 'POST',
      headers: {
        'Content-Type': 'application/json',
        Authorization: 'Bearer [ACCESS_TOKEN]' // Client access token
      },
      body: JSON.stringify({
        password: '[PASSWORD]', // Password chosen by the user
        force_replace: false,  // Indicates that the password isn't temporary
        username: '[USERNAME]', // Username chosen by the user (if username is set at all)
      })
    }
  );

  const data = await resp.json();
  console.log(data);
}

run();
Step 3: Authenticate user
When a user enters their password credentials, they should be validated by sending a backend authentication request like the one below. The username provided by the user may correspond to any of the following user identifiers (if set for the Mosaic user): username, email, phone number, or user ID. If successful, a 200 response will be returned with the user tokens, which should be validated as described here.
Note
You'll need a valid client access token to authorize the request. See Get client access tokens
import fetch from 'node-fetch';

async function run() {
  const resp = await fetch(
    `https://api.transmitsecurity.io/cis/v1/auth/password/authenticate`,
    {
      method: 'POST',
      headers: {
        'Content-Type': 'application/json',
        Authorization: 'Bearer [ACCESS_TOKEN]' // Client access token generated
      },
      body: JSON.stringify({
        username: '[USER_IDENTIFIER]', // User's username, user ID, email, or phone number
        password: '[PASSWORD]', // Password provided by the user
        username_type: '[USER_IDENTIFIER_TYPE]' // Type of user identifier in "username" field
      })
    }
  );

  const data = await resp.json();
  console.log(data);
}

run();
Here's an example of a successful response:
{
  "access_token": "string",
  "id_token": "string",
  "refresh_token": "string",
  "token_type": "string",
  "expires_in": 3600,
  "session_id": "string"
}
Step 4: Reset passwords
If a user forgets their password or their password expires, they'll need to set a new one. Before allowing the user to set a new password, the user should be authenticated to check that it's really them. For example, you can authenticate the user using email magic link, email OTP, SMS OTP, their current password (if they haven't forgotten it), or an external login method. Once the user is authenticated, you can use an update request like the one below to set their new password. If successful, their password will be updated and a 200 response will be returned.
Note
You'll need a valid client access token to authorize the request. See Get client access tokens
In the example below, the password is chosen by the user and set a non-temporary password so they won't need to update it after their first login.
import fetch from 'node-fetch';

async function run() {
  const userId = '[USER_ID]'; // User ID of the user
  const resp = await fetch(
    `https://api.transmitsecurity.io/cis/v1/users/[USER_ID]/password`, // User ID of the user
    {
      method: 'PUT',
      headers: {
        'Content-Type': 'application/json',
        Authorization: 'Bearer [ACCESS_TOKEN]' // Client access token
      },
      body: JSON.stringify({
        password: '[PASSWORD]', // New password chosen by the user
        force_replace: false // Indicates that the password isn't temporary
      })
    }
  );

  const data = await resp.json();
  console.log(data);
}

run();
Next steps
Once you've completed a basic integration, here are some customizations and additional options to consider:
Password settings
Various password settings are available from the Admin Portal and via API. From the Authentication > Authentication methods > Passwords page of the Admin Portal, you can configure the following:
- Complexity : configure the strength of your password policy by selecting its length and other requirements including uppercase and lowercase letters, special characters, numbers, and more.
- Expiration time : set the password expiration period in days.
- Reuse of recent passwords : enable/disable the reuse of recent passwords
- Failed attempts lockout policy : set the number of failed login attempts that trigger a temporary user lockout and specify the lockout duration in minutes.
- Reset policy : set the reset link expiration period in minutes, the length of the reset OTP.
- Temporary password : set the validity period for temporary passwords in hours.
With Login Preferences API, you can customize the same password settings. Additionally, you can change the appearance of the Reset password email by specifying a sender and subject, and choosing a custom color to apply to buttons.
Security considerations
To secure your password implementation, here are some recommendations.
Guidelines
- Implement secure account recovery flows to allow users to reset their password in case they forget it. The user should be authenticated before allowing them to update their password.
- To prevent credential harvesting, your backend shouldn't indicate to the client if the user wasn't found.