You can build WebAuthn-based login flows that involve multiple devices using Mosaic Platform SDK. This lets you provide a secure passwordless experience across all channels and devices. For example, suppose a user wants to log in to your website from a desktop device that doesn't support WebAuthn or doesn't belong to them. So the desktop presents a QR code that the user scans using their mobile device to initiate an authentication process in their mobile browser instead.

Get started with WebAuthn APIs using our Platform SDK. This describes how to quickly integrate WebAuthn registration and authentication into your application.
This flow represents a cross-device login scenario where the user wants to log in for one device, but authenticates using another. For example, the user can log in from a desktop device and use a mobile device to authenticate. In this case, the authenticating device isn't yet registered for this user so a WebAuthn registration is performed. Mosaic APIs are shown in pink along with the relevant integration steps.
This flow assumes that you've collected and verified the username before initiating registration. The username should be a representation of the user in your system, such as their email, phone number, or another verifiable username known to the user (like account ID).
The cross-device registration flow consists of the following parts:
After initializing the Web SDK, a cross-device ticket should be created to create a session with the relevant context of the user. 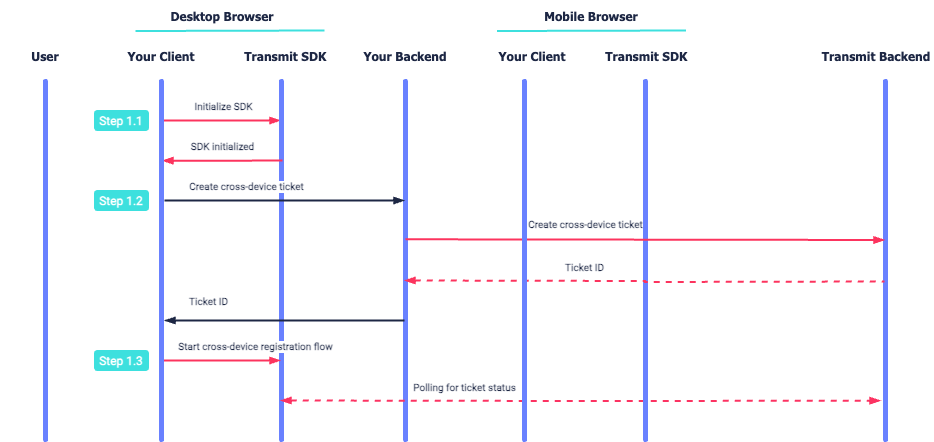
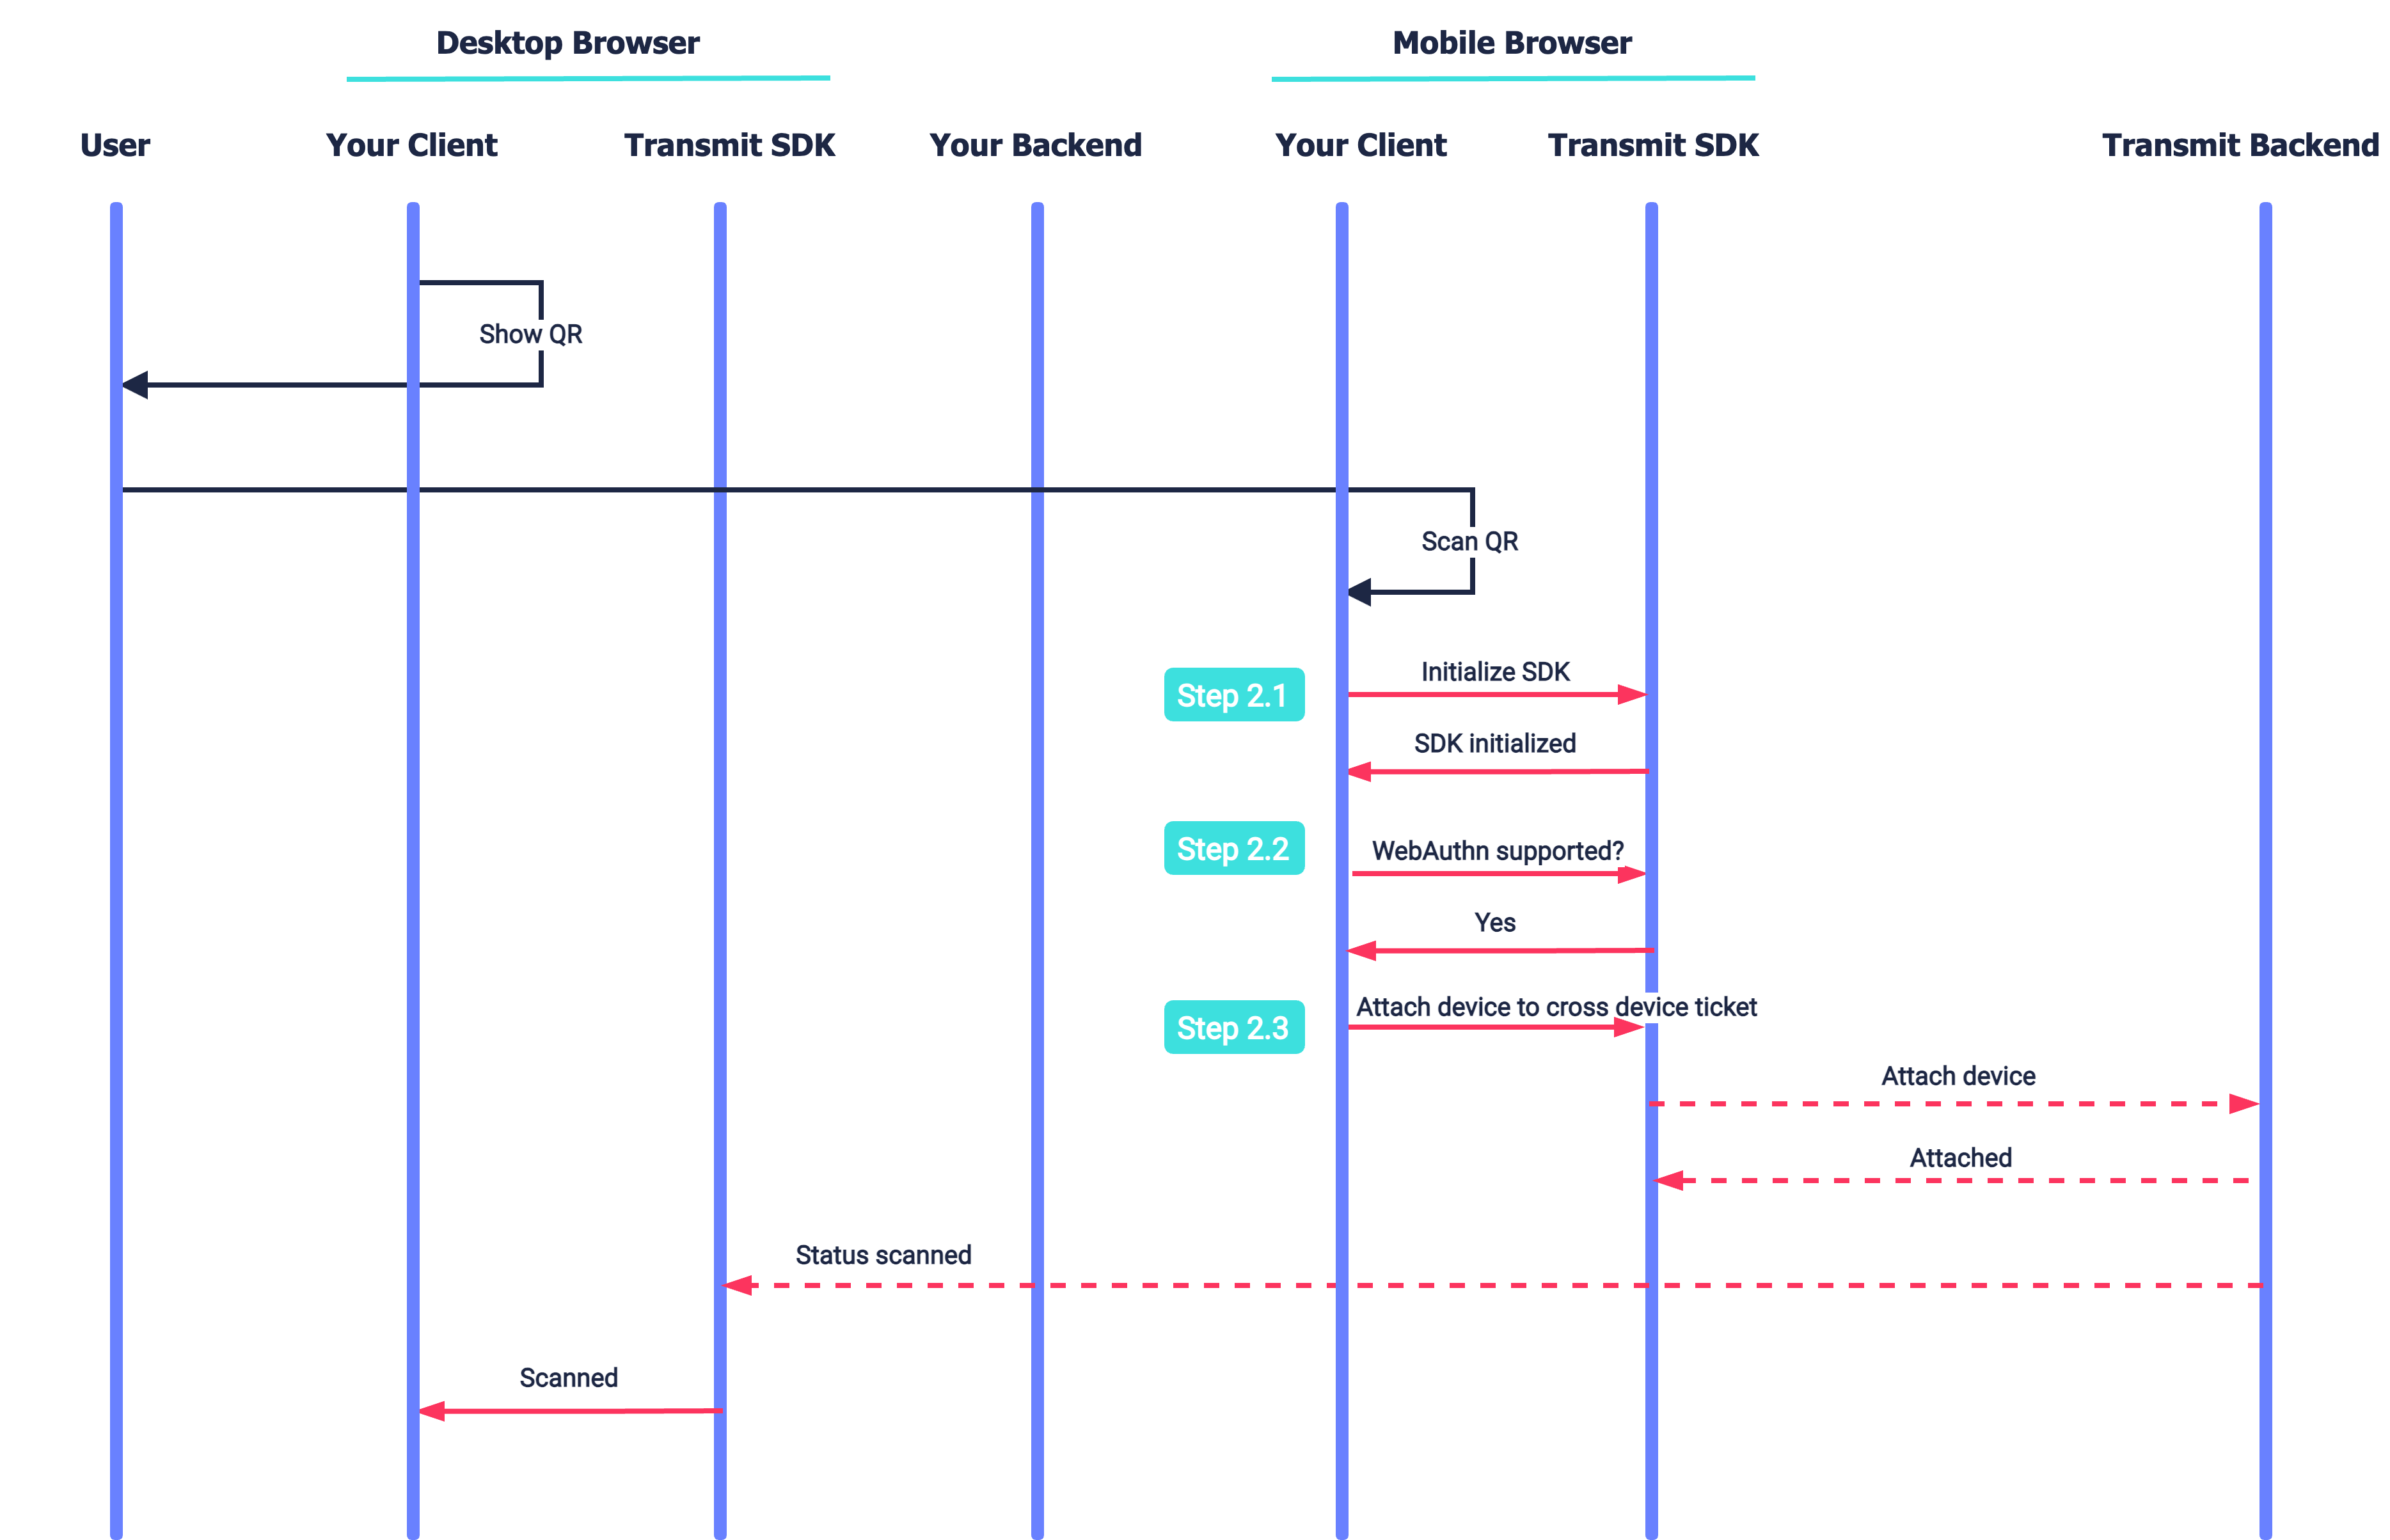
The client initiates a cross-device flow to create a session context and register relevant event handlers to respond to events occurring on the auth device. The access device delegates authentication to the auth device (e.g., by displaying a QR code that encodes the session ID). Once the auth device is invoked (e.g., by scanning the QR), the SDK is initialized. If the device isn't registered, the client validates that the device supports WebAuthn and then attaches the device to the session. The access device is notified that the device is attached.
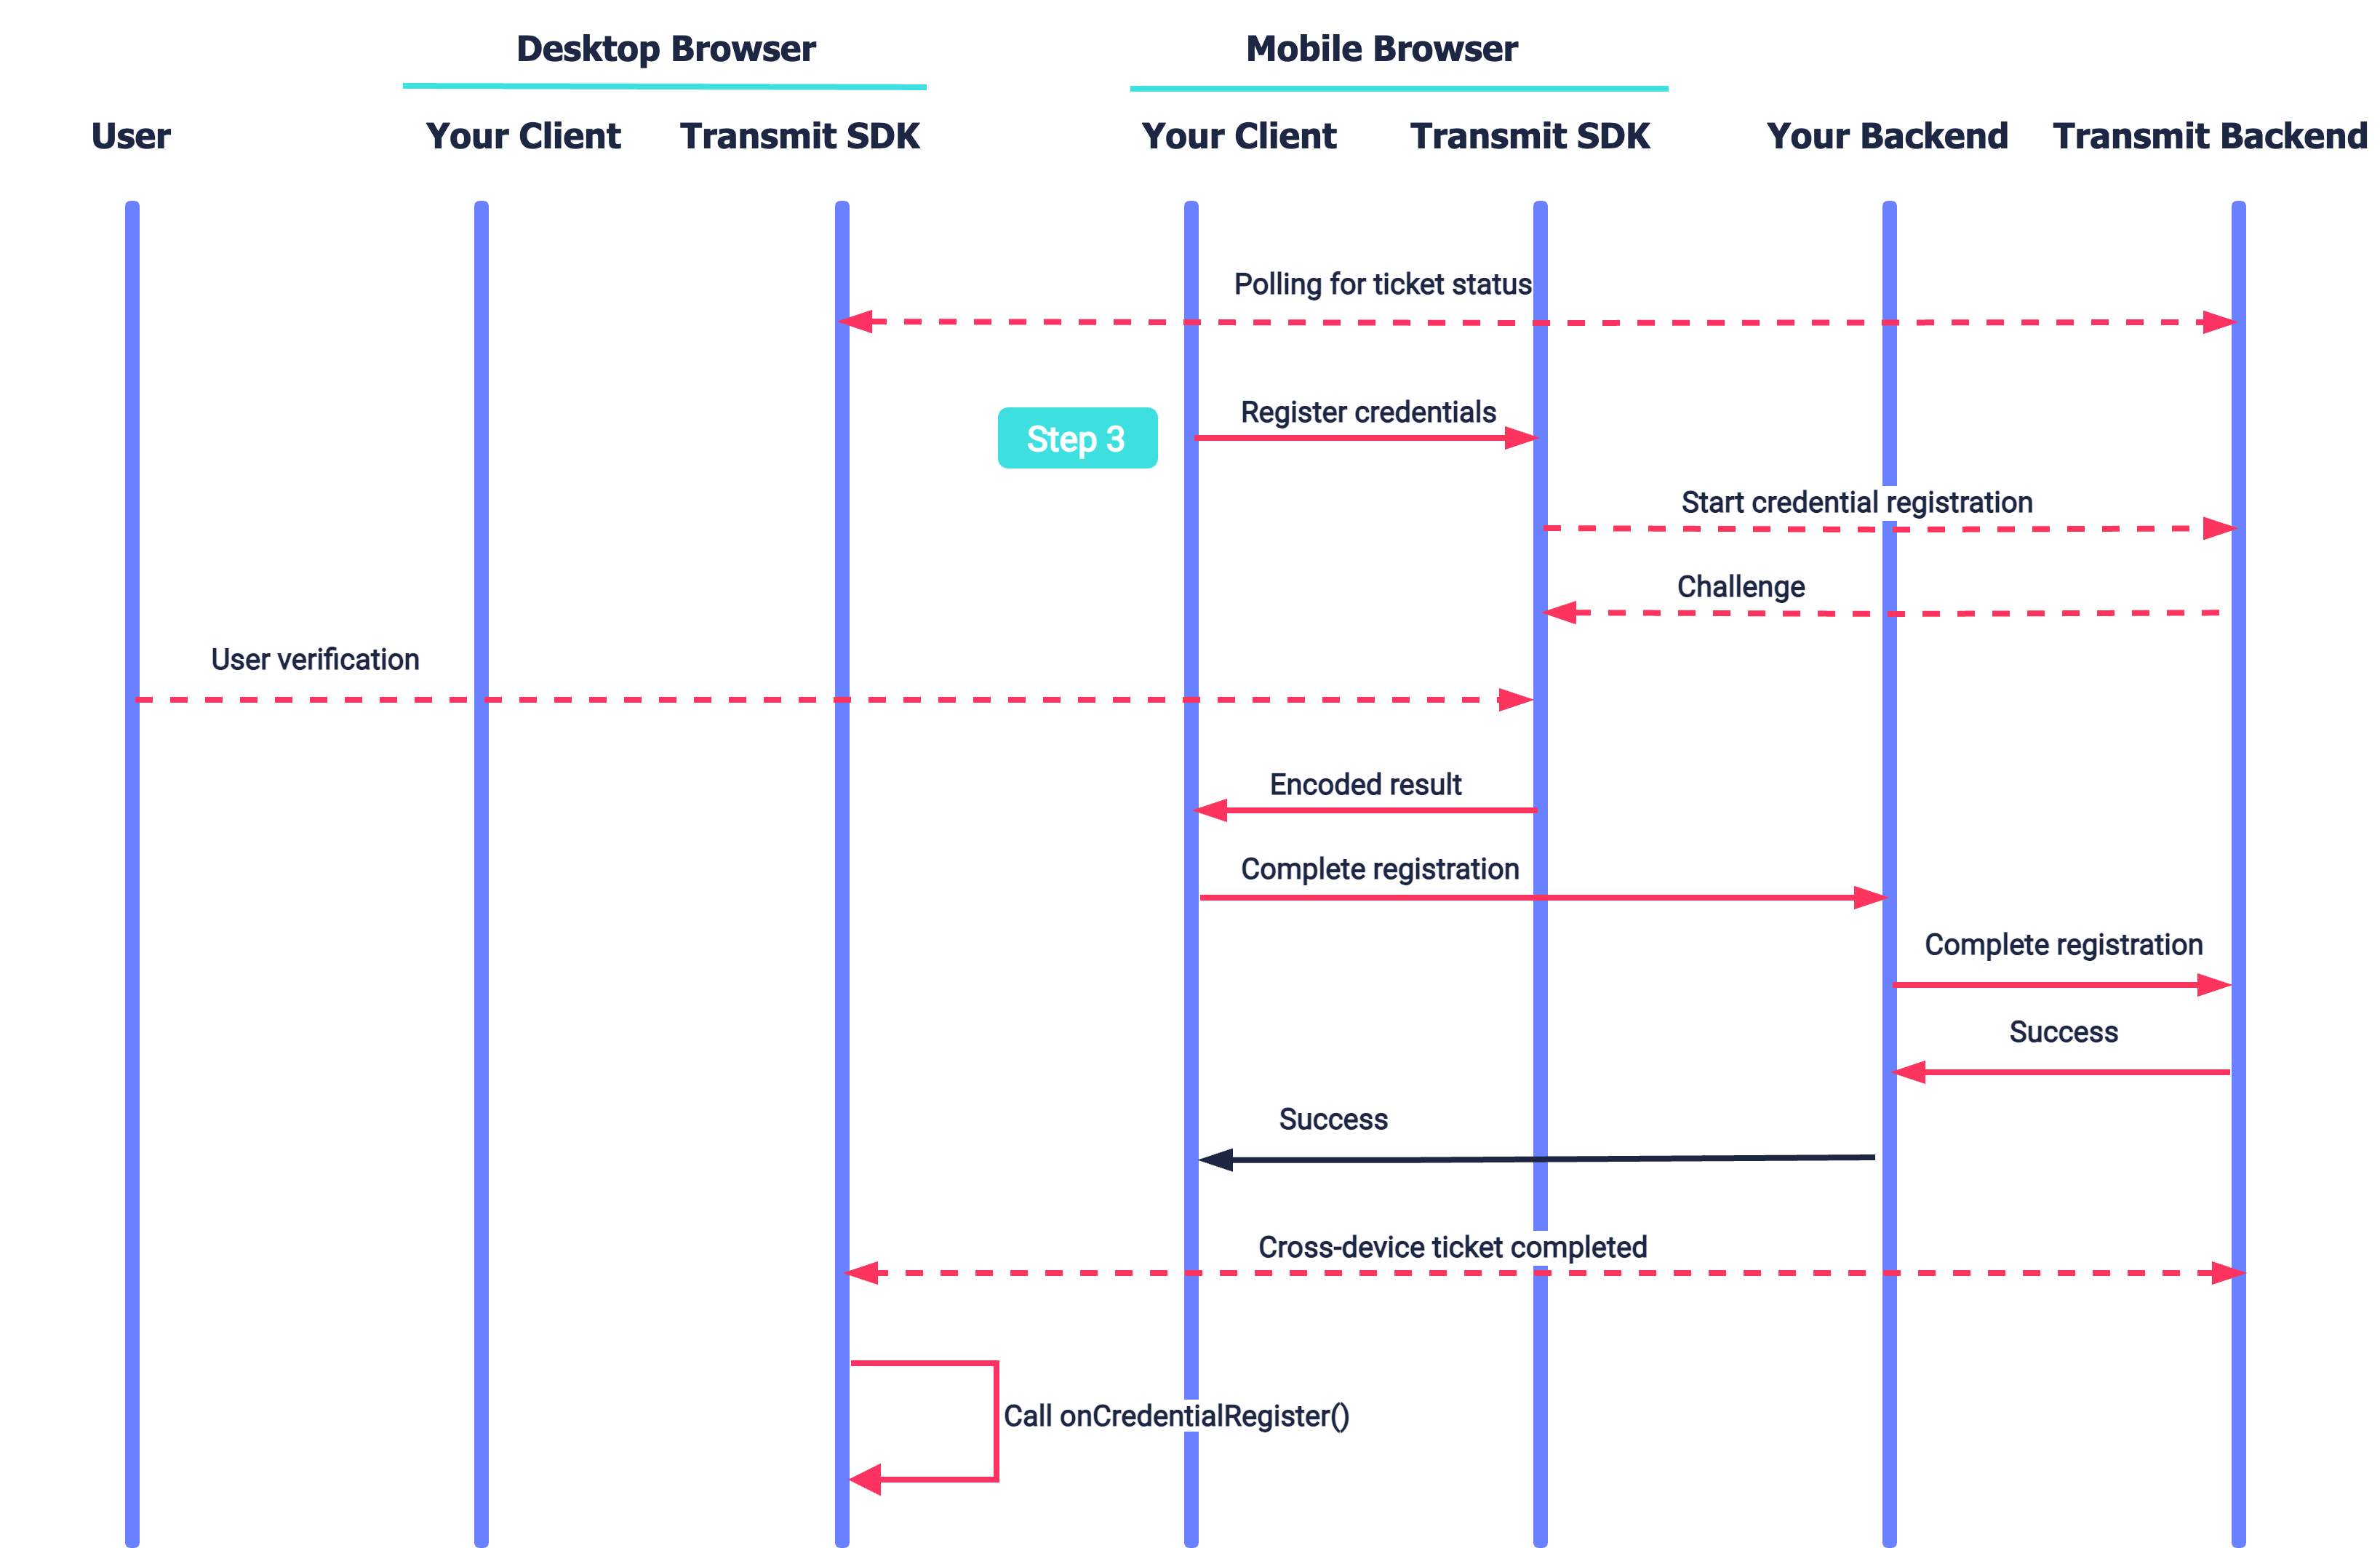
The SDK prepares for registration by fetching the challenge from the Mosaic Server. Once the user is ready to register their device, the SDK tells the browser to create credentials, which requires the user to verify (e.g., via TouchID). Once completed, the SDK will invoke the onCredentialRegister handler.
This flow represents a cross-device login scenario where the user wants to log in to one device, but authenticates using another. For example, the user can log in from a desktop device and use a mobile device to authenticate. In this case, the authenticating device was previously registered for this user so a WebAuthn authentication is performed. Mosaic APIs are shown in pink along with the relevant integration steps.
The cross-device authentication flow consists of the following parts:
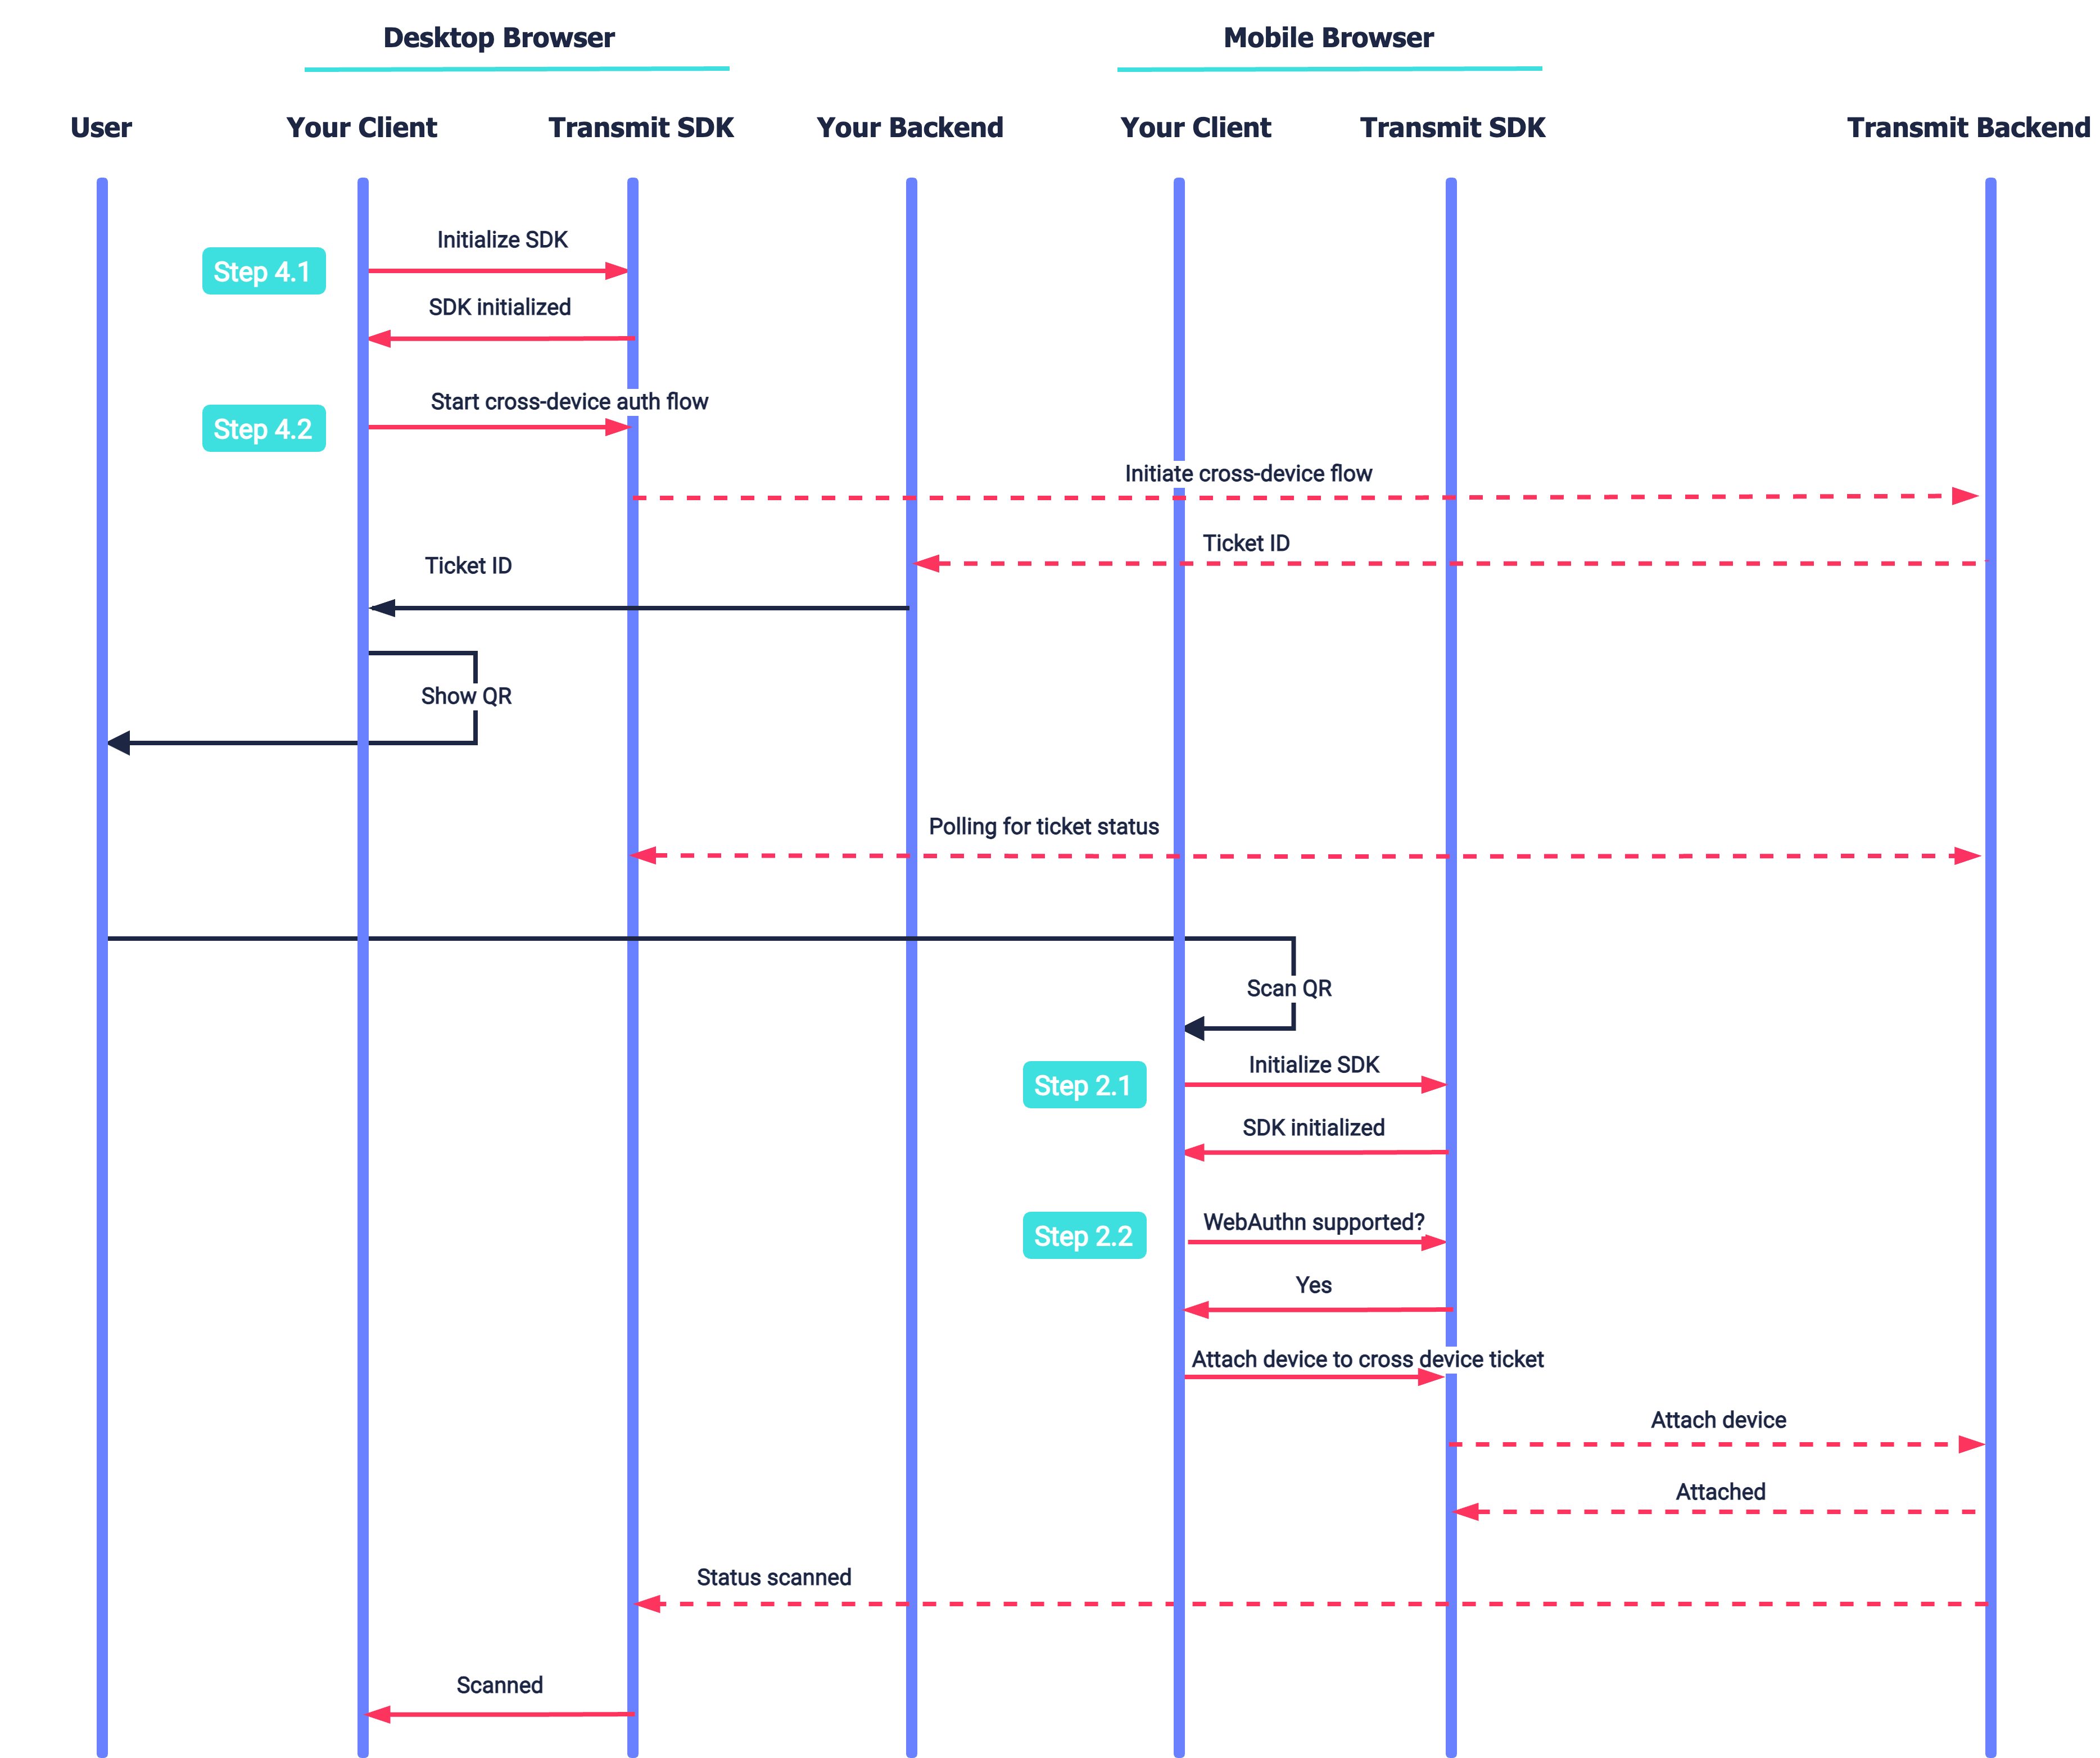
After initializing the SDK, the client initiates a cross-device flow to create a session context and register relevant event handlers to respond to events occurring on the auth device. The access device delegates authentication to the auth device (e.g., by displayed a QR code that encodes the session ID). Once the auth device is invoked (e.g., by scanning the QR), the SDK is initialized. If the device isn't registered, the client validates that the device supports WebAuthn and then attaches the device to the session. The access device is notified that the device is attached.
The SDK prepares for authentication by fetching the challenge from the Mosaic Server and storing it locally. Once the user is ready to authenticate, the SDK tells the browser to prompt for credentials, which will require the user to verify (e.g., via TouchID). Once completed, a session ID is returned to the client. The access device receives the session ID and invokes the onCredentialAuthenticate handler. 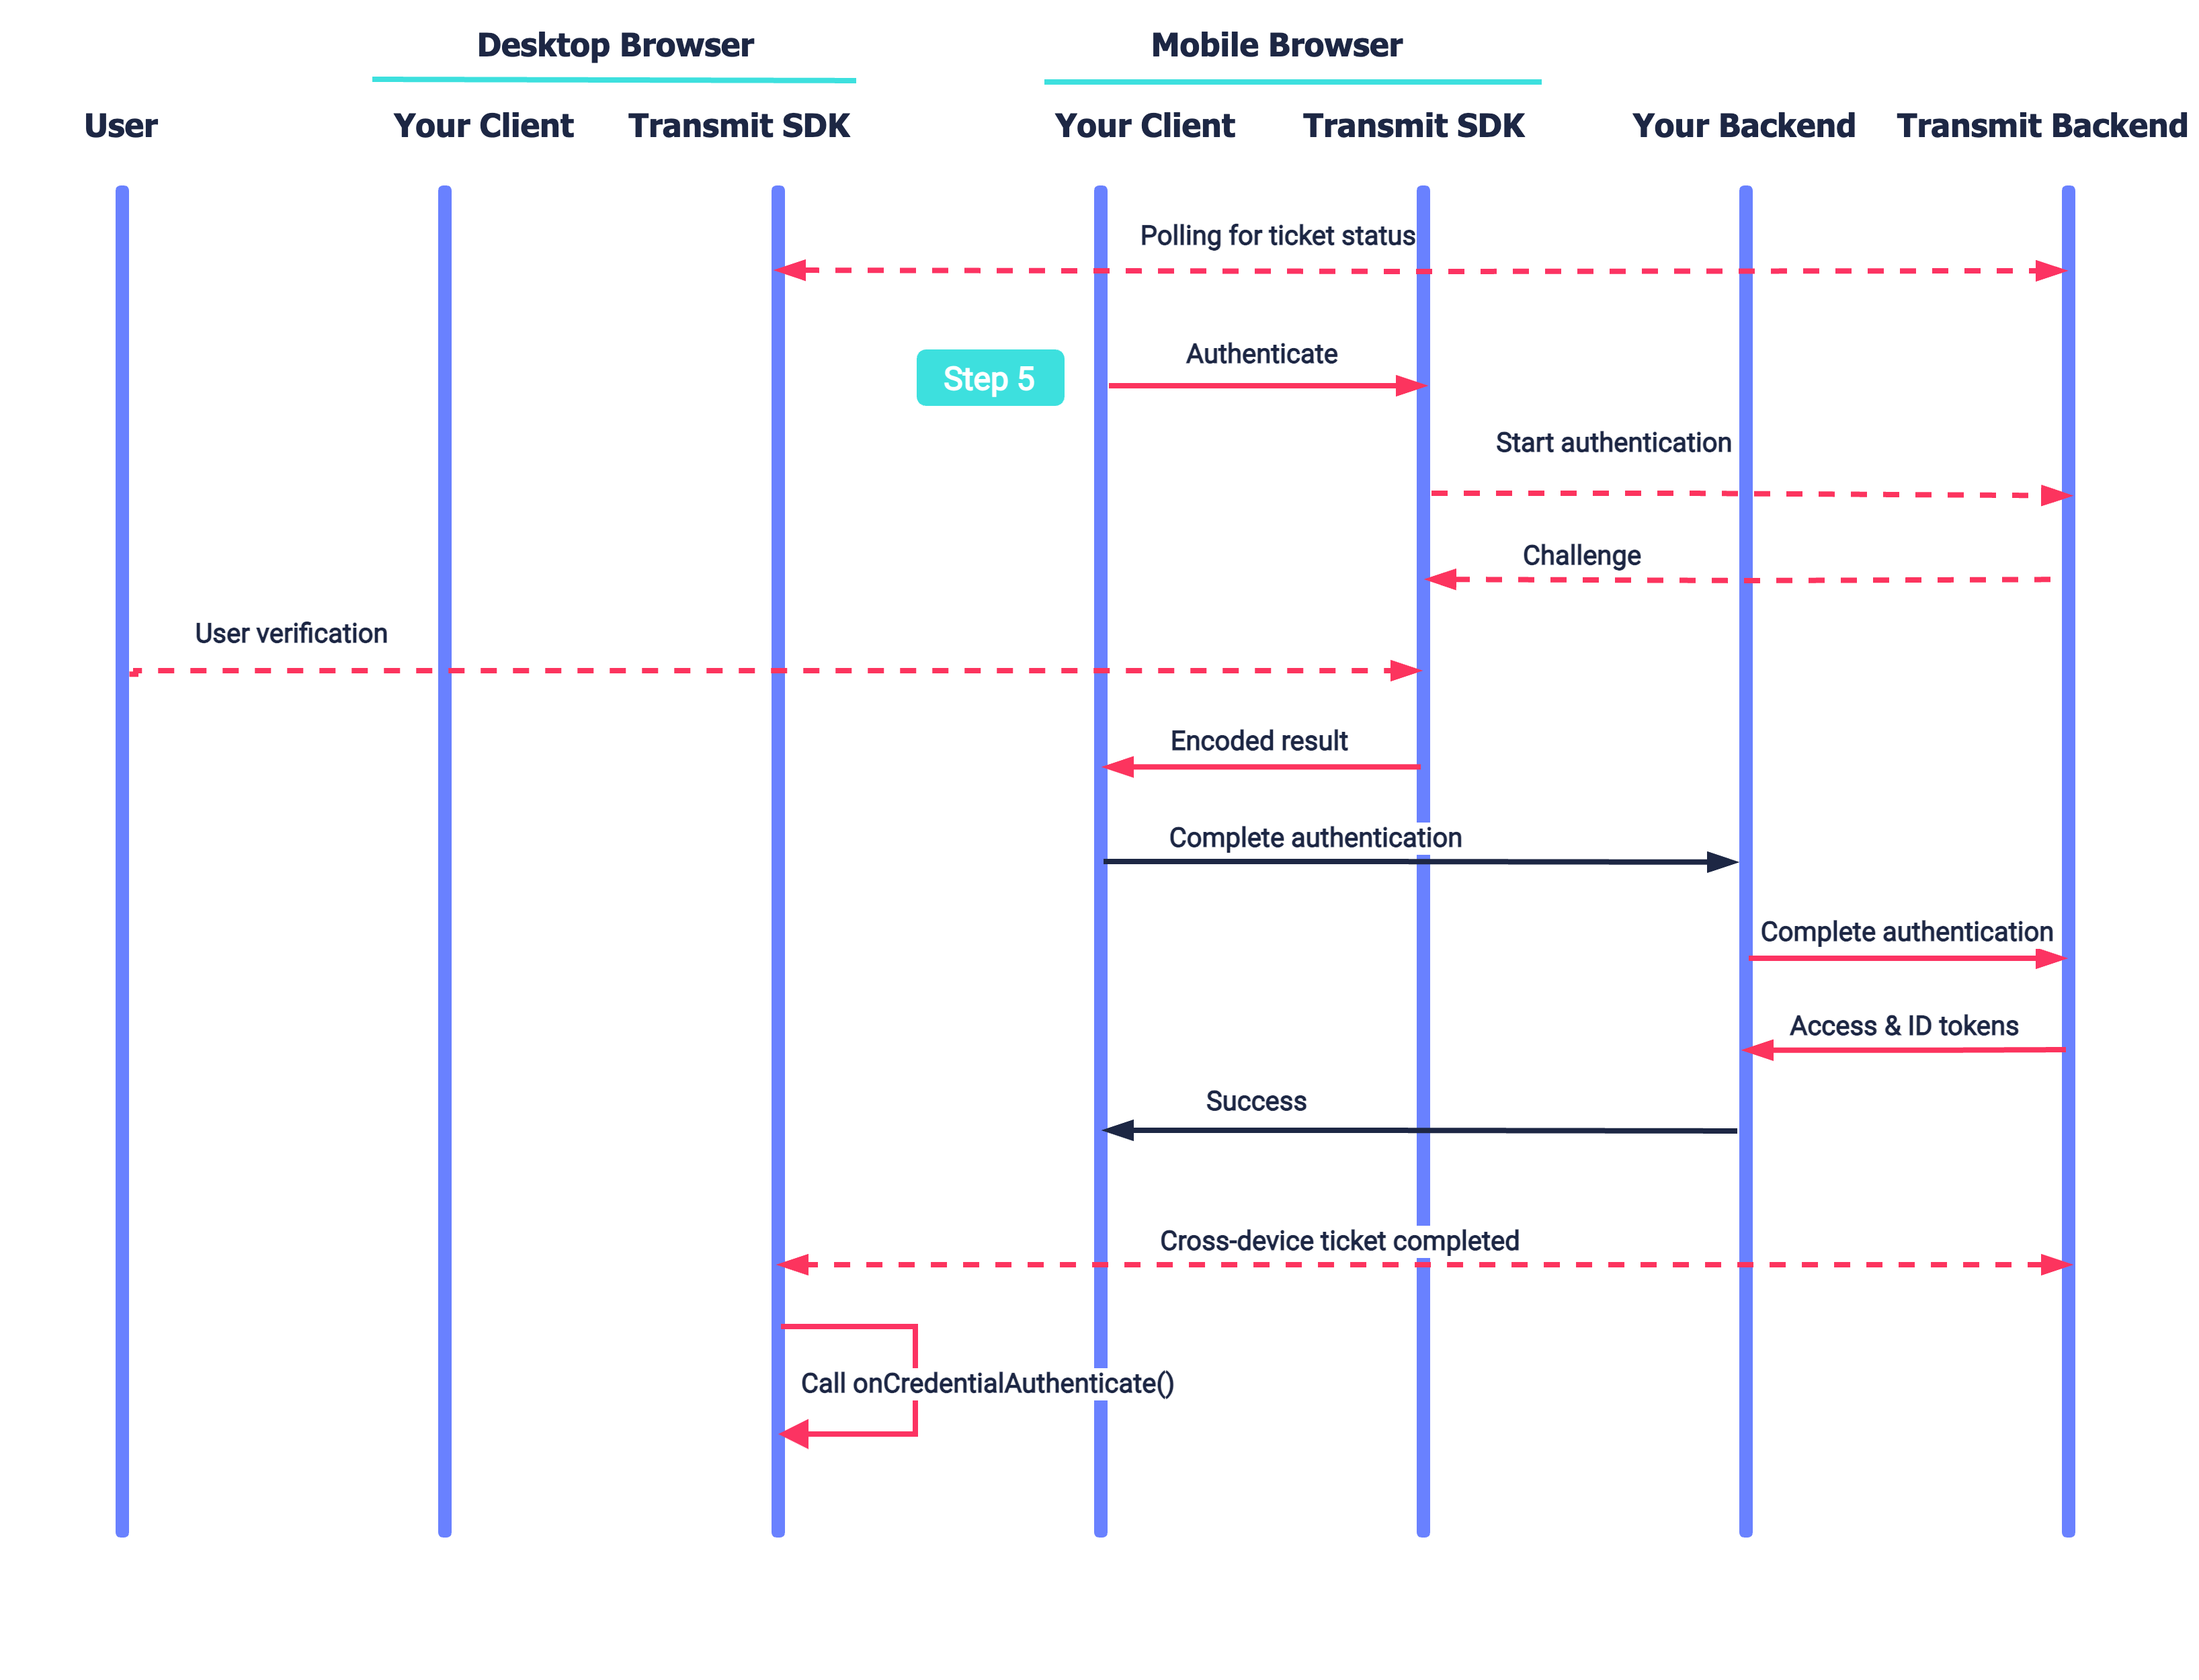
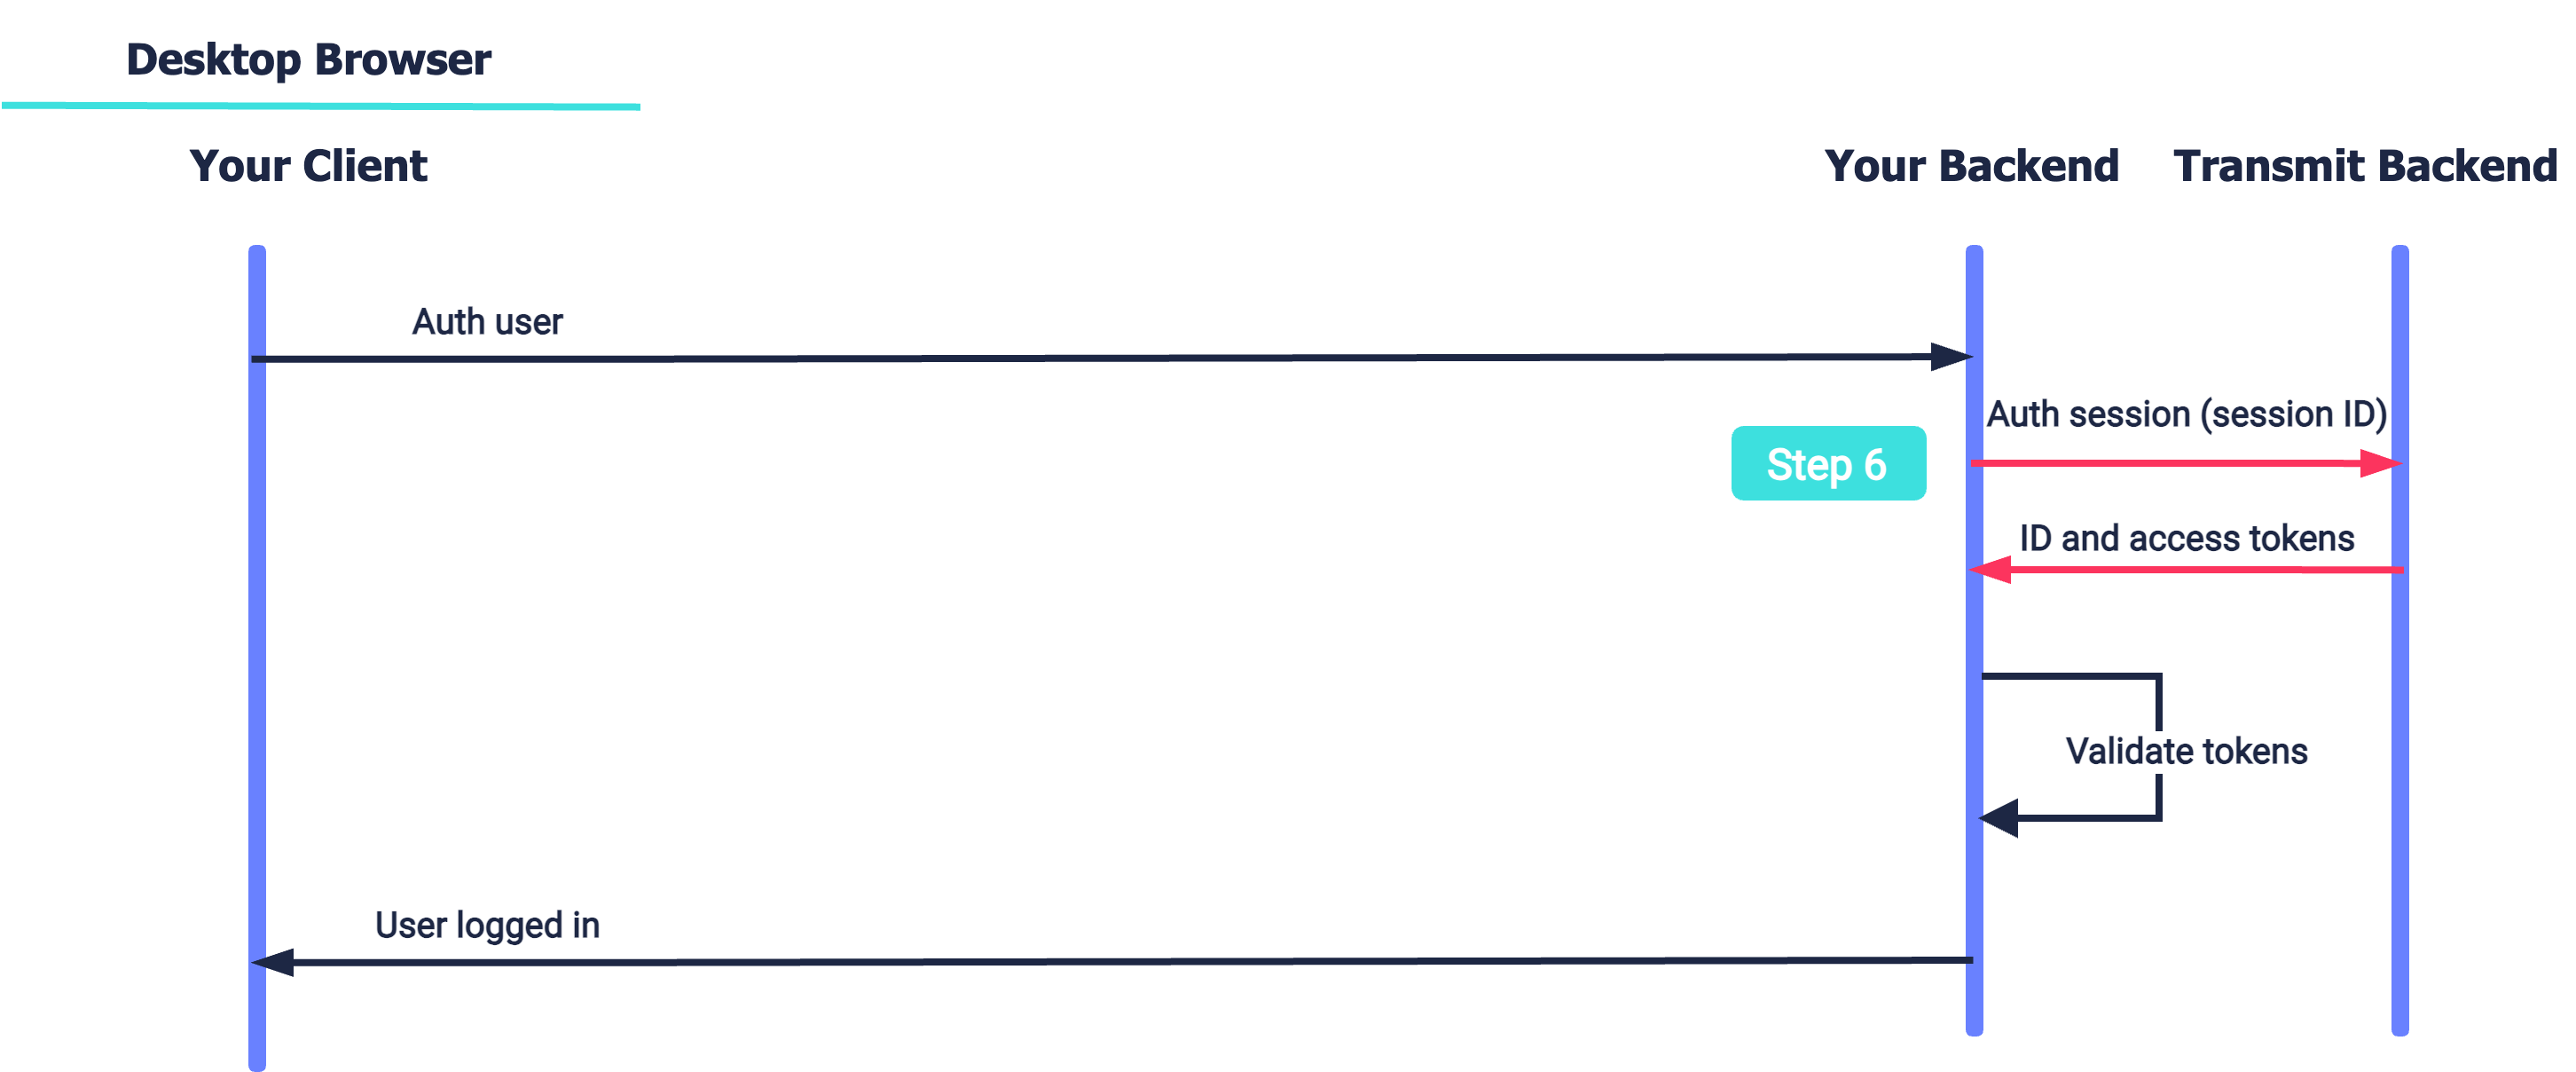
This part should be implemented inside the onCredentialAuthenticate handler. Your client backend exchanges the session ID for ID and access tokens. Once tokens are validated, the user's device is authenticated and they're logged in. This part is the same for single-device flows, as well as cross-device registration.
Set up basic WebAuthn registration and authentication using the WebAuthn Quick Start. It covers the basic setup needed for any flow, and you can test the basic flows before adding new integration scenarios like cross-device login.
In a cross-device login flow, the access device is the device that initiates the flow and will eventually log in to your app (pending a successful WebAuthn authentication or registration using a secondary device - known as the auth device).
To set up cross-device login for the access device:
You can obtain the Platform SDK directly from your Mosaic representation.
Configure the SDK on the page that initiates the cross-device flow, such as your login or registration page. To do this, call the initialize() SDK method (see Web quickstart guide), passing your client ID (from your application settings in the Admin Portal). For example:
import { webauthn, initialize } from '@transmitsecurity/platform-web-sdk';

const config = {
  clientId: 'CLIENT_ID',
  serverPath: 'https://api.transmitsecurity.io' // Required: Set serverPath based on your region or custom domain
};

// Initialize the SDK with WebAuthn configuration
// If SDK was loaded via script tag, use: window.tsPlatform.initialize({...})
await initialize({
  clientId: config.clientId,
  webauthn: {
    serverPath: config.serverPath
  }
});For logged in user:
const ticketId = await fetch(
  'https://api.transmitsecurity.io/cis/v1/auth/webauthn/cross-device/register/init',
  {
    method: 'POST',
    headers: {
      'Content-Type': 'application/json',
      Authorization: 'Bearer USER_ACCESS_TOKEN'
    },
    body: JSON.stringify({
      username: 'USERNAME',
    })
  }
);
For logged out user:
const ticketId = await fetch(
  'https://api.transmitsecurity.io/cis/v1/auth/webauthn/cross-device/external/register/init',
  {
    method: 'POST',
    headers: {
      'Content-Type': 'application/json',
      Authorization: 'Bearer CLIENT_CREDENTIAL_TOKEN'
    },
    body: JSON.stringify({
        username: 'USERNAME',
        external_user_id: 'EXTERNAL_USER_ID'
    })
  }
);Initiate the flow on the access device before allowing the user to proceed to the auth device.
Register event handlers that will be called by the SDK when the event occurs on the auth device. For example, the onDeviceAttach handler allows the desktop to display a spinner once the QR code is scanned by the mobile device (after it attaches to the session).
To start the flow, call the crossDevice.init.registration SDK method, passing the event handlers you want to register:
// Triggered when the auth device calls attach()
async function onDeviceAttach() {
	//Show a spinner in the UI
	return true; // Return true to keep polling
}

// Triggered at the end of the registration process on the auth device
async function onCredentialRegister() {
}

// Triggered on failure
async function onFailure(error) {
	// Log the error and display a message to the user / navigate to an error page.
}

// Initiate the cross-device registration flow and provide the handlers.
await webauthn.crossDevice.init.registration({
	crossDeviceTicketId: ticketId,
	handlers: {
	    onDeviceAttach,
	    onCredentialRegister,
	    onFailure,
	}
});

// Construct the URL of your login page along with the ticketId param.
// It is best to display the generated URL using a QR code.
const url = `<YOUR_APP_LOGIN_PAGE_URL>?ticketId=${ticketId}`;In cross-device login flows, the auth device is the device used to authenticate (or register credentials) in order to allow the access device to log in to the app.
To set up cross-device login for the auth device:
- Initialize the WebAuthn SDK
- Check that the device supports WebAuthn
- Attach the auth device to the session
Configure the SDK on the page that will continue the cross-device flow on the auth device, such as the page that the mobile browser will navigate to when the QR code is scanned by the mobile device. To do this, add code to the page that calls the initialize() SDK method, passing the same client ID used in Step 1. For example:
import { webauthn, initialize } from '@transmitsecurity/platform-web-sdk';

const config = {
  clientId: 'CLIENT_ID',
  serverPath: 'https://api.transmitsecurity.io' // Required: Set serverPath based on your region or custom domain
};

// If SDK was loaded via script tag, use: window.tsPlatform.initialize({...})
await initialize({
  clientId: config.clientId,
  webauthn: {
    serverPath: config.serverPath
  }
});Before attaching the auth device to the session, use the isPlatformAuthenticatorSupported() SDK call to check if the device supports WebAuthn.
const isBiometricsSupported = await webauthn.isPlatformAuthenticatorSupported();To add the auth device to the cross-device flow initiated by the access device, the auth device needs to attach to the session. This corresponds to the ticket ID that you passed to the auth device when delegating registration (e.g., by encoding it in the QR code). The device must be attached before initiating the registration or authentication processes described in the subsequent steps.
Attach the auth device to the session using the attachDevice() SDK call. Once attached, the onDeviceAttach handler will be called if it was registered in Step 1.3.
await webauthn.crossDevice.attachDevice(ticketId);In the request below, you should replace the following:
ticketIdis the ID of the sessionTOKENis the client credential token
const webauthnEncodedResult = await webauthn.crossDevice.register(ticketId)
const resp = await fetch(
  'https://api.transmitsecurity.io/cis/v1/auth/webauthn/cross-device/register',
  {
    method: 'POST',
    headers: {
      'Content-Type': 'application/json',
      Authorization: 'Bearer TOKEN'
    },
    body: {
        webauthn_encoded_result: webauthnEncodedResult
    }
  }
);

const data = await resp.json();
console.log(data);Configure the SDK on the page that initiates the cross-device flow, such as your login or registration page. To do this, call the initialize() SDK method, passing your client ID (from your application settings in the Admin Portal). For example:
import { webauthn, initialize } from '@transmitsecurity/platform-web-sdk';

const config = {
  clientId: 'CLIENT_ID',
  serverPath: 'https://api.transmitsecurity.io' // Required: Set serverPath based on your region or custom domain
};

// If SDK was loaded via script tag, use: window.tsPlatform.initialize({...})
await initialize({
  clientId: config.clientId,
  webauthn: {
    serverPath: config.serverPath
  }
});Initiate the flow on the access device before allowing the user to proceed to the auth device.
Register event handlers that will be called by the SDK when the event occurs on the auth device. For example, the onDeviceAttach handler allows the desktop to display a spinner once the QR code is scanned by the mobile device (after it attaches to the session).
onCredentialAuthenticate handler is called with a session ID to exchange for user tokens in Step 6.
To start the flow, call the crossDevice.init.authentication SDK method, passing the event handlers you want to register:
// Triggered when the auth device calls attach()
async function onDeviceAttach() {
	//Show a spinner in the UI
	return true; // Return true to keep polling
}

// Triggered at the end of the authentication process on the auth device
async function onCredentialAuthenticate(sessionId) {
    // The following API call should be done from your backend.
    const resp = await fetch(
        'https://api.transmitsecurity.io/cis/v1/auth/session/authenticate',
        {
            method: 'POST',
            headers: {
                'Content-Type': 'application/json',
                Authorization: 'Bearer TOKEN'
            },
            body: JSON.stringify({
                session_id: sessionId
            })
        }
    );
}

// Triggered on failure
async function onFailure(error) {
	// Log the error and display a message to the user / navigate to an error page.
}

// Initiate the cross-device authentication flow and provide the handlers.
const { crossDeviceTicketId } = await webauthn.crossDevice.init.authentication({
	handlers: {
	    onDeviceAttach,
	    onCredentialAuthenticate,
	    onFailure,
	}
});

// Construct the URL of your login page along with the ticketId param.
// It is best to display the generated URL using a QR code.
const url = `<YOUR_APP_LOGIN_PAGE_URL>?aid=${crossDeviceTicketId}`;Authenticate by sending a request like the one below:
const webauthnEncodedResult = await webauthn.crossDevice.authenticate.modal(ticketId)
const resp = await fetch(
  'https://api.transmitsecurity.io/cis/v1/auth/webauthn/authenticate',
  {
    method: 'POST',
    headers: {
      'Content-Type': 'application/json',
      Authorization: 'Bearer TOKEN'  // Client access token
    },
    body: JSON.stringify({
        webauthn_encoded_result: webauthnEncodedResult,
    })
  }
);

const data = await resp.json();
console.log(data);Upon successful WebAuthn registration or authentication, a session ID is returned to the auth device. If the onCredentialAuthenticate handlers was registered in Step 4.2, the access device will receive the session ID. Exchange this session ID for ID and access tokens in the backend using the authenticate API.