Add strong authentication with Passkeys to your native iOS application, while providing a native experience. This describes how to use the iOS SDK to register credentials and use them to authenticate for login.
This SDK implements Apple's public-private key authentication for passkeys. It allows you to add FIDO2-based biometric authentication to your iOS app, while providing your users with a native experience instead of a browser-based one. With passkeys, credentials are securely stored by the device in the iCloud keychain. These credentials must be associated with your domain, so they can be shared between your mobile app and your website (if you have one).
The requirements for passkey authentication include:
- iOS 13.0+ (or iOS 16.0+ for passkeys)
- Xcode 11.0+ (or Xcode 14.0+ for passkeys)
- Device with registered biometrics (e.g., FaceID or TouchID)
- Device registered with the user's Apple ID
- Device with iCloud KeyChain turned on
The sample flows demonstrate possible ways to implement biometric authentication using Mosaic iOS SDK. In the diagrams below, Mosaic APIs are shown in pink along with the relevant integration step.
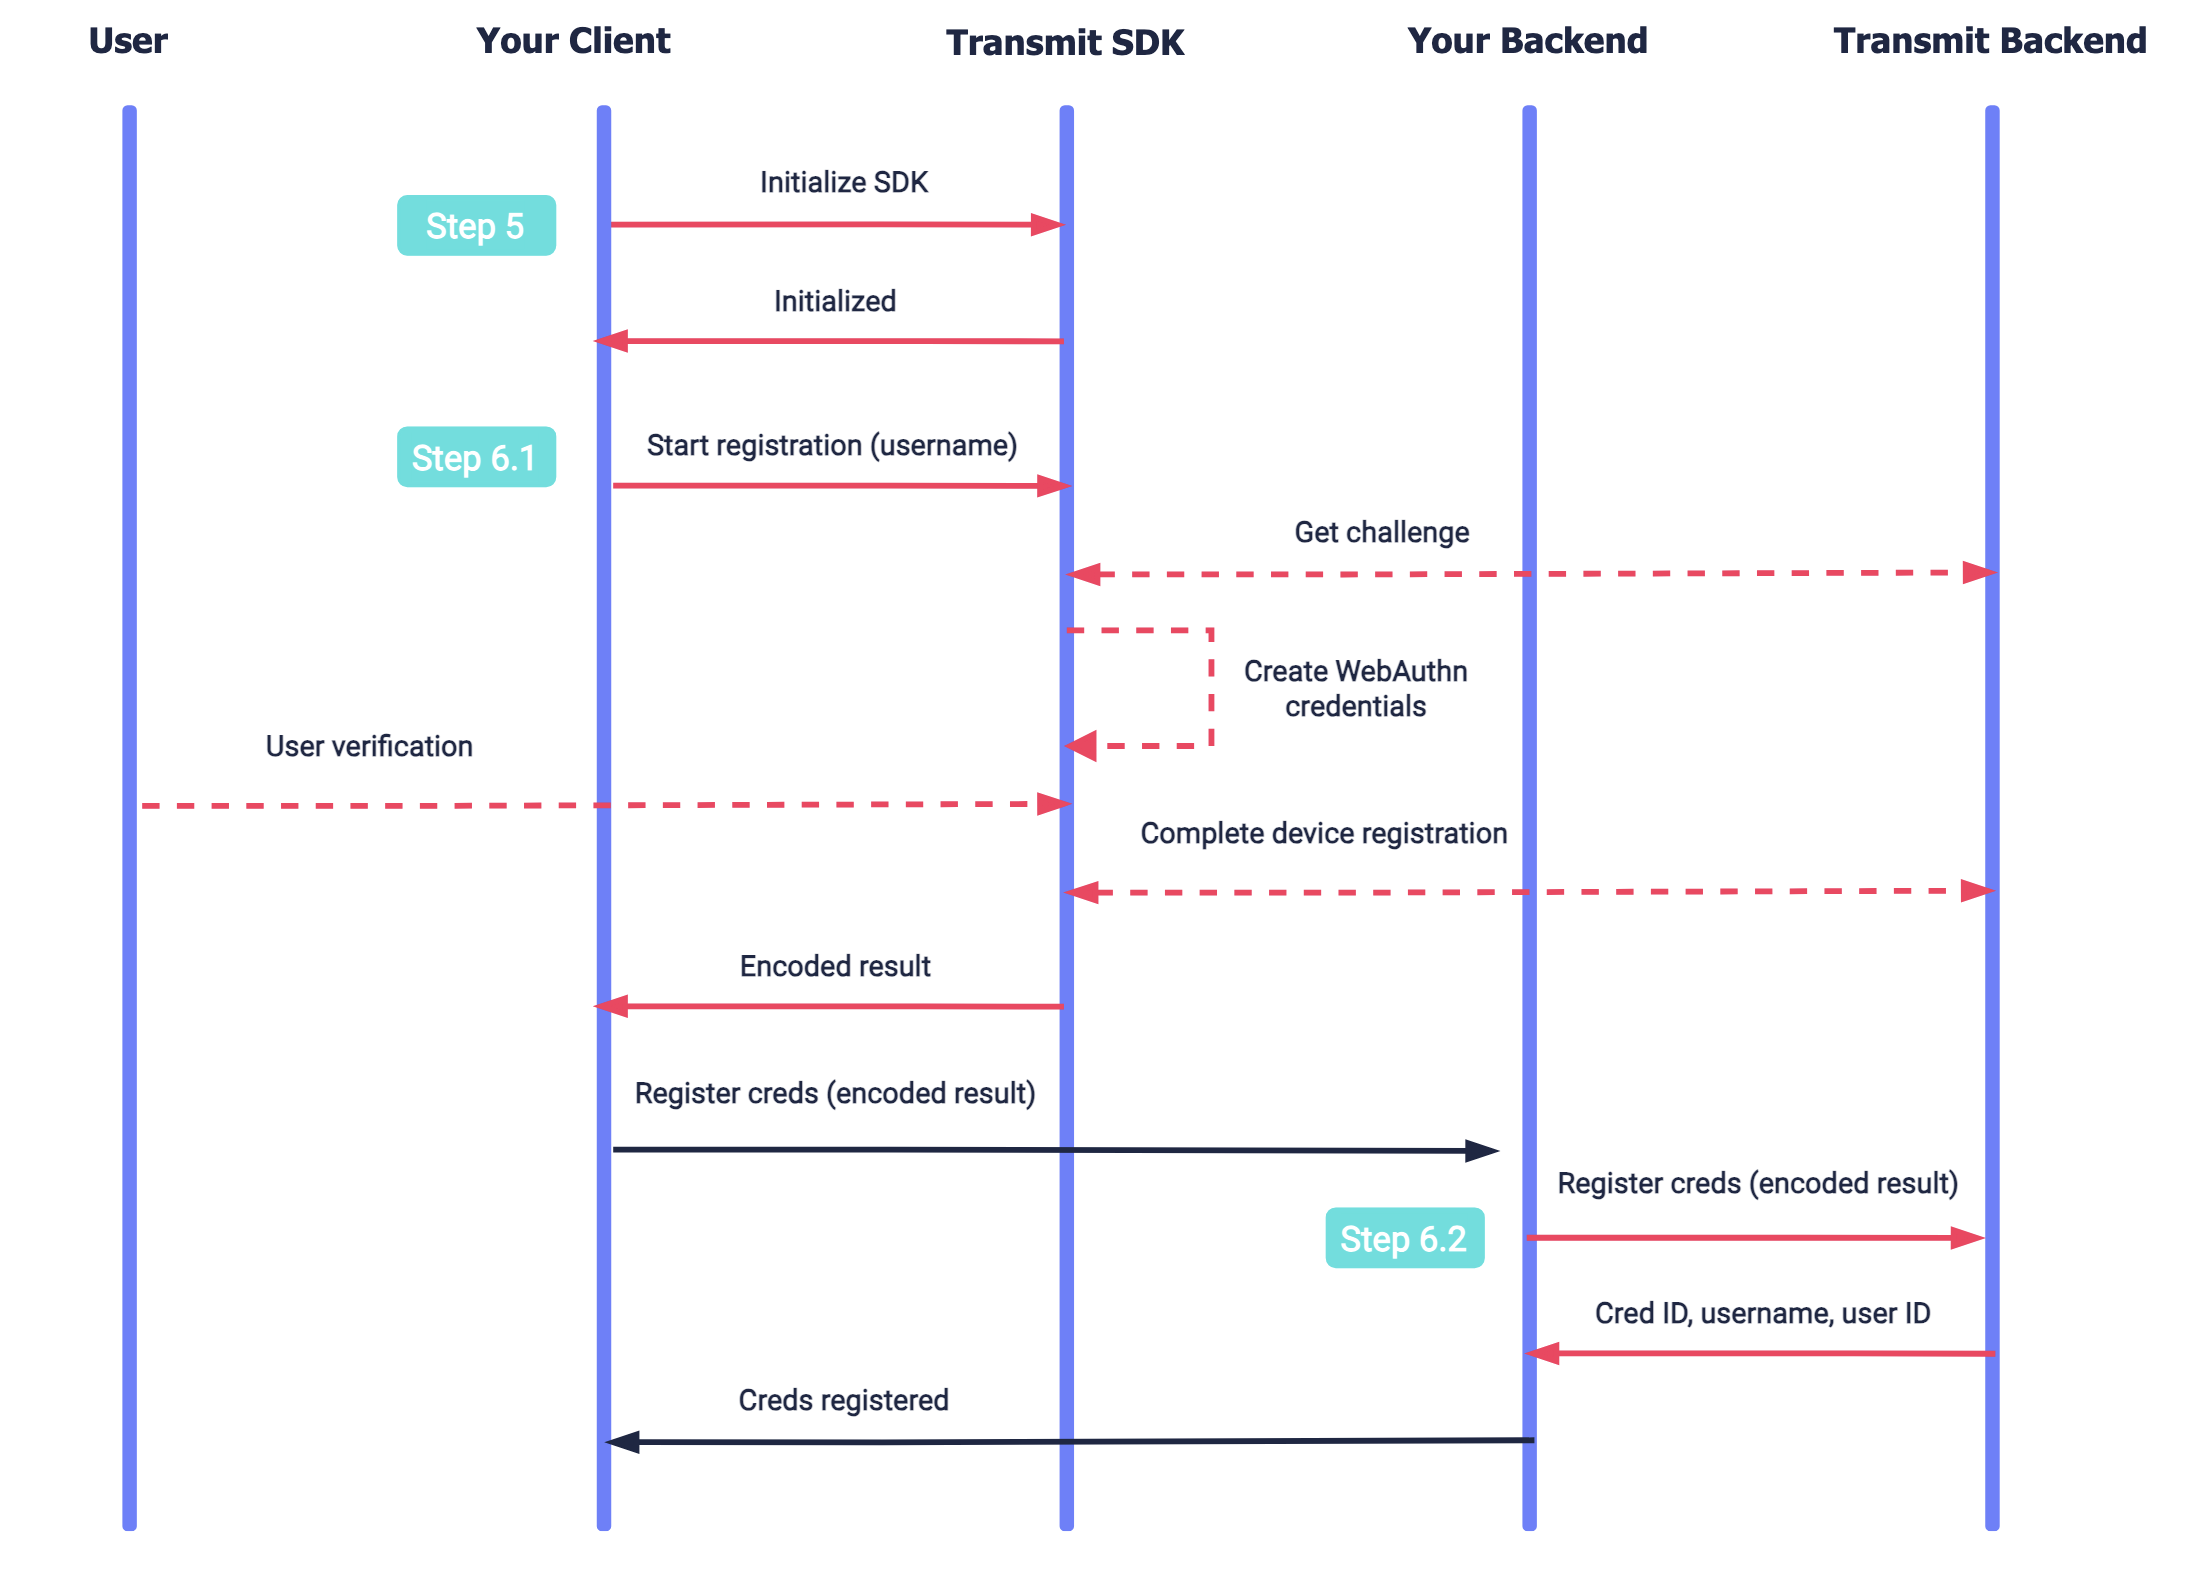
This flow represents a new user logging in from a device that supports passkeys. It assumes that you've collected and verified the username before initiating registration. The username should be a representation of the user in your system, such as their email, phone number, or another verifiable username known to the user (like account ID).
After initializing the SDK and once the user is ready to register their credentials, the SDK tells the device to create credentials, which may require the user to verify (e.g., via TouchID). Once completed, the encoded Webauthn result is returned to the client to complete the registration process via their backend. Once registration is completed, the user's credentials are registered and can be used for subsequent logins.
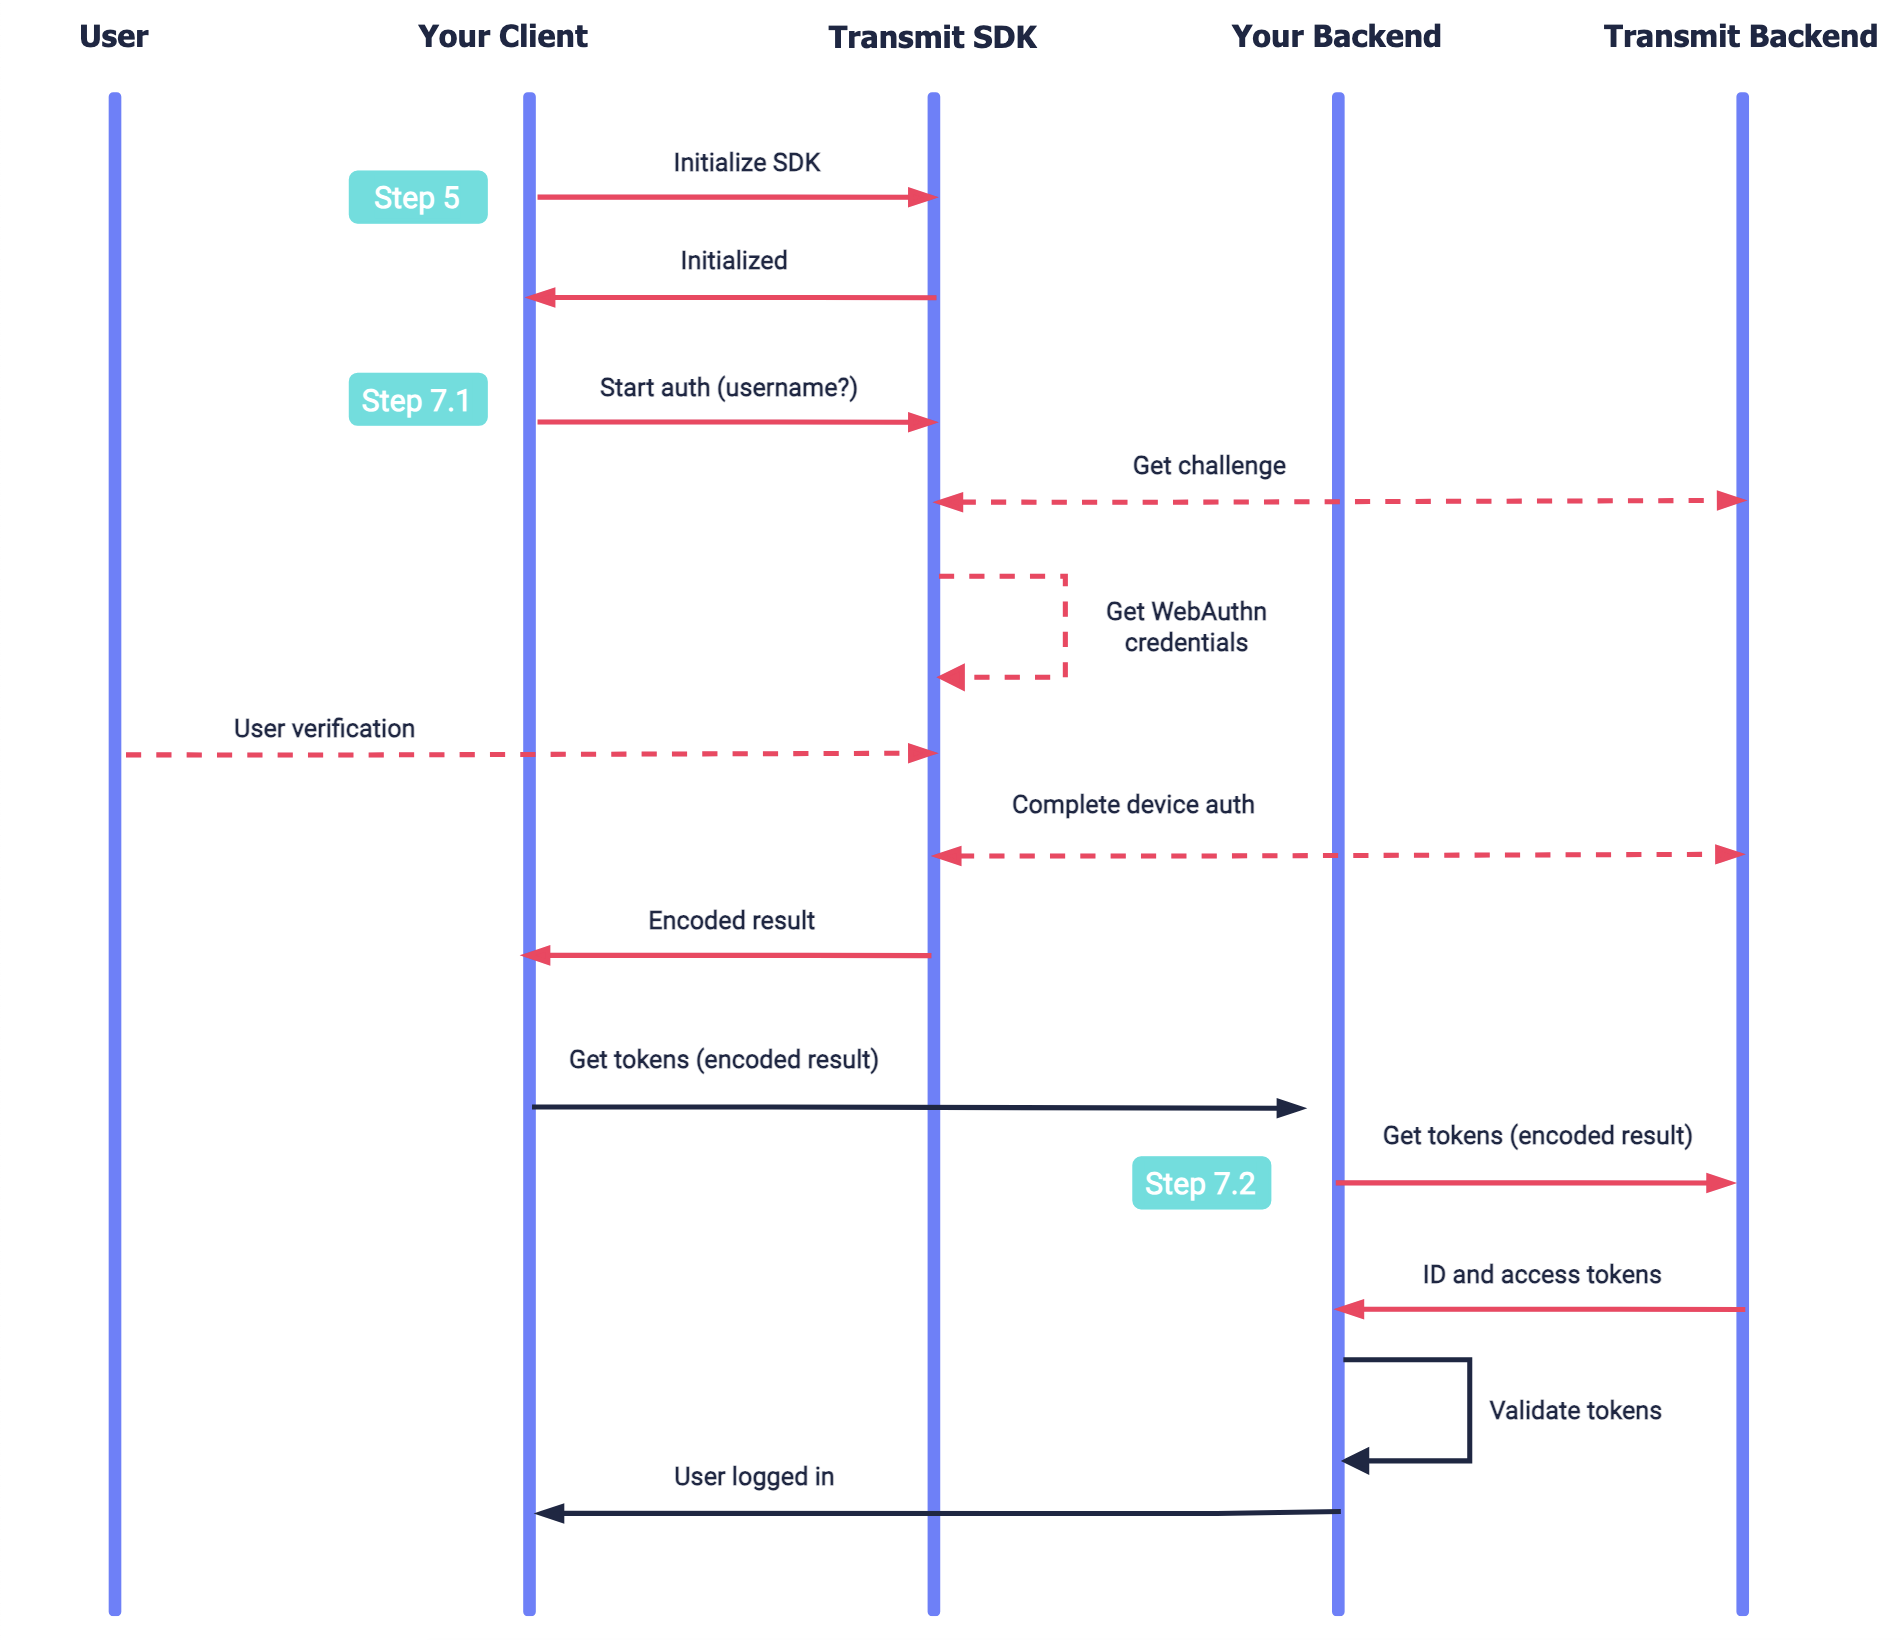
This flow represents an existing user authenticating using registered credentials which exist on the device.
The SDK is initialized. Once the user is ready to authenticate, the SDK tells the device to get credentials, which may require the user to verify (e.g., via TouchID). The SDK returns an encoded WebAuthn result to the client to complete the authentication process via their backend. Once completed, a user access token is returned to your client backend and the user is logged in.
To integrate with Mosaic, you'll need to configure an application. From the Applications page, create a new application or use an existing one.
From the application settings:
- For Client type, select native
- For Redirect URI, enter your website URL. This is a mandatory field, but it isn't used for this flow.
- Obtain your client ID and secret for API calls, which are autogenerated upon app creation.
- Enable public sign-up if you manage users using an external system (e.g., external identity provider) or if you want to quickly test WebAuthn registration and authentication without first logging in using a different authentication method.
From the Authentication methods page, configure the WebAuthn login method for your application:
Enable the Enforce single password per ecosystem toggle to ensure that each username has only one active passkey per ecosystem (in this case, Apple). When enabled, registering a new passkey automatically replaces any existing one within the same ecosystem.
For the Relying party ID: , add your full website's domain (e.g., www.example.com). This is the domain that will be associated with your credentials in Step 3.
To specify iOS mobile origins, toggle the Relying Party Origins, and for Mobile origins use ios:bundle-id:YOUR_APP_BUNDLE_ID, where YOUR_APP_BUNDLE_ID is your iOS app unique identifier. This is the origin that will be provided when requesting passkeys registration and authentication.
For complete information about passkey settings, see Customize login methods.
In order to support passkeys, Apple requires having a domain associated with the relevant credential type (as noted here). This is done by adding the associated domain file to your website, and the appropriate entitlement in your app.
To use Apple's sample code project, follow the steps described here. The domain should be set to your domain, and match the WebAuthn RP ID configured in Step 2. To learn more about the associated domain, click here.
CocoaPods is a dependency manager for Cocoa projects. For usage and installation instructions, visit their website. To integrate TSAuthenticationSDK into your Xcode project using CocoaPods, specify it in your Podfile:
pod 'TSAuthentication', '~> 1.0'The Swift Package Manager is a tool for automating the distribution of Swift code and is integrated into the swift compiler. It is in early development, but TSAuthenticationSDK does support its use on supported platforms.
Once you have your Swift package set up, adding TSAuthenticationSDK as a dependency is as easy as adding it to the dependencies value of your Package.swift.
dependencies: [
    .package(url: "https://github.com/TransmitSecurity/authentication-ios-sdk", .upToNextMajor(from: "1.0.0"))
]If you prefer not to use any of the aforementioned dependency managers, you can integrate TSAuthenticationSDK into your project manually.
- Download the TSAuthenticationSDK framework manually, open the new
TSAuthenticationSDKfolder, and drag theTSAuthenticationSDK.xcframeworkinto the Project Frameworks directory of your application's Xcode project.
The TSAuthenticationSDK.framework is automatically added as a target dependency, linked framework and embedded framework in a copy files build phase which is all you need to build on the simulator and a device.
Initialize using PLIST configuration (recommended)
To do this, create a plist file named TransmitSecurity.plist in your Application with the following content. CLIENT_ID is your client ID (obtained in Step 1).
<?xml version="1.0" encoding="UTF-8"?>
<!DOCTYPE plist PUBLIC "-//Apple//DTD PLIST 1.0//EN" "http://www.apple.com/DTDs/PropertyList-1.0.dtd">
<plist version="1.0">
<dict>
    <key>credentials</key>
    <dict>
        <!-- Use api.eu.transmitsecurity.io for EU, api.ca.transmitsecurity.io for CA, api.au.transmitsecurity.io for AU, or your custom domain -->
        <key>baseUrl</key>
        <string>https://api.transmitsecurity.io/</string>
        <key>clientId</key>
        <string>CLIENT_ID</string>
    </dict>
</dict>
</plist>
Add the code below to your Application Class
Make sure to add the import TSAuthenticationSDK at the top of the implementation class.
class AppDelegate: UIResponder, UIApplicationDelegate {

    func application(_ application: UIApplication, didFinishLaunchingWithOptions launchOptions: [UIApplication.LaunchOptionsKey: Any]?) -> Bool {
        TSAuthentication.shared.initializeSDK()
        return true
    }
}
Initialize using SDK parameters
Add the code below to your Application Class. CLIENT_ID is your client ID (obtained in Step 1).
Make sure to add the import TSAuthenticationSDK at the top of the implementation class.
class AppDelegate: UIResponder, UIApplicationDelegate {

    func application(_ application: UIApplication, didFinishLaunchingWithOptions launchOptions: [UIApplication.LaunchOptionsKey: Any]?) -> Bool {
        TSAuthentication.shared.initialize(baseUrl: "https://api.transmitsecurity.io/", clientId: "CLIENT_ID", domain: "[YOUR_DOMAIN]") // Use api.eu.transmitsecurity.io for EU, api.ca.transmitsecurity.io for CA, api.au.transmitsecurity.io for AU, or your custom domain, if you're using one
        return true
    }
}Before users can log in with WebAuthn, they'll need to register WebAuthn credentials. This assumes that the registration flow occurs only after the end-user has logged in to your website (or at least performed an authentication process that verifies their identity), regardless of whether this is done using another Mosaic authentication method or using an authentication external to Mosaic. Credentials can be registered for existing Mosaic users or for new Mosaic users.
To implement a registration flow, you'll need to:
When the end-user requests to register biometrics, call the registerWebAuthn() SDK call as shown below. Username is required and additional optional properties like display name are supported. This will prompt the user for biometrics. If successful, it returns a result encoded as a base64 string, which is required to complete the registration via your backend.
USERNAMEis a verified username, which should be a representation of the user in your system (such as their email, phone number, or another verifiable username known to the user like account ID).- Make sure to add
import TSAuthenticationSDKat the top of the implementation class.
  TSAuthentication.shared.registerWebAuthn(username: "USERNAME") { response in
      switch response {
      case .success(let response):
          //Handle success
      case .failure(let error):
          //Handle error
      }
}Once WebAuthn credentials have been registered on the device (via the SDK), they will need to be registered in Mosaic to the relevant user. This is done by taking the encodedResult parameter returned by the SDK (in step 6.1) and passing it to a backend API. This step varies based on whether the end-user logged into your app using a Mosaic authentication method or using an external one, as described below.
User is logged-in via Transmit
Complete WebAuthn credential registration for a user that is currently logged-in using a different Mosaic authentication method. This registration API must be called from the backend using the user access token returned upon login. If successful, the credential will be registered for the user that corresponds to the authorization token.
const resp = await fetch(
  `https://api.transmitsecurity.io/cis/v1/auth/webauthn/register`, // Use api.eu.transmitsecurity.io for EU, api.ca.transmitsecurity.io for CA, api.au.transmitsecurity.io for AU, or your custom domain
  {
    method: 'POST',
    headers: {
      'Content-Type': 'application/json',
      Authorization: 'Bearer [TOKEN]' // User access token from Mosaic login
    },
    body: JSON.stringify({
      webauthn_encoded_result: '[ENCODED_RESULT]' // Returned by register() SDK call
    })
  }
);

const data = await resp.json();
console.log(data);
User isn't logged-in via Transmit
Complete WebAuthn credential registration for an end-user that logged into your app using a non-Mosaic authentication method. This registration API must be called from the backend using a client access token (See Get client access tokens). If successful, the credentials will be registered for the user corresponding to the external user ID in the request. If no user is found, a new user will be created.
- While an end-user may be logged-in to your app, if they didn't perform a Mosaic authentication (i.e., there is no active Mosaic session for the user), they are considered a logged-out Mosaic user.
- While an end-user may be registered to your app, if they've never logged in via Mosaic (or created as a Mosaic user), they are considered an existing user in your system but a new user in Mosaic.
const resp = await fetch(
  `https://api.transmitsecurity.io/cis/v1/auth/webauthn/external/register`, // Use api.eu.transmitsecurity.io for EU, api.ca.transmitsecurity.io for CA, api.au.transmitsecurity.io for AU, or your custom domain
  {
    method: 'POST',
    headers: {
      'Content-Type': 'application/json',
      Authorization: 'Bearer [TOKEN]'// Client access token
    },
    body: JSON.stringify({
      webauthn_encoded_result: '[ENCODED_RESULT]', // Returned by register() SDK call
      external_user_id: '[EXTERNAL_USER_ID]'// Identifier of the user in your system
    })
  }
);

const data = await resp.json();
console.log(data);Once WebAuthn credentials are registered for a user, they can use them to authenticate. Users are identified by their username.
To implement an authentication flow, you'll need to:
When logging in users with registered devices, call the authenticateWebAuthn() SDK method. The username parameter is optional as it's only used to fetch credentials matching to the username. If the username is not provided, all the credentials for this app in this device will be displayed. This will prompt the user for biometrics. If successful, it returns a base64 result which is required to complete the authentication via your backend.
Make sure to add the import TSAuthenticationSDK at the top of the implementation class.
For example:
     TSAuthentication.shared.authenticateWebAuthn(username: "USERNAME") { response in
        switch response {
        case .success(let response):
          //Handle success
        case .failure(let error):
          //Handle error
        }
}Once the user has authenticated on the device via the SDK, call the authentication endpoint via your backend with the encodedResult parameter returned by the SDK (in step 7.1) and a client access token (See Get client access tokens).
If successful, ID and access tokens will be returned. The user tokens will identify the user via user_id. If set for the user, it will also include any other verified alias (such as email or phone number) and the external user ID (external_user_id). These tokens should be validated as described here. For more, see the Token Reference.
const resp = await fetch(
  `https://api.transmitsecurity.io/cis/v1/auth/webauthn/authenticate`, // Use api.eu.transmitsecurity.io for EU, api.ca.transmitsecurity.io for CA, api.au.transmitsecurity.io for AU, or your custom domain
  {
    method: 'POST',
    headers: {
      'Content-Type': 'application/json',
      Authorization: 'Bearer [TOKEN]' // Client access token
    },
    body: JSON.stringify({
      webauthn_encoded_result: '[ENCODED_RESULT]' // Returned by authenticate() SDK call
    })
  }
);

const data = await resp.json();
console.log(data);Once you've tested your basic WebAuthn integration, you can complete your implementation. See Implement login scenarios for additional logic, like how to verify user identities before registering credentials.