# JavaScript SDK quick start
This guide describes how to quickly integrate Fraud Prevention into your web application to get started. This includes both the client-side integration, as well as the backend API integration required to complete the flow.
Check out our sample app
Note
Client-side integrations are recommended for POCs and testing. For production environments, consider implementing [Backend integration](/guides/risk/quick_start_backendapi). Learn more about integration options: [Client-side integration vs Backend integration](/guides/risk/integration_clientside_vs_backend).
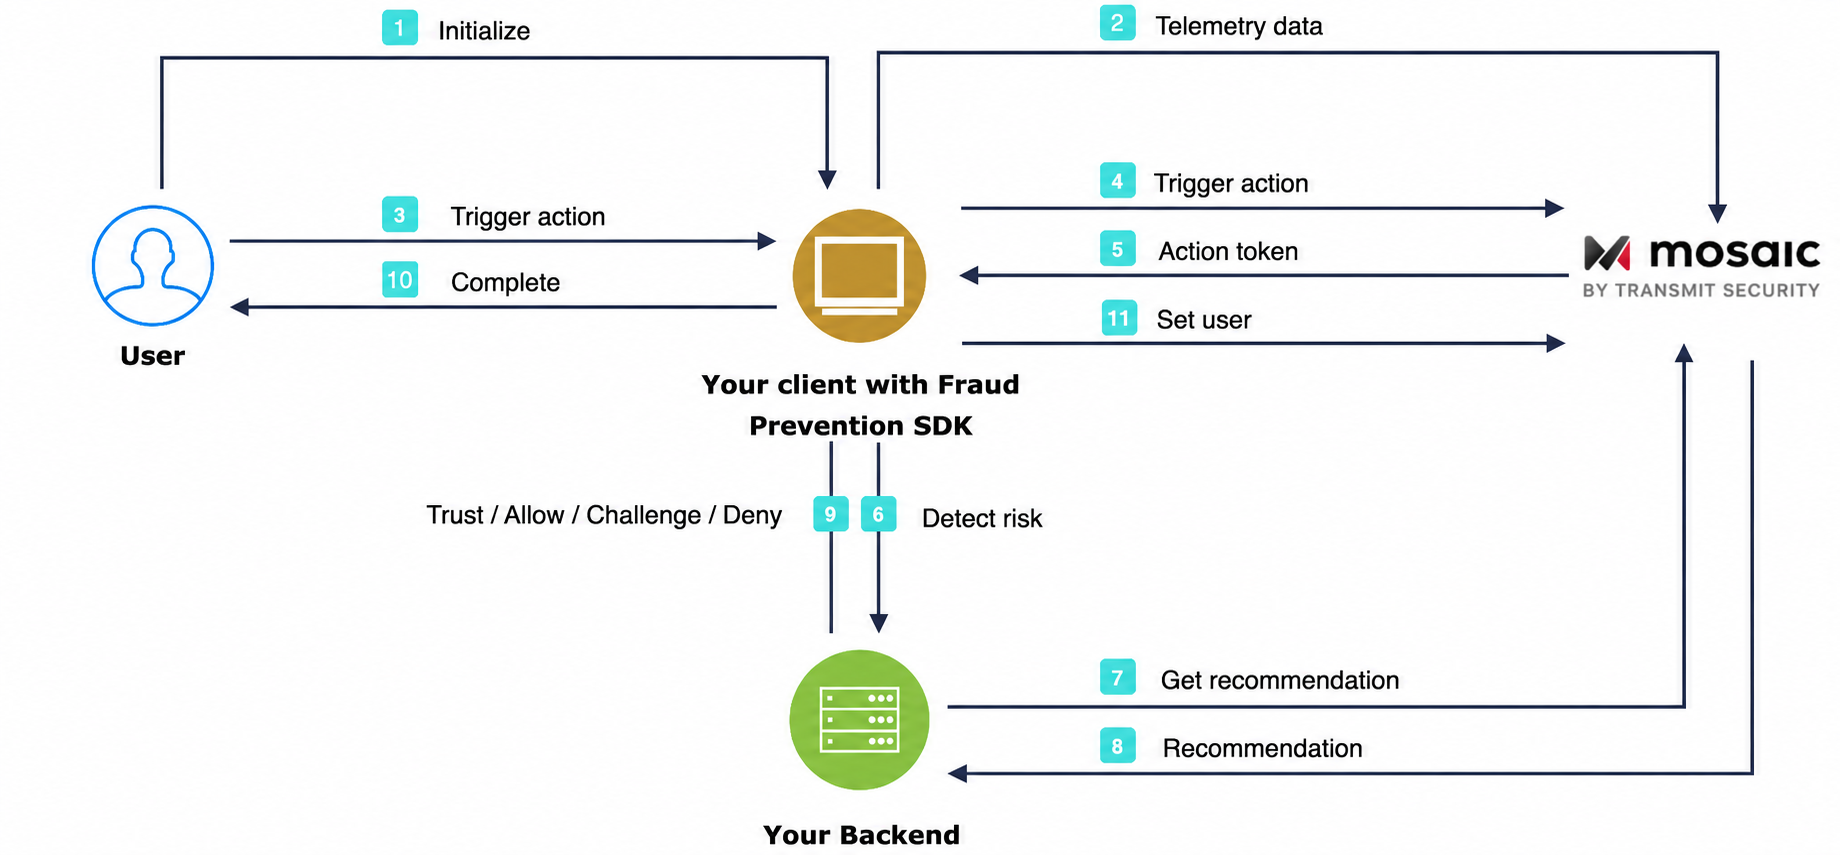
## How it works
The flow starts with the user navigating to the webpage (1). The SDK gets initialized and starts sending telemetry to Mosaic (2). When a user performs an action, for example, clicks a login button (3), the SDK triggers an action event (4) and obtains an action token (5) which then forwards to the backend (6). Having received an action token, the application backend uses it to fetch recommendation from Mosaic (7 & 8) and instructs the client to act accordingly (9) in order to complete the login procedure (10). Upon successful login, the client sets the user (11).
## Before you start
Before you start integrating the SDK:
* Ensure that **Fraud Prevention** is enabled as the risk engine for your tenant. Identity Threat Protection and Fraud Prevention are mutually exclusive—contact your Customer Success Manager to enable the appropriate engine.
* Ensure effective communication with Mosaic's assets, including enabling Mosaic's IPs and URLs on your network and extending the `Content-Security-Policy` header (if you have enabled [Content Security Policy](https://developer.mozilla.org/en-US/docs/Web/HTTP/CSP) (MDN) on your web server). See [Enable communication with Mosaic APIs](/guides/quick_start/enable_communication) for additional information.
## Step 1: Get client credentials
div
div
Admin Portal
Client credentials are used to identify your app and generate access tokens for authorizing Mosaic requests. To obtain them, you'll need to create an application in the [Admin Portal](https://portal.transmitsecurity.io/) (if you don’t have one yet).
1. From **Applications**, click **Add application**.
2. Add the friendly application name to display in the Admin Portal.
3. Add an OIDC client, specify the client secret as an authentication method, and your website URL as a redirect URI (e.g., `https://your-domain.com`).
Note
These fields are required for all Mosaic apps, but won’t be used for Fraud Prevention.
1. Click **Add** to create your application. This will automatically generate your client credentials.
## Step 2: Load SDK
div
div
Client
Start by loading the SDK from the registry (recommended) or CDN.
npm
```bash
npm install @transmitsecurity/platform-web-sdk@^2
```
yarn
```bash
yarn add @transmitsecurity/platform-web-sdk@^2
```
script tag (CDN)
```html
```
When using the script tag, all functions must be invoked inside `window.tsPlatform`. This applies only to the CDN method.
Then import the Fraud Prevention module and initialize it. For more details about available options and customizations, see the [SDK reference](/sdk-ref/platform/installation).
- `clientId`: (required) your client ID from [Step 1](#step-1-get-client-credentials).
- `serverPath`: (required) the base URL for submitting telemetry and actions. Set based on your region or [custom domain](/guides/deployment/custom_domains):
- US: `https://api.transmitsecurity.io/risk-collect/`
- EU: `https://api.eu.transmitsecurity.io/risk-collect/`
- CA: `https://api.ca.transmitsecurity.io/risk-collect/`
- AU: `https://api.au.transmitsecurity.io/risk-collect/`
- Sandbox: `https://api.sbx.transmitsecurity.io/risk-collect/`
- Custom domain: `https:///risk-collect/`
```js
import { drs, initialize } from '@transmitsecurity/platform-web-sdk';
// If SDK was loaded via script tag, use: window.tsPlatform.initialize({...})
initialize({
clientId: "[CLIENT_ID]",
drs: {
serverPath: "https://api.transmitsecurity.io/risk-collect/" // Required: Set serverPath based on your region or custom domain
}
});
```
## Step 3: Trigger actions
div
div
Client
To obtain risk recommendations for sensitive actions, your application should report these actions using the SDK. To do this, add the JS code below to relevant user interactions (such as the Login button `click` event handler). Replace `[ACTION_TYPE]` with the appropriate action type from our [list of actions](/guides/risk/recommendations#action-types). To improve Fraud Prevention, optionally pass the correlation ID, and claimed user ID and its type. This call returns an `actionToken` that you should pass to your backend to obtain the recommendation in the next step and, if needed, report the final outcome of that action. For successful login flows, reporting the final result also sets the authenticated user in Mosaic.
Note
For an alternative approach that directly utilizes our backend API instead, refer to our [Backend API implementation](/guides/risk/quick_start_backendapi#step-4-trigger-actions) guide.
```js
const actionResponse = await drs.triggerActionEvent("[ACTION_TYPE]", { correlationId: "[CORRELATION_ID]", claimedUserId: "[CLAIMED_USER_ID]" });
const actionToken = actionResponse.actionToken;
// Add code here to send the received actionToken to your backend
```
## Step 4: Fetch recommendation
div
div
Backend
You can fetch recommendations for the reported action using the [Recommendation API](/openapi/risk/recommendations.openapi/other/getriskrecommendation). This is the same API that's also used for mobile integrations.
Mosaic APIs are authorized using an OAuth access token so you'll need to fetch a token using your client credentials (from step 1). To do this, send the following request:
```js
const resp = await fetch(
`https://api.transmitsecurity.io/oidc/token`,
{
method: 'POST',
headers: {
'Content-Type': 'application/x-www-form-urlencoded'
},
body: new URLSearchParams({
grant_type: 'client_credentials',
client_id: '[CLIENT_ID]',
client_secret: '[CLIENT_SECRET]'
})
}
);
const { access_token } = await resp.json();
```
From your backend, invoke the Recommendation API by sending a request like the one below. The `[ACCESS_TOKEN]` is the authorization token you obtained using your client credentials and `[ACTION_TOKEN]` is the `actionToken` received from the SDK in step 3.
```js
const query = new URLSearchParams({
action_token: '[ACTION_TOKEN]', // Obtained in Step 3
}).toString();
const resp = await fetch(
`https://api.transmitsecurity.io/risk/v1/recommendation?${query}`,
{
method: 'GET',
headers: {
Authorization: 'Bearer [ACCESS_TOKEN]',
},
}
);
```
## Step 5: Set user
div
div
Client
A user identifier should be reported to Mosaic only after the user is fully authenticated, including any required 2FA. This sets the user for subsequent events in the current device session until the user is cleared or the app starts a new login flow.
For successful `login` and custom login actions, if the code that completes the login still has the original `actionToken` from [Step 3](#step-3-trigger-actions), use [`reportActionResult()`](/sdk-ref/platform/modules/drs#reportactionresult). This records the outcome on that login action event. When `userId` is included, Mosaic updates the user ID on that original login action and also sets the same user for subsequent events in the current device session.
By reporting the result with the original `actionToken`, Mosaic links the authenticated user and final outcome to the login action that initiated the flow. This provides action-level visibility in the **Admin Portal** (**Fraud Prevention** > **Recommendations**) and allows Mosaic to evaluate the login with the full action context.
We recommend to pass the `[USER_ID]` as an opaque identifier from your system, not a plain-text personal identifier such as an email address.
```js
await drs.reportActionResult('[ACTION_TOKEN]', 'success', {
userId: '[USER_ID]'
});
```
Beyond login
You can also use [`reportActionResult()`](/sdk-ref/platform/modules/drs#reportactionresult) for any action previously triggered with `triggerActionEvent()` to report its final outcome. For non-login actions, this updates that specific action record only and does not set the user for the device session.
Fallback option
If your application architecture does not preserve the original `actionToken` through login completion, for example after a redirect, in a different page or component, in a server-side callback, or in an external identity flow, use [`setAuthenticatedUser()`](/sdk-ref/platform/modules/drs#setauthenticateduser) as a fallback.
```js
await drs.setAuthenticatedUser('[USER_ID]');
```
Note
For an alternative approach that directly utilizes our backend API instead, refer to our [Backend API implementation](/guides/risk/quick_start_backendapi#step-6-report-action-result) guide.
## Step 6: Clear user
The user gets automatically cleared once the session or in case of a new login action. After the user logs out, you should clear the set user so they are not associated with future actions. To clear the user, call the `clearUser()` method:
```js
await drs.clearUser();
```